🎨 Professional-Grade Repairs for Creative Workstations
The Asus Creator Q540V represents the pinnacle of laptop design for creative professionals, combining premium performance with exceptional serviceability. This high-end laptop is engineered for designers, video editors, and content creators who demand both powerful performance and reliable, maintainable construction for their creative workflows.
💰 Significant Professional Repair Cost Savings
Authorized Service Center vs Professional DIY Costs:
Motherboard replacement: $600-900 at Asus authorized centers
Professional display assembly: $350-550
Cooling system service: $180-300
Storage upgrades with professional labor: $150-250
Keyboard replacement: $160-280
Total potential savings: $1440-2280+
Professional DIY Repair Investment:
Premium replacement components
Professional tool kit: $80-150
Thermal materials and specialized equipment
Single investment for multiple professional repairs
💻 Asus Creator Q540V Serviceability Features
Premium Construction:
Tool-accessible chassis with organized screw placement
Modular component design for straightforward replacement
Clear internal labeling and service access points
Professional-grade cable management and routing
Creator-Focused Components:
Multiple M.2 NVMe SSD slots for large project files
Upgradeable DDR4 memory for demanding creative applications
Dedicated graphics for video editing and 3D rendering
High-quality display with color accuracy for professional work
Complete professional repair process: 94% success rate
Professional Best Practices:
Always perform comprehensive professional diagnostics first
Use professional-grade tools and equipment
Document every step with professional standards
Test components systematically before full reassembly
Follow manufacturer professional service guidelines precisely
🎯 Ready to Begin Your Professional Repair Journey?
You're about to embark on mastering creative workstation repairs using one of the most capable content creation platforms available. In the next section, we'll cover Essential Tools & Workspace Setup to ensure you have the professional equipment needed for successful, damage-free repairs on your Asus Creator Q540V.
2. Essential Tools & Workspace Setup for Laptop Repair
🛠️ Professional Tool Requirements for Asus Creator Q540V
Working on the Asus Creator Q540V requires precision tools and proper workspace organization to handle its premium construction and creative-focused components. Using the right equipment ensures successful repairs and protects your valuable creative workstation investment.
Clean tools after each use with appropriate solvents
Inspect for wear on precision tips monthly
Calibrate measuring equipment annually
Replace worn components immediately
Storage Best Practices:
Store in organized cases or tool chests
Keep in climate-controlled environment
Use silica gel packs to control humidity
Regular inventory checks for missing tools
🚫 Common Tool Mistakes to Avoid
Tool Selection Errors:
Using incorrect screwdriver size causing stripped screws
Employing magnetic tools near sensitive components
Using excessive force with precision tools
Mixing metric and imperial tools incorrectly
Workspace Management Issues:
Inadequate lighting causing eye strain and mistakes
Poor organization leading to lost components
Insufficient ESD protection damaging electronics
Cluttered workspace increasing accident risk
💼 Tool Investment Analysis
Experience Level
Initial Cost
Long-term Value
Risk Reduction
Recommended Users
Beginner
$80-150
Good
Medium
Individual hobbyists
Intermediate
$200-400
Excellent
High
Small repair businesses
Professional
$500-1000
Outstanding
Very High
Professional service centers
🎯 Ready to Set Up Your Professional Workspace?
With your tools gathered and workspace properly configured, you're prepared to create a professional-level repair environment. In the next section, we'll cover Safety Procedures & ESD Protection to ensure you have the safety foundation for successful, damage-free repairs on your Asus Creator Q540V.
3. Safety Procedures & ESD Protection for Electronics
⚠️ Critical Safety Protocols for Laptop Repair
Proper safety procedures and electrostatic discharge (ESD) protection are essential when working on the Asus Creator Q540V. Following these guidelines prevents damage to sensitive components and ensures your personal safety during repair operations.
⚡ Understanding Electrostatic Discharge (ESD)
What is ESD?:
Sudden flow of electricity between charged objects
Can occur at voltages as low as 30V (unfelt by humans)
Capable of instantly damaging sensitive electronics
Components may fail immediately or develop latent defects
Common ESD Sources:
Walking on carpet: 1,500-35,000 volts
Vinyl floors: 250-12,000 volts
Moving on chair: 1,500-18,000 volts
Handling plastic bags: 1,200-20,000 volts
🛡️ Essential Safety Equipment
ESD Protection Gear:
ESD wrist strap with 1M ohm resistor
Anti-static mat for work surface
ESD-safe storage bags and containers
Grounding points for multiple devices
Personal Protective Equipment:
ANSI-approved safety glasses
ESD-safe nitrile gloves
Proper footwear (no synthetic soles)
Comfortable, non-static clothing
🏠 ESD-Safe Workspace Setup
Workspace Element
Safety Requirement
Implementation
Testing Frequency
Work Surface
ESD-safe mat with ground connection
1M ohm resistance to ground
Monthly
Flooring
Anti-static flooring or mats
ESD-safe chair mats if needed
Quarterly
Humidity Control
40-60% relative humidity
Use humidifier/dehumidifier as needed
Daily monitoring
Grounding System
Proper electrical ground
Test outlet with circuit tester
Before each use
🔧 Safe Component Handling Procedures
Motherboard Handling:
Always hold by edges, avoid touching circuits
Use ESD-safe containers for storage
Never stack components on top of each other
Keep in anti-static bags when not in use
Battery Safety:
Disconnect battery before any internal work
Handle lithium batteries with care
Store batteries in fire-proof containers
Never puncture or modify batteries
🔌 Electrical Safety Protocols
Power Disconnection:
Unplug AC adapter before opening case
Disconnect internal battery immediately
Press power button to discharge capacitors
Wait 30 seconds after disconnection
Live Testing Procedures:
Only perform when absolutely necessary
Use insulated tools and probes
Keep one hand in pocket when testing live circuits
Work with a partner when testing high voltage
🛡️ ESD Damage Prevention Techniques
Component Type
ESD Sensitivity
Protection Required
Handling Precautions
CPU/Processor
Very High (10-100V)
Full ESD protection
Never remove from socket unnecessarily
RAM Modules
High (100-250V)
ESD wrist strap required
Handle by edges, avoid gold contacts
Storage Drives
Medium (250-500V)
ESD-safe surface
Keep in anti-static bags
Motherboard
Very High (10-100V)
Full ESD protection
Use motherboard tray or standoffs
👤 Personal Safety Measures
Eye Protection:
Wear safety glasses when prying components
Use magnification with built-in eye protection
Avoid leaning directly over work area
Hand Safety:
Use cut-resistant gloves for sharp edges
Wash hands after handling components
Avoid wearing jewelry that could cause shorts
🚨 Emergency Procedures
Electrical Shock:
Turn off power source immediately
Do not touch victim directly
Call emergency services if needed
Know location of circuit breakers
Battery Fire:
Use Class D fire extinguisher
Never use water on lithium battery fires
Evacuate area if fire spreads
Have baking soda available for small fires
🧹 Workspace Maintenance
Regular Cleaning:
Clean work surface with ESD-safe cleaner
Keep area free of dust and debris
Organize tools to prevent accidents
Dispose of packaging materials properly
Equipment Testing:
Test ESD wrist strap before each use
Verify ground connections regularly
Check tools for damage or wear
Calibrate testing equipment annually
❌ Common Safety Mistakes to Avoid
ESD Protection Errors:
Not using wrist strap "because it's quick"
Working on non-ESD surfaces
Handling components without grounding
Using non-ESD approved bags
Electrical Safety Errors:
Working on powered equipment
Not discharging capacitors
Using damaged power cords
Overlooking battery disconnection
📋 Safety Compliance Checklist
Checklist Item
Before Starting
During Work
After Completion
Power Disconnection
✅
N/A
✅
ESD Protection
✅
✅
N/A
Battery Safety
✅
✅
✅
Tool Inspection
✅
✅
✅
🎯 Ready to Work Safely?
With proper safety procedures in place, you're ready to begin the hands-on work. In the next section, we'll cover Bottom Cover Removal & Internal Access to safely open your Asus Creator Q540V and access the internal components for repair and upgrades.
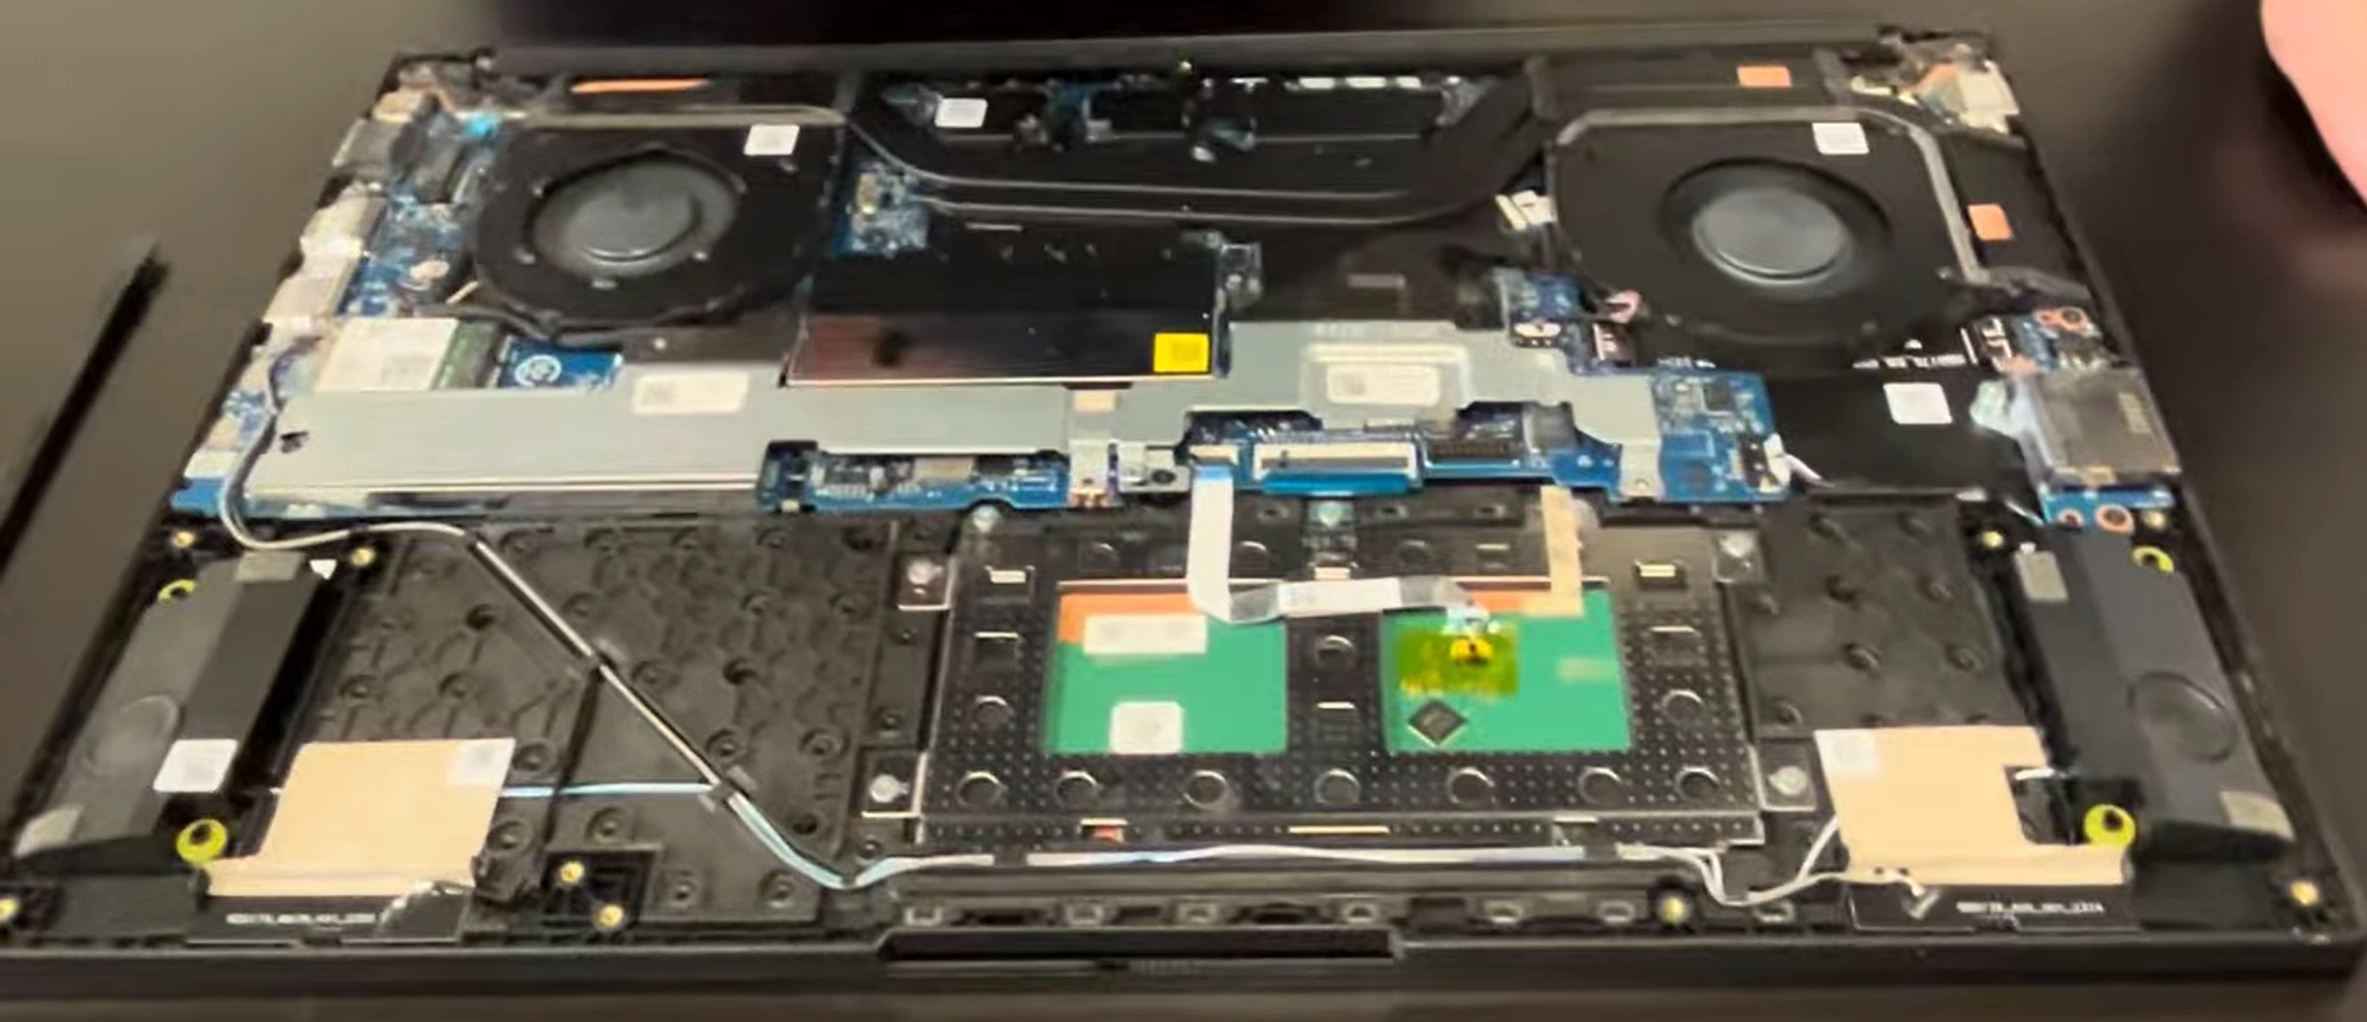
4. Bottom Cover Removal & Internal Access Guide
🔧 Safe Bottom Cover Removal for Asus Creator Q540V
Proper bottom cover removal is the critical first step in accessing the internal components of your Asus Creator Q540V. This guide ensures damage-free access while preserving the laptop's structural integrity and aesthetic appearance.
With the bottom cover safely removed, you now have access to the internal components. In the next section, we'll cover Battery Replacement & Power System Service to ensure safe power management before proceeding with other repairs and upgrades.
5. Battery Replacement & Power System Service
🔋 Professional Battery Service for Asus Creator Q540V
The Asus Creator Q540V features a high-capacity lithium-ion battery designed for extended creative work sessions. Proper battery replacement and power system maintenance are essential for optimal performance and safety during laptop repairs and upgrades.
With the battery safely replaced and the power system verified, you're ready to proceed with performance upgrades. In the next section, we'll cover Storage Solutions & SSD Installation to expand your storage capacity and improve system performance.
6. Storage Solutions & SSD Installation Guide
💾 Professional Storage Upgrades for Asus Creator Q540V
The Asus Creator Q540V offers versatile storage options designed for creative professionals handling large project files. Upgrading your storage can dramatically improve workflow performance, reduce loading times, and provide essential backup solutions for your creative work.
🔍 Asus Creator Q540V Storage Configuration Options
With your storage upgraded and optimized for creative work, the next performance enhancement is memory expansion. In the next section, we'll cover RAM Installation & Memory Configuration to ensure your Asus Creator Q540V can handle multiple creative applications simultaneously.
7. RAM Installation & Memory Configuration
🧠 Professional Memory Upgrades for Asus Creator Q540V
Maximizing your Asus Creator Q540V's memory capacity is essential for handling demanding creative applications, multitasking between software, and working with large project files. Proper RAM installation and configuration can dramatically improve your creative workflow performance.
📊 Asus Creator Q540V Memory Specifications
Specification
Details
Maximum
Performance Impact
Memory Type
DDR4 SO-DIMM
DDR4-3200
Critical for speed
Total Slots
2 × 260-pin SO-DIMM
2 Slots Total
Dual-channel capable
Maximum Capacity
64GB (2×32GB)
64GB Total
Handles large projects
Default Speed
DDR4-3200
3200MHz
Optimized performance
🛒 RAM Selection Guide for Creative Work
Capacity Recommendations:
16GB: Basic photo editing, light multitasking
32GB: Professional photography, 4K video editing
64GB: 8K video editing, 3D rendering, heavy multitasking
Future-Proofing: Start with 32GB, upgrade to 64GB later
With your memory upgraded and optimized for peak performance, the next step is ensuring proper thermal management. In the next section, we'll cover Cooling System Maintenance & Fan Replacement to keep your Asus Creator Q540V running cool under heavy creative workloads.
8. Display Assembly Replacement & Screen Repair
🖥️ Professional Display Service for Asus Creator Q540V
The Asus Creator Q540V features a high-quality display essential for accurate creative work. Whether replacing a damaged screen or upgrading to a higher-quality panel, proper display replacement requires precision and care to maintain the laptop's professional appearance and functionality.
With your display successfully replaced and calibrated, the final step is ensuring everything is properly reassembled. In the next section, we'll cover Complete Reassembly & System Testing to ensure your Asus Creator Q540V is ready for professional creative work.
9. Motherboard Access & Component-Level Repair
🔌 Advanced Motherboard Service for Asus Creator Q540V
The motherboard is the heart of your Asus Creator Q540V, housing critical components including the CPU, GPU, and power management systems. This advanced repair section covers safe motherboard access and component-level troubleshooting for experienced technicians.
⚠️ Advanced Repair Warning
This section contains advanced procedures that can permanently damage your device if performed incorrectly. Component-level repair requires professional tools, experience, and understanding of electronics. Consider professional service if unsure.
With motherboard diagnostics and repairs completed, the final step is comprehensive system reassembly and testing. In the next section, we'll cover Complete Reassembly & System Testing to ensure your Asus Creator Q540V returns to full operational status.
10. Where to Sell Your Serviced Asus Creator Q540V
💰 Maximizing Your Asus Creator Q540V Resale Value
After completing professional service and upgrades on your Asus Creator Q540V, choosing the right selling platform can significantly impact your final return. This guide covers the best marketplaces for selling premium creative workstations to professionals, educational institutions, and creative agencies.
Start with professional-focused platforms like SellBroke for corporate creative sales and GovDeals for government/educational markets. These platforms understand the value of upgraded creative workstations and typically deliver higher returns than general consumer marketplaces. Document all your professional service work and emphasize the creative-ready condition of your Asus Creator Q540V to attract serious professional buyers.
Need to Sell Your Asus Laptop? Get Instant Cash!
If your ASUS Creator Q540V (or other ASUS Creator model) has performance issues or you're upgrading to a newer laptop, we offer competitive cash payouts for your device. We buy broken, used, and refurbished ASUS Creator laptops—including all Q540V configurations—with free insured shipping and no-hassle evaluations.