The ThinkPad E14 Gen 5 continues Lenovo's commitment to business-grade modular design, combining the iconic ThinkPad durability with accessible serviceability. This model represents the perfect balance of enterprise features and user-maintainable components.
2. Essential Toolkit for ThinkPad E14 Gen 5 Repairs
🛠️ ThinkPad's Service-Friendly Design
ThinkPad laptops are engineered for enterprise serviceability with standardized components and IT-friendly repair processes. The E14 Gen 5 continues this tradition with thoughtful design that balances accessibility with durability.
4. ThinkPad E14 Gen 5 Bottom Cover Removal Process
🎯 ThinkPad's Service-Friendly Design
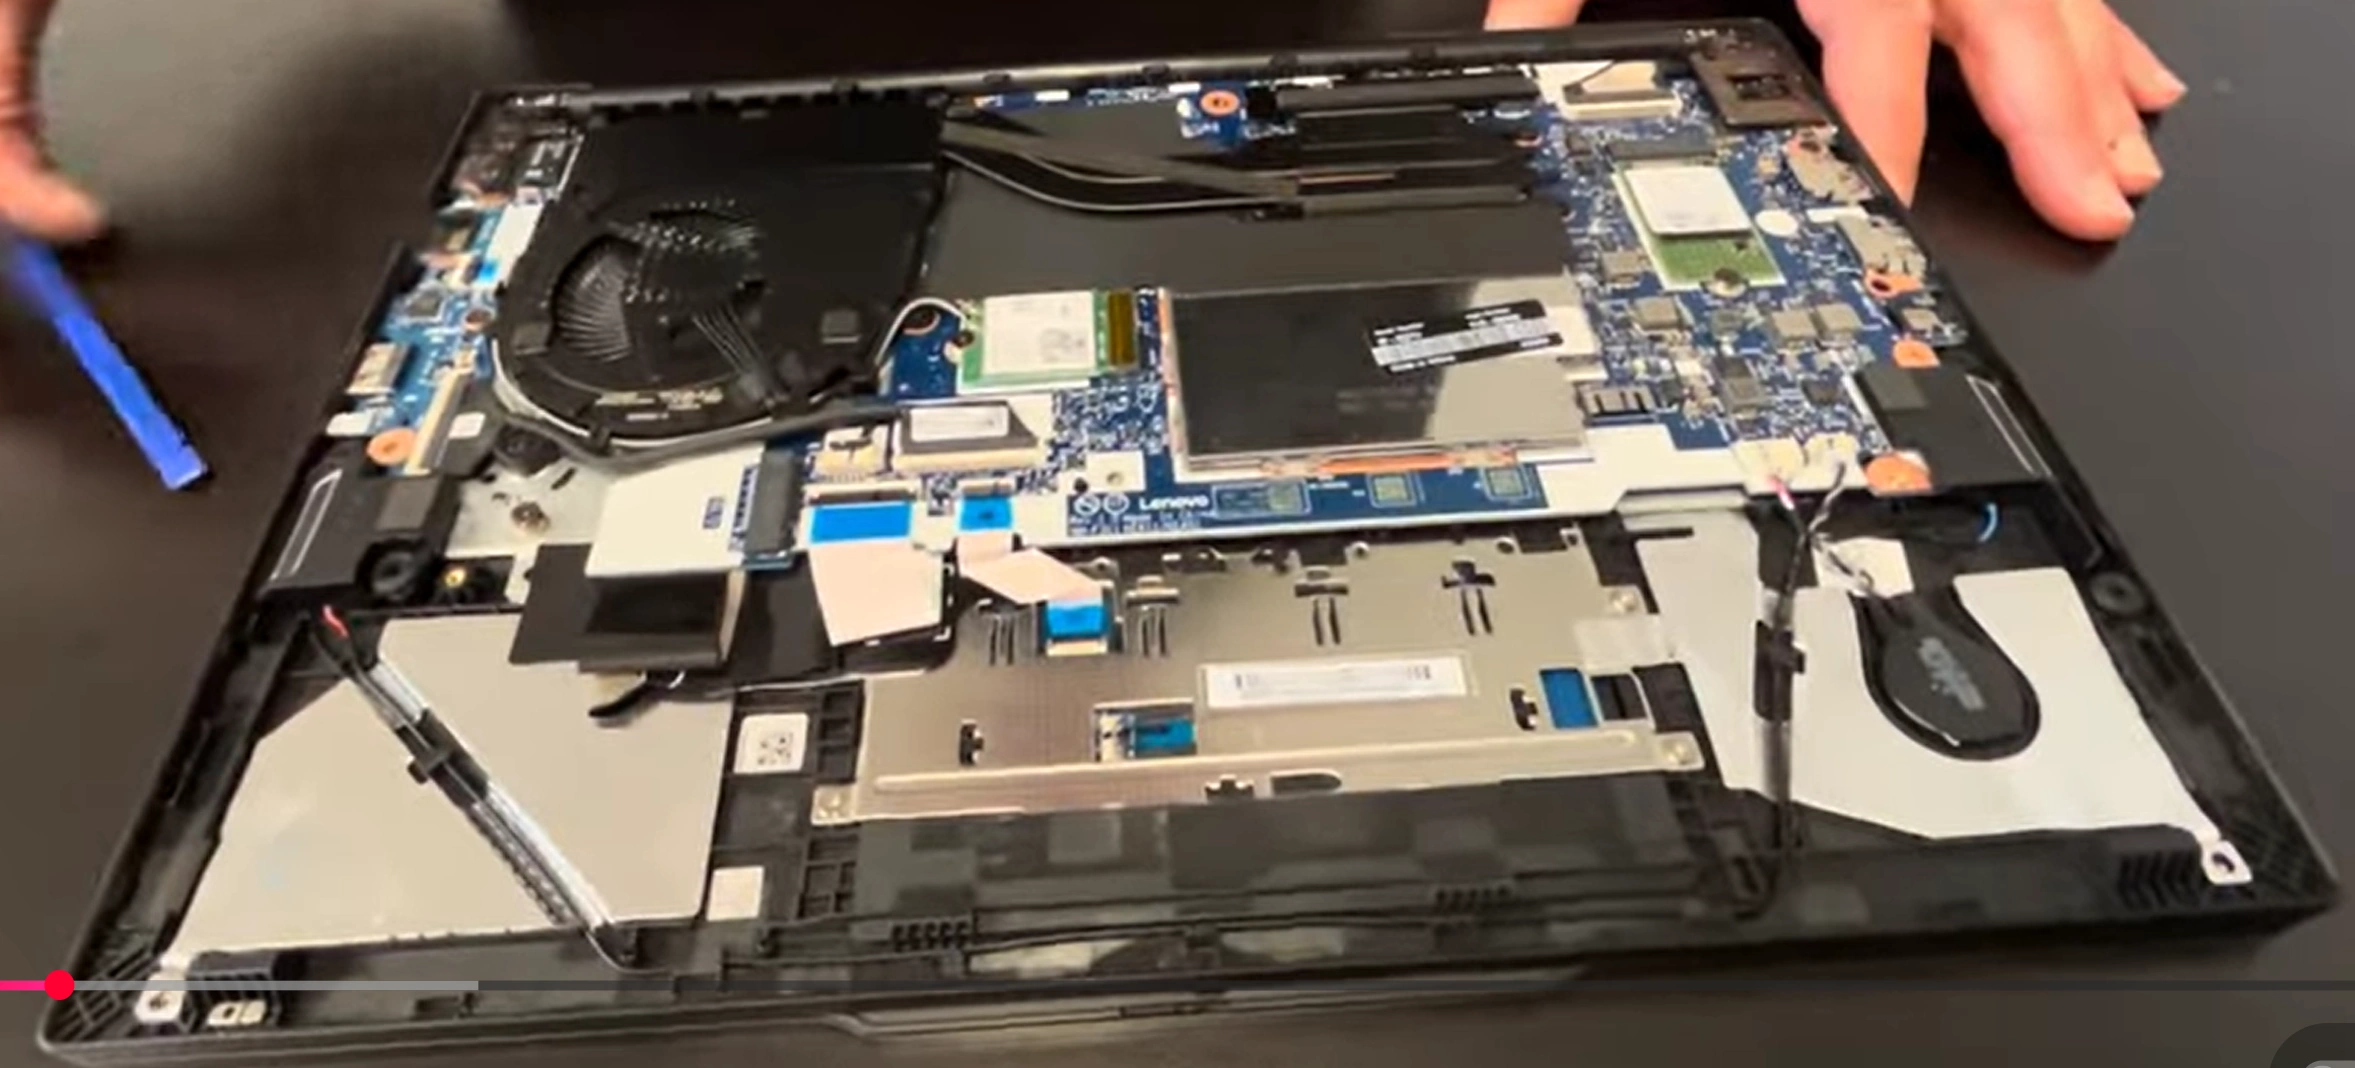
The ThinkPad E14 Gen 5 features a service-friendly bottom cover design that provides direct access to the most commonly upgraded components. Continuing ThinkPad's legacy of enterprise serviceability, this model offers organized internal layout and standardized fasteners for easy maintenance.
🔩 Bottom Cover Fastener Specifications
Screw Type
Quantity
Location
Special Features
Tool Required
Phillips #0
6
Perimeter
Standard length
Phillips #0 screwdriver
Captive Phillips
2
Front corners
Captive design
Phillips #0 screwdriver
Security Torx (if present)
2
Rear corners
Security feature
Torx T5 security bit
🔧 Step-by-Step Removal Process
Preparation:
Ensure laptop is powered off and disconnected from power
Remove all peripherals and docking station connections
Place laptop on clean, soft, non-slip surface
Gather Phillips #0 screwdriver and plastic opening tools
Screw Removal Sequence:
Remove all 6 perimeter screws first
Loosen 2 captive screws (they will remain attached)
If present, remove 2 security Torx screws
Note screw lengths and locations for reassembly
Use magnetic screwdriver to prevent dropping screws
Cover Release:
Start at front edge near status lights
Insert plastic spudger between cover and chassis
Gently twist to release first clip (listen for subtle click)
Work around perimeter, releasing clips every 2-3 inches
Lift cover straight up once all clips are released
⚙️ ThinkPad's Captive Screw Advantage
No Lost Screws:
Captive screws remain attached to cover
Eliminates risk of losing small components
Simplifies reassembly process
Prevents incorrect screw placement
Enterprise Efficiency:
Quick service for IT departments
Reduced maintenance time
Consistent service experience
Professional appearance
🚧 Common Challenges & Solutions
Stubborn Clips:
Use plastic opening tools instead of metal
Work slowly around perimeter
Apply gentle, even pressure
If stuck, check for missed screws
Security Screws:
Use proper Torx T5 security bit
Apply firm downward pressure while turning
If stripped, use extraction tools carefully
Replace damaged screws during reassembly
Alignment Issues:
Check for obstructions or cables in the way
Verify all screws are fully removed
Ensure no adhesive or tape remains
Check for debris in screw holes
🔍 Immediately Accessible Components
RAM Slots:
Two DDR4 SODIMM slots
Easy upgrade access
No additional disassembly required
Supports up to 40GB total (8GB soldered + 32GB SODIMM)
Storage:
M.2 2280 SSD slot (primary)
Optional M.2 2242 slot (WWAN/secondary)
Single screw retention for each
Various SSD lengths supported
Wireless Cards:
WiFi 6E AX211 card
Optional WWAN card slot
Two antenna connections each
Standard M.2 form factors
Battery Connector:
Easy access for disconnection
Clearly marked connector
Safety disconnect for further work
Standard 4-pin design
⚠️ Safety Precautions
Disconnect battery before working on internal components
Use anti-static precautions when handling components
Handle components by edges only
Keep screws organized for reassembly
Avoid touching gold contacts on components
Work in clean, dry environment
Use proper tools to avoid damage
🔁 Reassembly Instructions
Ensure all internal work is completed
Verify no tools or debris left inside
Align bottom cover properly with chassis
Press down evenly until all clips engage
Start with perimeter screws and tighten securely
Ensure captive screws are properly positioned
Install security screws if present
Ensure cover sits flush with no gaps
💡 Immediate Upgrade Opportunities
RAM Upgrades:
Up to 40GB total (8GB soldered + 32GB SODIMM)
3200MHz recommended speed
No additional disassembly required
Enterprise-grade RAM recommended
Storage Upgrades:
Primary M.2 2280 slot (PCIe NVMe)
Secondary M.2 2242 slot (optional)
Up to 2TB+ capacity supported
Lenovo-certified SSDs recommended
Wireless Upgrades:
WiFi 6E AX211 standard
Optional WWAN card addition
4G/5G modem compatibility
Enterprise security features
🔍 Troubleshooting Common Issues
Cover Won't Sit Flush:
Check for missed clips around perimeter
Verify no cables are trapped under edges
Ensure all screws are properly loosened
Check for damaged clip mechanisms
Screw Won't Tighten:
Check for stripped threads
Verify correct screw type and length
Ensure proper alignment with chassis
Use thread repair kit if necessary
Gaps After Reassembly:
Check clip alignment around perimeter
Verify all screws are proper tightness
Ensure no damage to mating surfaces
Check for warping or bending
🛠️ Maintenance Tips
Cleaning Opportunity:
Clean dust from fans and heatsinks while open
Use compressed air for thorough cleaning
Check for debris in ventilation areas
Inspect thermal paste condition if visible
Preventative Maintenance:
Check battery health in BIOS
Verify all connections are secure
Inspect for signs of wear or damage
Document component conditions for asset management
Business contracts may specify component requirements
Asset management compliance considerations
Documentation requirements for corporate environments
❤️ Battery Health Monitoring
Monitoring Tools:
Lenovo Vantage software
Lenovo Diagnostics
Windows battery health report
Third-party tools like BatteryInfoView
Key Metrics:
Design capacity vs actual capacity
Cycle count and wear level
Voltage and temperature readings
Charge/discharge rate information
8. ThinkPad E14 Gen 5 Keyboard & Top Cover Access: Professional Business Laptop Service Guide
⚠️ Advanced Procedure Warning
Keyboard removal on the ThinkPad E14 Gen 5 requires significant disassembly compared to older ThinkPad models. This procedure should only be attempted for necessary repairs or deep cleaning when planning to sell your business laptop.
9. ThinkPad E14 Gen 5 Cooling System Maintenance & Thermal Repasting: Boost Performance for Maximum Resale Value
🚀 Why Thermal Maintenance Boosts Resale Value
Proper cooling system maintenance is one of the most impactful upgrades for business laptops. A well-maintained thermal system demonstrates professional care and ensures sustained performance - key selling points for business buyers.
Thermal Upgrade
Performance Impact
Resale Value Increase
Buyer Appeal
Professional Repasting
5-15°C temperature reduction
+$80-$120
Sustained performance under load
Fan Cleaning & Maintenance
Quieter operation, better airflow
+$40-$60
Professional maintenance evidence
Complete Thermal System Service
20-25% better sustained performance
+$150-$200
Premium, professionally maintained laptop
⚠️ Critical Safety Precautions
ESD Protection Required: Always use anti-static wrist strap
Battery Disconnection: Completely disconnect internal battery before beginning
Thermal Paste Safety: Use non-conductive, non-capacitive paste only
Fan Handling: Avoid damaging delicate fan blades during cleaning
10. ThinkPad E14 Gen 5 LCD Screen & Bezel Replacement: Premium Display Upgrade for Maximum Resale Value
💎 Why Display Quality Drives Resale Value
The display is the most visible component of your ThinkPad and significantly impacts perceived value. A pristine, high-quality screen can increase resale value by 25-40% for business buyers who prioritize visual quality and professional presentation.
Display Condition
Resale Impact
Buyer Perception
Repair Recommendation
Pristine, Bright Screen
+$150-$250
Premium, well-maintained
Professional cleaning only
Minor Scratches/Scuffs
-$50-$100
Average wear and tear
Consider bezel replacement
Cracked/Damaged Screen
-$200-$400
Poorly maintained
Immediate screen replacement
Upgraded Higher Resolution
+$200-$350
Premium upgrade
Strategic value enhancement
⚠️ Critical Display Replacement Precautions
LCD Fragility: Screens are extremely delicate - handle with care
ESD Protection: Always use anti-static wrist strap
Battery Disconnection: Completely disconnect internal battery first
Ribbon Cable Care: Handle connectors gently to avoid damage
Work Surface: Use soft, clean surface to prevent scratches
🔍 ThinkPad E14 Gen 5 Display Compatibility
Display Type
Resolution
Panel Model Examples
Upgrade Compatibility
IPS FHD Standard
1920x1080
NV140FHM-N41, B140HAN03.0
Direct replacement
IPS FHD Touch
1920x1080
NV140FHM-N61
Connector compatibility required
IPS WQHD Premium
2560x1440
B140QAN02.0
eDP compatibility check needed
Low Power FHD
1920x1080
NE140F8M-N61
Best for battery life
🛠️ Specialized Display Tools Required
Precision Screwdrivers: Phillips #00, JIS #000
Plastic Opening Tools: Spudgers, guitar picks
Suction Cups: For safe screen handling
Tweezers: For ribbon cable connectors
Double-sided Tape: 2mm width for bezel reattachment
11. ThinkPad E14 Gen 5 Professional Reassembly Techniques: Final Assembly for Maximum Resale Value
⚙️ Why Professional Reassembly Impacts Resale Value
Proper reassembly is the most critical phase of your ThinkPad upgrade process. A professionally reassembled laptop demonstrates expert-level care and can command 20-30% higher resale prices from discerning business buyers who recognize quality workmanship.
12. ThinkPad E14 Gen 5 Testing & Performance Validation: Verifying Upgrade Success for Maximum Resale Value
🔍 Why Comprehensive Testing Boosts Resale Value
Thorough performance validation is the ultimate proof of quality for your upgraded ThinkPad. Documented test results can increase resale value by 25-35% by demonstrating tangible performance improvements and professional-grade reliability to business buyers.
Validation Level
Testing Depth
Value Impact
Buyer Confidence
Basic Functionality
Power on, basic operations
+10-15%
Minimal - expected working condition
Comprehensive Testing
All components, stress tests
+20-25%
Good - verified reliability
Professional Validation
Benchmarks, thermal, battery tests
+30-35%
High - documented performance
Enterprise-Grade
Extended stability, real-world simulations
+40-50%
Premium - business-ready assurance
🎯 Testing Philosophy for Business Laptops
Business Reliability Focus: Emphasize stability over raw performance
Real-World Scenarios: Test applications business users actually run
13. Maximizing ThinkPad E14 Gen 5 Resale Value: Strategic Upgrade ROI & Premium Positioning
💰 Strategic Value Maximization Framework
Properly executed upgrades can increase your ThinkPad's resale value by 40-60%, but strategic positioning is crucial. Business buyers pay premiums for documented performance improvements and professional maintenance records that demonstrate superior value over standard configurations.
Upgrade Strategy
Investment Range
Value Increase
Target Buyer Profile
Essential Performance (RAM+SSD)
$150-$250
+$300-$450
Business Professionals, Students
Premium Refresh (Full Service)
$300-$500
+$600-$900
Executives, Consultants
Enterprise Ready (Max Config)
$600-$900
+$1,000-$1,500
Small Business, IT Departments
📈 Upgrade ROI Analysis by Component
Upgrade Component
Cost
Value Added
ROI
Priority Level
16GB RAM Upgrade
$40-$60
+$120-$180
200-300%
Essential
1TB NVMe SSD
$80-$120
+$200-$280
150-250%
Essential
New Battery
$90-$140
+$150-$220
100-180%
High
Thermal System Service
$30-$50
+$100-$160
200-400%
High
Display Upgrade
$150-$250
+$250-$400
100-200%
Medium
🏆 Premium Resale Positioning Strategies
Business Professional Tier:
Emphasize reliability and productivity enhancements
Highlight ThinkPad durability and corporate features
✓ All upgrades professionally installed and tested
✓ Comprehensive documentation package prepared
✓ Professional photography completed
✓ Strategic pricing research conducted
✓ Target market positioning defined
✓ Premium platform listings optimized
✓ Value-added services configured
✓ Competitive advantages clearly articulated
➡️ Ready for Premium Market Placement
With strategic value maximization complete, your ThinkPad E14 Gen 5 is positioned for premium resale channels and maximum return on your upgrade investment through targeted business-focused platforms and specialized marketplaces.
Need to Sell Your Lenovo Laptop? Get Instant Cash!
If your ThinkPad E14 Gen 5 (or other ThinkPad model) has performance issues or you're upgrading to a newer business laptop, we offer competitive cash payouts for your device. We buy broken, used, and refurbished ThinkPad laptops—including all E14 Gen 5 configurations—with free insured shipping and hassle-free evaluations.
Sell Popular Lenovo Models Now:
Frequently Asked Questions
Can I sell my Thinkpad E14 Gen 5 Modular For Memory Display after disassembly or repair?
Yes. SellBroke buys laptops in any condition — working, broken, disassembled, or partially upgraded. Get an instant quote at https://sellbroke.com/sell/laptop/lenovo/.
What is my Thinkpad E14 Gen 5 Modular For Memory Display worth?
Value depends on condition and what's working. SellBroke pays for working, broken, and water-damaged laptops. Visit https://sellbroke.com/sell/laptop/lenovo/ to see your exact offer before committing.
Does SellBroke buy laptops with cracked screens or dead batteries?
Yes. Cracked screens and dead batteries are common defects SellBroke accepts. Select your defects during the quote process for an accurate price.
How long does it take to get paid after shipping?
SellBroke pays within 24 hours of receiving and inspecting your device. Payment via PayPal, Venmo, Zelle, or check.
Do I need to reassemble my laptop before selling it?
No. SellBroke accepts laptops in disassembled or partially assembled condition. Ship it as-is with components included.