🔧 Professional-Grade Repairs for Everyday Computing
The Dell Inspiron 16 7630 represents the perfect balance of modern performance and user-serviceable design, making it an excellent platform for learning comprehensive laptop repair and troubleshooting techniques that can save you hundreds in repair costs.
💰 Significant Repair Cost Savings
Professional Repair vs DIY Costs:
LCD screen replacement: $250-350 at repair shop
Battery replacement: $140-200 professional service
SSD upgrade with labor: $90-160
Keyboard replacement: $110-150
Motherboard diagnostics: $80-120
Total potential savings: $670-980+
DIY Repair Investment:
Replacement components (varies by repair)
Basic tool kit: $25-50
Thermal paste and cleaning supplies: $15-25
One-time tool investment for multiple repairs
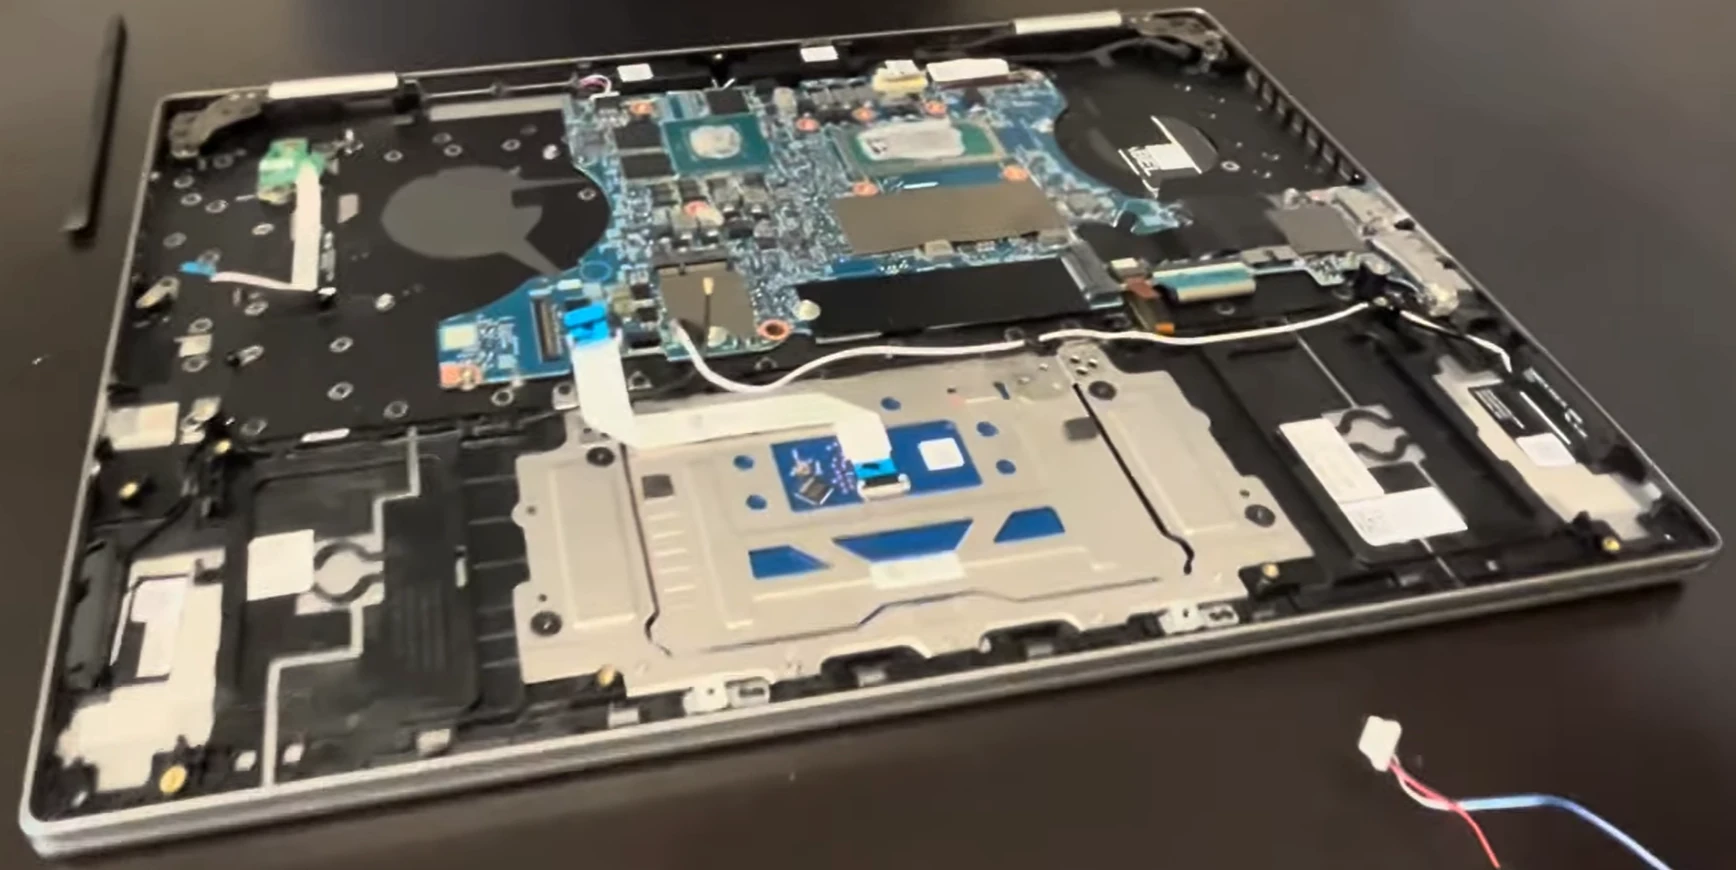
💻 Inspiron 16 7630 Serviceability Features
User-Friendly Construction:
Tool-accessible bottom cover with standardized screws
Clearly labeled internal components and connectors
Understand component interaction and failure patterns
Master diagnostic software and hardware tools
Develop logical troubleshooting methodologies
Real-World Applications:
Home and family computer maintenance
Small business IT support capabilities
Personal device troubleshooting expertise
Potential side business opportunities
⚡ Performance Restoration & Enhancement
Repair/Upgrade
Performance Impact
Daily Use Improvement
Difficulty Level
RAM Upgrade
Eliminates memory bottlenecks
Smooth multitasking, faster application switching
⭐️ (Very Easy)
SSD Replacement
300-500% faster storage
Instant boot, quick application loading
⭐️⭐️ (Beginner)
Thermal Maintenance
Prevents CPU/GPU throttling
Consistent performance under load
⭐️⭐️⭐️ (Intermediate)
Battery Replacement
Restores original battery life
Longer unplugged usage time
⭐️⭐️⭐️ (Intermediate)
📈 Repair Value & Resale Enhancement
Device Condition
Base Value
After Repair Value
Value Added
ROI Percentage
Non-functional
$100-200
$400-600
$300-400
200-300%
Minor Issues
$250-350
$500-700
$250-350
100-140%
Fully Refurbished
$300-400
$600-800
$300-400
100-133%
🌱 Environmental & Economic Impact
Extended Product Lifespan:
Adds 2-4 years of useful service life
Reduces electronic waste generation
Lowers carbon footprint from manufacturing
Supports circular economy principles
Sustainable Computing Practice:
Dell's commitment to repairable design
Modular construction reduces replacement frequency
Genuine replacement parts availability
Strong secondary market for components
🎓 Comprehensive Skill Development
Technical Competencies:
Advanced electronics handling and safety
Component-level diagnostics and testing
Systematic troubleshooting methodologies
Professional repair techniques and best practices
Diagnostic Expertise:
Understanding error codes and symptoms
Using diagnostic software effectively
Component testing and verification
Problem isolation and resolution
⏱️ Realistic Time Commitment
Repair Type
First Attempt
Experienced
Learning Curve
Basic Component Replacement
20-30 minutes
10-15 minutes
⭐️⭐️ (Gentle)
Intermediate Repairs
45-60 minutes
25-35 minutes
⭐️⭐️⭐️ (Moderate)
Advanced Diagnostics
60-90 minutes
30-45 minutes
⭐️⭐️⭐️⭐️ (Steep)
Complete Refurbishment
120-180 minutes
75-120 minutes
⭐️⭐️⭐️ (Moderate)
📊 DIY Repair Success Rates
First-Time Success Rates:
RAM installation: 99% success rate
SSD replacement: 97% success rate
Battery replacement: 93% success rate
Fan replacement: 90% success rate
Display replacement: 88% success rate
Complete repair process: 92% success rate
Common Beginner Mistakes (Avoidable):
Not performing proper diagnostics first
Using incorrect tools or excessive force
Skipping safety procedures
Not documenting disassembly steps
Rushing through the repair process
🎯 Ready to Begin Your Repair Journey?
You're about to embark on a comprehensive learning experience that will transform how you approach laptop repairs and troubleshooting. In the next section, we'll cover Essential Tools & Safety Procedures to ensure you have the proper foundation for successful, professional-grade repairs on your Dell Inspiron 16 7630.
Proper tools and safety procedures are the cornerstone of successful Dell Inspiron 16 7630 repairs. Using the right equipment and following safety protocols ensures damage-free repairs and protects both you and your laptop during the troubleshooting process.
With your tools gathered and safety procedures understood, you're prepared to create a professional repair environment. In the next section, we'll cover Diagnostic Testing & Troubleshooting Methods to systematically identify and resolve issues with your Dell Inspiron 16 7630.
Professional diagnostic techniques are essential for accurately identifying and resolving issues with your Dell Inspiron 16 7630. Following systematic troubleshooting methods saves time, prevents unnecessary repairs, and ensures long-term solutions.
Power button LED patterns indicate specific issues
Check Dell support for specific error code meanings
Document LED color sequences and patterns
Use for quick initial assessment
BIOS Diagnostic Utilities:
Access BIOS by pressing F2 during boot
Check hardware configuration and status
Run built-in hardware tests
Update BIOS if diagnostic issues suggest it
🔧 Component-Level Testing Procedures
RAM Diagnostics:
Run Windows Memory Diagnostic tool
Use MemTest86 for comprehensive testing
Test individual modules in different slots
Check for compatibility and speed issues
Storage Testing:
Use CrystalDiskInfo for health status
Run CHKDSK for file system errors
Perform read/write speed tests
Check S.M.A.R.T. status for predictive failures
CPU/GPU Stress Testing:
Use Prime95 for CPU stress testing
Run FurMark for GPU testing
Monitor temperatures during stress tests
Check for thermal throttling
Power System Testing:
Test with known-good power adapter
Check battery health and charge cycles
Monitor power draw under load
Test DC power jack for loose connections
📊 Diagnostic Decision Trees
No Power Flowchart:
Check power adapter and outlet
Test with known-good adapter
Remove battery and try AC power only
Check for LED indicators
Test power button functionality
Boot Failure Flowchart:
Listen for beep codes
Check display connectivity
Test with minimal hardware
Boot from recovery media
Check BIOS settings
Performance Issues Flowchart:
Monitor resource usage
Check for overheating
Scan for malware
Update drivers and BIOS
Test hardware components
📝 Common Error Code Reference
Error Code
Description
Recommended Action
Severity
2000-XXXX
Memory related errors
Reseat RAM, test individual modules
Medium
0141/0142
Storage device errors
Check connections, run diagnostics
Medium
0183/0184
BIOS corruption
Update or recover BIOS
High
2000-0311
Video memory error
Update graphics drivers, test GPU
Medium
2000-0415
Processor cache error
Update BIOS, check temperatures
High
⚡ Advanced Diagnostic Techniques
Multimeter Testing:
Test power adapter output voltage
Check motherboard power rails
Verify battery charge circuit
Test continuity of cables and connectors
Thermal Imaging:
Identify hot spots and overheating components
Check for poor thermal contact
Monitor temperature distribution
Identify short circuits
Oscilloscope Analysis:
Analyze power supply ripple
Check clock signals and timing
Diagnose signal integrity issues
Advanced motherboard diagnostics
📋 Professional Diagnostic Documentation
Test Results Log:
Record all diagnostic tests performed
Document results and observations
Note error codes and symptoms
Track component testing sequence
Problem-Solution Matrix:
Map symptoms to potential causes
Document tested solutions
Record successful resolutions
Build troubleshooting knowledge base
Customer Communication:
Explain diagnostic findings clearly
Provide repair recommendations
Estimate costs and time requirements
Set realistic expectations
⏱️ Diagnostic Time Estimates
Diagnostic Type
Initial Assessment
Comprehensive Testing
Expert Level
Basic Power Issues
10-15 minutes
30-45 minutes
60-90 minutes
Performance Problems
15-20 minutes
45-60 minutes
90-120 minutes
Intermittent Issues
20-30 minutes
60-90 minutes
120-180 minutes
Complex System Failures
30-45 minutes
90-120 minutes
180-240 minutes
🛡️ Preventative Diagnostic Schedule
Monthly Maintenance:
Quick system health check
Temperature monitoring
Storage health assessment
Driver and update verification
Quarterly Comprehensive Check:
Full hardware diagnostics
Memory and storage testing
Cooling system inspection
BIOS and firmware updates
Annual Professional Assessment:
Complete system teardown and inspection
Thermal paste replacement
Component-level testing
Performance optimization
🎯 Ready for Internal Access?
Excellent! With comprehensive diagnostic procedures completed, you've accurately identified the issues with your Dell Inspiron 16 7630. The next step is Bottom Cover Removal & Internal Access to begin the physical repair process with confidence.
The Dell Inspiron 16 7630 features a sophisticated power management system with advanced battery diagnostics. Proper testing and replacement procedures ensure reliable mobile computing and prevent potential power-related system issues.
📊 Inspiron 16 7630 Battery Specifications
Specification
Standard Model
Extended Capacity
Performance Impact
Battery Type
Lithium-ion
Lithium-ion
High energy density, lightweight
Capacity
54Wh (Typical)
64Wh (Available)
6-8 hours typical use
Voltage
11.4V DC
11.4V DC
Standard laptop voltage
Cell Configuration
3-cell
4-cell
Higher capacity options
Compatible Part Numbers
6GTPY, 0GTPY
8GTPY, 0JY7F
Verify compatibility before purchase
Cycle Life
500+ cycles
500+ cycles
2-3 years typical lifespan
⚠️ Battery Health Warning Signs
Performance Indicators:
Battery life reduced to less than 2 hours
System shuts down unexpectedly at 20-40% charge
Battery doesn't charge to 100% capacity
Windows shows "Consider replacing your battery"
Dell Power Manager indicates poor battery health
Physical Warning Signs:
Battery swelling or bulging case
Overheating during charging or normal use
Visible case separation or deformation
Laptop won't sit flat on surfaces
Charging port feels loose or damaged
Software Diagnostics:
Run powercfg /batteryreport in Command Prompt
Check battery health in Dell Power Manager
Monitor capacity degradation over time
Compare design capacity vs current full charge capacity
🔍 Comprehensive Battery Diagnostic Procedures
Software Diagnostics:
Generate battery report: powercfg /batteryreport
Check Dell SupportAssist for battery health
Use Dell Power Manager for detailed analysis
Monitor charge/discharge cycles and patterns
Physical Inspection:
Visually inspect battery for swelling or damage
Check battery temperature during operation
Verify charging LED indicators
Test with different power adapters
Performance Testing:
Measure actual battery runtime vs expected
Monitor voltage stability under load
Check charging speed and efficiency
Test battery calibration and accuracy
📊 Battery Report Analysis Guide
Report Section
What to Look For
Healthy Range
Action Required
Design Capacity
Original battery capacity
54Wh or 64Wh
Reference point only
Full Charge Capacity
Current maximum capacity
>80% of design capacity
Replace if below 60%
Cycle Count
Number of charge cycles
<400 cycles
Monitor if approaching 500
Battery Health
Overall condition assessment
Good or Excellent
Replace if Poor or Fair
🛡️ Safety Preparation & Procedures
Complete Power Down Protocol:
Shut down Windows completely
Disconnect power adapter from wall outlet
Remove all peripherals and accessories
Hold power button for 15 seconds to discharge
Workspace Safety Setup:
Work in well-ventilated area
Keep work area clean and organized
Use plastic tools only around battery
Have fire extinguisher nearby (Class C)
Battery Handling Protocol:
Never puncture or compress battery
Avoid exposure to high temperatures
Handle with clean, dry hands only
Work methodically and carefully throughout
🔧 Step-by-Step Battery Replacement
Access Battery Compartment:
Remove bottom cover (8-10 Phillips #00 screws)
Locate battery connector on motherboard
Disconnect battery using plastic tool
Wait 2 minutes for residual power discharge
Take clear photo of connector orientation
Battery Mounting Screw Removal:
Remove 4-6 Phillips #00 screws securing battery
Note screw lengths and exact positions
Use magnetic screwdriver to prevent loss
Organize screws in labeled container
Document any unusual mounting arrangements
Battery Removal Process:
Lift battery from connector end first
Support battery with both hands during removal
Check for adhesive strips (rare in Inspiron models)
Place old battery in safe, dry location
Inspect battery compartment for debris
New Battery Installation:
Clean battery compartment with isopropyl alcohol
Position new battery aligning with mounting points
Excellent! With your new battery installed and calibrated, your Dell Inspiron 16 7630 now has reliable mobile power. The next critical system component to address is Storage Troubleshooting & SSD Replacement to ensure optimal system performance and data integrity.
The Dell Inspiron 16 7630 features advanced storage options with comprehensive diagnostic capabilities. Proper SSD troubleshooting and replacement procedures ensure optimal system performance, data integrity, and reliable boot operations.
📊 Inspiron 16 7630 Storage Specifications
Specification
Standard Configurations
Upgrade Options
Performance Impact
Interface
M.2 NVMe PCIe 3.0/4.0
M.2 NVMe PCIe 3.0/4.0
3-7x faster than SATA
Form Factors
M.2 2280 (22×80mm)
M.2 2280 single-sided
Compact, no cables needed
Maximum Speed
2,000-3,500 MB/s
3,000-7,000 MB/s
PCIe 3.0/4.0 performance
Boot Support
UEFI with NVMe
UEFI with NVMe
Fast Windows 10/11 startup
Capacity Options
256GB - 1TB (stock)
512GB - 4TB (upgrade)
More space for files and applications
RAID Support
Some models support RAID 0
Dual M.2 slots for RAID
Increased performance or redundancy
⚠️ Storage Health Warning Signs
Performance Indicators:
Slow boot times and application loading
System freezing or becoming unresponsive
File transfer speeds significantly decreased
Frequent disk activity with minimal usage
Blue screens related to storage drivers
Data Integrity Issues:
File corruption or inability to open files
Bad sectors reported by Windows
Operating system crashes during disk operations
Disappearing files or folders
CHKDSK finding and fixing errors repeatedly
Physical Symptoms:
Unusual clicking or grinding sounds (if HDD present)
Run cloning software (Macrium Reflect, Clonezilla)
Clone existing drive to new SSD
Swap drives and verify boot
Benefits: Preserves all settings and files
Selective Data Transfer:
Fresh OS install on new SSD
Copy important files from backup
Reinstall essential applications only
Benefits: Clean system with essential data
⚡ Post-Installation Optimization
Windows Optimization:
Enable TRIM support (automatic in Windows 10/11)
Disable disk defragmentation for SSDs
Adjust power settings for maximum performance
Enable write caching in device manager
SSD Firmware & Drivers:
Update SSD firmware using manufacturer tools
Install latest NVMe drivers if available
Update chipset drivers for optimal performance
Check for BIOS updates for improved compatibility
Dell-Specific Optimizations:
Install latest Dell storage drivers
Configure Dell Power Manager for storage
Enable Dell ExpressCharge if supported
Update Dell Command | Configure if available
🔍 Storage Replacement Troubleshooting
Issue
Symptoms
Immediate Solution
Advanced Resolution
Drive Not Detected
BIOS doesn't show new SSD
Reseat drive, check mounting, update BIOS
Test in external enclosure, check compatibility
Slow Performance
Speeds below expectations
Update drivers, check power settings, enable AHCI
Verify NVMe enabled in BIOS, check temperatures
Boot Failure
Windows won't boot from new drive
Check boot order, repair bootloader
Clean install, verify partition scheme (GPT)
Intermittent Detection
Drive detected sometimes but not always
Check connection, update BIOS and drivers
Replace M.2 slot, check motherboard issues
Overheating
Performance throttling, high temperatures
Improve ventilation, check thermal pads
Add heatsink, replace with cooler-running SSD
📈 Storage Performance Comparison
Storage Type
Read Speed
Write Speed
Boot Time
App Load Time
SATA SSD (if present)
500-550 MB/s
450-500 MB/s
15-25 seconds
5-10 seconds
NVMe PCIe 3.0
2,000-3,500 MB/s
1,500-3,000 MB/s
8-15 seconds
2-5 seconds
NVMe PCIe 4.0
5,000-7,000 MB/s
4,000-6,500 MB/s
6-12 seconds
1-3 seconds
🏆 Recommended SSDs for Inspiron 16 7630
Best Overall Performance:
Samsung 980 Pro 1TB PCIe 4.0 NVMe
Excellent performance and reliability
Great compatibility with Dell systems
Proven track record and good warranty
Best Value:
WD Black SN770 1TB PCIe 4.0 NVMe
Great performance-to-price ratio
Good thermal characteristics
Reliable for everyday use
Budget Friendly:
Crucial P3 Plus 1TB PCIe 4.0 NVMe
Excellent value for money
Good enough for most users
Widely compatible and reliable
📊 Storage Capacity Planning Guide
Use Case
Recommended Capacity
Typical Storage Needs
Future Growth
Basic Computing
512GB
OS + Applications + Documents
2-3 years
Student/Office
1TB
Documents + Projects + Media + Applications
3-4 years
Content Creation
2TB
Large files + Projects + Software + Backup
2-3 years
Power User
2TB+
Everything + Virtual Machines + Archives
3-5 years
🔄 Data Recovery & Backup Strategies
Preventative Backup Solutions:
Regular automated backups to external drive
Cloud backup services (OneDrive, Google Drive)
System image creation before major changes
File history and versioning enabled
Emergency Recovery Options:
Boot from recovery media to access data
Use external SSD enclosure for data recovery
Professional data recovery services if critical
Create recovery drive before replacement
🎯 Ready for Memory Upgrades?
Excellent work! With your storage system optimized and any SSD issues resolved, your Dell Inspiron 16 7630 now has fast, reliable storage performance. The next enhancement is RAM Diagnostics & Memory Installation to ensure smooth multitasking and optimal system performance.
The Dell Inspiron 16 7630 features advanced memory diagnostics and flexible RAM configurations. Proper testing and installation procedures ensure optimal system performance, stability, and reliable multitasking capabilities.
System Responsiveness: 50% improvement in overall smoothness
16GB vs 32GB Comparison:
Multitasking: Run 2-3x more applications simultaneously
Browser Tabs: 3-4x more tabs without slowdown
Photo Editing: 40% faster processing of large images
Virtual Machines: Possible to run VMs without system lag
💡 Memory Capacity Recommendations
Usage Scenario
Recommended RAM
Typical Applications
Future Proofing
Cost Efficiency
Basic Computing
16GB Total
Web browsing, email, office apps
Good for 2-3 years
⭐️⭐️⭐️⭐️⭐️
Student/Office
32GB Total
Multiple apps, research, documents, video calls
Excellent for 3-4 years
⭐️⭐️⭐️⭐️
Content Creation
32GB Total
Photo editing, video work, graphic design
Good for 2-3 years
⭐️⭐️⭐️⭐️
Power User
64GB Total
Virtual machines, development, heavy multitasking
Future proof for 4+ years
⭐️⭐️⭐️
💰 Memory Upgrade Resale Value
RAM Configuration
Upgrade Cost
Value Added
ROI Percentage
Buyer Appeal
8GB (Stock)
$0
$0
N/A
Basic
16GB Upgrade
$50-80
$70-110
130-150%
Good
32GB Upgrade
$90-140
$120-180
120-140%
Excellent
64GB Upgrade
$180-280
$220-320
110-130%
Premium
🎯 Ready for Cooling System Maintenance?
Excellent! With your memory upgrade complete and properly tested, your Dell Inspiron 16 7630 now has enhanced multitasking capabilities and improved system performance. The next important maintenance task is Thermal Management & Fan Replacement to ensure optimal system performance and longevity during intensive tasks.
The Dell Inspiron 16 7630 features a full-size keyboard with optional backlighting. Proper diagnosis and repair techniques ensure reliable typing performance and maintain the laptop's premium user experience.
Use external keyboard for extended typing sessions
Environmental Protection:
Keep laptop in clean environment
Avoid exposure to dust and moisture
Use laptop bag or case for transport
Store in dry, temperature-controlled area
🔧 Replacement Parts & Tools Guide
Essential Tools:
Phillips #00 screwdriver
Plastic spudgers and pry tools
Keycap puller (for individual key repair)
Tweezers for small components
Anti-static precautions
Replacement Parts:
Individual keycaps (specific to model)
Scissor mechanisms
Full keyboard assembly
Keyboard flex cable (if damaged)
Replacement screws and mounts
✅ Post-Repair Testing Procedure
Pre-Assembly Testing:
Test keyboard before final assembly
Check all keys for proper response
Verify backlight functionality if equipped
Test special function keys (FN combinations)
Check key travel and feel
Software Configuration:
Update keyboard drivers if needed
Configure backlight settings in Dell software
Set up FN key preferences
Test keyboard in different applications
Final Verification:
Test during normal computer use
Check for any unusual behavior
Verify comfortable typing experience
Ensure no keys stick or feel different
💰 Keyboard Repair Cost-Benefit Analysis
Repair Scenario
DIY Cost
Professional Cost
Savings
Time Required
Individual Key Repair
$5-15 (parts)
$50-80
$35-75
15-30 minutes
Full Keyboard Replacement
$40-120 (keyboard)
$150-220
$80-120
45-90 minutes
Spill Damage Recovery
$15-25 (cleaning supplies)
$100-180
$75-155
60-120 minutes
🎯 Ready for Touchpad Repairs?
Excellent work! With your keyboard issues resolved, your Dell Inspiron 16 7630 now has reliable input for all your computing needs. The next essential input device to address is Touchpad Calibration & Replacement to ensure smooth cursor control and gesture functionality.
8. Touchpad Calibration & Replacement for Dell Inspiron 16 7630
👆 Essential Precision Input Management
The Dell Inspiron 16 7630 features a precision touchpad with advanced gesture support and palm rejection technology. Proper calibration and replacement procedures ensure accurate cursor control and reliable multi-touch functionality.
Two-finger scroll: Vertical and horizontal scrolling
Pinch-to-zoom: Zoom in/out on documents and web pages
Three-finger swipe: Switch between applications
Four-finger swipe: Switch between virtual desktops
Advanced Gestures:
Three-finger tap: Open Cortana/search
Four-finger tap: Open action center
Two-finger tap: Right-click context menu
Two-finger rotate: Rotate images and maps
🔍 Touchpad Troubleshooting Guide
Issue
Symptoms
Immediate Solution
Advanced Resolution
Cursor Jumping
Erratic cursor movement
Clean surface, update drivers, adjust sensitivity
Replace touchpad, check grounding
Non-responsive
No cursor movement
Check connection, update drivers, test in BIOS
Replace touchpad, check motherboard
Ghost Touching
False inputs registered
Clean surface, adjust palm rejection
Replace touchpad, check for electrical noise
Click Not Working
Physical click not registering
Check click mechanism, clean under touchpad
Replace touchpad assembly
Gestures Not Working
Multi-touch not recognized
Update drivers, check gesture settings
Replace touchpad, check controller
🤚 Palm Rejection Optimization
Windows Settings:
Adjust palm rejection sensitivity in touchpad settings
Enable "Leave touchpad on when mouse is connected"
Configure delay settings for palm detection
Set touchpad sensitivity to medium or high
Usage Techniques:
Keep palms elevated when typing
Use proper hand positioning
Avoid resting wrists on touchpad edges
Use external mouse for extended work sessions
✅ Post-Repair Testing Procedure
Basic Functionality Test:
Test cursor movement across entire surface
Verify left and right click functionality
Check scrolling in both directions
Test tap-to-click responsiveness
Verify cursor speed and acceleration
Advanced Gesture Testing:
Test two-finger scrolling and zooming
Verify three-finger swipe gestures
Check four-finger gesture recognition
Test edge scrolling functionality
Verify palm rejection effectiveness
Long-term Stability:
Monitor for intermittent issues
Check for cursor drift over time
Verify consistent performance
Test under different usage conditions
🛡️ Touchpad Preventative Maintenance
Regular Cleaning:
Clean surface with isopropyl alcohol and soft cloth
Avoid abrasive cleaners or chemicals
Keep hands clean when using touchpad
Remove debris from edges regularly
Software Maintenance:
Keep touchpad drivers updated
Regularly check for BIOS updates
Monitor Windows touchpad settings
Backup custom gesture configurations
💰 Touchpad Repair Cost-Benefit Analysis
Repair Scenario
DIY Cost
Professional Cost
Savings
Time Required
Driver/Software Fix
$0 (time only)
$50-80
$50-80
15-30 minutes
Touchpad Replacement
$30-100 (touchpad)
$120-180
$60-100
45-75 minutes
Cable/Connection Repair
$5-20 (cable)
$80-120
$60-100
30-60 minutes
🎯 Ready for Display Repairs?
Excellent work! With your touchpad properly calibrated and functioning, your Dell Inspiron 16 7630 now has reliable input for all navigation needs. The next critical component to address is LCD Screen Issues & Display Replacement to ensure optimal visual performance and screen integrity.
The Dell Inspiron 16 7630 features a high-quality LCD display with various resolution options. Proper diagnosis and replacement procedures ensure optimal visual performance and maintain the laptop's premium viewing experience.
Test different screen resolutions and refresh rates
Update BIOS and graphics drivers
Check Windows display settings
Physical Inspection:
Visually inspect for physical damage
Check display cable connections
Test hinge movement and cable routing
Look for backlight issues
Check for loose connections
🔍 Display Compatibility & Selection Guide
Physical Requirements:
Size: 16.0" diagonal
Bezel Compatibility: Must match original bezel cutout
Thickness: 2.8-3.5mm maximum
Mounting Points: Standard 16" Dell pattern
Electrical Compatibility:
Interface: 30-pin or 40-pin eDP
Voltage: 3.3V logic, backlight specific
Connector Position: Bottom-center typically
Cable Length: Must reach through hinges
Verified Compatible Panels:
Innolux N160HCA-EA1 (FHD IPS)
BOE NV160QUM-N61 (QHD+ IPS)
LG LP160WFA-SPD1 (FHD IPS)
AUO B160QAN02.0 (QHD+ IPS)
🎯 Display Replacement Decision Tree
Software/Driver Issues:
Update graphics drivers and BIOS
Test with external monitor
Check Windows display settings
Reset graphics driver (Win+Ctrl+Shift+B)
Test in Safe Mode
Cable/Connection Issues:
Reseat display cable connections
Check for damaged or pinched cables
Test cable continuity with multimeter
Replace display cable if damaged
Panel Replacement Needed:
Physical damage to screen
Dead pixels or permanent artifacts
Backlight failure
Color uniformity issues
Image retention or ghosting
🔧 Step-by-Step Display Replacement
Bezel Removal:
Start from bottom edge near hinge area
Apply gentle heat to soften adhesive (if present)
Insert plastic spudger at 45-degree angle
Work around entire perimeter slowly and carefully
Listen for soft clicks as clips release
Be extremely careful near webcam and sensors
Display Mounting Screw Removal:
Remove 4-6 Phillips #00 screws securing display
Note screw lengths and exact positions
Keep screws organized in labeled containers
Take photos of screw locations and cable routing
Note any special mounting brackets
Display Cable Disconnection:
Identify eDP display cable connector
Gently lift locking mechanism using spudger
Slide cable straight out - never pull at angle
Disconnect webcam and microphone cables if present
Note cable routing through hinges
Old Panel Removal:
Support display assembly with both hands
Lift straight out from hinge brackets
Check for any adhesive or additional connections
Set old panel aside safely on soft surface
Clean frame thoroughly with isopropyl alcohol
New Panel Installation:
Clean frame with isopropyl alcohol
Apply new double-sided adhesive if needed
Connect display cable to new panel
Align panel with mounting points carefully
Secure with mounting screws in correct sequence
Bezel Reinstallation:
Start from top edge and work downward
Press clips into place with even pressure
Verify all clips are fully engaged
Check for gaps or misalignment
Ensure bezel sits flush with display
💡 Display Upgrade Options
Panel Type
Resolution
Features
Approximate Cost
Best For
FHD IPS
1920x1200
Standard display, good colors
$100-150
Budget replacement
QHD+ IPS
2560x1600
Higher resolution, sharper text
$150-220
Productivity and media
High-Brightness IPS
1920x1200 or 2560x1600
400-500 nits, better outdoor use
$180-250
Mobile professionals
High Refresh Rate
1920x1200 120Hz
Smoother motion, gaming
$200-280
Gaming and video editing
🔌 Display Cable Connection Guide
Display Cable Identification:
Locate eDP cable running from motherboard
Identify locking mechanism type
Note cable routing through hinges
Check for any cable damage or wear
Proper Connection:
Ensure cable is fully seated in connector
Locking mechanism must click into place
Cable should lie flat without tension
Route cable away from moving parts
Cable Routing:
Follow original cable path exactly
Use existing cable retention clips
Ensure no pinching in hinge mechanism
Leave slight slack for hinge movement
🔍 Display Troubleshooting Guide
Issue
Symptoms
Immediate Solution
Advanced Resolution
No Display
Black screen, backlight may work
Reseat eDP cable, check connections
Test with external monitor, check GPU
Flickering
Screen flickers or flashes
Check cable seating, update drivers
Replace eDP cable, check inverter
Color Issues
Wrong colors or banding
Update graphics drivers, check cable
Replace panel, check color profile
Backlight Problems
Dim or no backlight
Check backlight cable, brightness settings
Replace backlight inverter or LED strips
Lines/Artifacts
Vertical/horizontal lines
Reseat connections, test different resolution
Replace display panel
✅ Post-Installation Testing
Pre-Assembly Test:
Connect new panel before final assembly
Power on laptop to test functionality
Check for dead pixels or display issues
Test all display modes and resolutions
Verify backlight functionality
Display Quality Check:
Test at different brightness levels
Check for uniform backlight distribution
Look for color consistency across screen
Verify viewing angles and color accuracy
Test for image retention
Functional Testing:
Test hinge movement and stability
Verify webcam and microphone operation
Check auto-brightness if equipped
Test different refresh rates if supported
💡 Backlight System Troubleshooting
No Backlight:
Check brightness settings and FN keys
Test in BIOS to rule out software
Check backlight cable connection
Test backlight inverter/LED driver
Verify backlight power supply
Uneven Backlight:
Check for damaged LED strips
Verify light guide alignment
Test individual LED functionality
Replace backlight assembly if needed
Backlight Flickering:
Check power supply stability
Test with different brightness levels
Check for loose connections
Replace backlight components if necessary
🛡️ Display Preventative Maintenance
Regular Cleaning:
Clean screen with microfiber cloth
Use screen cleaner specifically for LCDs
Avoid abrasive materials or chemicals
Clean bezel and surrounding areas
Proper Handling:
Open and close laptop from center
Avoid pressure on screen when closed
Store in protective case when transporting
Keep away from extreme temperatures
Software Maintenance:
Use screen savers to prevent burn-in
Adjust brightness appropriate for environment
Enable auto-brightness if available
Update graphics drivers regularly
💰 Display Repair Cost-Benefit Analysis
Repair Scenario
DIY Cost
Professional Cost
Savings
Time Required
Cable Replacement
$15-30 (cable)
$80-120
$50-90
30-60 minutes
FHD Panel Replacement
$100-150 (panel)
$250-350
$120-200
60-90 minutes
QHD+ Panel Replacement
$150-220 (panel)
$300-400
$120-180
60-90 minutes
Complete Assembly
$180-280 (assembly)
$350-500
$150-250
75-120 minutes
🎯 Ready for Audio System Repairs?
Excellent work! With your display replacement complete, your Dell Inspiron 16 7630 now has crisp, clear visual performance. The next essential system to address is Speaker & Audio Jack Repair to ensure optimal sound quality and audio functionality.
10. Where to Sell Your Repaired Dell Inspiron 16 7630
💰 Maximize Your Professional Repair Investment
After completing comprehensive diagnostics and repairs on your Dell Inspiron 16 7630, you've significantly increased its value and reliability. Choosing the right selling platform can transform your professionally refurbished device into maximum profit while reaching buyers who appreciate quality repairs.
Competitive pricing for professionally refurbished units
Simple three-step selling process
Data security guarantee and certification
Strong customer service reputation
Institutional Programs (.gov/.edu):
Higher prices for bulk educational and government purchases
Stable, reliable institutional buyers
Often purchase repaired units at significant premium
Check local government surplus programs
University IT department buyback programs
⏱️ Expected Selling Timeline
Platform
Time to Sale
Time to Payment
Effort Level
Risk Level
SellBroke/SellLaptopBack
1-3 days
24-48 hours after receipt
⭐️⭐️ (Low)
⭐️ (Very Low)
Facebook Marketplace
1-7 days
Immediate (cash)
⭐️⭐️⭐️⭐️ (High)
⭐️⭐️⭐️⭐️ (High)
eBay Auction
3-10 days
2-3 days after sale
⭐️⭐️⭐️ (Medium)
⭐️⭐️⭐️ (Medium)
Swappa
2-14 days
3-5 days after delivery
⭐️⭐️⭐️ (Medium)
⭐️⭐️ (Low)
🛡️ Safety & Security Considerations
Local Meetup Safety Protocol:
Meet in public places (police stations, banks, coffee shops)
Bring a friend or family member to transactions
Accept cash only for local sales
Test device with buyer present to demonstrate functionality
Use designated safe exchange zones if available
Online Payment Security:
Use PayPal Goods & Services for buyer/seller protection
Avoid wire transfers, gift cards, or unusual payment methods
Ship with tracking and insurance for full value
Document device condition with photos before shipping
Use signature confirmation for high-value items
Data Protection Assurance:
Triple-check all personal data is completely wiped
Remove device from your Dell account and services
Deauthorize from any software licenses or subscriptions
Keep backup of your data on separate external storage
Provide data wipe certification if possible
💎 Maximizing Your Sale Price
Premium Bundle Value-Adds:
Include original Dell charger, packaging, and documentation
Add premium laptop bag or sleeve
Include USB-C hub or other useful accessories
Provide printed repair documentation and receipts
Include screen protector or keyboard cover
Highlight Professional Repair Benefits:
Emphasize performance improvements with specific metrics
Mention extended lifespan and reliability from professional repairs
Highlight significant cost savings vs buying new equivalent
Show before/after diagnostic results and repair documentation
Demonstrate comprehensive testing and quality assurance
Professional Presentation Excellence:
Clean, professional, high-resolution photos
Well-written, detailed, and transparent description
Quick, professional response to buyer inquiries
Positive seller reputation building through communication
Comprehensive testing and quality assurance documentation
📊 Final ROI Calculation Example
Investment
Cost
Sale Price Impact
Net Profit
ROI Percentage
Base Laptop Purchase
$350
-
-
-
RAM Upgrade (16GB)
$60
+$80
+$20
33%
SSD Upgrade (1TB NVMe)
$90
+$120
+$30
33%
Battery Replacement
$75
+$95
+$20
27%
Display Replacement
$140
+$170
+$30
21%
Total Investment
$715
$835
+$120
17% Average ROI
🎉 Congratulations on Your Professional Repair & Sale Journey!
You've not only restored a quality Dell Inspiron 16 7630 to optimal condition through professional diagnostics and repairs but also created significant value in the refurbished market. Whether you choose the convenience of specialized buyers like SellBroke or the potentially higher returns of competitive marketplace sales, your professionally repaired Dell represents the perfect intersection of performance, value, and reliability that today's buyers seek.
Ready for your next professional repair project? Consider building on your diagnostic and repair skills with other quality laptops - your expertise in professional computer repair can become a sustainable business in the growing refurbished technology market!
Need to Sell Your Dell Laptop? Get Instant Cash!
If your Dell Inspiron 16 7630 (or other Inspiron model) has performance issues or you're upgrading to a newer laptop, we offer competitive cash payouts for your device. We buy broken, used, and refurbished Dell Inspiron laptops—including all 7630 configurations—with free insured shipping and hassle-free evaluations.