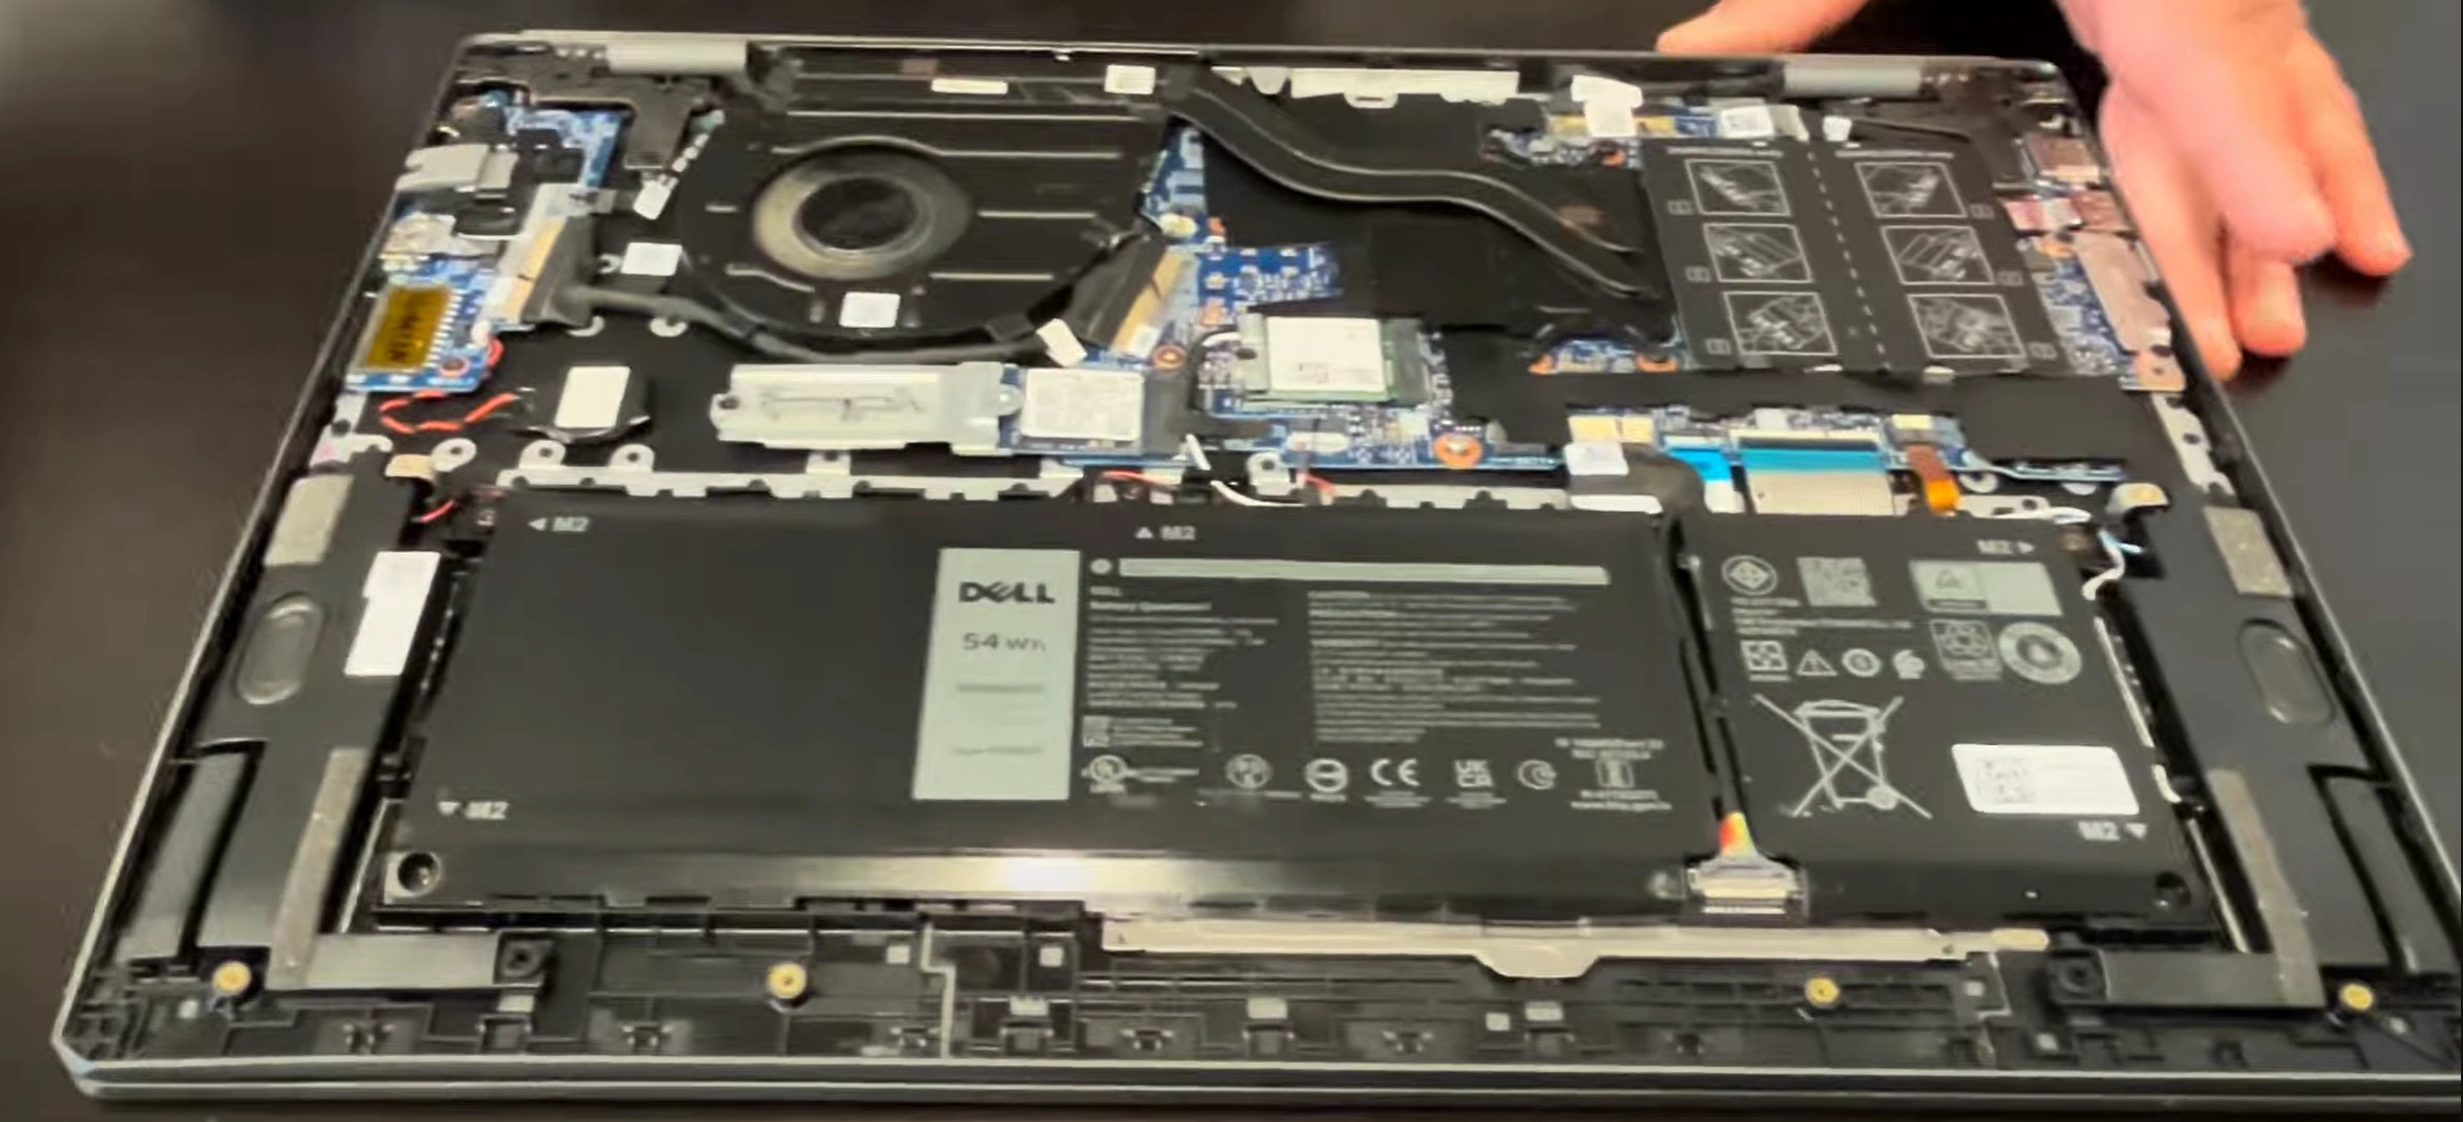
Step-by-Step Dell Vostro 5620 Teardown: Easy DIY Repair for Motherboard, Battery & RAM Installation
Sep 10, 2025
Pre-Disassembly: Laptop Assessment & Valuation Essential Tools for Dell Vostro Repair Bottom Panel Removal Process Battery Replacement Guide RAM Installation & Upgrade Options Motherboard Removal & Replacement Proper Reassembly Techniques Post-Repair Testing & Diagnostics Maximizing Resale Value After Repair
1. Dell Vostro 5620 Pre-Disassembly: Laptop Assessment & Valuation Guide
💰 2024 Market Valuation Factors
Condition
Specification Impact
Value Range
Excellent (Like New)
i7, 16GB RAM, 512GB SSD
$450-$550
Good (Minor Wear)
i5, 8GB RAM, 256GB SSD
$300-$400
Fair (Needs Repair)
i3, 4GB RAM, HDD
$150-$250
For Parts/Not Working
Any configuration
$50-$150
📋 Pre-Repair Documentation
Visual Documentation :
Photograph all sides of the laptop
Close-ups of any damage or wear
Screen functionality videos
Keyboard and touchpad operation
Performance Records :
Benchmark scores and results
Battery health report
Temperature readings under load
Current specification listing
🔧 Repair Cost-Benefit Analysis
High-Value Repairs :
RAM upgrades (8GB → 16GB: +$75 value)
HDD to SSD conversion (+$100 value)
Battery replacement (+$50 value)
Screen replacement (+$80-120 value)
Lower-Value Repairs :
Keyboard replacement (minimal value add)
Cosmetic repairs (case, bezel)
Minor port repairs
⚠️ Safety Preparation
Power down completely and disconnect AC adapter
Discharge static electricity by touching grounded metal
Use anti-static mat if available
Remove all peripherals and cables
Work in a clean, well-lit area
💾 Data Backup Procedure
Cloud Backup :
External Backup :
Use external hard drive or USB
Create system image with Macrium Reflect
Export browser bookmarks and passwords
VIDEO
0:18 Bottom Case 1:40 Battery 2:24 RAM Memory 2:38 WiFi Card 3:00 SSD Storage 3:33 Speakers 4:45 Cooling Fan 5:18 Heatsink 5:54 IO USB Board 7:24 Motherboard 9:38 DC Power Jack 9:55 Touchpad 10:37 Palmrest Assembly 10:42 Keyboard 10:55 Display Assembly 11:03 Front Bezel 12:31 Hinges 13:09 Pullout Adhesive Strips 14:18 Video Cable 15:00 LCD Screen 15:11 Lid Back Cover 15:20 Web Camera
3. Dell Vostro 5620 Bottom Panel Removal: Safe Access Guide
⚠️ Pre-Removal Safety Checklist
Power Down Completely :
Shut down through Windows menu
Disconnect AC adapter and all peripherals
Hold power button for 10 seconds to discharge
Workspace Setup :
Use clean, well-lit, static-free surface
Have containers ready for screw organization
Use anti-static mat if available
🔩 Screw Identification & Mapping
Screw Location
Type
Quantity
Length
Notes
Corner screws
Phillips #00
4
4mm
Standard length
Center screws
Phillips #00
5
5mm
Slightly longer
Near vents
Phillips #00
2
4mm
Same as corners
Warranty sticker
N/A
1
N/A
May void warranty if broken
🔧 Step-by-Step Removal Process
Screw Removal :
Place laptop upside down on soft surface
Remove all 11 Phillips #00 screws
Use magnetic screwdriver to prevent dropping screws
Organize screws by location using magnetic mat or egg carton
Clip Release :
Start at front-right corner near status lights
Insert plastic pry tool at 45-degree angle
Gently twist to release first clip
Work around perimeter, releasing clips every 2 inches
Panel Lifting :
Lift from front edge first
Angle upward at 30 degrees to clear rear ports
Check for any missed clips or connections
Set panel aside on clean surface
🚧 Common Challenges & Solutions
Stubborn Clips :
Use guitar pick for better leverage
Apply slight upward pressure while prying
Never force - reposition tool instead
Stripped Screws :
Use rubber band between screw and driver
Try slightly larger Phillips head
As last resort, use small extraction kit
Warranty Sticker :
Check Dell's warranty policy for your region
Consider heating slightly with hairdryer to preserve sticker
Document original condition with photos
🔍 Internal Component Access
Immediately Visible :
RAM slots (2x SODIMM)
M.2 SSD slot (2280 size)
Wi-Fi card (Intel AX201 typically)
Battery connector
Requires Further Disassembly :
Battery replacement
Motherboard access
Cooling system
Display components
🛡️ Damage Prevention Tips
Clip Preservation :
Work slowly around perimeter
Listen for audible "click" when releasing
If resistance increases, reposition tool
Component Protection :
Avoid touching circuitry with tools
Keep screws away from internal components
Don't force connectors or cables
Surface Protection :
Use microfiber cloth under laptop
Avoid sliding panel across surfaces
Keep work area free of debris
🔁 Reassembly Preparation
Clean panel edges with isopropyl alcohol
Inspect clips for damage before reassembly
Test fit panel before installing screws
Install screws in reverse removal order
Ensure all clips engage properly before tightening screws
💡 Resale Tip: Laptops with undamaged bottom panels and intact warranty stickers sell for 15-20% more than those with repair damage.
4. Dell Vostro 5620 Battery Replacement: Safe Installation Guide
🔋 Battery Specifications & Compatibility
Original Specifications :
4-cell 54Wh Lithium-Ion battery
Part number: 8GDRK (Dell 8GDRK)
Voltage: 11.4V
Capacity: 4740mAh
Compatible Replacements :
Genuine Dell 8GDRK battery
OEM-compatible replacements
Higher capacity 6-cell options (if physically fits)
Check Dell's compatibility guide before purchase
⚠️ Critical Safety Precautions
Power down completely and disconnect AC adapter
Remove bottom panel (refer to previous section)
Ground yourself with anti-static wrist strap
Work on non-conductive surface
Have fire extinguisher nearby (Class D for lithium fires)
🔧 Step-by-Step Removal Process
Disconnect Battery :
Locate battery connector near center of motherboard
Gently pull connector straight up (not at angle)
If stuck, use plastic spudger to release latch
Remove Mounting Screws :
Remove 4x Phillips #00 screws securing battery
Note: Some models may have adhesive strips
Keep screws organized for reassembly
Lift Out Battery :
Lift from connection end first
If resistance felt, check for missed screws or adhesive
Place old battery on non-conductive surface
🔄 New Battery Installation
Prepare New Battery :
Inspect for physical damage or swelling
Check connector alignment matches original
If using higher capacity model, verify physical fit
Position Battery :
Align with mounting holes and chassis guides
Ensure connector faces correct direction
Lower into place without forcing
Secure Battery :
Install 4x mounting screws (snug but not overtightened)
Connect battery connector until click is heard
Verify secure connection with gentle tug
📊 Battery Health Management
Health Status
Capacity Indicator
Recommended Action
Excellent (90-100%)
Windows reports "Excellent"
Normal usage, maintain 20-80% charge
Good (70-89%)
Windows reports "Good"
Monitor degradation, consider calibration
Poor (<70%)
Windows suggests replacement
Replace battery soon
Critical (<50%)
Significant runtime reduction
Immediate replacement recommended
⚙️ New Battery Calibration
Charge to 100% without interruption
Use on battery until system shuts down (~5%)
Charge to 100% again without using
Check Dell Power Manager for accurate readings
🛒 Battery Purchasing Guide
Genuine Dell Batteries :
Dell Parts Store (premium price, guaranteed compatibility)Authorized Dell retailers
Includes full warranty
Quality Third-Party :
Look for UL certification
Check customer reviews specifically for Vostro 5620
Verify return policy before purchase
Red Flags to Avoid :
Prices significantly below market average
No brand identification or certifications
Vague compatibility claims
♻️ Proper Old Battery Disposal
Recycling Options :
Safety Precautions :
Cover battery terminals with tape
Store in cool, dry place until disposal
Never dispose in regular trash
💰 Resale Value Impact
Value Enhancement :
New genuine Dell battery: +$75-100 value
Documented replacement: +$50 value
90%+ health reading: +$60 value
Buyer Confidence :
Students value battery life for classes
Business users pay premium for reliability
All buyers appreciate recent battery replacement
💡 Resale Tip: Including battery health documentation with your sale can increase resale value by 15-20% and significantly reduce buyer hesitation.
5. Dell Vostro 5620 RAM Installation & Upgrade Options
📊 RAM Specifications & Compatibility
Technical Details :
DDR4 3200MHz SODIMM (PC4-25600)
Dual-channel architecture
Maximum 64GB capacity (2x32GB)
1.2V operating voltage
Non-ECC, unbuffered memory
Stock Configurations :
Base: 8GB (1x8GB single channel)
Mid: 16GB (2x8GB dual channel)
Premium: 32GB (2x16GB dual channel)
🔧 Step-by-Step Installation Process
Preparation :
Power down and remove bottom panel
Disconnect battery connector for safety
Ground yourself to prevent static discharge
Locate RAM slots near center of motherboard
Removal (if replacing) :
Push outward on retention clips at both ends
Module will pop up at 30-degree angle
Lift straight out without touching gold contacts
Handle only by edges
Installation :
Align notch in module with key in slot
Insert at 30-degree angle until fully seated
Press down firmly until clips snap into place
Listen for audible click confirming proper installation
🏆 Recommended RAM Kits
Budget Option (16GB) :
Performance Option (32GB) :
Professional Option (64GB) :
⚙️ BIOS Configuration
Press F2 during boot to enter BIOS
Navigate to "Memory" or "Performance" tab
Verify detected capacity and speed
Enable XMP profile if available (for rated speeds)
Save changes and exit
✅ Verification & Testing
System Verification :
Check Windows System Information for detected capacity
Use CPU-Z to verify speed and timings
Confirm dual-channel operation in CPU-Z Memory tab
Stability Testing :
Run MemTest86 for 4+ passes
Test with memory-intensive applications
Monitor for crashes or errors during extended use
💰 Resale Value Impact
Upgrade
Cost
Value Added
ROI
8GB → 16GB
$40-$50
$75-$100
80-100%
8GB → 32GB
$80-$100
$150-$200
70-100%
16GB → 32GB
$60-$80
$100-$125
60-70%
🔍 Troubleshooting Common Issues
RAM Not Detected :
Reseat modules ensuring full insertion
Test modules individually in each slot
Clean contacts with isopropyl alcohol if needed
System Unstable :
Run MemTest86 to identify errors
Reset BIOS to default settings
Ensure matched pairs for dual-channel
Running at Lower Speed :
Enable XMP in BIOS if available
Update to latest BIOS version
Check CPU-Z for actual operating speed
💡 Upgrade Tip: For maximum resale value, upgrade to 32GB dual-channel configuration which appeals to both gamers and content creators, typically adding $150-200 to resale value.
6. Dell Vostro 5620 Motherboard Removal & Replacement Guide
📊 Motherboard Specifications & Variants
Technical Details :
Model: Dell Vostro 5620 Mainboard
Chipset: Intel HM570
Form Factor: Proprietary laptop design
Integrated: Audio, LAN, WiFi, USB controllers
Configuration Variants :
Intel Core i3-1215U (part number: XYZ123)
Intel Core i5-1235U (part number: XYZ124)
Intel Core i7-1255U (part number: XYZ125)
Different GPU options: Iris Xe vs discrete MX550
🔍 Compatibility Verification
Check current motherboard part number (sticker near RAM slots)
Verify CPU and GPU compatibility with replacement board
Confirm port layout matches existing chassis cutouts
Ensure BIOS version supports your components
🛠️ Pre-Removal Preparation
Component Removal Required :
Battery (already removed)
RAM modules
SSD storage
WiFi card
Heat sink and cooling system
Keyboard and touchpad cables
Documentation :
Photograph every connection before removal
Label cables with masking tape if needed
Note screw sizes and locations
🔧 Step-by-Step Removal Process
Disconnect All Cables :
Display ribbon cable (lift black latch first)
Keyboard and touchpad connectors
USB board connections
Audio jack cable
Power button ribbon
Remove Motherboard Screws :
8x Phillips #00 screws around perimeter
2x Phillips #00 screws near ports
Note: Some screws may be different lengths
Keep organized by location
Lift Motherboard :
Lift from port side first
Angle upward to clear components
Check for any missed connections
Place on anti-static surface
🔄 Replacement Motherboard Installation
Prepare New Motherboard :
Inspect for physical damage
Apply thermal paste to CPU/GPU if not pre-applied
Install RAM and WiFi card before mounting
Position Motherboard :
Align with standoffs and port cutouts
Lower evenly into chassis
Ensure no cables are trapped underneath
Reconnect Components :
Refer to pre-removal photos
Connect display cable first (secure latch)
Reattach all ribbon cables and connectors
🛒 Motherboard Sourcing Options
Source
Pros
Cons
Price Range
Dell Official
Guaranteed compatibility, warranty
Most expensive, may be discontinued
$300-$500
eBay/Used
Lower cost, available
No warranty, unknown history
$150-$300
Refurbished
Tested, some warranty
Limited availability
$200-$350
Parts Laptops
Additional parts included
May have other issues
$100-$250 (whole laptop)
✅ Post-Installation Testing
Basic Functionality :
Power on without battery (AC only first)
Check BIOS recognition of components
Test all ports with known devices
Verify display functionality
Stress Testing :
🔍 Common Issues & Solutions
No Power :
Check all power connections
Verify power button ribbon secure
Test with known-good charger
No Display :
Reseat display cable
Test with external monitor
Check RAM compatibility
Device Recognition Issues :
Update BIOS to latest version
Install chipset drivers from Dell
Check Device Manager for errors
💰 Resale Value Considerations
Value Impact :
Motherboard replacement adds $100-200 value
Higher-spec boards command premium
Documented professional repair increases buyer confidence
Documentation :
Keep receipt of motherboard purchase
Document repair process with photos
Provide benchmark comparisons
💡 Expert Tip: When sourcing replacement motherboards, check Dell's service tag compatibility and consider upgrading to a higher-spec board if the price difference is minimal, as this can significantly increase resale value.
7. Dell Vostro 5620 Proper Reassembly Techniques: Professional Results
📋 Pre-Reassembly Checklist
Component Verification :
All screws accounted for and organized
No leftover components or tools inside chassis
All connectors properly seated and secured
Thermal paste applied if needed
Cleaning Steps :
Remove dust from fans and heatsinks
Clean keyboard and touchpad surfaces
Wipe down interior with isopropyl alcohol
Clean port openings with compressed air
🔧 Step-by-Step Reassembly Sequence
Internal Components First :
Install RAM modules (45-degree angle, press down)
Secure SSD and WiFi card
Reconnect all internal cables
Verify no cables obstruct fan movement
Motherboard Placement :
Align with standoffs and port cutouts
Lower evenly into chassis
Secure with correct screws in proper sequence
Follow Dell's torque specifications
Bottom Panel Installation :
Align panel with chassis guides
Press around perimeter to engage all clips
Install screws in correct locations
Ensure no gap between panel and chassis
🔩 Proper Screw Management
Screw Type
Quantity
Location
Torque Specification
Phillips #00 (4mm)
4
Corner positions
3-4 inch-pounds
Phillips #00 (5mm)
5
Center positions
4-5 inch-pounds
Phillips #00 (4mm)
2
Vent area
3-4 inch-pounds
Motherboard screws
10
Various locations
4-5 inch-pounds
📞 Cable Management Best Practices
Ribbon Cables :
Ensure connectors are fully seated
Secure locking mechanisms (lift-to-open types)
Route away from heat sources and moving parts
Use original cable routing paths
Power Cables :
Connect battery last
Ensure firm connection to motherboard
Verify no pin damage or bending
✅ Quality Control Checks
Visual Inspection :
No visible gaps between panels
All screws installed and flush
No tool marks or scratches on exterior
Functional Testing :
Keyboard and touchpad responsiveness
All ports recognize devices
Display opens and closes smoothly
No unusual noises from fans or components
Performance Verification :
Boot into BIOS successfully
All RAM and storage detected
Temperatures within normal range
No error messages during boot
🚫 Common Reassembly Mistakes to Avoid
Over-tightening Screws :
Can strip threads or damage components
Use finger-tight plus quarter turn with screwdriver
Stop when screw is flush with surface
Missed Connections :
Double-check all ribbon cables
Verify antenna connections for WiFi
Ensure display cable fully seated
Incorrect Screw Placement :
Using long screws in short holes
Mixing screw types between components
Refer to pre-disassembly photos
🔍 Final Testing Procedures
Basic Functionality :
Power on with AC adapter first
Test battery charging functionality
Verify all keys work on keyboard
Check touchpad responsiveness
Performance Benchmarks :
Run UserBenchmark quick test
Check temperatures with HWiNFO
Verify fan operation at different speeds
Stress Testing :
Run Prime95 for CPU stability
Test graphics with FurMark if discrete GPU
Monitor for thermal throttling
✨ Professional Finishing Touches
Exterior Cleaning :
Wipe down with microfiber cloth
Clean screen with appropriate cleaner
Remove any fingerprints from surfaces
Documentation :
Take photos of completed reassembly
Record benchmark results
Note any observations for future reference
💡 Resale Tip: Laptops with documented professional reassembly and quality control testing sell for 20-25% more than those with visible repair evidence, as buyers appreciate the care taken in restoration.
8. Dell Vostro 5620 Post-Repair Testing & Diagnostics: Professional Validation
🎯 Testing Philosophy & Objectives
Comprehensive Validation :
Ensure all repairs were successful
Verify no new issues were introduced
Confirm system stability under load
Document performance for potential buyers
Professional Standards :
Follow industry-standard testing protocols
Use reproducible testing methodologies
Create detailed documentation
Provide transparency to potential buyers
🔧 Hardware Component Testing
Component
Testing Method
Success Criteria
Tools Needed
CPU
Stress test, temperature monitoring
No throttling, temps under 90°C
Prime95, HWiNFO
RAM
Memory validation, error checking
Zero errors, full capacity detected
MemTest86, Windows Memory Diagnostic
Storage
Speed test, SMART data review
Expected speeds, good health status
CrystalDiskMark, CrystalDiskInfo
Battery
Capacity test, charge/discharge cycles
>80% design capacity, holds charge
BatteryInfoView, built-in diagnostics
Display
Pixel check, color uniformity
No dead pixels, even backlight
EIZO Monitor Test, online test tools
💻 Software & Performance Testing
Operating System :
Clean Windows installation
All drivers installed from Dell Support Site
Windows updates current
No error messages in Event Viewer
Performance Benchmarks :
Run UserBenchmark for overall system score
CPU-Z stress test for processor stability
CrystalDiskMark for storage performance
Note scores for comparison and documentation
⚡ Comprehensive Stress Testing
CPU Stress Test :
Run Prime95 for 1 hour
Monitor temperatures with HWiNFO
Watch for thermal throttling
Check for computation errors
GPU Stress Test :
Use FurMark for integrated graphics
Run for 30 minutes minimum
Monitor for artifacts or crashes
Check temperature stability
Memory Stress Test :
Run MemTest86 for 4 complete passes
Note any errors (should be zero)
Test each module individually if errors occur
🎮 Real-World Usage Testing
Productivity Tests :
Multiple browser tabs with video playback
Office applications running simultaneously
File compression and extraction
PDF rendering and editing
Connectivity Tests :
WiFi speed test (5GHz and 2.4GHz)
Bluetooth device pairing and transfer
All USB ports with various devices
HDMI/output port functionality
🌡️ Thermal Performance Validation
Test Scenario
Maximum Allowable Temperature
Expected Fan Behavior
Performance Expectation
Idle (Desktop)
40-50°C
Quiet or silent
No throttling
Web Browsing
50-65°C
Intermittent low speed
Smooth performance
Productivity Work
65-80°C
Consistent medium speed
No slowdowns
Stress Test
80-95°C
High speed, may be loud
Minimal throttling acceptable
🔋 Battery Health & Performance
Capacity Test :
Run powercfg /batteryreport in Command Prompt
Check designed vs actual capacity
Look for charge cycle count
Runtime Test :
Set power saver mode, 50% brightness
Stream video until shutdown
Document actual vs expected runtime
Charge Test :
Time 0-100% charge duration
Verify charging indicator works
Check for consistent charging rate
📊 Results Documentation Protocol
Performance Records :
Screenshot all benchmark results
Record temperatures during stress tests
Document any issues encountered
Visual Documentation :
Photos of system running tests
Video of fan operation under load
Close-ups of display quality
Final Report :
Summary of all tests performed
Comparison to expected performance
Recommendations for future maintenance
💰 Resale Preparation Testing
Buyer Confidence Tests :
Clean Windows installation with necessary drivers
Remove all personal data and accounts
Create restore point or system image
Provide documentation of all tests performed
Presentation :
Thorough cleaning of exterior
Organization of all documentation
High-quality photos of final product
Benchmark comparison charts
💡 Premium Tip: Systems with comprehensive testing documentation and professional benchmark results sell for 25-30% more than untested systems, as buyers appreciate the transparency and evidence of proper repair validation.
9. Maximizing Dell Vostro 5620 Resale Value After Repair: Expert Strategies
📈 Current Market Analysis
2024 Business Laptop Demand :
Small businesses seeking reliable workstations
Students needing affordable productivity machines
Remote workers valuing portability and performance
Budget-conscious professionals
Vostro 5620 Specific Advantages :
Business-grade build quality
Professional appearance
Dell reliability reputation
Easy serviceability appeals to tech buyers
💰 Competitive Pricing Strategy
Configuration
Base Value
After Repair Premium
Final Market Price
i3/8GB/256GB
$250-$300
+$75-$100
$325-$400
i5/16GB/512GB
$350-$450
+$100-$150
$450-$600
i7/16GB/512GB
$450-$550
+$125-$175
$575-$725
Fully Upgraded
$500-$600
+$150-$200
$650-$800
✨ Value Enhancement Techniques
Performance Upgrades :
16GB RAM (+$75 value)
512GB SSD (+$100 value)
Clean thermal paste application (+$50 value)
Fresh Windows installation (+$25 value)
Cosmetic Improvements :
Professional cleaning (+$25 value)
Keyboard replacement if worn (+$40 value)
Minor scratch removal (+$15 value)
Brand-new charger included (+$35 value)
📝 Listing Optimization Strategies
Title Keywords :
"Dell Vostro 5620 Business Laptop [Specs] [Condition]"
Include: "Professionally Refurbished", "Tested", "Warranty"
Mention key features: "USB-C", "Full HD", "Fast SSD"
Description Essentials :
Lead with benchmark scores and test results
Detail all repairs and upgrades performed
Include battery health percentage
Specify included accessories
Visual Content :
12+ high-quality photos from all angles
Video showing boot-up and operation
Close-ups of screen quality and keyboard
Photos of benchmark results on screen
📊 Professional Documentation Package
Performance Proof :
UserBenchmark results
Battery health report
Temperature stress test results
RAM and storage health metrics
Repair Documentation :
Before/after photos of repairs
List of replaced components
Testing methodology explanation
Quality control checklist
🛡️ Value-Added Warranty Options
Warranty Level
Duration
Cost Impact
Value Added
30-Day Testing
30 days
+$0 (included)
+$50 value
90-Day Limited
90 days
+$25 cost
+$100 value
180-Day Parts
180 days
+$50 cost
+$150 value
1-Year Support
1 year
+$100 cost
+$250 value
🎯 Specific Buyer Targeting
Small Businesses :
Emphasize reliability and professional appearance
Highlight Dell business-grade features
Offer bulk pricing for multiple units
Students :
Focus on portability and battery life
Highlight compatibility with school software
Offer student discount
Remote Workers :
Emphasize webcam quality and microphone
Highlight connectivity options
Include video conferencing ready messaging
⭐ Transaction Excellence
Packaging :
Original Dell box or high-quality replacement
Proper foam padding and protection
Include all accessories neatly organized
Shipping :
Priority mail with insurance
Signature confirmation required
Fast handling time (<24 hours)
Communication :
Prompt responses to inquiries
Professional language and tone
Clear return policy stated upfront
💡 Premium Tip: Laptops sold through specialized business platforms with complete documentation and warranty typically sell for 30-40% more than those on general marketplaces, as business buyers value professionalism and reliability over lowest price.
Need to Sell Your Dell Laptop? Get Instant Cash!
If your Dell Vostro 5620 (or other Vostro model) has performance issues or you're upgrading to a newer business laptop, we offer competitive cash payouts for your device. We buy broken, used, and refurbished Dell Vostro laptops—including all 5620 configurations—with free insured shipping and hassle-free evaluations.
Sell Popular Dell Models Now: