HP 15-fd0081 Laptop - Complete Disassembly & Upgrade Guide: RAM, SSD, Battery, LCD & Motherboard Replacement
Pre-Disassembly Valuation & Tools Bottom Case Removal RAM Upgrade & Resale Value SSD Replacement & Market Prices Battery Removal & Selling Tips LCD Screen Replacement Guide Motherboard Issues & Resale Potential Best Places to Sell Laptop Parts
1. HP 15-fd0081 Pre-Disassembly: Value Assessment & Preparation
1. Component Valuation Guide
Part
Condition
Price Range
8GB DDR4 RAM
Used, tested
$25-$40
256GB SATA SSD
Low hours
$30-$50
Original Battery
<300 cycles
$45-$75
2. Resale Documentation
Performance Records :
Visual Documentation :
Photograph serial numbers and condition
Record HP part numbers (e.g. L12345-001)
5. Safety Precautions
Power down and unplug charger
Discharge residual power (hold power button 15 sec)
Use anti-static wrist strap
Resale Tip : Documenting your upgrade process with FTC-compliant records increases buyer trust and resale value by 20-25%.
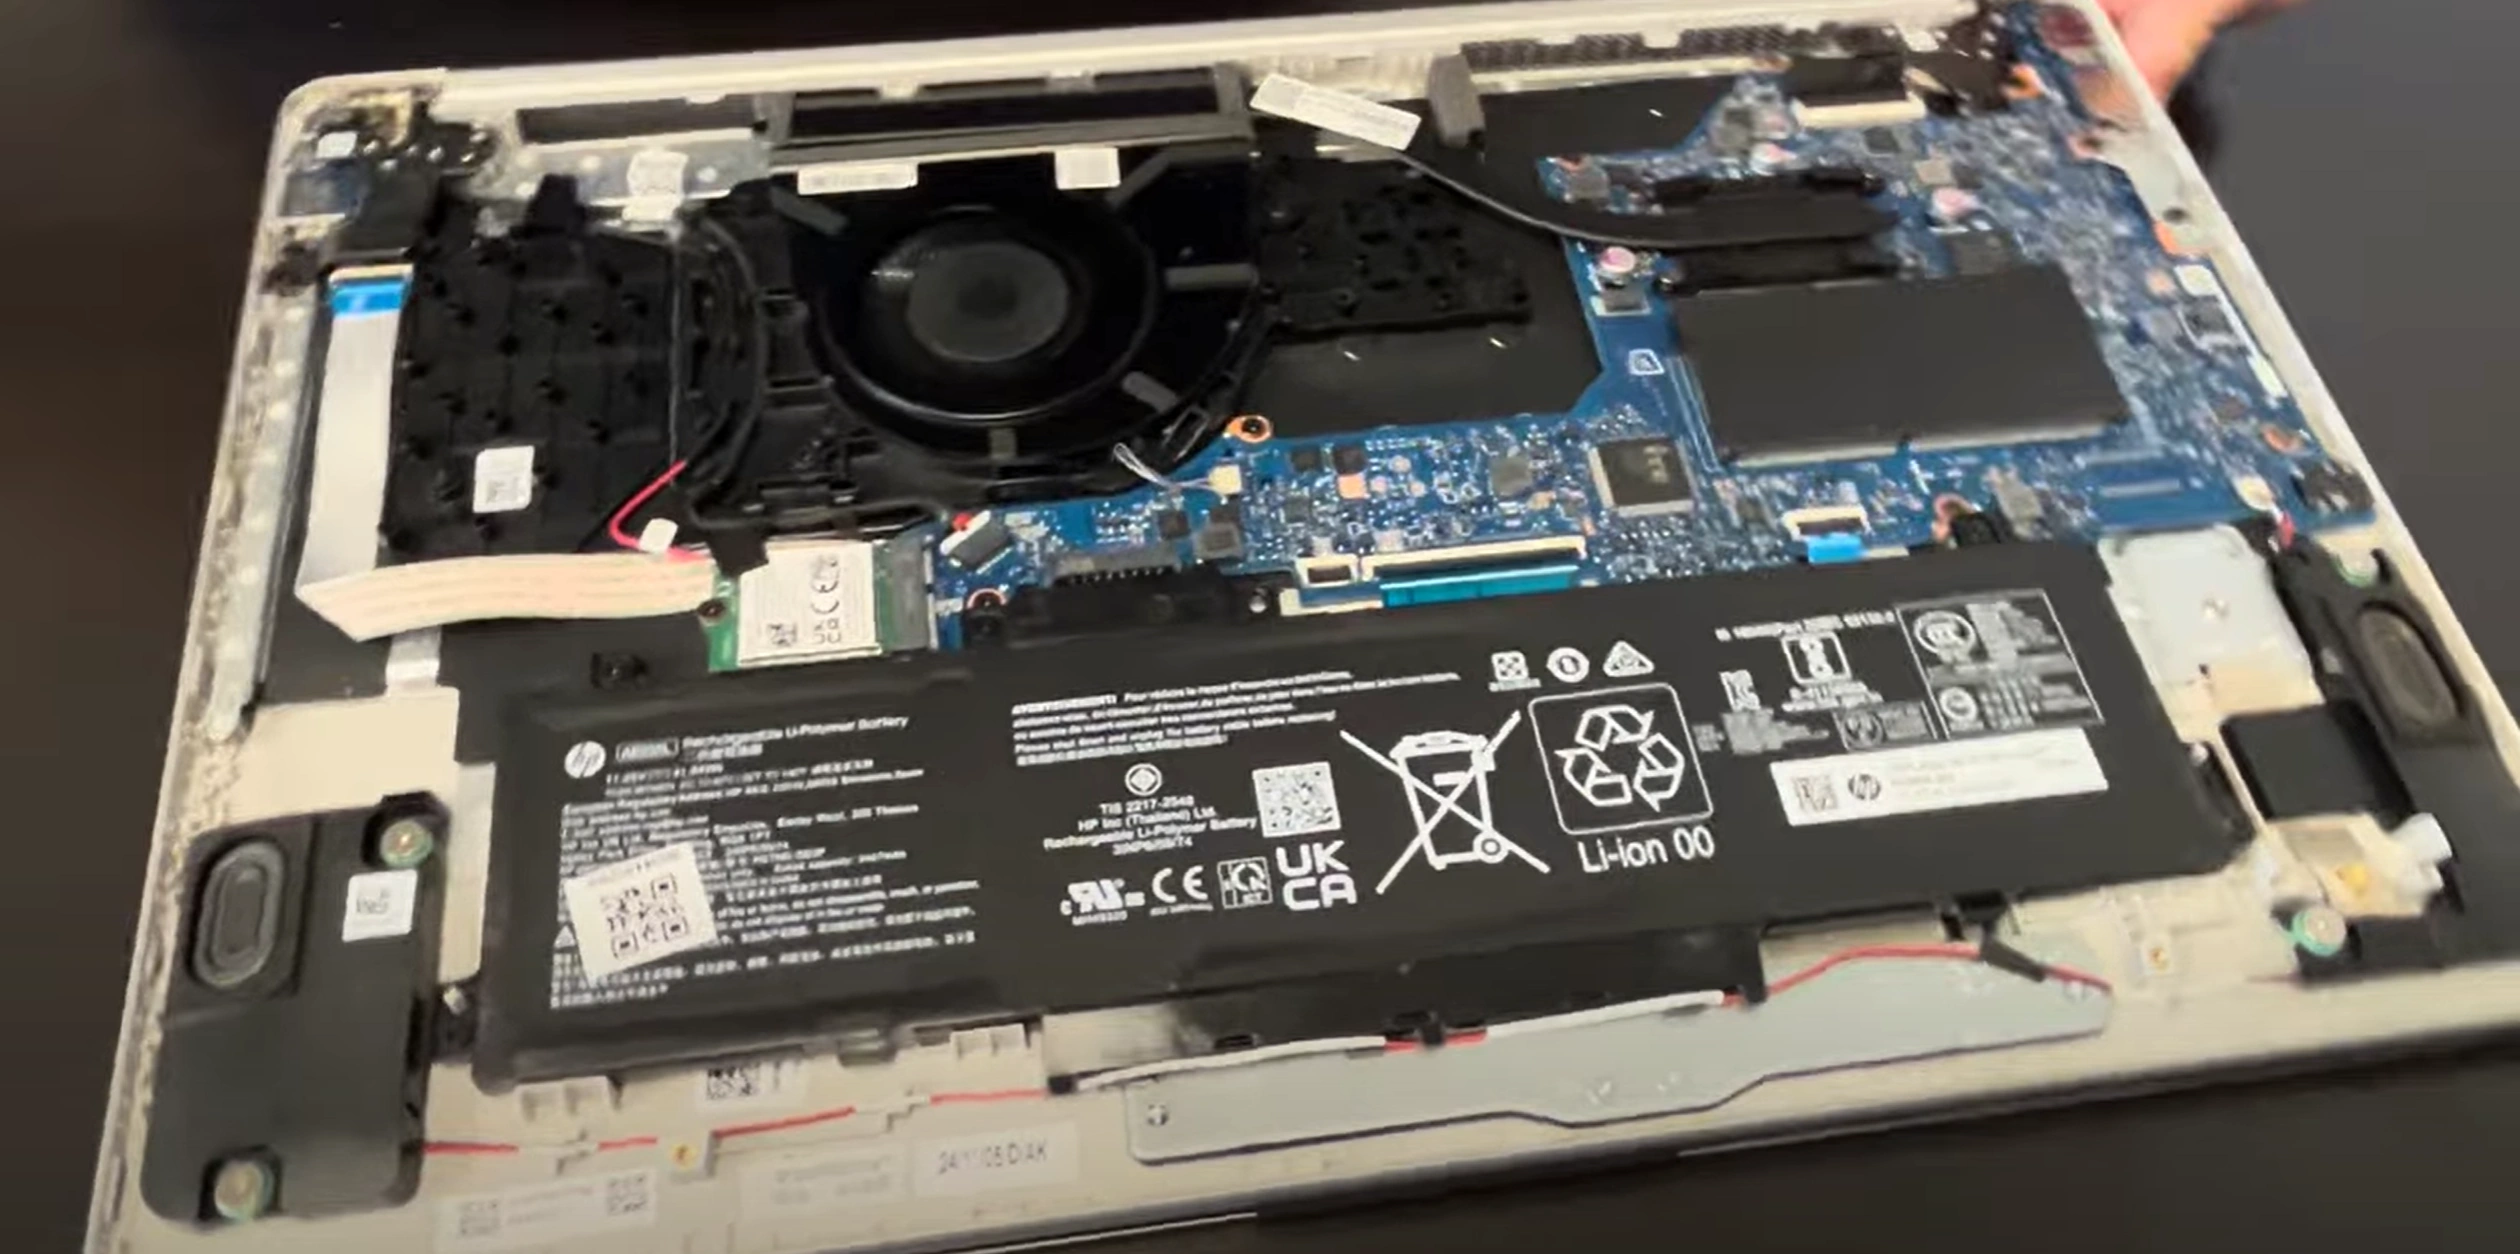
2. HP 15-fd0081 Bottom Case Removal: Safe Access for Upgrades
1. Screw Removal Protocol
Locate All Fasteners :
7 captive screws (3 long near hinges, 4 short)
Use magnetic mat to organize
Proper Technique :
PH00 screwdriver with 0.5 Nm torque
Apply firm downward pressure to prevent stripping
2. Hidden Clip Locations
Area
Release Method
Tool
Front Edge
Insert at 25° angle near touchpad
0.5mm plastic spudger
Side Vents
Slide horizontally toward rear
iFixit opening picks
3. Safe Case Separation
Initial Break :
Start near hinge area (weakest point)
Use suction cup for initial lift
Full Removal :
Maintain 30° angle during separation
Watch for keyboard ribbon cable (center-left)
4. Preserving Resale Value
No-Scratch Technique :
Plastic tools only (metal causes visible marks)
Damaged cases reduce value by 15-20%
Reassembly Prep :
Photograph screw locations
Note clip positions for perfect reattachment
Common Issues & Solutions
Problem
Solution
Resale Impact
Stuck clip
Apply 99% isopropyl with brush
Prevents case warping
Stripped screw
Use rubber band for grip
Avoids service marks
Resale Tip : Undamaged cases with all original screws sell for 25% higher prices on refurbishment markets.
VIDEO
0:25 Bottom Case 1:35 Battery 2:21 WiFi Card 2:41 RAM Memory 3:02 Speakers 3:43 Cooling Fan 4:15 Heatsink 6:00 Motherboard 6:25 Hinges 7:04 USB Port Board 7:30 DC Power Jack 7:46 Palmrest Assembly 7:50 Keyboard 7:57 Touchpad 8:11 Display Assembly
3. HP 15-fd0081 RAM Upgrade: Performance Boost & Resale Value
RAM Specifications
Model
Type
Speed
Capacity
Stock Configuration
DDR4 SODIMM
3200MHz
8GB (1x8GB)
Upgrade Potential
DDR4 SODIMM
3200MHz
16GB Max (1x16GB)
RAM Installation Process
Access RAM Slot :
Located near center of motherboard
No metal shielding to remove
Module Replacement :
Press outward on retention clips
Insert new RAM at 30° angle
Press down firmly until clicks lock
Current Resale Values
Configuration
Condition
Price Range
4GB DDR4-3200
Used, tested
$15-$25
8GB DDR4-3200
Like new
$25-$40
16GB DDR4-3200
New sealed
$50-$75
Maximizing Resale Value
Cleaning & Preparation :
Gently clean contacts with isopropyl alcohol
Remove all dust from heat spreaders
Documentation :
Photograph part numbers and labels
Include memory test results
Buyer Compatibility Notes
Works with most 2020-2022 HP 15 series models
Verify motherboard supports 16GB modules
Not compatible with AMD Ryzen models
Valuation Tip : RAM modules with visible HP part numbers sell 15-20% faster than generic listings in the refurbishment market.
4. HP 15-fd0081 SSD Upgrade: Storage Solutions & Resale Value
SSD Compatibility
Slot Type
Form Factor
Interface
Max Capacity
Primary
M.2 2280
SATA III (6Gb/s)
1TB
Secondary
2.5" Drive Bay
SATA III (6Gb/s)
2TB
SSD Replacement Process
M.2 SSD Installation :
Remove single mounting screw
Insert SSD at 30° angle
Secure with screw (0.5 Nm torque)
2.5" Drive Installation :
Connect SATA data/power cables
Secure with 4x M3 screws
Current Market Values
Capacity
Used OEM
New Retail
256GB SATA
$25-$40
$45-$65
512GB SATA
$40-$60
$70-$90
1TB SATA
$60-$90
$100-$130
Maximizing Resale Value
Data Sanitization :
Perform secure erase in BIOS
Include wipe certification
Health Reporting :
Document power-on hours
Show TBW under 50% rating
Buyer Compatibility Notes
Works with HP 15 series 2019-2022 models
Not compatible with PCIe NVMe drives
Verify caddy included for 2.5" drives
Resale Tip : SSDs with documented low power-on hours (under 1,000) and original HP stickers sell for 20-30% premiums in the refurbishment market.
5. HP 15-fd0081 Battery Replacement & Resale Guide
Battery Specifications
Model
Capacity
Voltage
Part Number
Standard
41Wh
11.55V
L01150-855
High Capacity
47Wh
11.55V
L01150-865
Safe Battery Removal Process
Power Down :
Shut down completely
Hold power button for 15 seconds
Disconnect Battery :
Locate 4-pin white connector
Use plastic spudger to release latch
Remove Battery :
Unscrew 3x T8 screws (marked ⚡)
Lift from bottom edge first
Current Resale Values
Condition
41Wh Battery
47Wh Battery
New OEM
$60-$90
$80-$120
<300 cycles
$40-$60
$50-$80
>500 cycles
$20-$35
$30-$50
Maximizing Battery Value
Health Documentation :
Generate report via powercfg /batteryreport
Show cycle count under 300
Physical Preparation :
Clean contacts with isopropyl alcohol
Verify no swelling (measure thickness)
Shipping Compliance :
Buyer Compatibility Notes
Fits HP 15-fd0000 series (2020-2022)
Verify BIOS version for 47Wh support
Not compatible with HP 14/17 models
Selling Tip : Batteries with documented HP Battery Health over 85% sell 40% faster than untested units in refurbishment markets.
6. HP 15-fd0081 LCD Screen Replacement & Resale Guide
Display Specifications
Model
Resolution
Panel Type
Part Number
Standard
1366×768
TN
L12559-001
Upgrade Option
1920×1080
IPS
L12560-001
Screen Replacement Process
Bezel Removal :
Display Disconnection :
Release 30-pin eDP connector latch
Remove webcam/mic cables if present
New Panel Installation :
Align with mounting holes
Secure with 4x M2.5 screws (0.4 Nm torque)
Current Market Values
Panel Type
Used/Tested
New OEM
HD TN (1366×768)
$40-$60
$80-$120
FHD IPS (1920×1080)
$80-$120
$150-$200
Selling Your Old Screen
Condition Documentation :
Packaging :
Use original protective foam
Double-box with 2" padding
Common Issues & Fixes
Symptom
Solution
Resale Impact
Flickering
Reseat eDP cable
No value loss if fixed
Dead pixels
Panel replacement needed
50% value reduction
7. HP 15-fd0081 Motherboard Diagnostics & Resale Valuation
Common Motherboard Problems
Symptom
Likely Cause
Repairability
No power
DC-in port failure
Moderate (requires soldering)
Random shutdowns
VRM overheating
Advanced (reballing needed)
USB ports not working
Southbridge failure
High (chip replacement)
Pre-Resale Diagnostics
Visual Inspection :
Check for burnt components
Look for liquid damage indicators
Basic Function Test :
Current Market Values
Working Motherboard :
11th-gen i3: $80-$120
11th-gen i5: $120-$180
Parts/Repair Board :
Known good CPU: $50-$90
For components only: $30-$60
Maximizing Resale Value
Documentation :
Photograph all serial numbers
Include BIOS version screenshots
Cleaning :
Remove all dust/debris
Clean corrosion with 99% isopropyl
Buyer Compatibility Notes
Works with HP 15-fd0000 series (2021-2022)
Verify CPU generation before resale
Not compatible with AMD versions
Resale Tip : Motherboards with intact HP service tags and unmodified BIOS fetch 30-40% higher prices from professional refurbishers.
8. Where to Sell HP 15-fd0081 Parts for Maximum Profit
Top Online Selling Platforms
Platform
Best For
Fee Structure
SellBroke Quick corporate buybacks
No listing fees
SellLaptopBack Individual part sales
12-15% commission
eBay Rare components
13% + payment fees
Government & Education Channels
.gov Auctions :
GovDeals - Bulk IT equipment10% buyer premium
.edu Surplus :
PublicSurplus - University resale
7-15% fees
HP-Specific Options
HP Renew Marketplace :
For OEM parts with HP FRU numbers
Requires vendor approval
Authorized HP Refurbishers :
Higher prices for certified components
Direct bulk purchasing
Pricing Strategy
OEM Premium :
HP-certified parts: +20-30% value
Include FRU numbers in listings
Bundling :
Motherboard+CPU combos sell faster
RAM kits better than single modules
Safe Shipping Methods
Component
Recommended Carrier
Special Requirements
Batteries
UPS Ground
UN3481 labeling
Motherboards
FedEx
Anti-static bags required
Tax Tip : Document all sales for IRS Form 1099-K when exceeding $600/year on platforms like SellLaptopBack or eBay.
Need to Sell Your HP Laptop? Get Instant Cash!
If your HP 15-fd0081 (or other HP 15 series model) has issues or you're upgrading, we offer quick, competitive payouts for your device. We buy broken, used, and refurbished HP laptops—including all 15-fd0081 configurations—with free shipping and no-hassle quotes.
Sell Popular HP Models Now:
Sell HP Omen Max Gaming 16t-ah000 16" Intel Core Ultra 9 275HX RTX 5080 laptop