How to Disassemble a ThinkPad X13 Gen 2: Step-by-Step SSD Replacement & Component Repair
1. Preparation & System Assessment: Maximizing Your ThinkPad X13 Gen 2's Value
Before beginning any disassembly of your ThinkPad X13 Gen 2, a thorough assessment is essential to understand its market position, identify valuable upgrade opportunities for business users, and ensure professional handling that preserves its premium build quality and enterprise value.
🔍 Identifying Your X13 Gen 2 Configuration
Accurate identification ensures proper part compatibility and realistic valuation.
- Find Your Serial Number: Located on bottom label or in Lenovo Vantage software. Check exact specs on the Lenovo Support Portal.
- Key Configuration Variants:
- Processors: 11th Gen Intel Core i5-1135G7 or i7-1165G7 (with vPro options)
- Memory: Soldered LPDDR4x (8GB, 16GB, or 32GB) - non-upgradeable
- Display Options: 13.3" FHD (1920x1200) IPS, 400-nit Low Power, or 500-nit Privacy Guard
- Original Storage: Typically 256GB, 512GB, or 1TB M.2 NVMe SSD
- Wireless: Intel Wi-Fi 6 AX201 typically standard
💰 2024 Business Laptop Market Valuation
ThinkPad X13 models hold strong value in the corporate and professional market.
| Condition Grade | Typical Specifications | Professional Market Value | Enterprise Premium Factors |
|---|---|---|---|
| Excellent (Corporate Refurb) | i7-1165G7, 16GB RAM, 1TB SSD, 400-nit display | $650 - $850 | +25% for documented professional service |
| Good (Light Business Use) | i5-1135G7, 16GB RAM, 512GB SSD, FHD IPS | $500 - $650 | +20% with remaining Lenovo warranty |
| Fair (Visible Wear) | i5-1135G7, 8GB RAM, 256GB SSD | $350 - $500 | +15% with fresh thermal optimization |
| For Parts/Repair | Any configuration with significant issues | $150 - $300 | Minimal enterprise value |
📈 Upgrade ROI Analysis for Business Users
Focus on upgrades that deliver tangible business value and resale premium.
| Upgrade | Approx. Cost | Value Added at Resale | ROI | Business User Appeal |
|---|---|---|---|---|
| 512GB → 1TB NVMe SSD | $70 - $90 | $100 - $150 | 40-80% | Very High (Business data capacity) |
| Standard → 400-nit Low Power Display | $150 - $250 (part + labor) | $200 - $300 | 30-60% | Extreme (Productivity & battery life) |
| New Genuine Battery | $80 - $120 | $100 - $160 | 60-80% | High (Professional mobility) |
| Professional Thermal Repaste | $15 - $25 (materials) | $60 - $100 | 200-300% | High (Sustained performance) |
| Keyboard Replacement (US English) | $70 - $110 | $90 - $140 | 60-80% | Extreme (Typing experience) |
Critical Note: RAM is soldered on X13 Gen 2. This fixed configuration significantly impacts base value.
⚙️ Pre-Disassembly Diagnostic Assessment
Establish performance baseline and identify issues before opening the device.
- Run Lenovo Diagnostics: Use Lenovo Vantage > Device > Hardware Scan for comprehensive testing.
- Performance Benchmarking:
- CPU: Run Cinebench R23 for multi-core performance
- Storage: Test with CrystalDiskMark
- System: Use PCMark 10 for business application simulation
- Functional Testing Checklist:
- Test both Thunderbolt 4/USB-C ports with charging and data
- Verify fingerprint reader and IR camera (if equipped)
- Check keyboard backlighting and all keys using online tester
- Test display for dead pixels and brightness uniformity
- Verify Wi-Fi 6 and Bluetooth connectivity
📋 Warranty & Professional Documentation
- Check Warranty Status: Enter serial on Lenovo's Warranty Lookup. Note: Some upgrades may not void warranty, but damage during disassembly might.
- Document Original Condition:
- High-resolution photos from all angles showing exterior condition
- Close-ups of any existing cosmetic damage (scratches, dents)
- Video demonstrating all functional components working
- Professional Data Management:
- Full Backup: Use Macrium Reflect Free for system image
- Cloud Sync: Ensure business data is synced to OneDrive/SharePoint
- Recovery Media: Create Lenovo Recovery USB via Lenovo Vantage
🛡️ Safety & Professional Workspace Setup
- Complete Power Down: Shut down Windows, disconnect AC adapter and all peripherals.
- ESD Protection: Use anti-static wrist strap connected to grounded surface.
- Organized Workspace:
- Clean, well-lit, static-free surface
- Magnetic project mat for screw organization
- Containers for small components
- Tool Preparation:
- Phillips #00 and #000 screwdrivers
- Plastic spudgers and opening tools
- Non-magnetic tweezers
- Reference Materials: Download ThinkPad X13 Gen 2 Hardware Maintenance Manual for official procedures.
💼 Key Business Value Determinants
Understand what corporate buyers and IT departments value most.
- Reliability Indicators:
- Genuine Lenovo parts used in any replacements
- Documented maintenance and service history
- Clean diagnostics report from Lenovo tools
- Battery health >80% of original capacity
- Enterprise Features:
- Intel vPro capability (on certain configurations)
- Windows 11 Pro with BitLocker encryption
- Docking station compatibility (Thunderbolt 4)
- Security features: dTPM 2.0, fingerprint reader, IR camera
- Professional Service Value:
- Clean, documented disassembly/assembly
- Performance optimization evidence
- Proper cable management and thermal application
2. Essential Tools for ThinkPad X13 Gen 2 Professional Repair
Professional-grade maintenance of the ThinkPad X13 Gen 2 requires precision tools to preserve its compact, business-class design and avoid costly damage. This section details the exact tools needed for safe, effective disassembly and reassembly, ensuring your repairs meet enterprise standards and maintain the device's premium value.
🛠️ Core Tool Kit for ThinkPad X13 Gen 2
These tools are essential for proper maintenance of this ultraportable business laptop.
- Precision Screwdriver Set:
- Phillips #00: Primary driver for 90% of screws (bottom cover, internal components).
- Phillips #000: For smaller screws on connectors, shields, and delicate components.
- Torx T5: Required for display hinge screws and certain internal brackets.
- Magnetic Tip Essential: Prevents dropping tiny screws into compact motherboard.
- Professional Prying Tools:
- Plastic Spudger Set: For releasing plastic clips without scratching magnesium chassis.
- Nylon Opening Picks: Various shapes for navigating different clip points.
- ThinkPad-Specific Tools: Consider iFixit opening tools designed for Lenovo laptops.
- Anti-Static Equipment:
- ESD Wrist Strap: Mandatory for protecting sensitive enterprise components.
- Anti-Static Mat: Provides grounded workspace for small, dense components.
⚙️ Specialized & Highly Recommended Equipment
| Tool | Purpose for X13 Gen 2 | Professional Grade | Business Standard |
|---|---|---|---|
| Magnetic Project Mat | Organize tiny screws by assembly layer (critical in compact design) | iFixit Magnetic Project Mat | ESD-safe mats with labeled compartments |
| Precision Tweezers | Handle small ribbon cable connectors and antenna wires | Non-magnetic, anti-static tipped | ESD-safe fine point tweezers |
| Spudger & Pry Tool Set | Safe release of precision clips in compact chassis | iFixit Jimmy or opening tools | Lenovo service kit equivalent |
| Thermal Materials | CPU thermal repaste for optimal performance in thin design | Thermal Grizzly Kryonaut, Noctua NT-H2 | High-performance pastes for business use |
| ESD-Safe Brush | Cleaning dust from compact fan and heatsink assembly | Anti-static nylon brush | Professional electronics cleaning kit |
| Digital Multimeter | Testing power circuits (for advanced repairs) | Fluke or equivalent professional grade | Basic continuity tester for safety checks |
🔩 ThinkPad X13 Gen 2 Specific Tool Notes
This compact model has particular requirements different from larger ThinkPads.
- Screw Types & Count:
- Bottom Cover: 5x Phillips #00 screws (all same length)
- Internal Components: Mix of Phillips #00 and #000 screws
- Display Hinges: Torx T5 screws (specific to compact hinge design)
- Keyboard Assembly: Special clips requiring specific angled prying
- Compact Design Challenges:
- Tighter internal spacing requires thinner, more precise tools
- Ribbon cables are shorter and more delicate
- Less margin for error with prying tools
- Connector Types: Many use flip-up ZIF connectors requiring careful handling with plastic tools only.
🏆 Recommended Professional Tool Kits
Investing in quality tools pays dividends in preservation of business value.
- Best Overall for X13 Owners:
- iFixit Pro Tech Toolkit ($70-85)
- Includes all necessary drivers, prying tools, and spudgers
- Lifetime warranty, perfect balance for business laptop maintenance
- Specifically includes tools for compact laptop designs
- Enterprise Service Alternative:
- Lenovo Service Toolkit (for authorized technicians)
- Includes specialized tools for ThinkPad-specific components
- Higher cost, but designed specifically for Lenovo ultraportables
- Budget Professional Option:
- iFixit Essential Electronics Toolkit ($30-35)
- Covers basic needs for SSD and battery replacement
- May lack specialized tools for display or keyboard work on X13
🧴 Essential Consumable Materials
Professional repairs require quality consumables for lasting results.
- Thermal Interface Materials:
- Thermal Paste: High-quality paste (Arctic MX-6, Thermal Grizzly Kryonaut)
- Thermal Pads: Various thicknesses (0.5mm, 1mm) for VRM cooling
- Cleaning Supplies: 99% isopropyl alcohol and lint-free wipes
- Adhesives & Tapes:
- Double-sided Tape: Specific thickness for ThinkPad components
- Kapton Tape: Heat-resistant insulation for compact designs
- Battery Adhesive Strips: If replacing battery (must be compatible)
⚠️ Tool Safety & Professional Best Practices
- Always Disconnect Power: Remove AC adapter and disconnect internal battery before any work.
- ESD Protection Mandatory: Wear wrist strap throughout entire process.
- Systematic Organization:
- Use magnetic mat with labeled sections for different screw types
- Take photos at each disassembly step for reference
- Keep small components in labeled containers
- Precise Force Application:
- X13 requires minimal, precise force due to compact design
- If something doesn't move easily, re-check for hidden screws or clips
- Never force connectors or components in tight spaces
- Cleanliness Standards:
- Work in clean, dust-free environment
- Clean tools before use on sensitive components
- Avoid moisture and static-generating materials
🏢 Enterprise Service Considerations
- Asset Tag Preservation: Be careful not to damage corporate asset tags during disassembly.
- Warranty Compliance: Use Lenovo's Warranty Checker before beginning. Corporate warranties may have specific requirements.
- Documentation Requirements: Enterprise IT departments require:
- Part numbers used in repairs
- Serial numbers of replacement components
- Date of service and technician notes
- Photos showing professional cable management
- Genuine Parts Requirement: Corporate environments typically require genuine Lenovo parts for compatibility and warranty purposes.
🛒 Where to Purchase Professional Tools
- Professional Electronics Focus:
- iFixit.com - Comprehensive kits with lifetime warranty
- Lenovo Parts - Genuine service tools and parts
- Industrial Suppliers:
- McMaster-Carr - High-precision tools and materials
- Grainger - Professional maintenance equipment
- Local Options:
- Micro Center - Electronics-specific tools
- Industrial hardware stores for basic tools
📐 X13 Gen 2 Compact Design Challenges
Specific considerations for this ultraportable business laptop.
- Tight Internal Layout:
- Components are densely packed
- Less room for tool maneuverability
- Requires more disassembly steps to access certain components
- Tool Size Limitations:
- Standard tools may be too large for certain areas
- Consider smaller, more precise alternatives
- Angle of access is often limited
- Cable Management Critical:
- Proper routing essential for reassembly
- Cables must be precisely placed to avoid interference
- Document original routing with photos
0:23 Bottom Case 1:10 Battery 1:52 Storage SSD 2:13 WiFi Card 2:40 Heatsink and Cooling Fan 3:36 USB Board 4:09 Speakers 5:55 Motherboard 6:13 Processor 6:27 Hinges 6:55 Palmrest Assembly 7:15 Power Button 4:48 Touchpad 9:00 Display Assembly
3. Bottom Cover Removal: Safe Access to ThinkPad X13 Gen 2 Internal Components
Gaining professional access to the internals of the compact ThinkPad X13 Gen 2 requires precise technique to preserve its magnesium alloy chassis and delicate internal clips. This guide provides step-by-step instructions for safely removing the bottom cover without damage, ensuring you can perform upgrades and maintenance while maintaining the device's enterprise value and structural integrity.
✅ Pre-Removal Enterprise Safety Protocol
- Complete Power Down: Shut down Windows via Start menu. Do not use sleep or hibernate.
- Disconnect All Power: Unplug the USB-C power adapter from laptop and wall outlet.
- Remove All Peripherals: Disconnect docking stations, monitors, USB devices, and network cables.
- Discharge Residual Power: Press and hold power button for 15 seconds after disconnection.
- Prepare Workspace: Use anti-static mat in clean, well-lit environment with magnetic mat ready.
🔩 Bottom Cover Screw Identification & Mapping
The X13 Gen 2 uses five (5) Phillips #00 screws of identical length to secure the bottom cover.
- Screw Layout Pattern:
- Two screws along rear edge (near hinge area)
- Two screws along sides (mid-section)
- One screw near front center
- Critical Details:
- All screws are same length (M2 × 4mm), simplifying reassembly
- Screws are not captive—will come completely out
- Note that some screws may be under rubber feet—check carefully
- Professional Removal Technique:
- Place laptop upside down on soft, anti-static surface
- Using magnetic Phillips #00, loosen all five screws in star pattern
- Remove screws completely and place immediately on magnetic mat in layout pattern
- Inspect screw holes for any debris or stripped threads before proceeding
🔓 Professional Clip Release Method for Compact Design
The magnesium chassis uses precisely engineered plastic clips. Proper technique prevents breakage in tight spaces.
- Initial Separation Point: Start at the rear-right corner (near hinge and USB-C ports).
- Tool Selection: Use thin plastic spudger or nylon opening tool. Never use metal tools against magnesium chassis.
- Correct Insertion Angle:
- Insert tool at 20-30 degree angle between bottom cover and main chassis
- Apply gentle upward pressure while twisting slightly clockwise
- Listen/feel for soft click as first clip releases
- Progressive Release Pattern:
- Work your way around perimeter, releasing clips every 1-2 inches
- Alternate sides (right, then left) to prevent bending cover
- Pay special attention to front edge near touchpad—clips are more delicate
- Trouble Spots: If section won't release, do not force it. Re-check for missed screws or work from opposite side.
📤 Safe Bottom Cover Removal for Ultraportable Design
Once all clips are released, the cover will be loose but may still have connections.
- Lift from Rear Edge: Gently lift cover starting from rear (hinge side).
- Check for Attached Cables: As you lift, immediately inspect for any ribbon cables. X13 Gen 2 may have:
- Touchpad cable (runs along front edge)
- Fingerprint reader cable (if equipped)
- Optional: WWAN antenna cables
- Disconnect if Necessary: If cables are present:
- Identify connector type (flip-up ZIF or pull-out)
- Use plastic tweezers to gently release connectors
- Never pull cables by wires—grasp only connector body
- Complete Removal: Once all connections are free, lift cover completely away and set aside on clean surface.
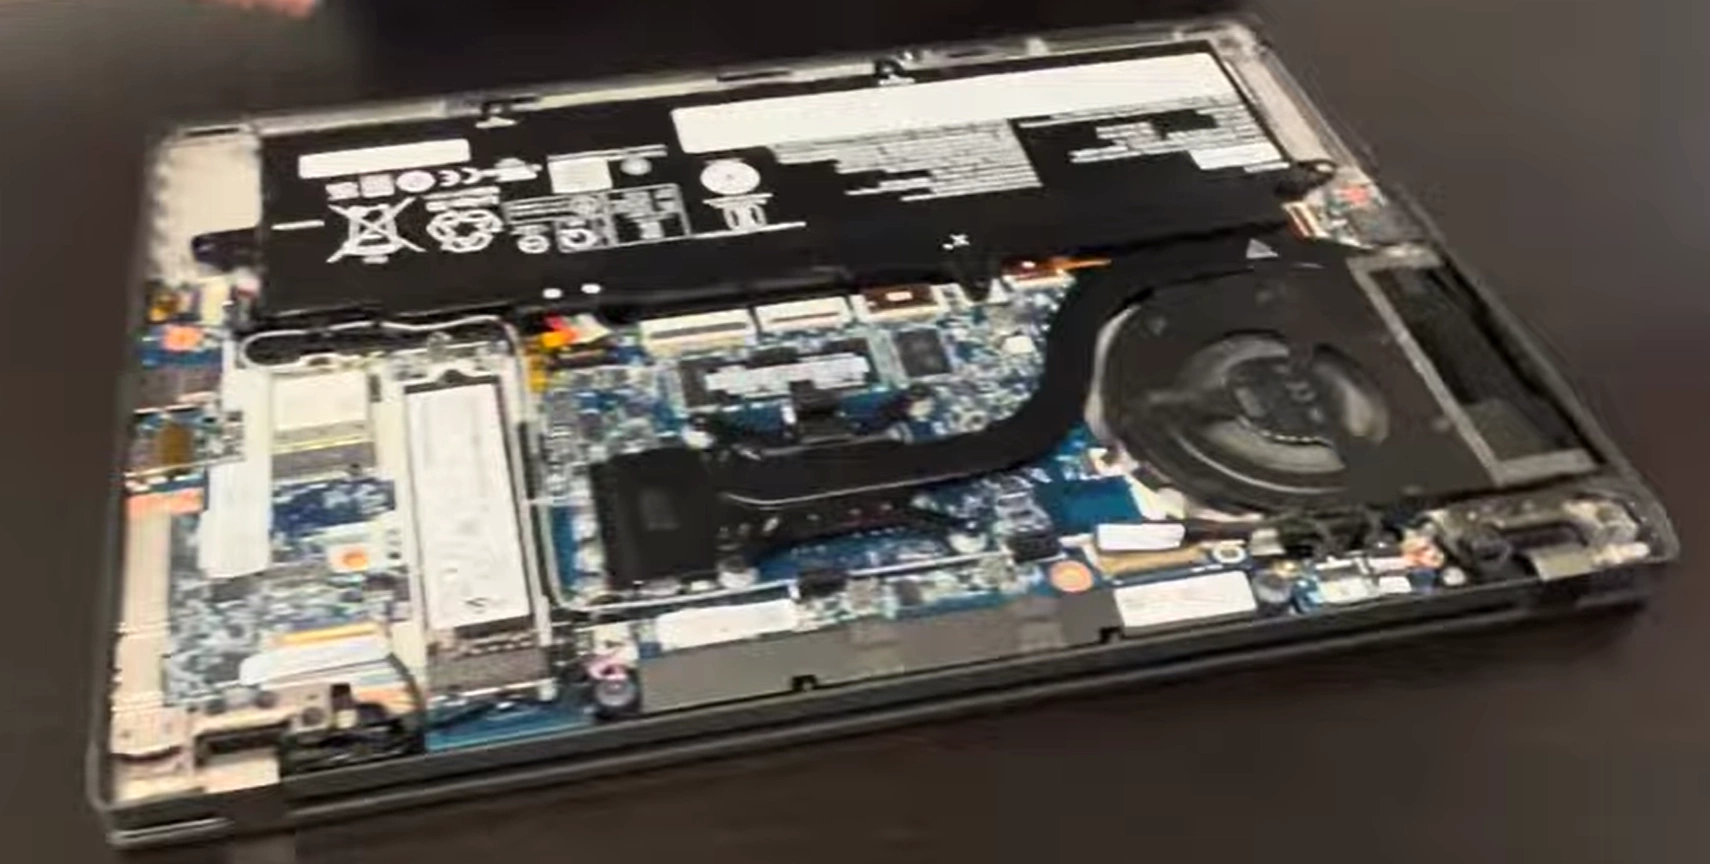
🔍 Internal Component Layout Overview
With cover removed, you'll see the professional-grade internal layout of this compact business laptop.
- A. Battery (Center): 54.7Wh Li-Polymer battery with Lenovo branding
- B. Motherboard (Center): Houses soldered RAM, Intel CPU, and chipset
- C. M.2 SSD Slot (Right of Battery): 2280 NVMe slot, may have thermal shield
- D. Cooling System (Top Center): Single fan with heatpipe covering CPU
- E. Wireless Cards (Left of SSD): M.2 slots for Wi-Fi 6 (Intel AX201) and optional WWAN
- F. I/O Boards (Edges): Separate boards for Thunderbolt 4, audio, etc.
- G. Speakers (Front Edges): Dolby Audio speakers on left and right fronts
⚠️ CRITICAL: Internal Battery Disconnection
Before touching ANY internal components, you MUST disconnect the internal battery. This is non-negotiable for safety in compact design.
- Locate Battery Connector: Find white/black connector on motherboard near battery edge.
- Proper Disconnection:
- If pull-type: Gently pull straight out from motherboard
- If latch-type: Use plastic tweezers to lift latch before pulling
- Verify Power Drain: Press and hold power button for 10 seconds to discharge capacitors.
- Visual Confirmation: Ensure connector is completely separated from motherboard socket.
Only proceed with upgrades/maintenance after this step is complete and verified.
🛡️ Professional Handling for Compact Design
- Chassis Protection:
- Place bottom cover on soft cloth to prevent scratches
- Handle magnesium chassis by edges only
- Keep work area free of metal debris that could cause shorts
- Component Protection:
- Use ESD wrist strap throughout process
- Avoid touching gold contacts on connectors
- Keep magnets away from storage and sensitive components
- Documentation:
- Take high-resolution photos of internal layout before proceeding
- Note cable routing paths for proper reassembly
- Document any pre-existing issues or anomalies
🔍 Troubleshooting Common Removal Issues
- Cover Won't Budge After Screw Removal:
- Solution: You missed a clip. Re-examine entire perimeter, especially near front corners.
- Cracking Sound During Prying:
- Solution: Stop immediately. You're likely using too much force or wrong tool angle.
- One Clip Won't Release:
- Solution: Work from opposite side to release tension, then return to stubborn clip.
- Stripped Screw Head:
- Solution: Use rubber band between screw and driver for extra grip. Replace damaged screws.
📐 X13 Gen 2 Specific Design Considerations
- Compact Spacing:
- Less room for tool maneuverability
- Components are more densely packed
- Requires more careful prying technique
- Thinner Materials:
- Chassis materials are thinner than larger ThinkPads
- Requires gentler handling to avoid bending
- Clip mechanisms are more delicate
- Thermal Considerations:
- Note thermal pad placements during removal
- Document thermal interface locations for reassembly
🏢 Meeting Enterprise Quality Standards
- Zero-Tolerance for Damage: Enterprise buyers expect no cosmetic or functional damage.
- Documentation Requirements: Corporate IT departments require photos showing:
- Internal condition before any work
- Serial numbers of major components
- Proof of ESD protection usage
- Reassembly Readiness: Before closing, ensure:
- All internal cables properly routed and secured
- No tools or debris remain inside compact chassis
- Thermal interface materials properly applied if disturbed
4. Battery Safety & Management Procedures for ThinkPad X13 Gen 2
Proper battery management is critical for safety, reliability, and maintaining the business value of your ThinkPad X13 Gen 2. This comprehensive guide covers battery health assessment, safe handling during disassembly, replacement procedures, and optimization techniques to ensure enterprise-grade performance and longevity for professional users.
🔋 ThinkPad X13 Gen 2 Battery Specifications
Understanding the exact specifications ensures proper handling and compatibility.
- Original Battery Part: Lenovo FRU # 5B10W13852 or 5B10W13853 (54.7Wh)
- Chemistry: Lithium-Ion Polymer (Li-Po) - common in ultraportables
- Voltage: 11.55V nominal
- Capacity: 4730mAh / 54.7Wh
- Expected Runtime: 8-12 hours (MobileMark 2018 standard)
- Charge Cycles: Designed for 1000+ cycles while maintaining >80% capacity
- Fast Charging: Supports Rapid Charge (80% in 1 hour with 65W adapter)
Compatibility Note: Must use X13 Gen 2 specific battery. Other ThinkPad batteries may physically fit but have different firmware or connector configurations.
⚙️ Comprehensive Battery Health Assessment
Use multiple diagnostic approaches for accurate business-ready evaluation.
Software Diagnostic Tools
- Lenovo Vantage/Commercial Vantage:
- Navigate to Device > Power > Battery Details
- Check "Battery Health" percentage and cycle count
- Use "Battery Gauge Reset" for calibration
- Windows Powercfg Report:
- Open Command Prompt as Administrator
- Run:
powercfg /batteryreport /output "C:\battery-report.html" - Key metrics to examine:
- DESIGN CAPACITY: 54,700 mWh
- FULL CHARGE CAPACITY: Current maximum capacity
- CYCLE COUNT: Total charge cycles
- USAGE PATTERNS: Recent battery usage history
- Third-Party Tools:
- BatteryCare for detailed monitoring
- CrystalDiskInfo shows battery health in SMART data
Physical Inspection Criteria (During Teardown)
- Visual Inspection:
- Check for swelling (battery should be perfectly flat)
- Look for leakage, corrosion, or discoloration
- Inspect connector for damage or burn marks
- Performance Testing:
- Time actual discharge from 100% to 5% under light load
- Monitor charge rate and temperature during charging
- Check for sudden drops in charge percentage
📊 Professional Battery Health Assessment Matrix
| Health Category | Capacity Retention | Cycle Count | Professional Recommendation | Business Value Impact |
|---|---|---|---|---|
| Excellent (Enterprise Ready) | 85% - 100% | < 300 cycles | No action needed. Use conservation mode for desktop use. | +$100 - $150 value |
| Good (Professional Use) | 70% - 84% | 300 - 600 cycles | Monitor monthly. Consider replacement for mobile professionals. | +$50 - $80 value |
| Fair (Limited Mobility) | 50% - 69% | 600 - 900 cycles | Replace for business users. Acceptable for desktop replacement. | -$70 - $110 if not replaced |
| Poor (Critical/Replace) | < 50% or swelling | > 900 cycles | Replace immediately. Safety risk. | -$130 - $200 if not replaced |
⚠️ Critical Safety Handling Protocol
Lithium-ion batteries require specific safety procedures during disassembly.
- Pre-Disassembly Preparation:
- Work in well-ventilated area
- Have Class D fire extinguisher nearby (for lithium fires)
- Wear safety glasses and non-conductive gloves
- During Disassembly:
- Never puncture, bend, or compress battery
- Use plastic tools only around battery
- Avoid shorting battery terminals with tools
- Swollen Battery Protocol:
- DO NOT CONTINUE DISASSEMBLY
- Place device in fire-safe container
- Contact professional hazardous waste disposal
- Never attempt to charge swollen battery
🤔 Professional Replacement Decision Framework
Determine if battery replacement offers economic and functional justification.
- Replace If:
- Capacity < 70% for business/resale purposes
- Any physical swelling (safety priority)
- Unexpected shutdowns when power adapter disconnected
- Device intended for frequent business travel
- Selling to enterprise buyers who demand >80% battery health
- May Defer Replacement If:
- Capacity > 80% and usage is primarily desktop/docked
- Enable Conservation Mode in Lenovo Vantage for desktop use
- Device near end of lifecycle with other major issues
- Business ROI Calculation:
- Replacement Cost: $80-$120 (genuine Lenovo)
- Value Added: $90-$150 (for business/resale)
- Net Benefit: $10-$30 + professional reliability assurance
🔧 Professional Battery Replacement Procedure
Prerequisites: Bottom cover removed, internal battery disconnected (as per Section 3).
Step-by-Step Battery Removal
- Identify Mounting:
- X13 Gen 2 battery secured with 4-6 Phillips #00 screws
- May have adhesive strips in addition to screws
- Remove Screws:
- Remove all screws securing battery to chassis
- Note screw lengths and locations for reassembly
- Keep screws organized on magnetic mat
- Release Adhesive (if present):
- Gently lift battery from connector end
- If resistance felt, use plastic card to release adhesive strips
- Apply isopropyl alcohol to adhesive with cotton swab if stubborn
- Lift Battery Out:
- Lift at angle to clear surrounding components
- Note cable routing for reassembly reference
- Place old battery on non-conductive surface
New Battery Installation
- Prepare New Battery:
- Inspect for damage and verify FRU number matches original
- Remove protective films from adhesive strips (if included)
- Position Battery:
- Align with screw holes and chassis guides
- Ensure connector faces correct direction
- Lower into place without forcing
- Secure Battery:
- Install screws in star pattern (snug but not overtightened)
- Connect battery to motherboard LAST after physical installation
- Verify secure connection with gentle tug test
⚙️ Post-Replacement Calibration & Optimization
Proper calibration ensures accurate battery reporting and longevity.
- Initial Charge: Charge to 100% without interruption using Lenovo 65W adapter.
- Battery Gauge Reset:
- Boot into BIOS (F1 during startup)
- Navigate to Config > Power > Battery Gauge Reset
- Follow on-screen instructions
- Full Calibration Cycle:
- Charge to 100%
- Use on battery until system shuts down (3-5% remaining)
- Charge to 100% again without interruption
- Configure Business Optimization:
- Enable "Battery Conservation Mode" in Lenovo Vantage for desktop use
- Set charge thresholds: Start at 75%, Stop at 80% for optimal longevity
- Configure Windows Power Plan for "Balanced" or "Best Battery Life"
🛒 Sourcing Genuine Lenovo Batteries
For business/resale purposes, genuine parts are essential for reliability and value.
| Source | Authenticity | Price Range | Business Recommendation |
|---|---|---|---|
| Lenovo Authorized | 100% Genuine | $85 - $130 | Best for enterprise/resale - full warranty, guaranteed compatibility |
| Certified Resellers | Genuine (verify FRU) | $65 - $100 | Good alternative - ensure seller has Lenovo authorization |
| Quality Third-Party | Compatible (not genuine) | $45 - $75 | Acceptable for personal use - check for UL/CE certifications |
| Unauthorized/Generic | Risky | $30 - $55 | Avoid for business/resale - safety risks, poor longevity |
♻️ Professional Battery Disposal & Compliance
Proper disposal is environmental responsibility and often legal requirement.
- Business Compliance Requirements:
- Many corporations have e-waste policies
- Some states/countries require certified recycling
- Keep disposal certificates for corporate records
- Safe Disposal Methods:
- Call2Recycle Drop-off (free in US/Canada)
- Lenovo Recycling Program (check regional availability)
- Authorized electronics recyclers with R2/RIOS certification
- Swollen Battery Protocol:
- Do not puncture or bend
- Place in non-flammable container away from heat
- Label clearly as "Swollen Lithium Battery"
- Contact professional hazardous waste disposal
📑 Enterprise-Grade Documentation for Resale
Proper documentation justifies premium pricing to business buyers.
- Documentation Package Should Include:
- Original battery health report (before replacement)
- Receipt for genuine Lenovo battery with FRU number
- Post-replacement battery report showing 100% health
- Calibration completion verification
- Disposal certificate for old battery (if applicable)
- Business Sales Language:
- "Professionally replaced with genuine Lenovo 54.7Wh battery"
- "Battery health: 100% with full calibration completed"
- "Includes documentation of professional service and genuine parts"
- "Optimized for enterprise use with conservation mode configured"
💼 Business Optimization & Longevity Tips
Maximize battery life for professional users.
- Desktop Use Optimization:
- Enable Battery Conservation Mode in Lenovo Vantage
- Keeps charge between 55-60% for prolonged desktop use
- Can extend battery lifespan by 2-3x for stationary devices
- Travel Optimization:
- Use Rapid Charge for quick top-ups before meetings
- Carry 65W USB-C charger (universal for many devices)
- Consider power banks for extended travel days
- Storage Recommendations:
- If storing long-term, charge to 50-60%
- Store in cool, dry environment (20-25°C ideal)
- Recharge every 6 months if in storage
5. Memory Configuration Analysis & Understanding for ThinkPad X13 Gen 2
Critical Information: The ThinkPad X13 Gen 2 features soldered LPDDR4x memory that cannot be upgraded or replaced. This ultraportable business laptop uses permanently attached RAM for space efficiency and power optimization. This section provides essential information for assessing your current configuration, understanding performance implications, and making informed decisions about purchasing or selling this model based on its fixed memory capacity.
🔍 Understanding the X13 Gen 2 Memory Architecture
This laptop uses advanced memory technology optimized for business mobility and power efficiency.
- Memory Type: LPDDR4x-4266 (Low Power Double Data Rate 4)
- Configuration: Soldered directly to motherboard - non-upgradeable
- Architecture: Dual-channel by default (regardless of capacity)
- Available Configurations from Factory:
- 8GB (entry-level business configuration)
- 16GB (most common business configuration)
- 32GB (premium configuration for power users)
- Performance Characteristics:
- Higher bandwidth than standard DDR4 (4266MHz vs 3200MHz)
- Lower power consumption for extended battery life
- Excellent thermal characteristics for compact design
- Optimized for Intel 11th Gen Tiger Lake processors
⚙️ How to Check Your Current RAM Configuration
Verify your exact memory setup to understand your device's capabilities and limitations.
- Using Lenovo Vantage:
- Open Lenovo Vantage > Device > System Details
- Look for "Installed memory" specification
- Check "Memory slots" will show as 0 available (soldered)
- Windows System Information:
- Press Windows + R, type
msinfo32, press Enter - Find "Installed Physical Memory (RAM)"
- Note: "Total Physical Memory" and "Available Physical Memory"
- Press Windows + R, type
- Task Manager Analysis:
- Press Ctrl + Shift + Esc
- Go to Performance > Memory
- Note: "Slots used" will show as 1 of 1 (soldered configuration)
- Check "Speed" should show 4267 MHz
- Command Line Verification:
- Open Command Prompt or PowerShell as Administrator
- Type:
wmic memorychip get capacity, speed, memorytype - This confirms soldered nature (single chip listing)
📊 Performance Implications by RAM Configuration
Different capacities suit different business use cases and directly impact market value.
| RAM Capacity | Recommended For | Limitations | 2024 Business Value |
|---|---|---|---|
| 8GB LPDDR4x | Basic office tasks, email, light web browsing, simple document work | May struggle with multiple applications, large spreadsheets, Teams meetings with video, modern web browsing | $350 - $500 (entry-level business) |
| 16GB LPDDR4x | Standard business use: Office suite, 20+ browser tabs, video conferencing, moderate multitasking, light development | May limit virtual machines, large data analysis, professional creative work, heavy development environments | $500 - $750 (mainstream business premium) |
| 32GB LPDDR4x | Power users: Software development, data science, virtualization, advanced financial modeling, professional content creation, future-proofing | None for typical business use - provides headroom for several years | $700 - $950+ (premium business/enterprise) |
🔄 Memory Optimization Techniques for Fixed RAM
Maximize performance within your existing memory constraints through software optimization.
- Windows Memory Management:
- Disable unnecessary startup programs (Task Manager > Startup)
- Adjust for best performance: System Properties > Advanced > Performance Settings
- Increase virtual memory (page file) on fast NVMe SSD
- Use Windows 11's Memory Integrity and Core Isolation features
- Browser Optimization for Business:
- Use browser extensions like OneTab or The Great Suspender
- Limit open tabs to essential business applications
- Consider Microsoft Edge for better memory management with business features
- Disable unnecessary browser extensions
- Application Management Best Practices:
- Close unused applications rather than minimizing
- Use web versions of Office apps when possible (reduces RAM usage)
- Monitor memory usage with Task Manager regularly
- Consider lightweight alternatives to resource-heavy applications
- Professional Diagnostic Tools:
💡 Alternative Upgrade Paths for Enhanced Performance
Since RAM cannot be upgraded, focus on other performance-enhancing modifications.
- SSD Upgrade (Highest Impact):
- Upgrade to faster NVMe SSD (PCIe 4.0 compatible running at Gen3 speeds)
- Increase capacity to reduce need for virtual memory swapping
- A faster SSD can compensate for some RAM limitations through faster page file access
- Recommended: Samsung 980 PRO, WD Black SN850X, or Crucial P5 Plus
- Thermal Optimization:
- Repaste CPU for better sustained performance
- Clean cooling system to prevent thermal throttling
- Ensure memory controller (integrated in CPU) runs at optimal temperature
- Operating System Optimization:
- Clean Windows installation to remove bloatware
- Use Windows 10/11 Pro for better memory management features
- Configure power settings for maximum performance when plugged in
- Keep BIOS and chipset drivers updated from Lenovo
🤔 Purchasing Considerations Based on RAM
When buying or selling an X13 Gen 2, RAM configuration is the primary value determinant.
- For Buyers:
- 8GB: Only consider for very basic tasks with no future needs
- 16GB: Sweet spot for most business users - good for next 3-4 years
- 32GB: Ideal for developers, analysts, power users, or future-proofing
- Verify: Always confirm RAM capacity before purchase - cannot be changed later
- Check: Ensure it's LPDDR4x-4266 for optimal performance
- For Sellers:
- Highlight RAM capacity prominently in all listings
- Include screenshot of System Information or Task Manager as proof
- Emphasize benefits of LPDDR4x (speed and power efficiency)
- Be transparent about non-upgradeability to manage buyer expectations
- Market appropriate configurations to appropriate buyers
🏢 Enterprise & Business RAM Considerations
Corporate deployment requires careful RAM planning and understanding of business needs.
- Standard Corporate Deployment: 16GB is becoming the new minimum for enterprise Windows 11 deployments
- Software Requirements Analysis: Check if business applications have specific RAM needs:
- Accounting/ERP software: Often 8GB minimum, 16GB recommended
- CRM systems (Salesforce, Dynamics): 8-16GB depending on usage
- Development environments: 16GB minimum, 32GB ideal for modern IDEs
- Virtualization: 16GB minimum for single VM, 32GB for multiple VMs
- Future-Proofing Analysis:
- Windows 11 uses more RAM than Windows 10
- Modern web applications and Electron apps are memory-intensive
- Security software (EDR, antivirus) consumes additional memory
- 16GB provides better longevity for 3-4 year business cycle
- Cost-Benefit Analysis: For business use, the premium for 16GB over 8GB typically pays for itself in productivity gains within months.
🔍 Troubleshooting Memory-Related Issues
Even with soldered RAM, issues can occur that require professional diagnosis.
- System Reporting Wrong RAM Amount:
- Update BIOS to latest version from Lenovo Support
- Reset BIOS to default settings (F1 during boot > F9 > Enter > F10)
- Perform clean Windows installation to rule out software issues
- Run Lenovo Diagnostics (F10 during boot) for hardware verification
- Performance Issues with Adequate RAM:
- Check for memory leaks in applications using Task Manager
- Scan for malware that consumes memory resources
- Monitor memory usage patterns to identify problematic software
- Check for driver issues with Intel Graphics (shares system memory)
- Hardware Memory Failure:
- Run Windows Memory Diagnostic (search in Start Menu)
- Use Lenovo Diagnostics (F10 during boot) for hardware testing
- If hardware failure confirmed, requires motherboard replacement
- Note: This is rare with soldered memory but can occur
📑 Professional Documentation for Resale
Properly document your RAM configuration to maximize business value and buyer confidence.
- Essential Documentation:
- Screenshot of System Information showing exact RAM capacity and speed
- Photo of Lenovo label with model/serial number for verification
- Task Manager screenshot showing memory speed (4267 MHz) and slots used
- Benchmark results showing memory performance (optional but valuable)
- Effective Listing Language:
- "16GB LPDDR4x-4266 soldered RAM - dual-channel configuration for optimal business performance"
- "Memory is not upgradeable - choose capacity that meets your long-term business needs"
- "High-speed LPDDR4x memory provides better performance and power efficiency than standard DDR4 in business applications"
- "Professional configuration for [specific business use case] with adequate memory for [applications]"
- Value Proposition by Configuration:
- 8GB: "Cost-effective for basic business tasks and light office use"
- 16GB: "Ideal balance for professional business use, multitasking, and future-proofing"
- 32GB: "Premium configuration for power users, developers, data analysis, and enterprise applications"
6. M.2 SSD Replacement: Installation & Data Migration for ThinkPad X13 Gen 2
While RAM is fixed, the SSD offers significant upgrade potential to enhance performance, increase storage capacity, and boost the business value of your ThinkPad X13 Gen 2. This comprehensive guide covers selecting compatible SSDs, professional installation techniques, and business-grade data migration strategies to ensure continuity and maximize your investment.
🔍 ThinkPad X13 Gen 2 Storage Specifications
Understanding compatibility is essential for a successful business-grade upgrade.
- Interface: M.2 PCIe NVMe 3.0 x4 (compatible with PCIe 4.0 drives at Gen3 speeds)
- Form Factor: M.2 2280 (22mm width, 80mm length) - most common size
- Key: M-Key (standard for NVMe SSDs)
- Supported Capacities: 256GB, 512GB, 1TB, 2TB (verify 4TB compatibility in BIOS)
- Original Configurations: Typically ships with 256GB, 512GB, or 1TB NVMe SSD
- Thermal Considerations: Some models include thermal shield - ensure compatibility
- Encryption Support: Compatible with Windows BitLocker and hardware encryption
🏆 Recommended SSDs for Business & Enterprise Use
Select SSDs that balance performance, reliability, and value for professional environments.
| Use Case | Recommended SSD Models | Key Features | Business Value Proposition |
|---|---|---|---|
| General Business (Best Value) |
Samsung 970 EVO Plus WD Black SN750 Crucial P5 Plus |
PCIe 3.0/4.0, Excellent endurance, Good performance/price ratio | Reliable for office tasks, excellent ROI for business upgrades |
| Power Users & Developers (Performance Focus) |
Samsung 980 PRO WD Black SN850X Sabrent Rocket 4 Plus |
PCIe 4.0 (runs at Gen3), Future-proof, High endurance ratings | Excellent for development, data analysis, and demanding business applications |
| Enterprise/High Reliability | Samsung 970 PRO Intel SSD 670p SK hynix Gold P31 |
MLC NAND options, Power-loss protection, High TBW ratings | Critical for business data integrity, long-term reliability |
| Budget Business Upgrade | Crucial P3 Plus Kingston NV2 TeamGroup MP34 |
Cost-effective, Adequate performance for most business needs | Good for cost-conscious upgrades while maintaining professional standards |
Capacity Recommendation: 1TB offers the best balance of cost and future-proofing for business users. 512GB is adequate for most, while 2TB is ideal for data-intensive professionals or those requiring extensive local storage.
📋 Pre-Installation Business Data Preparation
Proper data management ensures business continuity and prevents data loss.
- Data Assessment & Inventory:
- Check current storage usage (File Explorer > This PC)
- Identify critical business data, applications, and custom settings
- Note installed business software and license keys
- Document network drives and cloud storage configurations
- Comprehensive Backup Strategy:
- Full System Image: Use Macrium Reflect Free or Windows Backup
- Cloud Synchronization: Ensure OneDrive/Google Drive/Dropbox is fully synced
- Critical Data Backup: Manually copy irreplaceable files to external drive
- Application Configuration: Export settings for business applications
- Recovery Media Creation:
- Create Lenovo Recovery USB using Lenovo Vantage
- Create Windows Installation Media via Microsoft Media Creation Tool
- Download latest drivers from Lenovo Support
🔧 Professional SSD Installation Procedure
Prerequisites: Bottom cover removed, battery disconnected (as per Sections 3-4).
Step-by-Step Existing SSD Removal
- Locate Existing SSD:
- Find M.2 slot to the right of battery (near center of motherboard)
- Note any thermal shield or sticker covering the SSD
- Identify retention screw at end of slot (typically Phillips #000)
- Remove Thermal Shield (if present):
- Carefully remove any screws securing thermal shield
- Lift shield gently, noting thermal pad placement
- Preserve thermal pad if in good condition for reuse
- Remove Original SSD:
- Remove single Phillips #000 retention screw
- SSD will pop up at 30-degree angle
- Gently pull SSD out of slot at same angle
- If thermal pad present, carefully separate from SSD
New SSD Installation
- Prepare New SSD:
- Inspect for physical damage or defects
- Remove any protective films from label side
- If reusing thermal pad, ensure proper alignment
- Install SSD:
- Insert new SSD at 30-degree angle into slot
- Press down gently until lies flat against motherboard
- Secure with retention screw (snug, not overtightened)
- Thermal Management:
- If thermal shield present, reinstall with original thermal pad or new equivalent
- Ensure good contact between SSD and thermal interface
- For high-performance SSDs without shield, consider adding thermal pad
- Professional Considerations:
- Use anti-static precautions throughout
- Handle SSD by edges, avoid touching gold contacts
- Ensure no debris in M.2 slot before installation
⚙️ Post-Installation Professional Optimization
Maximize performance, reliability, and business readiness of your new SSD.
- BIOS/UEFI Configuration:
- Enter BIOS (F1 during boot)
- Verify SSD detected correctly with correct capacity
- Ensure AHCI mode enabled (should be default for NVMe)
- Check for BIOS updates that may improve SSD compatibility
- Windows Optimization:
- Run Windows Update to ensure latest storage drivers
- Install Lenovo Vantage for ThinkPad-specific optimizations
- Enable TRIM (automatic for NVMe in Windows 10/11)
- Disable disk defragmentation for SSD (should be automatic)
- Configure Windows Search indexing appropriately
- Performance Validation & Benchmarking:
- Run CrystalDiskMark to verify speeds (expect ~3,500 MB/s read for Gen3)
- Check health with CrystalDiskInfo (should show 100% health, 0°C temperature initially)
- Benchmark boot times and application launch speeds
- Test file copy operations with business-sized files
🏢 Enterprise Storage Considerations
Business environments have specific storage requirements and compliance needs.
- Encryption Compatibility:
- Ensure compatibility with Windows BitLocker (most NVMe SSDs support)
- Check for TPM integration if using hardware encryption
- Some SSDs have built-in encryption - verify with IT security policies
- Test encryption/decryption performance impact
- Warranty & Support Documentation:
- Document SSD purchase for warranty claims and asset tracking
- Keep original packaging and receipts for business records
- Consider enterprise-grade SSDs with longer warranties (5 years typical)
- Register SSD with manufacturer for extended support
- Data Security & Disposal:
- Securely erase old SSD before disposal/resale using manufacturer tools
- Use professional erasure tools like Parted Magic or manufacturer secure erase
- Maintain chain of custody documentation for sensitive business data
- Consider physical destruction for highly sensitive data per corporate policy
🔍 Troubleshooting Common SSD Issues
Professional approaches to resolving common post-installation issues.
- SSD Not Detected:
- Reseat SSD in slot ensuring proper alignment
- Update BIOS to latest version from Lenovo Support
- Test SSD in external enclosure to verify functionality
- Check for physical damage to SSD or motherboard slot
- Slow Performance or Inconsistent Speeds:
- Check for driver updates (Intel Rapid Storage Technology drivers)
- Verify PCIe link speed in Device Manager properties
- Ensure SSD firmware is up to date using manufacturer tools
- Check for thermal throttling during sustained operations
- Boot Issues After Cloning:
- Check boot order in BIOS (ensure new SSD is first)
- Repair bootloader using Windows Recovery Environment
- Consider clean Windows installation if cloning failed
- Verify GPT partition style matches original drive
💰 Resale Value Impact & Professional Documentation
Properly documenting your SSD upgrade significantly increases business value and buyer confidence.
| Upgrade Scenario | Approx. Cost | Value Added | Business Marketing Language |
|---|---|---|---|
| 256GB → 1TB High-Speed SSD | $70 - $100 | $120 - $180 | "Professionally upgraded to 1TB high-speed NVMe SSD for business data capacity" |
| 512GB → 2TB Enterprise SSD | $120 - $160 | $180 - $250 | "Enterprise-grade 2TB SSD installed - ample storage for business applications and data" |
| Any → Samsung 980 PRO | $80 - $150 | $100 - $160 | "Premium Samsung 980 PRO SSD - optimal performance for business applications" |
Professional Documentation Checklist:
- Screenshot of CrystalDiskInfo showing drive health, temperature, and model
- CrystalDiskMark benchmark results showing read/write performance
- Receipt or proof of purchase for the SSD with warranty information
- Photo of installed SSD showing model clearly visible
- Documentation of data migration method and verification
- Before/after performance comparison for business applications
7. Cooling System Maintenance & Thermal Optimization for ThinkPad X13 Gen 2
Effective thermal management is critical for maintaining sustained performance in the compact ThinkPad X13 Gen 2. This business ultraportable requires professional cooling system maintenance to prevent thermal throttling, ensure reliability during extended business use, and extend component lifespan. This guide covers comprehensive fan cleaning, thermal repasting techniques, and optimization strategies that restore cooling efficiency and enhance enterprise value.
🔍 ThinkPad X13 Gen 2 Cooling System Architecture
Understanding the compact cooling design is essential for effective maintenance.
- Cooling Configuration: Single fan with dual heatpipe assembly cooling CPU and integrated Intel Iris Xe graphics
- Fan Type: Axial fan with Lenovo Intelligent Cooling technology
- Heat Dissipation: Thin copper heatpipes transfer heat to compact aluminum fin stack
- Thermal Interface: Factory-applied thermal paste on CPU die
- Airflow Path: Bottom intake → heatsink → rear exhaust (right side)
- Intel 11th Gen Specifics: 15-28W TDP configurable, thermal headroom critical for Turbo Boost
- Compact Design Challenges: Limited space requires efficient thermal design
⚠️ Signs Your ThinkPad X13 Needs Thermal Maintenance
Recognize symptoms before performance degrades in business-critical applications.
- Performance Indicators:
- Frequent CPU/GPU throttling during sustained loads (meetings, renders)
- Reduced application performance in extended business sessions
- Inconsistent benchmark scores between runs
- Slower response in CPU-intensive business applications
- Audible & Physical Signs:
- Fan runs constantly at high speed under light business loads
- Unusual fan noises (grinding, clicking, whining, or rattling)
- Excessive heat from keyboard or bottom chassis during normal use
- Hot air exhaust feels weaker than normal or inconsistent
- Software Diagnostic Indicators:
- Use HWiNFO64 to monitor:
- CPU temperatures under load (target: <85°C sustained for business use)
- Thermal throttling flags (PROCHOT, PL1/PL2 power limits)
- Fan RPM and duty cycle percentages
- CPU clock speed consistency during workloads
- Run Lenovo Diagnostics (F10 during boot) for fan functionality testing
- Use HWiNFO64 to monitor:
🛠️ Required Tools & Materials for Professional Thermal Maintenance
Professional-grade materials ensure lasting results in compact business laptops.
| Item | Purpose for X13 Gen 2 | Professional Recommendation | Business Grade Alternative |
|---|---|---|---|
| Thermal Paste | CPU die thermal interface replacement | Thermal Grizzly Kryonaut, Noctua NT-H2 | Arctic MX-6 (excellent value/performance ratio) |
| Isopropyl Alcohol | Cleaning old thermal compound | 99% purity for minimal residue | 90%+ purity acceptable with careful application |
| Lint-Free Wipes | Surface cleaning and prep | Kimwipes, coffee filters, specialized electronics wipes | High-quality microfiber cloth (dedicated use only) |
| Compressed Air | Dust removal from compact heatsink fins | ESD-safe canned air with nozzle attachment | DataVac electric duster (long-term cost effective) |
| Precision Screwdrivers | Disassembly of cooling assembly | Phillips #00, #000 for small screws | iFixit toolkit with proper sizes |
| Anti-Static Protection | Component safety during maintenance | Wrist strap, mat, proper grounding | Grounded work surface with humidity control |
🔧 Accessing the Cooling System (Disassembly Steps)
Prerequisites: Bottom cover removed, battery disconnected, SSD removed if obstructing.
- Remove SSD (if present): Single screw, lift at angle, set aside carefully.
- Disconnect Fan Cable:
- Locate small white/black fan connector near heatsink edge
- Gently pull connector straight up (may have small retention clip)
- Use plastic tweezers if connector is tight
- Remove Heatsink Assembly:
- Identify 4 Phillips #00 screws securing heatsink (typically numbered 1-4)
- Loosen screws in reverse numerical order (4→3→2→1) to prevent warping
- Remove screws completely and place on magnetic mat in numbered pattern
- Gently lift heatsink straight up - thermal paste may provide resistance
- If stuck, gently twist (never pry) to break paste seal
- Separate Fan from Heatsink (if needed):
- Remove 2-3 small screws attaching fan to heatsink bracket
- Carefully separate fan, noting cable routing through chassis
- For deep cleaning only - not necessary for repaste alone
🧹 Professional Cleaning Procedure for Business Laptops
Thorough cleaning restores optimal airflow and heat transfer in compact designs.
Fan Cleaning Steps for Ultraportable Design
- Exterior Cleaning:
- Use compressed air to blow dust from fan blades and housing
- Hold fan blades stationary while blowing to prevent overspinning and bearing damage
- Angle air nozzle to reach between blades
- Deep Cleaning (if heavily soiled):
- Use soft anti-static brush to loosen stubborn dust
- For grease/oil contamination, use isopropyl alcohol on cotton swab
- Clean fan housing interior where dust accumulates
- Bearing Inspection & Maintenance:
- Check for axial play (front-to-back movement indicating wear)
- Listen for grinding noises when spinning manually
- If bearing is worn or noisy, replace entire fan assembly (FRU replacement)
Heatsink & Fin Array Cleaning
- Fin Cleaning:
- Use compressed air to blow through fins from inside out
- For compacted dust, use soft brush between fins
- Pay attention to corners where dust accumulates
- Heatpipe Inspection:
- Check for dents, kinks, or flattening in heatpipes
- Look for discoloration indicating overheating or oxidation
- Ensure heatpipe makes full contact with CPU area
- Thermal Interface Surface Preparation:
- Clean both CPU die and heatsink base thoroughly
- Remove all old thermal compound completely
- Ensure surfaces are smooth and free of debris
⚙️ Professional Thermal Repasting Technique for Intel 11th Gen
Proper application is critical for optimal heat transfer in compact ultraportables.
- Surface Preparation:
- Clean CPU die thoroughly with isopropyl alcohol (99% recommended)
- Clean heatsink base with same method
- Ensure surfaces are completely dry and free of lint/residue
- Use lint-free wipes or coffee filters for final wipe
- Paste Application (Intel 11th Gen CPU):
- The X13 Gen 2 has a single, rectangular Intel CPU die
- Recommended Method: Rice-grain sized dot in center of die
- Alternative Method: Small "X" pattern for better spread coverage
- Avoid: Spreading with tool (creates air bubbles and uneven application)
- Quantity: Approximately 0.05-0.1ml for compact die size
- Heatsink Reinstallation:
- Lower heatsink straight down onto CPU (no sliding motion)
- Align screw holes carefully before any pressure applied
- Install screws in numerical order (1→2→3→4)
- Tighten gradually in star pattern, finishing with firm but not excessive torque
- Stop when screw stops turning easily - do not overtighten
- Professional Quality Checks:
- Paste should be visible around edges but not dripping onto motherboard
- Excess paste will squeeze out - wipe minimal excess from sides if excessive
- Ensure no paste contaminates other components or connectors
🔍 Reassembly & Performance Validation Protocol
Verify your maintenance restored optimal cooling performance for business use.
- Reassembly Sequence:
- Reconnect fan cable securely (listen for click)
- Reinstall SSD if removed
- Reconnect battery, replace bottom cover
- Initial Functional Testing:
- Power on and listen for normal fan operation at startup
- Enter BIOS (F1) to verify fan detection and RPM reading
- Check for unusual noises, vibrations, or grinding sounds
- Performance Benchmarking:
- Run Cinebench R23 multi-core test for CPU thermal stress
- Monitor temperatures with HWiNFO64 during 10-minute test
- Compare scores and temperatures to pre-maintenance results
- Test fan speed transitions using Lenovo Vantage performance modes
- Business Application Testing:
- Run typical business workloads (Excel calculations, Teams meetings, browser tabs)
- Monitor for sustained performance without thermal throttling
- Verify fan noise is appropriate for office environment
- Test under sustained load to ensure no performance degradation
📊 Expected Performance Improvements for Business Users
Professional thermal maintenance typically yields these business-relevant improvements:
| Metric | Typical Improvement | Business Impact | Measurement Method |
|---|---|---|---|
| CPU Temperature | 8-18°C reduction under sustained load | Reduced thermal throttling, consistent performance in extended meetings | HWiNFO64 during Cinebench R23 multi-core test |
| Cinebench R23 Score | 8-20% increase in multi-core performance | Better multitasking, faster calculations and data processing | Cinebench R23 before/after comparison |
| Fan Noise Levels | Reduced RPM at same workload, quieter operation | More professional office environment, less distraction | Subjective/audible comparison, fan RPM monitoring |
| Battery Life | 5-15 minute improvement in typical use | Extended mobile productivity, longer meetings away from outlet | Standardized battery runtime test |
| Application Responsiveness | Noticeably smoother performance in sustained use | Better user experience in business applications | Subjective testing with typical business software stack |
📅 Recommended Preventive Maintenance Schedule
For business environments, proactive maintenance prevents downtime and performance issues.
- Light Business Use (Office/Email/Browsing): Every 2-3 years
- Moderate Business Use (Development/Analysis/Meetings): Every 1.5-2 years
- Heavy Business Use (Virtualization/Rendering/Data Processing): Annually
- High-Dust Environments (Construction/Manufacturing/Education): Every 6-12 months (fan cleaning only)
- Signs Requiring Immediate Attention:
- Audible fan bearing noise or grinding
- Thermal throttling in normal business applications
- Excessive external chassis temperatures during light use
- Inconsistent performance in CPU-intensive tasks
🏢 Enterprise Documentation & Resale Value Impact
Documented thermal maintenance significantly enhances business laptop value and buyer confidence.
- Documentation Package Should Include:
- Before/after temperature screenshots from HWiNFO64 during standardized test
- Cinebench R23 or other benchmark comparisons showing performance gains
- Photos of clean heatsink/fan assembly demonstrating professional work
- Receipt for thermal materials used (premium pastes add perceived value)
- Date of service, technician notes, and maintenance schedule recommendation
- Business Resale Language & Marketing:
- "Professionally serviced cooling system with Thermal Grizzly Kryonaut thermal paste"
- "Optimized thermal performance - sustains peak clock speeds in business applications"
- "Documented 15°C temperature reduction under load compared to factory thermal state"
- "Preventive maintenance completed - ensures long-term reliability for business deployment"
- "Enterprise-grade thermal management for consistent performance in professional use"
- Value Impact Analysis: Documented professional thermal maintenance typically adds $80-$150 to resale value for business buyers who prioritize reliability and sustained performance in professional applications.
💻 Complementary Software Optimization for Thermal Management
Combine hardware maintenance with software optimization for best results.
- Lenovo Vantage Settings:
- Configure Intelligent Cooling for optimal balance
- Set performance mode based on use case (Quiet, Balanced, Performance)
- Enable battery conservation for thermal management during charging
- Windows Power Settings:
- Create custom power plan for business use
- Adjust processor power management settings
- Configure system cooling policy for active cooling
- Intel Graphics Command Center:
- Optimize integrated graphics power settings
- Configure display power savings
- Adjust video playback settings for efficiency
8. Keyboard & Input Device Service Procedures for ThinkPad X13 Gen 2
The ThinkPad keyboard and precision input devices are critical components for business productivity. This comprehensive guide covers professional service procedures for keyboard replacement, trackpad maintenance, and input device troubleshooting, ensuring you maintain the premium typing experience that defines ThinkPad's business reputation while preserving structural integrity and enterprise value.
🔍 ThinkPad X13 Gen 2 Input Component Specifications
Understanding the design and variations helps with proper service and replacement.
- Keyboard Types & Variations:
- Backlit Keyboard: White LED backlight, spill-resistant design
- Non-Backlit Keyboard: Standard professional keyboard, spill-resistant
- Language Variants: US English (most common), UK English, International layouts
- Regional Differences: Key sizes and positions vary by region
- Trackpad & Pointing Device Specifications:
- Precision touchpad with physical buttons (Classic ThinkPad three-button design)
- Optional: Fingerprint reader integrated into power button
- TrackPoint (red pointing stick) with dedicated middle button
- Glass surface on premium configurations
- Part Identification & Compatibility:
- Use Lenovo Parts Lookup with your serial number
- FRU (Field Replaceable Unit) numbers are critical for compatibility
- Example FRU: 5K10X49559 (US English Backlit Keyboard)
- Trackpad assemblies vary by configuration (with/without fingerprint reader)
🤔 When to Replace vs. Repair Input Components
Determine the most cost-effective approach for business needs and value preservation.
| Issue | Recommended Action | Business Impact | Cost/Benefit Analysis |
|---|---|---|---|
| Single Key Failure | Individual keycap replacement if possible, otherwise full keyboard | Minimal if non-critical key, significant if frequently used | $5-15 vs $80-120 full replacement |
| Multiple Key Failures | Full keyboard replacement recommended | Major productivity impact for business users | $80-120 justified for business continuity |
| Backlight Failure | Keyboard replacement (LEDs integrated into keyboard assembly) | Affects low-light productivity, professional appearance | $80-120 for backlit version replacement |
| Trackpad Physical Damage | Trackpad assembly replacement required | Major productivity hindrance for business users | $40-80 + labor cost justified |
| TrackPoint Button Failure | Trackpad assembly replacement (buttons integrated) | Critical for ThinkPad power users and accessibility | $40-80 replacement cost typically justified |
| Spill Damage | Immediate keyboard replacement, potential motherboard inspection | Critical business interruption risk | $80-120 + potential additional repairs |
⌨️ Professional Keyboard Replacement Procedure
Warning: This is a complex repair in compact ultraportables. Consider professional service if inexperienced.
Prerequisites & Safety Considerations
- Bottom cover removed, battery disconnected
- SSD removed if obstructing access
- ESD protection (wrist strap) mandatory
- Proper workspace with good lighting and organization
- New keyboard (verified FRU compatibility)
- Tools: Phillips #00, #000, plastic spudgers, tweezers, magnetic mat
Step-by-Step Disassembly for Keyboard Access
- Remove Display Assembly:
- Disconnect display cables from motherboard (carefully release latches)
- Remove hinge screws (typically Torx T5, document locations)
- Carefully lift display assembly away from main chassis
- Set aside on protected surface
- Remove Palmrest Assembly:
- Remove all screws securing palmrest (8-10 screws of varying lengths)
- Document screw locations carefully - they are not all the same
- Disconnect all ribbon cables:
- Trackpad cable (typically ZIF connector with flip-up latch)
- Fingerprint reader cable (if equipped)
- Keyboard backlight cable (if present)
- Any other peripheral cables
- Carefully lift palmrest starting from front edge near touchpad
- Work around perimeter to release all clips
- Remove Existing Keyboard:
- Keyboard secured with clips along top edge and screws underneath
- Carefully release clips along top edge using plastic spudger
- Lift keyboard gently and disconnect ribbon cable from motherboard
- Note routing of keyboard cable through chassis
New Keyboard Installation Procedure
- Prepare New Keyboard:
- Inspect for physical damage or defects
- Test flexibility of ribbon cable (should be supple, not stiff)
- Remove any protective films from keyboard surface
- Verify FRU number matches original or compatible replacement
- Connect Ribbon Cable:
- Connect keyboard ribbon cable to motherboard first
- Ensure connector is fully seated and any latch secured
- Test connection gently before proceeding with physical installation
- Position Keyboard:
- Align keyboard with chassis cutout carefully
- Ensure ribbon cable is routed correctly to avoid pinching
- Keyboard should sit flush without forcing
- Secure Keyboard:
- Press top edge until clips engage (listen/feel for clicks)
- Install any securing screws from underneath if present
- Verify keyboard is seated evenly across entire surface
🖱️ Trackpad Assembly Service Procedures
The trackpad is integrated into the palmrest assembly and requires careful handling.
Accessing the Trackpad Assembly
- Follow Keyboard Removal Steps 1-2: Remove display and palmrest assemblies
- Separate Trackpad from Palmrest:
- Remove screws securing trackpad to palmrest (typically 2-4 small screws)
- Disconnect trackpad ribbon cable from its connector on trackpad PCB
- Carefully lift trackpad out of palmrest recess
- Note orientation and any adhesive placement
New Trackpad Installation
- Prepare Replacement Trackpad:
- Ensure correct model (with/without fingerprint reader, appropriate surface)
- Test trackpad surface for smoothness and button actuation
- Check ribbon cable for flexibility and connector integrity
- Install in Palmrest:
- Position trackpad in recess with correct orientation
- Secure with screws (snug but not overtightened)
- Connect ribbon cable to trackpad PCB
- If adhesive strips included, apply according to instructions
- Reassembly Sequence:
- Reinstall palmrest assembly onto main chassis
- Reconnect all cables in reverse order of disconnection
- Reinstall display assembly with proper hinge alignment
- Test all functions before final assembly completion
🔍 Post-Service Testing & Calibration Protocol
Thorough testing ensures business-ready functionality and user satisfaction.
Comprehensive Keyboard Testing Protocol
- Basic Function Test:
- Use online keyboard tester (keyboardtester.com)
- Test every key including function keys and special ThinkPad keys
- Check key travel consistency across all keys
- Verify key actuation force feels uniform
- Backlight Testing (if applicable):
- Test backlight brightness levels (Fn+Space cycles through settings)
- Check for even illumination across entire keyboard
- Verify timeout functionality (should turn off after inactivity)
- Test automatic brightness adjustment if equipped
- Special Function Testing:
- Test ThinkPad special keys (ThinkVantage, microphone mute, etc.)
- Verify Fn lock functionality (Fn+Esc)
- Test keyboard shortcuts (volume, brightness, presentation mode)
- Check Windows key and context menu key functionality
Trackpad & Pointing Device Testing Protocol
- Basic Functionality Testing:
- Test single, double, and right-click functionality
- Verify multi-finger gestures (2-finger scroll, 3-finger swipe, pinch zoom)
- Check trackpad sensitivity and cursor accuracy
- Test edge scrolling functionality
- TrackPoint Testing:
- Test TrackPoint responsiveness in all directions
- Verify middle button scrolling functionality
- Check TrackPoint button actuation force and feedback
- Test TrackPoint speed settings in control panel
- Driver & Software Verification:
- Update Synaptics/Elan drivers from Lenovo Support site
- Configure settings in Windows Settings > Bluetooth & devices > Touchpad
- Test palm rejection to ensure it works during typing
- Verify all gestures work as configured
🛒 Sourcing Genuine ThinkPad Input Components
Authentic parts are essential for maintaining ThinkPad quality and business value.
| Source | Authenticity Guarantee | Price Range | Business Recommendation |
|---|---|---|---|
| Lenovo Authorized Parts | 100% Genuine with FRU verification | $80-$120 (keyboard) $40-$80 (trackpad) |
Best for business/resale - exact match, full warranty, guaranteed compatibility |
| Certified Lenovo Resellers | Genuine (verify FRU before purchase) | $60-$100 $30-$60 |
Good alternative - check seller authorization and reviews carefully |
| Compatible Aftermarket | Variable quality, not genuine Lenovo | $40-$80 $20-$40 |
Risk for business use - may lack authentic ThinkPad feel and durability |
| Used/Refurbished Parts | Genuine but potentially worn | $30-$60 $15-$30 |
Only for personal use or budget repairs - inconsistent quality and lifespan |
🔍 Common Issues & Professional Troubleshooting
Systematic approach to resolving input device problems in business laptops.
- Keys Not Working After Replacement:
- Reseat keyboard ribbon cable at motherboard connector
- Check for damaged cable or bent pins in connector
- Update keyboard drivers in Device Manager
- Test in BIOS to rule out software issues
- Keyboard Backlight Not Functioning:
- Verify backlight cable is connected (separate from main keyboard cable)
- Check Fn+Space functionality for cycling through modes
- Update Lenovo Vantage for backlight control software
- Test in dark environment to see if ambient light sensor is affecting it
- Trackpad Not Recognized or Erratic:
- Reseat trackpad ribbon cable at both ends
- Update Synaptics/Elan drivers from Lenovo Support
- Check BIOS settings for touchpad enable/disable options
- Test with external mouse to isolate issue
- Uneven Key Feel or Sticking Keys:
- Ensure keyboard is fully seated and level in chassis
- Check for debris under keycaps using compressed air
- Verify correct keyboard model for specific chassis variant
- Test individual key mechanisms if possible
💰 Business Value Impact & Professional Documentation
Professional input device service significantly enhances business appeal and resale value.
Resale Value Impact Analysis
- Keyboard Replacement: Adds $60-$100 to business resale value
- Trackpad Replacement: Adds $40-$70 to business resale value
- Combined Input Device Service: Adds $90-$150+ when documented professionally
- Backlit Keyboard Premium: Additional $20-$30 value over non-backlit
Professional Service Documentation Checklist
- Before/after photographs showing keyboard and trackpad condition
- Receipts for genuine Lenovo parts with FRU numbers clearly visible
- Screenshots from keyboard testing software showing all keys functional
- Video demonstration of backlight functionality and trackpad gestures
- Documentation of driver updates and calibration procedures performed
- Service certificate with date and technician notes
Business Marketing Language for Resale
- "Professionally replaced with genuine ThinkPad keyboard - like-new typing experience for business productivity"
- "New trackpad assembly installed - precise navigation calibrated for professional use"
- "All input components tested and optimized - ready for immediate business deployment"
- "Includes documentation of professional service and genuine Lenovo parts verification"
- "Backlit keyboard for productive low-light work environments"
🛡️ Preventive Maintenance for Input Devices
Proactive care extends lifespan and maintains business readiness.
- Regular Cleaning Protocol:
- Use compressed air monthly to remove debris from keyboard
- Clean trackpad surface with microfiber cloth and screen cleaner
- Avoid eating or drinking near business laptops
- Use keyboard covers during transport if in harsh environments
- Usage Best Practices:
- Type with reasonable force - excessive force reduces lifespan
- Keep nails trimmed to prevent trackpad scratching
- Use external keyboard for extended typing sessions when possible
- Store in protective case during transport
- Software Maintenance:
- Keep input device drivers updated from Lenovo
- Regularly calibrate trackpad if precision decreases
- Configure input settings for optimal business use
9. Display Assembly & Hinge Maintenance for ThinkPad X13 Gen 2
The display assembly and hinge mechanism are critical components that significantly impact both functionality and perceived quality of your ThinkPad X13 Gen 2. Professional maintenance and repair of these elements preserve the business laptop's premium appearance, ensure reliable operation, and maintain enterprise value. This comprehensive guide covers display panel replacement, hinge service, and bezel maintenance procedures.
🔍 ThinkPad X13 Gen 2 Display Specifications Overview
Understanding the available display configurations informs replacement and upgrade decisions.
- Standard Configuration:
- 13.3" diagonal, 16:10 aspect ratio
- 1920x1200 (FHD+) resolution, IPS technology
- 300 nits brightness, anti-glare coating
- 45% NTSC color gamut (typical for business use)
- Premium Display Options:
- 400-nit Low Power Display: 1920x1200, IPS, 72% NTSC, power-efficient
- Privacy Guard Display: 1920x1200, 500 nits, built-in privacy filter
- Touchscreen Options: Available on some configurations (less common)
- Panel Identification:
- Use Lenovo Parts Lookup with serial number
- Check Windows Display Settings > Advanced Display
- Note FRU numbers for exact replacement compatibility
🤔 When to Service Display Components
Determine the most cost-effective approach for business needs and value preservation.
| Issue | Recommended Service | Business Impact | Cost/Benefit Analysis |
|---|---|---|---|
| Dead Pixels (1-2) | Live with if not in critical area, panel replacement if severe | Minor distraction, may affect professional appearance | $150-$250 panel cost vs. tolerance |
| Backlight Bleed | Panel replacement if excessive, otherwise monitor | Affects dark content viewing, professional presentations | $150-$250 for replacement if business-critical |
| Hinge Stiffness/Looseness | Hinge replacement or lubrication | Affects usability, professional appearance | $40-$80 for hinge replacement, high ROI |
| Cracked Screen | Immediate panel replacement required | Critical business interruption | $150-$250 + labor, justified for continued use |
| Upgrade to Premium Display | Panel replacement with higher-spec display | Enhanced productivity, better user experience | $200-$300 investment adds $150-$250 value |
🖥️ Professional Display Panel Removal Procedure
Warning: Display components are fragile. Handle with extreme care.
Prerequisites & Safety Considerations
- Bottom cover removed, battery disconnected
- ESD protection (wrist strap) mandatory
- Clean, padded work surface large enough for display
- Proper tools: Phillips #00, Torx T5, plastic spudgers, suction cups
- Replacement panel (verified FRU compatibility)
Step-by-Step Display Assembly Disassembly
- Remove Bottom Cover & Prepare:
- Complete bottom cover removal as per Section 3
- Disconnect battery for safety
- Remove any components obstructing display cables
- Disconnect Display Cables:
- Locate display cables on motherboard (typically right side)
- Carefully disconnect LVDS/EDP cable (video signal)
- Disconnect webcam/microphone cable if present
- Disconnect Wi-Fi antenna cables from wireless card
- Note: Some models have cable routing through hinge
- Remove Hinge Screws:
- Identify 4 hinge screws (2 per hinge, typically Torx T5)
- Remove screws carefully, noting lengths and locations
- Support display assembly while removing final screws
- Separate Display Assembly:
- Gently lift display assembly away from main chassis
- Guide cables through hinge openings if routed internally
- Place display assembly face down on padded surface
Display Panel Removal from Bezel
- Remove Bezel:
- Use plastic spudger to carefully release bezel clips
- Work around perimeter, releasing clips systematically
- Bezel may have adhesive - apply gentle heat if resistant
- Access Panel Connections:
- Once bezel removed, panel will be visible with brackets
- Remove 4-6 screws securing panel to display lid
- Carefully disconnect panel cable from controller board
- Remove Old Panel:
- Lift panel from display lid carefully
- Note any adhesive or tape placements
- Place old panel in anti-static bag for proper disposal
🔄 New Display Panel Installation
Proper installation ensures optimal performance and longevity.
Step-by-Step Panel Installation
- Prepare New Panel:
- Inspect for damage before installation
- Remove protective films from both sides of panel
- Verify FRU number matches compatible replacement
- Install Panel in Lid:
- Position panel in display lid with correct orientation
- Secure with mounting screws (snug, not overtightened)
- Connect panel cable to controller board securely
- Replace any adhesive or tape as original configuration
- Reassemble Bezel:
- Align bezel with display lid
- Press around perimeter to engage all clips
- Ensure even gap around entire display
Reassembly to Main Chassis
- Reconnect Cables:
- Route cables through hinge areas if required
- Reconnect display cables to motherboard
- Reconnect Wi-Fi antenna cables to wireless card
- Reattach Hinges:
- Align display assembly with main chassis
- Install hinge screws in proper sequence
- Tighten gradually to ensure even tension
- Final Assembly:
- Reconnect battery
- Replace bottom cover
- Power on and test display functionality
⚙️ Hinge Mechanism Service & Maintenance
Proper hinge maintenance ensures smooth operation and prevents damage.
Hinge Inspection & Diagnosis
- Common Hinge Issues:
- Excessive stiffness or resistance
- Looseness or wobble when positioned
- Creaking or grinding noises during movement
- Uneven tension between left and right hinges
- Inspection Points:
- Check for stripped screw holes in hinge mounts
- Inspect hinge brackets for cracks or deformation
- Test smoothness through full range of motion
- Compare left and right hinge tension
Hinge Service Procedures
- Hinge Replacement:
- Remove display assembly as described above
- Remove old hinges from both display lid and main chassis
- Install new hinges with proper screw torque
- Test tension and adjust if possible before full reassembly
- Hinge Lubrication (if accessible):
- Use small amount of dry PTFE lubricant
- Avoid petroleum-based lubricants that attract dust
- Apply sparingly to pivot points only
- Wipe excess to prevent contamination
- Tension Adjustment:
- Some hinges have tension adjustment mechanisms
- Adjust incrementally, testing after each adjustment
- Aim for smooth motion with enough tension to hold position
🔍 Post-Service Testing & Calibration
Comprehensive testing ensures professional-grade results.
Display Panel Testing Protocol
- Basic Function Test:
- Check for dead or stuck pixels using full-screen color tests
- Test brightness uniformity at different levels
- Verify color reproduction with test images
- Check viewing angles for consistency
- Backlight Testing:
- Test brightness control through full range
- Check for backlight bleed with black screen in dark room
- Verify automatic brightness adjustment if equipped
- Test flicker at different brightness levels
- Connectivity & Performance:
- Test display detection in Windows
- Verify correct resolution and refresh rate
- Check for artifacts or distortion during motion
- Test with external display to verify GPU functionality
Hinge Mechanism Testing
- Smoothness Test:
- Open and close lid through full range 10+ times
- Check for consistent tension throughout motion
- Listen for unusual noises
- Position Hold Test:
- Test at various angles to ensure lid stays positioned
- Check for wobble when typing or touching screen
- Verify one-hand open capability
- Durability Simulation:
- Gently test hinge limits (don't force beyond design)
- Check alignment when closed (should be even)
- Verify no interference with chassis or ports
💡 Display Upgrade Opportunities
Consider upgrades that enhance business productivity and value.
🛒 Sourcing Genuine Display Components
Authentic parts are essential for compatibility and quality.
| Component Source | Authenticity | Price Range | Business Recommendation |
|---|---|---|---|
| Lenovo Authorized | 100% Genuine with FRU verification | $150-$250 (panel) $40-$80 (hinges) |
Best for business/resale - guaranteed compatibility, quality |
| Certified Resellers | Genuine (verify FRU before purchase) | $120-$200 $30-$60 |
Good alternative with proper verification |
| Compatible Panels | May work but not guaranteed | $80-$150 $20-$40 |
Risk for business use - potential compatibility issues |
| Used/Refurbished | Variable condition and remaining life | $60-$120 $15-$30 |
Only for budget repairs - inconsistent quality |
💰 Business Value Impact & Documentation
Professional display service significantly enhances business appeal and resale value.
Resale Value Impact Analysis
- Display Panel Replacement: Adds $100-$200 to business resale value
- Hinge Replacement/Repair: Adds $40-$80 to business resale value
- Premium Display Upgrade: Adds $150-$250+ depending on upgrade type
- Bezel Replacement: Adds $30-$50 for cosmetic improvement
Professional Service Documentation
- Before/after photographs showing display quality
- Dead pixel test results (using online testing tools)
- Receipts for genuine Lenovo parts with FRU numbers
- Video demonstrating smooth hinge operation
- Display calibration report if performed
- Service certificate with technician notes
Business Marketing Language for Resale
- "Professionally replaced display panel - pristine screen with no dead pixels"
- "Upgraded to 400-nit low power display - better visibility and battery efficiency"
- "Hinges serviced/replaced - smooth operation with proper tension"
- "Display calibrated for business use - optimal settings for productivity"
- "Includes documentation of professional service and genuine parts verification"
10. Maximizing Resale Value After Professional ThinkPad X13 Gen 2 Service
Professional upgrades and meticulous service transform your ThinkPad X13 Gen 2 from a used device into a premium business asset. This strategic guide provides a comprehensive framework for positioning, pricing, and selling your professionally serviced ultraportable to maximize return on investment, targeting the lucrative business, enterprise, and institutional markets that value documented professional work.
🎯 Strategic Market Positioning for Professionally Serviced ThinkPads
Differentiate your device in the competitive business laptop market by emphasizing professional service.
- From "Used" to "Professionally Refurbished & Upgraded":
- Emphasize documented upgrades, testing, and genuine parts
- Highlight performance improvements over stock configurations
- Position as "enterprise-ready" rather than "second-hand"
- Target Market Segmentation:
- Small & Medium Businesses: Value reliability, documentation, and cost savings
- Enterprise IT Departments: Require service records, compatibility, and deployment readiness
- Educational Institutions: Budget-conscious but need durability (.edu buyers)
- Professional Consultants & Freelancers: Need portable, reliable business-grade performance
- Government Contractors: May have specific requirements for refurbished equipment
- Competitive Analysis:
- Research prices for stock X13 Gen 2 on eBay, Amazon Renewed, B&H
- Compare to business refurbishers like Dell Refurbished, Apple Refurbished
- Identify market gaps your professionally serviced device can fill
- Monitor corporate IT refresh cycles for optimal selling timing
💎 Developing Your Compelling Value Proposition
Articulate why your professionally serviced ThinkPad commands premium pricing.
Core Value Proposition Components
- Performance Enhancement: "Faster than stock with SSD upgrades and thermal optimization"
- Reliability Assurance: "Professionally serviced with documented testing and validation"
- Business Readiness: "Configured and tested for immediate enterprise deployment"
- Cost Efficiency: "Premium business features at 40-60% of new ultraportable cost"
- Sustainability Value: "Environmentally responsible choice extending product lifecycle"
Effective Elevator Pitch Examples
- "This isn't just a used ThinkPad - it's a professionally upgraded business system with documented performance improvements and genuine Lenovo parts."
- "Skip new laptop depreciation while getting better-than-stock performance with our SSD upgrade and thermal optimization."
- "Perfect for businesses needing enterprise reliability at SMB prices, with full service documentation included."
- "Professionally serviced and validated - not just repaired, but enhanced for business productivity."
💰 Data-Driven Pricing Strategy Framework
Calculate your optimal price using business valuation principles and market data.
Professional Pricing Calculation Model
| Cost Component | Example Calculation | Notes & Documentation |
|---|---|---|
| Base System Market Value | $550 (i5/16GB/512GB configuration, good condition) | Based on current market for stock units in similar condition |
| Parts Investment | $200 (1TB SSD, thermal materials, cleaning supplies) | Actual receipts required for documentation, genuine parts preferred |
| Professional Service Premium | $200 - $300 | Based on 10-15 hours at $20-30/hour professional service rate |
| Documentation & Testing Value | $100 - $150 | Comprehensive testing protocols add verifiable enterprise value |
| Warranty/Support Value | $75 - $125 | 30-90 day support period adds buyer confidence and value |
| Total Target Price Range | $1,125 - $1,425 | Represents premium over stock but 30-40% below new business pricing |
Market Positioning by Price Point & Service Level
- Premium Business Tier ($1,100+): Full documentation, extensive testing, 90-day support, premium parts
- Professional Tier ($850-$1,099): Good documentation, comprehensive testing, 60-day support
- Value Business Tier ($650-$849): Basic documentation, functional testing, 30-day support
- Quick Sale Tier (Below $650): Consider quick sale platforms (see below)
🛒 Sales Channel Analysis & Strategic Selection
Choose the right platform based on your target price, buyer profile, and value proposition.
Sales Channel Comparison Matrix for Business Laptops
| Platform | Best For | Fees/Commission | Business Buyer Reach |
|---|---|---|---|
| eBay Business & Industrial | National reach, competitive bidding, business category targeting | ~13.25% (including payment processing) | Excellent - business category reaches corporate buyers nationally |
| Facebook Marketplace | Local business sales, higher margins, relationship building | 0% (but requires local pickup/delivery) | Good for small businesses, less effective for enterprise buyers |
| LinkedIn Business Network | Direct enterprise sales, IT department targeting | 0% (time investment for networking) | Excellent for corporate and enterprise buyers |
| Specialized Business Forums (HardForum, RedFlagDeals) |
Tech-savvy buyers who appreciate professional upgrades | 0% | Niche but high-value buyers who understand upgrade work |
| Wholesale Platforms (SellBroke, SellLaptopBack) |
Quick, guaranteed sales - convenience over profit | Built into (lower) purchase offer | Wholesale pricing only - not for premium professionally serviced devices |
Strategic Channel Recommendations by Goal
- For Maximum Profit: Facebook Marketplace with detailed listing targeting local businesses
- For National Business Reach: eBay with "Buy It Now" and "Best Offer" options in Business category
- For Enterprise Sales: LinkedIn outreach to IT managers with personalized value proposition
- For Quick Liquidation: SellBroke or SellLaptopBack when upgrades won't command premium
- For Multiple Units: Develop relationships with local IT service providers
✍️ Professional Listing Optimization Template
Craft listings that appeal to business buyers and justify premium pricing through clear value demonstration.
Title Optimization Formula for Business Buyers
Formula: Brand + Model + Key Specs + Professional Service + Business Value + Condition
- Example: "Lenovo ThinkPad X13 Gen 2 - i5/16GB/1TB SSD - Professionally Upgraded - Business Ready"
- Keywords to Include: "Business," "Enterprise," "Professional," "Upgraded," "Refurbished," "Serviced"
- Keywords to Avoid: "Used," "Old," "Cheap," "Bargain" - these devalue professional work
- Character Optimization: Use all available characters (typically 80) for maximum visibility
Power Bullet Point Strategy for Business Listings
- Opening Bullets (The Value Hook):
- ✔️ PROFESSIONALLY SERVICED & UPGRADED - Not just used, but enhanced for business performance
- ✔️ 1TB HIGH-SPEED SSD INSTALLED - 2x factory capacity for business data and applications
- ✔️ THERMAL OPTIMIZATION COMPLETED - Sustains peak performance in extended business use
- ✔️ FULLY DOCUMENTED SERVICE HISTORY - Includes test results and parts verification
- ✔️ BUSINESS READY CONFIGURATION - Tested and validated for enterprise deployment
- Feature Bullets (The Specification Details):
- • Intel Core i5-1135G7 Processor (4-core, 8-thread business CPU)
- • 16GB LPDDR4x-4266 RAM (soldered, dual-channel for optimal performance)
- • 13.3" 1920x1200 IPS Display (300-nit, anti-glare for office use)
- • Windows 11 Professional (includes BitLocker encryption for business security)
- • Genuine Lenovo 65W USB-C Fast Charger Included
Compelling Description Narrative Structure
Structure: Problem → Solution → Proof → Differentiation → Call to Action
- Problem Statement: "Business laptops lose performance over time, often come with insufficient storage, and used devices lack reliability documentation..."
- Solution Presentation: "We've professionally upgraded this ThinkPad X13 Gen 2 with a high-speed 1TB SSD, optimized the cooling system, and thoroughly tested all components..."
- Proof & Validation: "Includes documented benchmark results showing 40% faster application launches, 15°C lower temperatures under load, and comprehensive functional testing..."
- Differentiation: "Unlike typical used laptops, this device comes with professional service documentation, genuine parts verification, and business-ready configuration..."
- Call to Action: "Perfect for small businesses, consultants, or enterprise users needing reliable performance without new equipment costs. Ready for immediate deployment with all documentation included."
📦 Professional Documentation & Presentation Package
Presentation and documentation transform perception from "used equipment" to "professionally serviced business asset."
Complete Professional Documentation Package
- Service Certificate: Formal document detailing all work performed with dates and technician notes
- Performance Portfolio: Before/after benchmark comparisons and testing results
- Parts Verification Portfolio: Receipts, FRU numbers, and compatibility verification for all components
- Testing Results Archive: Comprehensive test logs from validation protocols
- Visual Evidence Portfolio: High-quality photos of internal components showing professional workmanship
- Warranty/Support Documentation: Clear terms for post-sale support period
- Environmental Impact Statement: Documentation of sustainability benefits from refurbishment
Professional Packaging & Presentation Standards
- High-quality, professional photos showing laptop from all angles in good lighting
- Clean, professional packaging (consider branded boxes for multiple sales)
- All accessories organized, cleaned, and included (charger, documentation)
- Consider including basic peripherals (mouse, carrying case) for premium listings
- Professional labeling and organization of all documentation
🏛️ Institutional & Educational Market Strategy
Target schools, nonprofits, government entities, and businesses for bulk or premium sales.
Institutional Sales Channels & Approaches
- Educational Institutions:
- Contact school and university IT departments directly
- Emphasize durability, repairability, and total cost of ownership
- Reference .edu technology initiatives and sustainability goals
- Offer educational pricing with volume discounts
- Nonprofit Organizations:
- Offer discount for registered 501(c)(3) organizations
- Highlight environmental benefits of refurbishing and circular economy
- Provide donation receipt for tax purposes if applicable
- Emphasize reliability for nonprofit operations
- Government & Municipal Entities:
- Check SAM.gov for contracting opportunities and requirements
- Emphasize security features, professional documentation, and compliance
- Understand government procurement cycles and budgeting timelines
- Consider GSA Schedule if pursuing government sales regularly
Institutional Pricing & Packaging Strategy
- Volume Discount Structure: 5-10% discount for 3+ units, 10-15% for 5+ units
- Educational Pricing: 10-15% below standard business market rate
- Standardized Configurations: Offer predefined configurations for institutional deployment
- Extended Support Options: Charge extra for on-site support, extended warranties, or bulk imaging
- Bulk Imaging Services: Offer to pre-load institutional software images for additional fee
📈 Post-Sale Value Maximization & Business Development
Enhance professional reputation and build sustainable business for future sales.
Professional Reputation Building Strategies
- Testimonial Collection: Request written reviews from satisfied business buyers
- Portfolio Development: Document successful sales with before/after photos and metrics
- Professional Networking: Connect with buyers on LinkedIn for future opportunities
- Service Documentation Templates: Create consistent professional templates for all work
- Case Study Development: Create detailed case studies of successful business deployments
Scaling & Business Development Opportunities
- Corporate Refurbishment Contracts: Approach businesses about regular laptop refresh programs
- Educational Partnerships: Develop relationships with schools for annual technology updates
- IT Service Add-ons: Offer setup, data migration, imaging, or ongoing support services
- Volume Sourcing Relationships: Develop connections with businesses for bulk laptop purchases
- Specialized Service Offerings: Develop niche expertise (medical, legal, creative professional configurations)
🌱 Environmental & Sustainability Value Proposition
Leverage growing corporate sustainability initiatives and environmental responsibility trends.
- Environmental Benefits Documentation:
- Calculate and document CO2 savings from refurbishment vs. new manufacturing
- Document e-waste reduction through extended product lifecycle
- Highlight energy savings (90% less energy than manufacturing new devices)
- Support corporate ESG (Environmental, Social, Governance) reporting
- Sustainability Marketing Materials:
- Create environmental impact statement for each device sold
- Highlight participation in circular economy and responsible e-waste management
- Partner with environmental organizations for certification or recognition
- Develop sustainability-focused marketing materials for environmentally conscious buyers
- Corporate Appeal: Many businesses now have sustainability mandates and prefer refurbished equipment when professionally validated, creating premium market opportunities.
Need to Sell Your Lenovo Laptop? Get Instant Cash!
If your ThinkPad X13 Gen 2 (or other ThinkPad model) has performance issues or you're upgrading to a newer business laptop, we offer competitive cash payouts for your device. We buy broken, used, and refurbished ThinkPad laptops—including all X13 Gen 2 configurations—with free insured shipping and hassle-free evaluations.
Sell Popular Lenovo Models Now: