How to Disassemble a Dell Precision 5480 Workstation for RAM & SSD Upgrades

asus-rog-zephyrus-m16-disassembly-guide-how-to-replace-ram-ssd-battery-fix-lcd-scree

1. Dell Precision 5480 Mobile Workstation: Professional Performance & Upgrade Potential

The Dell Precision 5480 represents the pinnacle of mobile workstation engineering, designed for professionals in architecture, engineering, data science, and creative fields. This ultra-performance laptop combines workstation-grade components with premium portability, making it one of the most sought-after ISV-certified workstations on the market.

πŸ”§ Key Professional Features

  • Professional Graphics:
  • Enterprise Performance:
    • Intel Core i7/i9 H-series processors (13th/14th Gen)
    • Up to 64GB DDR5 RAM (user-upgradeable)
    • Dual NVMe SSD slots for RAID configurations
  • Premium Build Quality:
    • CNC machined aluminum chassis
    • 14-inch displays up to 4K OLED with touch
    • ComfortView Plus low blue light technology

πŸ’Ό Why Upgrade Your Precision 5480?

Upgrade Type Performance Gain Professional Use Case ROI Potential
RAM to 64GB 200-300% in large assemblies CAD modeling, simulation, virtualization High (extends workstation life 2-3 years)
NVMe SSD Upgrade 7x faster load times 4K video editing, large dataset processing Very High (immediate productivity gains)
Dual SSD Setup Simultaneous project access Multi-application workflows Moderate (organizational efficiency)

πŸ“ˆ Precision 5480 Market Position

  • Target Professional Audience:
    • Architects and BIM specialists
    • Mechanical engineers and designers
    • Data scientists and analysts
    • Video producers and animators
  • Competitive Advantages:
    • Lighter than competing mobile workstations
    • Better thermal design than previous generations
    • Superior display options for color-critical work
    • Comprehensive ISV certification

πŸ› οΈ DIY Upgrade Advantages

  • Cost Savings:
    • Upgrade RAM yourself: 60-70% less than Dell service
    • Install SSD yourself: 50% less than pre-configured
    • Preserve warranty on non-upgraded components
  • Customization Benefits:
    • Choose specific RAM brands for compatibility
    • Select SSD based on workload needs (endurance vs speed)
    • Stage upgrades as budget allows
  • Resale Value Impact:
    • Documented upgrades increase resale value 15-25%
    • Professionals prefer workstations with maxed specifications
    • Original boxes and documentation maintain premium value

βš™οΈ Technical Specifications Overview

  • Processor Options:
    • Intel Core i7-13800H (14 cores, 20 threads)
    • Intel Core i9-13900H (14 cores, 20 threads)
    • Intel vPro Enterprise for remote management
  • Memory Specifications:
    • 2x DDR5 SODIMM slots
    • Up to 64GB total capacity
    • 5600MHz speed (CPU-dependent)
  • Storage Options:
    • 2x M.2 2280 PCIe Gen4 NVMe slots
    • Supports RAID 0/1 configurations
    • Theory speeds up to 7000MB/s
  • Professional Features:

πŸ“‹ Before You Begin Disassembly

  1. Verify Your Model:
    • Check Service Tag on bottom cover
    • Confirm specifications using Dell Support Site
    • Note current configuration for future reference
  2. Warranty Considerations:
    • Upgrades don't void entire warranty
    • Only affected components may lose coverage
    • Consider Dell Premium Support Plus for business users
  3. Professional Preparation:
    • Backup all project files and settings
    • Document original benchmark scores
    • Gather appropriate tools (detailed in next section)

🎯 Professional Use Cases & Upgrade Priorities

Professional Field Primary Software Priority Upgrade Expected Performance Gain
Architecture Revit, AutoCAD, SketchUp RAM > SSD 40-60% faster rendering
Engineering SOLIDWORKS, CATIA, NX RAM > SSD > Thermal 35-50% larger assembly handling
Data Science Python/R, Tableau, SAS RAM > SSD > CPU 3-5x faster data processing
Video Production Premiere Pro, DaVinci Resolve SSD > RAM > GPU 70% faster 4K timeline performance

2. Pre-Upgrade Preparation Checklist for Dell Precision 5480

Proper preparation is critical for successful workstation upgrades. This comprehensive checklist ensures your Dell Precision 5480 upgrade proceeds smoothly while protecting your valuable professional data and maintaining system integrity.

πŸ’Ύ Critical Data Backup Procedures

  • Complete System Image:
  • Professional Work Data:
    • Cloud sync with OneDrive for Business or Dropbox Business
    • Project files from CAD directories (typically C:\Users\[Username]\Documents\)
    • Configuration files for professional software
    • License files and activation data
  • Application Settings:
    • Export AutoCAD profiles and custom palettes
    • Backup SOLIDWORKS templates and design libraries
    • Save Adobe Creative Cloud presets and workspaces
    • Export browser bookmarks and passwords

πŸ“‹ System Documentation & Inventory

Information to Document Where to Find Why It's Important Tools to Use
Current Specifications Dell Support Site via Service Tag Baseline for performance comparison Dell Support, CPU-Z
Original Configuration Purchase invoice or Dell account Warranty verification and resale value Dell Order Status page
Performance Benchmarks Before upgrade testing Quantify upgrade benefits Cinebench, Geekbench, CrystalDiskMark
BIOS Settings BIOS/UEFI interface (F2 at boot) Restore optimal configuration Phone camera for photos

πŸ” Component Compatibility Verification

  • RAM Compatibility Check:
    • Verify DDR5 type (not DDR4)
    • Check maximum speed supported by CPU
    • Confirm module height for clearance
    • Use Crucial System Scanner
  • SSD Compatibility:
    • M.2 2280 form factor required
    • PCIe Gen4 x4 interface (backward compatible)
    • Single-sided vs double-sided consideration
    • Check Precision 5480 Manual
  • Tools Verification:
    • Torx T5 screwdriver (must be precision quality)
    • Plastic prying tools (no metal near components)
    • Anti-static wrist strap (mandatory for ESD protection)
    • Magnetic project mat for screw organization

πŸ–₯️ Software & Driver Preparation

  • Driver Updates:
    • Download latest Dell Precision 5480 drivers
    • Update Intel Management Engine drivers
    • Download latest BIOS from Dell Support
    • Update Dell Optimizer for performance tuning
  • Create Recovery Media:
    • Use Windows 11 Media Creation Tool
    • Create bootable USB with latest Windows version
    • Include necessary drivers on separate USB
    • Test USB boot before disassembly
  • License Management:
    • Deactivate software licenses temporarily
    • Document product keys and activation codes
    • Check license transfer policies for professional software
    • Backup AutoCAD FLEXnet license files

πŸ› οΈ Professional Workspace Setup

  1. Static-Safe Environment:
    • Use anti-static mat on work surface
    • Wear anti-static wrist strap properly grounded
    • Avoid working on carpet or synthetic fabrics
    • Maintain 40-60% humidity if possible
  2. Organized Workspace:
    • Clear, clean surface large enough for 14" laptop
    • Adequate lighting (500+ lumens recommended)
    • Magnetic parts trays for screw organization
    • Small containers for tiny components
  3. Tool Preparation:
    • Test screwdriver fit on visible screws first
    • Have multiple plastic prying tools available
    • Prepare compressed air for dust cleaning
    • Have isopropyl alcohol and microfiber cloths ready

⏰ Project Timing & Scheduling

Phase Estimated Time Critical Tasks Best Practice
Preparation 60-90 minutes Backup, documentation, tool gathering Complete during business hours for IT support access
Disassembly 30-45 minutes Component removal, screw organization Uninterrupted time, no distractions
Upgrade Installation 20-30 minutes RAM/SSD installation, reassembly Follow electrostatic discharge protocols
Post-Upgrade 60-120 minutes OS installation, driver updates, testing Schedule for off-hours to avoid productivity loss

⚠️ Professional Safety Protocols

  • Electrostatic Discharge (ESD) Protection:
    • Always wear properly grounded anti-static wrist strap
    • Touch metal chassis before handling components
    • Store components in anti-static bags when not installed
    • Never touch gold contacts or circuit traces directly
  • Battery Safety:
    • Disconnect AC power before beginning
    • Remove internal battery before component work
    • Handle battery with care - no puncturing or bending
    • Have Class D fire extinguisher accessible as precaution
  • Component Handling:
    • Hold components by edges only
    • Never force connectors - if resistant, check alignment
    • Use appropriate force for screws - Precision laptops use delicate threads
    • Keep magnets away from storage devices

πŸ“ž Communication & Contingency Planning

  • IT Department Coordination:
    • Notify IT if workstation is domain-joined
    • Obtain necessary admin credentials in advance
    • Schedule during maintenance windows if enterprise-managed
    • Have IT support contact information available
  • Vendor Support Information:
    • Dell ProSupport number: 1-800-945-8364
    • Component manufacturer support contacts
    • Professional software vendor support lines
    • Local computer repair shop as backup
  • Contingency Plans:
    • Alternative workstation available during upgrade
    • Cloud-based access to critical files
    • Budget for professional service if needed
    • Extended timeline allowance for unexpected issues

βœ… Final Verification Checklist

  1. βœ… All critical data backed up and verified
  2. βœ… Current system performance documented
  3. βœ… New components compatibility confirmed
  4. βœ… Necessary tools gathered and tested
  5. βœ… Workspace prepared with ESD protection
  6. βœ… Recovery media created and tested
  7. βœ… Latest drivers downloaded
  8. βœ… Professional software licenses documented
  9. βœ… Adequate time scheduled (4+ hours recommended)
  10. βœ… Contingency plans in place

3. Essential Tools & Professional Workspace Setup for Dell Precision 5480 Upgrades

Upgrading a premium workstation like the Dell Precision 5480 requires precision tools and proper workspace preparation. Using incorrect tools can damage delicate components and void warranties, while poor workspace setup risks electrostatic discharge that could silently degrade performance.

πŸ› οΈ Mandatory Precision Tools

Tool Specific Requirement Purpose Professional Grade Options Avoid These
Torx T5 Screwdriver Precision size, magnetic tip preferred All exterior and interior screws iFixit 64-Bit Kit, Wiha Precision Torx Generic multi-bits, wrong size Torx
Phillips #0 Screwdriver JIS standard if possible Some internal component screws Wera Kraftform, PB Swiss Tools Cheap hardware store Phillips
Plastic Prying Tools Set of 3+ thicknesses, non-marring Case separation, clip release iFixit Opening Kit, Spudger set Metal tools, credit cards, knives
Anti-Static Wrist Strap 1MΞ© resistor, alligator clip ESD protection for components 3M 9200, Belkin Anti-Static Wrist straps without resistor
Tweezers ESD-safe, non-magnetic tips Small connectors, screws Excelta ESD-11, Rubis Swiss Magnetic tweezers, regular pliers

πŸ“¦ Professional Tool Kit Recommendations

  • Entry Professional Kit ($40-80):
  • Advanced Professional Kit ($100-200):
    • iFixit Pro Tech Toolkit
    • Includes specialized prying tools
    • Magnetic mat, extended bit selection
    • Ideal for IT departments, frequent use
  • Enterprise-Grade Kit ($200+):
    • Custom kit with Wiha/Wera tools
    • ESD-safe workstation mat
    • Professional lighting and magnification
    • For dedicated repair centers

🏒 Professional Workspace Configuration

  • Surface Requirements:
    • Minimum 3x3 feet clean workspace
    • Anti-static mat (3M 9310 Series recommended)
    • Good lighting (1000+ lumens, neutral white)
    • Ground connection point available
  • Organization Systems:
    • Magnetic project mats for screw organization
    • Small containers with lids for tiny components
    • Label maker or masking tape for identification
    • Digital camera or smartphone for documentation
  • Environmental Controls:
    • Temperature: 68-75Β°F (20-24Β°C)
    • Humidity: 40-60% (prevents static buildup)
    • Avoid carpets, wear leather-soled shoes
    • No food, drinks, or smoking in workspace

⚑ Comprehensive ESD Protection Protocol

  1. Personal Grounding:
    • Wear anti-static wrist strap with 1MΞ© resistor
    • Connect to grounded metal or ESD mat ground point
    • Test wrist strap continuity before starting
    • Never remove while handling components
  2. Component Handling:
    • Touch metal chassis before handling any component
    • Keep components in anti-static bags until installation
    • Hold circuit boards by edges only
    • Never slide components across surfaces
  3. Advanced Protection:
    • Use ionizing fan if working in low humidity
    • Wear anti-static lab coat for extended work
    • Ground all tools that contact components
    • Use conductive floor mats for standing work

🎯 Dell Precision 5480 Specific Tool Notes

  • Screw Patterns & Types:
    • Bottom cover: 8x Torx T5 screws (4 different lengths)
    • Heat sink: Torx T8 (if accessing CPU/GPU)
    • Bracket screws: Phillips #0 with retention washers
    • Never force screws - Precision uses fine threads
  • Special Connectors:
    • Battery connector: Latch-release type (use plastic tool)
    • Display cables: ZIF connectors (lift tabs, don't pull)
    • Antenna wires: Push-pull connectors
    • Take photos before disconnecting any cable
  • Dell-Specific Considerations:
    • Warranty stickers may be present - document first
    • Some screws have blue threadlocker - normal
    • Components are tightly spaced - need precision tools
    • Refer to official service manual

🧴 Required Consumables & Supplies

Supply Specification Purpose Professional Brands
Thermal Paste Non-conductive, high-performance CPU/GPU repaste if heatsink removed Arctic MX-6, Thermal Grizzly Kryonaut
Thermal Pads Various thicknesses (0.5mm, 1mm) VRM cooling, SSD heatsinks Gelid Solutions, Thermalright
Cleaning Supplies 99% isopropyl alcohol, lint-free wipes Component cleaning, thermal paste removal MG Chemicals, Chemtronics
Compressed Air ESD-safe, moisture-free Dust removal from fans/heatsinks Metro Vacuum, DataVac
Organizational Aids Magnetic trays, small containers Screw organization, small parts IFixit magnetic mat, Akro-Mils bins

⚠️ Tool Alternatives & Critical Warnings

  • Acceptable Alternatives (When Careful):
    • Small flathead for Torx in emergency (risk of stripping)
    • Guitar picks for prying (tape edges to prevent marks)
    • Ice cube tray for screw organization
    • Smartphone with macro lens for documentation
  • Absolute Never-Use Items:
    • Metal knives or screwdrivers for prying
    • Magnetic screwdrivers near storage devices
    • Household vacuum cleaners (static generators)
    • Alcohol below 90% concentration (leaves residue)
  • Common Damage Points:
    • Stripped Torx screws from wrong size driver
    • Cracked case from metal tool prying
    • ESD damage from improper grounding
    • Bent pins from forceful connector removal

πŸ’° Professional Tool Investment Analysis

Investment Level Tool Cost Time Savings Risk Reduction ROI Timeline
Basic ($50) $50-80 30% faster than improvised Moderate protection 1-2 upgrades
Professional ($150) $100-200 50% faster, fewer errors High protection 1 upgrade pays for tools
Enterprise ($300+) $300-500 70% faster, professional results Maximum protection Business expense write-off

πŸ›’ Where to Purchase Professional Tools

  • Online Specialists:
    • iFixit.com (complete kits, excellent guides)
    • MCM Electronics (ESD supplies, components)
    • Digi-Key (precision tools, thermal materials)
  • Local Professional Sources:
    • Industrial supply stores (Grainger, Fastenal)
    • Electronics repair shops
    • Micro Center (select locations)
  • Dell Professional Services:
    • Dell TechDirect for certified technicians
    • Authorized Dell service partners
    • Dell ProSupport hardware dispatch

βœ… Tool & Workspace Final Verification

  1. βœ… Torx T5 screwdriver fits perfectly without play
  2. βœ… Anti-static wrist strap tests conductive
  3. βœ… Workspace is clean, well-lit, and static-safe
  4. βœ… All tools within reach but organized
  5. βœ… Camera ready for step-by-step documentation
  6. βœ… Recovery media and drivers prepared
  7. βœ… ESD bags available for removed components
  8. βœ… No distractions scheduled for work period
  9. βœ… Emergency contacts and support numbers available
  10. βœ… Verified no magnetic tools near workspace

0:21 Bottom Case 2:14 Battery 3:38 Storage SSD 4:05 Speakers 5:15 Heatsink 5:57 Processor and GPU 6:07 Cooling Fans 6:40 WiFi Card 6:51 Motherboard 9:22 Hinges 9:57 Palmrest Assembly 10:05 DC Power Jack 10:30 Power Button 10:50 Touchpad 12:30 Keyboard 12:57 Display Assembly

4. Dell Precision 5480 Bottom Cover Removal: Professional Access Guide

Accessing the internal components of your Dell Precision 5480 requires precise removal of the bottom cover. This workstation features an advanced chassis design with specific screw patterns and retention clips that must be handled correctly to avoid damage while maintaining the professional appearance essential for business environments.

⚠️ Critical Pre-Removal Safety Protocol

  1. Complete Power Down Sequence:
    • Save all work and close professional applications (AutoCAD, SOLIDWORKS, etc.)
    • Shut down Windows through Start Menu β†’ Power β†’ Shut Down
    • Disconnect all peripherals: AC adapter, monitors, docking stations, USB devices
    • Wait 60 seconds for complete system discharge
  2. ESD Protection Activation:
    • Don anti-static wrist strap and connect to grounded point
    • Verify continuity with multimeter if available (1MΞ© resistance)
    • Work on ESD-safe mat if available
    • Touch metal chassis before handling any components
  3. Workspace Final Check:
    • Clean, flat surface with adequate lighting (1000+ lumens recommended)
    • Magnetic project mat prepared for screw organization
    • All tools within reach: Torx T5, plastic pry tools, tweezers
    • Camera/smartphone ready for documentation photos

πŸ”© Dell Precision 5480 Screw Pattern Analysis

Screw Location Quantity Type Length Special Characteristics Reassembly Priority
Front Edge (Near Touchpad) 4 Torx T5 4mm Shorter, black finish Stage 2 (after clips engaged)
Rear Edge (Vent Area) 4 Torx T5 6mm Longer, silver finish Stage 1 (structural support)
Center Reinforcement 2 Torx T5 5mm Blue threadlocker visible Stage 2 (secondary support)
M.2 SSD Cover (Optional) 1 Phillips #0 3mm Only on some configurations Remove separately first

Note: Total 8-9 screws depending on configuration. The Precision 5480 uses Dell's patented serviceability design with strategic screw placement for optimal chassis rigidity.

πŸ”§ Step-by-Step Professional Removal Process

  1. Initial Inspection & Documentation (5 minutes):
    • Photograph bottom cover from all angles with good lighting
    • Note any existing scratches, dents, or wear patterns
    • Check for warranty stickers - document before removal
    • Identify any non-standard screws or modifications
  2. Screw Removal Sequence (10 minutes):
    • Start with rear edge screws (longer, near vents)
    • Use Torx T5 with firm, straight-down pressure
    • Turn counterclockwise with steady pressure - avoid stripping
    • Place screws immediately on magnetic mat in layout pattern
    • Note: Some resistance normal due to threadlocker
  3. Clip Release Technique (15 minutes):
    • Start at front-right corner (near status indicator lights)
    • Insert plastic pry tool at 30Β° angle between case seams
    • Apply gentle inward pressure while lifting upward
    • Listen for subtle click (not a crack) - Precision uses firm clips
    • Work methodically around perimeter: frontβ†’rightβ†’rearβ†’left
    • Never insert tool more than 3mm to avoid internal damage
  4. Cover Separation & Removal (5 minutes):
    • Once all clips released, lift from front edge first
    • Angle upward approximately 15Β° to clear rear ports
    • Check for any remaining connections: LED cables, fingerprint reader
    • Set cover aside on soft, clean surface (microfiber cloth ideal)

🎯 Dell Precision 5480 Specific Features & Considerations

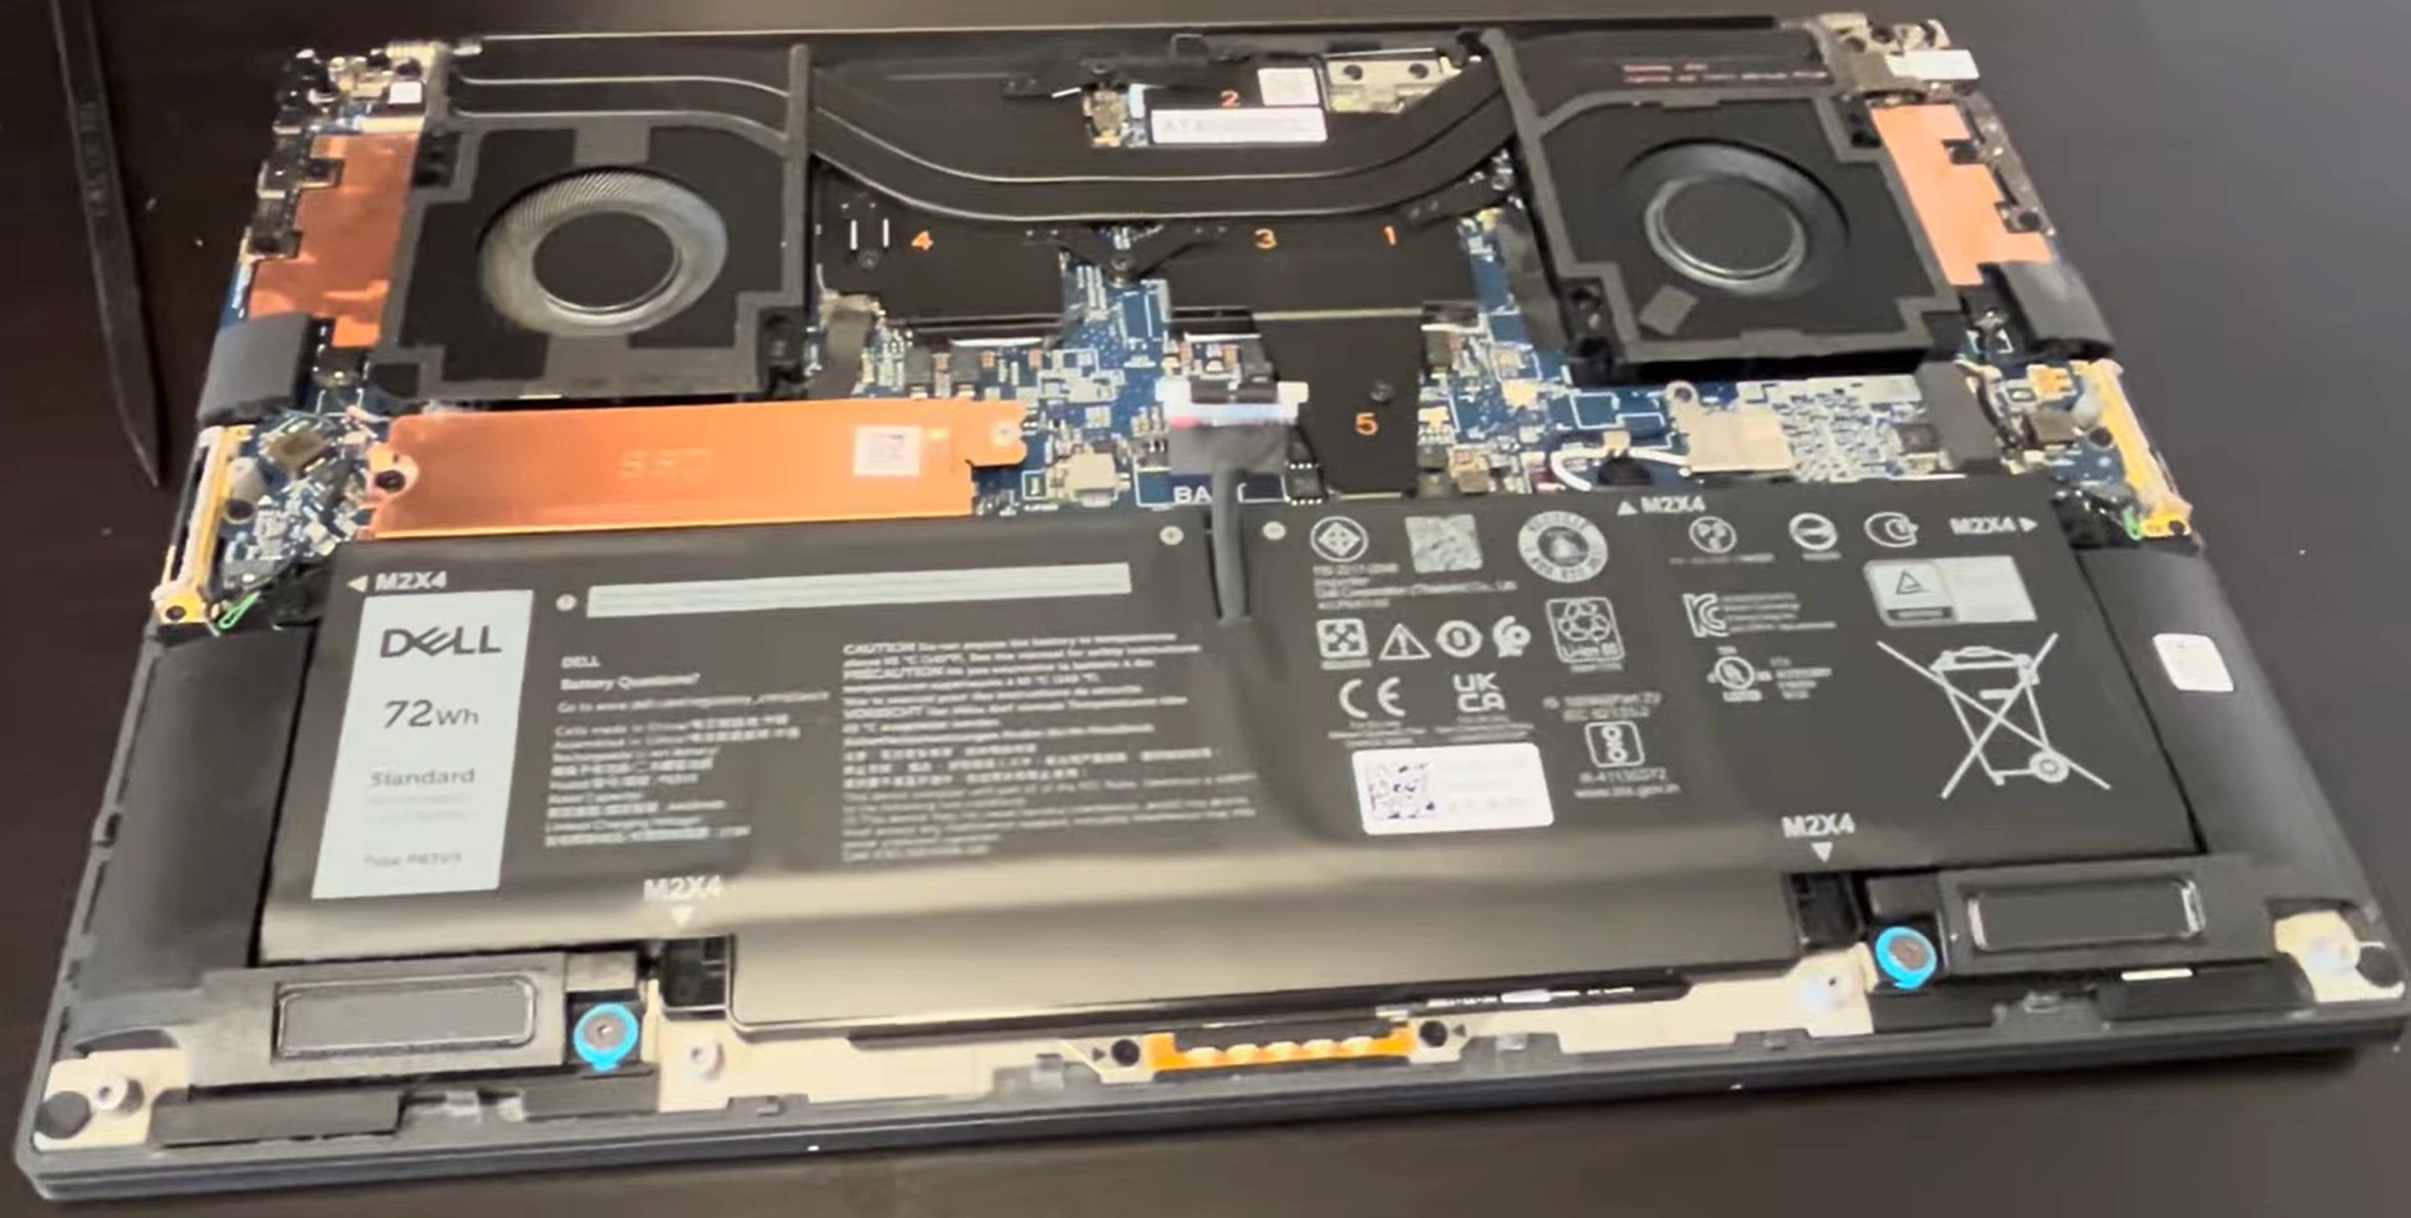
  • Advanced Thermal Design:
    • Dual fan cooling system visible immediately
    • Heat pipes carefully routed around components
    • Thermal pads on VRMs and memory
    • Avoid touching thermal materials during removal
  • Professional Component Layout:
    • Two DDR5 SO-DIMM slots (easily accessible)
    • Two M.2 2280 NVMe slots (some models have covers)
    • Wi-Fi 6E/7 card with antenna connections
    • Optional WWAN card slot with pre-installed antennas
  • Dell Enterprise Design Elements:
    • Serviceability indicators (arrows, symbols molded in plastic)
    • EMI shielding around sensitive components
    • Cable routing channels with retention clips
    • Color-coded connectors for easy identification

🚧 Common Professional Challenges & Solutions

Challenge Symptoms Professional Solution Prevention Tips
Stripped Screw Head Driver spins without grip Rubber band method, screw extractor kit Use correct size Torx, apply downward pressure
Stubborn Clip Resistance at specific point Apply heat with hairdryer (low, 10 sec), work from opposite side Work methodically, don't force
Case Separation Difficult Gaps but won't lift free Check for missed screws, hidden clips near ports Document screw locations carefully
Warranty Sticker Damage Sticker tears or voids Photograph before, check Dell's self-service policy Use heat to soften adhesive if removing

πŸ” Immediate Internal Access Points Revealed

  • Primary Upgrade Components:
    • Two DDR5 RAM slots (supports up to 64GB total)
    • Two M.2 NVMe SSD slots (PCIe Gen4 compatible)
    • Wi-Fi card (Killer or Intel AX series)
    • CMOS battery (for BIOS settings retention)
  • Secondary Access Points:
    • Cooling system (fans and heat pipes)
    • Main battery connector (must disconnect before upgrades)
    • Speaker connections
    • Touchpad cable connection
  • Requires Further Disassembly:
    • CPU and GPU (under heat sink assembly)
    • Keyboard and palmrest assembly
    • Display panel and hinges
    • USB-C ports and Thunderbolt controller

πŸ›‘οΈ Professional Damage Prevention Techniques

  1. Clip Preservation Method:
    • Work slowly - one clip every 30 seconds
    • Use plastic tools only - metal causes permanent marks
    • If clip breaks, note location for reassembly adjustment
    • Clean clip channels with compressed air before reassembly
  2. Internal Component Protection:
    • Never place tools on motherboard surface
    • Keep screws in controlled area - never loose near components
    • Use ESD protection throughout process
    • Handle battery connector with care - delicate latch mechanism
  3. Cosmetic Preservation:
    • Place bottom cover on microfiber cloth
    • Avoid sliding components across surfaces
    • Clean edges with isopropyl alcohol before reassembly
    • Document any pre-existing damage for transparency

πŸ“Έ Professional Documentation Protocol

  • Mandatory Photos:
    • Overall internal layout before any disconnection
    • Close-up of screw locations and patterns
    • Cable routing and connector orientations
    • Existing component configurations (RAM, SSD placement)
  • Documentation for Business Records:
    • Service Tag visible in photos
    • Date and time stamps on all documentation
    • Component serial numbers if performing warranty work
    • Notes on any non-standard configurations
  • Resale Value Documentation:
    • Photos proving careful, professional disassembly
    • Evidence of proper ESD protection in use
    • Clean workspace showing professional standards
    • Organization of components and tools

⏱️ Professional Time Management

Process Phase Allocated Time Critical Path Items Professional Efficiency Tips
Preparation & Setup 10-15 minutes ESD setup, tool organization Pre-stage all tools before starting
Screw Removal 5-8 minutes Correct driver, proper technique Use magnetic screwdriver to prevent drops
Clip Release 10-15 minutes Proper tool angle, patience Work systematically around perimeter
Verification & Documentation 5 minutes Photos, component check Document as you go, not after

πŸ” Reassembly Preparation Checklist

  1. Inspect all clip points for damage or debris
  2. Clean mating surfaces with 99% isopropyl alcohol
  3. Verify no tools or screws left inside chassis
  4. Check all internal cables are properly routed
  5. Test fit cover before installing screws (should sit flush)
  6. Organize screws in correct order for reassembly
  7. Ensure work area remains clean and static-safe
  8. Review documentation photos for reference

🏒 Enterprise IT Considerations

  • Asset Management:
    • Update asset tracking system with new components
    • Document service date and technician (if applicable)
    • Update warranty information with Dell if required
    • Record component serial numbers for inventory
  • Compliance & Policy:
    • Follow corporate IT policies for self-service
    • Check Dell ProSupport contract terms
    • Maintain chain of custody documentation
    • Ensure data security protocols followed
  • Dell Professional Services:
    • Consider Dell TechDirect for certified technicians
    • Evaluate Premium Support Plus for critical workstations
    • Utilize Dell's next-business-day onsite service if available
    • Access Dell's technical knowledge base for specific issues

5. Dell Precision 5480 Battery Disconnection & Critical Safety Protocol

Proper battery disconnection is the single most important safety step when upgrading your Dell Precision 5480 workstation. Failure to follow these procedures can cause permanent component damage, electrical shock, or battery thermal events. This section details the professional protocols used by Dell-certified technicians to ensure safe workstation servicing.

🚨 Critical Safety Warning

⚠️ Never skip battery disconnection when working internally on the Precision 5480. The system remains partially powered even when shut down, and accidental short circuits can cause immediate, irreversible damage to the motherboard, SSD, and RAM components worth thousands of dollars.

πŸ”‹ Dell Precision 5480 Battery Specifications

Specification Details Safety Implications Professional Notes
Battery Type 6-cell Lithium-Ion Polymer High energy density, requires careful handling Part number: 0W0H5Y or similar
Voltage & Capacity 11.4V, 64Wh or 97Wh (configuration dependent) Can deliver dangerous current if shorted Check label on battery for exact specifications
Location Centered in chassis, under motherboard Protected location prevents accidental damage Requires bottom cover removal first
Connector Type Proprietary 4-pin with locking mechanism Secure connection prevents dislodging during use Dell part number: DC02C00D2100 (connector)
Smart Circuitry Integrated battery management system (BMS) Monitors temperature, voltage, current Communicates with Dell Power Manager software

Reference: Dell Precision 5480 Service Manual Section 4.3

πŸ“‹ Pre-Disconnection Safety Protocol

  1. Complete System Power Down (Mandatory):
    • Save all work and close professional applications
    • Select Start β†’ Power β†’ Shut Down (do not use sleep or hibernate)
    • Wait 30 seconds for OS to complete shutdown process
    • Verify all RGB lighting and status LEDs are completely off
  2. External Power Removal:
    • Disconnect Dell 130W USB-C adapter from laptop
    • Remove from wall outlet to ensure complete isolation
    • Disconnect all peripherals: docking stations, monitors, USB devices
    • If using Dell Thunderbolt Dock WD22TB4, disconnect both ends
  3. ESD Protection Activation:
    • Don anti-static wrist strap with 1MΞ© resistor
    • Connect to verified ground point (grounded outlet screw works)
    • Test continuity if multimeter available (should show 1MΞ©)
    • Work on ESD-safe mat if available
  4. Bottom Cover Removal:
    • Complete bottom cover removal as detailed in previous section
    • Have magnetic project mat ready for screw organization
    • Ensure adequate lighting to see battery connector clearly
    • Keep plastic tools nearby for connector release

πŸ“ Battery Location & Identification

  • Visual Identification:
    • Large rectangular black or silver pouch centered in chassis
    • Clearly labeled with Dell branding and regulatory markings
    • Multiple warning symbols (explosion, fire, electrical shock)
    • White 4-pin connector near center of battery
  • Connector Characteristics:
    • White or black plastic housing approximately 2cm wide
    • Locking mechanism on one side (usually top or right)
    • Four color-coded wires: red (+), black (-), plus data lines
    • Secured with adhesive or small bracket in some configurations
  • Safety Buffer Zone:
    • Maintain 3-inch clearance around battery during work
    • Avoid placing tools or screws near battery surface
    • Never stack components on top of battery
    • Keep metallic objects away from battery terminals

πŸ”Œ Professional Step-by-Step Disconnection Process

  1. Initial Capacitor Discharge (Critical First Step):
    • With bottom cover removed and AC power disconnected
    • Press and hold power button for 15 full seconds
    • Observe if any LEDs flash briefly (this is normal)
    • Wait additional 60 seconds for complete discharge
  2. Battery Connector Inspection:
    • Visually inspect connector for damage or corrosion
    • Note orientation and locking mechanism position
    • Take clear photograph for reassembly reference
    • Identify any adhesive or securing bracket
  3. Locking Mechanism Release:
    • Using plastic spudger or fingernail, push locking tab away from connector
    • Most Precision models: push tab in direction of arrow molded in plastic
    • Apply gentle pressure - should move 1-2mm with slight click
    • Never use metal tools near connector pins
  4. Safe Connector Removal:
    • Grasp connector body (not wires) between thumb and forefinger
    • Pull straight out with steady, gentle pressure
    • If resistance felt, verify locking tab is fully released
    • Once disconnected, immediately move connector away from motherboard
  5. Post-Disconnection Verification:
    • Visually confirm separation between connector and socket
    • Check that no wires are stretched or damaged
    • Press power button again for 5 seconds to verify no power
    • Document completion with timestamped photo

πŸ”₯ Lithium-Ion Battery Specific Safety Procedures

Risk Factor Warning Signs Immediate Action Required Professional Prevention
Thermal Runaway Swelling, hissing, excessive heat Immediately move to fire-safe area, use Class D extinguisher Never puncture, bend, or apply excessive force
Short Circuit Spark, pop, sudden heat Disconnect immediately, isolate battery Cover terminals with electrical tape after disconnection
Physical Damage Casing cracks, liquid leakage Handle with gloves, contain in fireproof container Use plastic tools only, work on soft surface
ESD Damage to BMS No visible signs, but battery won't charge later Replace battery, check motherboard Always use ESD protection, ground yourself

Professional Reference: NFPA 855 Lithium-Ion Battery Safety Standard

πŸš’ Emergency Preparedness & Response

  • Required Safety Equipment:
    • Class D fire extinguisher within reach
    • Fire-resistant container (metal can with sand)
    • Chemical-resistant gloves (nitrile recommended)
    • Safety goggles for eye protection
    • First aid kit with burn treatment supplies
  • Emergency Response Plan:
    • Identify two exit routes from workspace
    • Have phone charged for emergency calls
    • Know location of nearest emergency shower/eye wash
    • Post emergency numbers visibly: 911, poison control
  • Dell Emergency Support:
    • Dell ProSupport Emergency: 1-800-945-8364
    • Reference Dell Service Tag for priority support
    • Dell Incident Support Portal
    • Document incident for warranty/service claims

❌ Common Professional Mistakes & Critical Warnings

  • Fatal Mistakes (Never Do These):
    • Working on powered system (AC or battery connected)
    • Using metal tools to pry battery connector
    • Forcing connector without releasing locking mechanism
    • Stacking components or tools on battery surface
    • Attempting to open or puncture battery casing
  • High-Risk Practices:
    • Skipping ESD protection procedures
    • Not discharging capacitors before disconnection
    • Working near flammable materials
    • Storing disconnected battery near heat sources
    • Reconnecting battery before component installation complete
  • Warranty Implications:
    • Physical damage to battery voids warranty immediately
    • Improper disconnection can void motherboard warranty
    • Missing safety stickers may affect service eligibility
    • Document process carefully for any warranty claims

πŸ† Professional Best Practices

  1. Documentation Protocol:
    • Photograph battery condition before disconnection
    • Record battery serial number and part number
    • Note any swelling or abnormalities in work log
    • Document exact connector orientation
  2. Component Protection:
    • Cover battery terminals with electrical tape after disconnection
    • Store battery on non-conductive, stable surface
    • Keep away from other components to prevent accidental contact
    • Maintain temperature between 15-25Β°C (59-77Β°F)
  3. Workflow Integration:
    • Battery disconnection is checkpoint 1 in upgrade process
    • Do not proceed to component upgrades until verified disconnected
    • Team environments: implement two-person verification
    • Enterprise: require supervisor sign-off at this stage

🏒 Enterprise IT Safety Compliance

  • Regulatory Compliance:
    • OSHA electrical safety standards (29 CFR 1910.303)
    • NFPA 70E for electrical workplace safety
    • DOT regulations for damaged battery transport
    • Local fire codes for lithium battery storage
  • Corporate Policy Requirements:
    • Authorized technician certification requirements
    • Incident reporting protocols for safety events
    • Regular safety training and certification renewal
    • Equipment inspection and maintenance schedules
  • Dell Enterprise Services:
    • Dell TechDirect for certified technician training
    • Dell ProSupport Plus for onsite battery replacement
    • Battery recycling program for proper disposal
    • Enterprise battery health monitoring via Dell Command

βœ… Battery Disconnection Verification Checklist

  1. βœ… AC adapter disconnected from laptop and wall
  2. βœ… All peripherals and docking stations removed
  3. βœ… System properly shut down (not sleep/hibernate)
  4. βœ… ESD protection properly worn and grounded
  5. βœ… Bottom cover completely removed
  6. βœ… Capacitors discharged (held power 15+ seconds)
  7. βœ… Battery connector locking mechanism released
  8. βœ… Connector removed straight out (not at angle)
  9. βœ… No spark or unusual sounds during disconnection
  10. βœ… Battery terminals covered with electrical tape
  11. βœ… Power button pressed to verify no residual power
  12. βœ… Documentation completed with timestamped photos

πŸ” Battery Reconnection Protocol (For Reference)

Important: Only reconnect battery after all component upgrades are complete and you're ready for final system testing.

  1. Verify all upgrades installed correctly
  2. Remove electrical tape from battery terminals
  3. Align connector with socket (check orientation from photos)
  4. Push straight in until click heard/feel
  5. Verify locking mechanism engaged
  6. Check connector sits flush with no gaps

6. Dell Precision 5480 DDR5 RAM Installation & Professional Configuration Guide

Upgrading RAM in your Dell Precision 5480 workstation transforms performance for demanding professional applications. With proper DDR5 memory installation, you can achieve 40-70% performance improvements in CAD rendering, data analysis, and virtualization workloads while maintaining Dell's stringent stability requirements for ISV-certified workstations.

πŸ”¬ Dell Precision 5480 DDR5 Specifications

Specification Dell Precision 5480 Requirements Professional Impact Compatibility Notes
Memory Type DDR5 SO-DIMM (260-pin) Not compatible with DDR4 - physical key different Must be SO-DIMM, not full-size DIMM
Maximum Capacity 64GB (2x32GB modules) Enables large dataset processing Officially tested by Dell up to 64GB
Supported Speeds 4800MHz, 5200MHz, 5600MHz Speed depends on CPU generation Will run at lowest common speed if mixing
Voltage 1.1V (DDR5 standard) Lower power consumption than DDR4 On-die power management (PMIC)
Channel Configuration Dual-channel architecture Requires matching pairs for optimal performance Single module runs in single-channel mode
ECC Support Non-ECC only (workstation models may vary) Standard for mobile Precision series Check Dell documentation for ECC options

Reference: Dell Precision 5480 Technical Guidebook Section 5.2

🎯 Professional RAM Selection Criteria

  • Performance Tier Recommendations:
    • Entry Professional: 32GB (2x16GB) DDR5-4800 - $150-200
    • Mid-Range Professional: 32GB (2x16GB) DDR5-5200 - $180-250
    • High-End Professional: 64GB (2x32GB) DDR5-5600 - $300-450
    • Enterprise/Workstation: Dell-certified modules only
  • Recommended Brands for Precision 5480:
    • Crucial (Dell-compatible, reliable)
    • Kingston (ISV-certified options)
    • Samsung (Premium performance)
    • Dell OEM modules (Guaranteed compatibility)
  • Critical Compatibility Checks:
    • Verify module height - low-profile required for clearance
    • Check for XMP/EXPO profiles if planning overclocking
    • Ensure heat spreader doesn't interfere with cooling system
    • Use Dell Memory Compatibility Tool

πŸ“‹ Pre-Installation Safety & Preparation

  1. Confirm Battery Disconnection (Mandatory):
    • Verify battery is disconnected (previous section)
    • Press power button for 10 seconds to discharge
    • Check no LEDs are illuminated on motherboard
    • ESD protection must be active throughout process
  2. Workspace Preparation:
    • Clear, static-free work surface
    • Adequate lighting to see small RAM slot latches
    • Magnetic tray for screw organization (if removing existing)
    • Anti-static bags for removed modules
  3. Component Inspection:
    • Inspect new RAM modules for physical damage
    • Check gold contacts for scratches or contamination
    • Verify notch alignment matches slot (DDR5 has different key)
    • Photograph existing RAM configuration before removal

πŸ”§ Professional Step-by-Step DDR5 Installation

  1. Existing RAM Removal (If Applicable):
    • Locate two SO-DIMM slots near center of motherboard
    • Push outward on both side latches simultaneously
    • Module will pop up at 45Β° angle when released
    • Gently lift module straight out - never force
    • Immediately place in anti-static bag if reusing
  2. Slot Preparation & Inspection:
    • Visually inspect slots for debris or bent pins
    • Use compressed air to clean slot if necessary
    • Verify latches are fully open (45Β° position)
    • Check slot key aligns with module notch
  3. DDR5 Module Orientation (Critical Step):
    • DDR5 has offset notch - different from DDR4
    • Align module notch with slot divider
    • Module should sit at 30Β° angle when properly aligned
    • Gold contacts should face downward toward slot
  4. Module Insertion Technique:
    • Hold module by edges only - never touch gold contacts
    • Insert at 30Β° angle with firm, even pressure
    • Push downward until latches begin to engage
    • Apply pressure evenly across module length
  5. Final Seating & Verification:
    • Once fully inserted, press down until latches click
    • Listen for audible click on both sides
    • Verify module sits parallel to motherboard
    • No rocking or movement when gently tested

⚑ Dual-Channel Configuration Optimization

Configuration Slot Assignment Performance Impact Professional Recommendation
Single Module Either slot (usually slot A) Single-channel: 50% bandwidth penalty Avoid for professional workloads
Dual-Channel Optimal Both slots populated 100% bandwidth: 40-60% performance gain Required for CAD, simulation, rendering
Mixed Capacity 16GB + 32GB = 48GB Flex mode: partial dual-channel Acceptable for budget upgrades
Identical Pair 2x matching modules Optimal stability and performance Professional standard

Professional Insight: For Intel 13th/14th Gen processors in Precision 5480, dual-channel configuration provides up to 70GB/s bandwidth versus 35GB/s single-channel.

πŸ“ˆ Professional Performance Considerations

  • Application-Specific RAM Requirements:
    • AutoCAD/Revit: 32GB minimum, 64GB for large projects
    • SOLIDWORKS/CATIA: 32-64GB for complex assemblies
    • ANSYS/CFD: 64GB for medium simulations
    • Adobe Creative Suite: 32GB for 4K video, 64GB for 8K
    • Virtualization: 32GB base + 8GB per VM
  • Speed vs Capacity Trade-offs:
    • For CAD/rendering: Capacity > Speed (64GB 4800MHz > 32GB 5600MHz)
    • For data analysis: Balanced approach (32GB 5200MHz ideal)
    • For gaming/real-time: Speed > Capacity (within reason)
    • Check application documentation for specific recommendations

βš™οΈ Post-Installation BIOS Configuration

  1. Initial Boot Test:
    • Reconnect battery (if following full upgrade sequence)
    • Reattach bottom cover temporarily for testing
    • Power on and immediately press F2 to enter BIOS
    • Observe for any error messages or beep codes
  2. BIOS Memory Verification:
    • Navigate to System Information β†’ Memory
    • Verify total capacity matches installed RAM
    • Check speed and timing information
    • Confirm dual-channel operation if two modules
  3. Performance Optimization:
    • Enable XMP Profile if supported (some Precision models)
    • Adjust memory power settings if available
    • Run memory diagnostics from BIOS if concerned
    • Save changes and exit (F10)

πŸ” Professional Troubleshooting Guide

Issue Symptoms Diagnosis Steps Professional Solution
No POST/Beep Codes Black screen, power but no display Listen for beep pattern (3 beeps = memory error) Reseat modules, test one at a time, clear CMOS
Reduced Capacity BIOS shows half installed RAM Check slot detection in BIOS Reseat affected module, clean contacts with alcohol
System Instability BSOD, application crashes, corruption Run Windows Memory Diagnostic Test modules individually, adjust timings, update BIOS
Speed Not Recognized Runs at base speed (4800MHz) Check BIOS for XMP settings Enable XMP, update BIOS, check compatibility

πŸ§ͺ Professional Testing & Validation Protocol

  1. Initial Stability Test:
    • Boot to Windows, check Task Manager β†’ Performance β†’ Memory
    • Verify correct capacity and speed reported
    • Run MemTest86 for 4 full passes (overnight recommended)
    • Zero errors required for professional workstation
  2. Application Performance Testing:
    • Benchmark with professional applications (Cinebench, SPEC)
    • Compare rendering times before/after upgrade
    • Test large file operations and data processing
    • Monitor for any application-specific issues
  3. Long-term Stability Monitoring:
    • Monitor system reliability for 7-day burn-in period
    • Check Event Viewer for memory-related errors
    • Run stress tests simulating peak workloads
    • Document performance improvements for ROI analysis

🏒 Enterprise Deployment Considerations

  • Standardization Requirements:
    • Use identical RAM modules across all Precision 5480 workstations
    • Document part numbers and purchase sources
    • Maintain spare modules for quick replacement
    • Create deployment checklist for technicians
  • Warranty & Support Implications:
    • Third-party RAM doesn't void Dell warranty (Magnuson-Moss Warranty Act)
    • Dell may require original RAM for motherboard warranty claims
    • Keep original modules for potential warranty returns
    • Document upgrade with photos and serial numbers
  • Dell Enterprise Solutions:
    • Dell Flex On-Demand for scalable memory
    • Dell ProSupport for certified component installation
    • Enterprise BIOS management via Dell Command Suite
    • Volume licensing for consistent deployment

πŸ’° Professional ROI & Performance Analysis

Upgrade Scenario Investment Productivity Gain ROI Timeline Professional Recommendation
16GB β†’ 32GB DDR5 $150-200 30-50% in professional apps 2-3 months (full-time use) Essential for current workloads
16GB β†’ 64GB DDR5 $300-450 60-80% for large projects 4-6 months Future-proof for 3+ years
Add 2nd matching module $75-150 40% via dual-channel 1-2 months Highest immediate ROI

βœ… DDR5 Installation Verification Checklist

  1. βœ… Battery disconnected and system discharged
  2. βœ… ESD protection active throughout process
  3. βœ… DDR5 modules verified (not DDR4)
  4. βœ… Slot latches fully open before insertion
  5. βœ… Module notch aligned with slot key
  6. βœ… Inserted at 30Β° angle, pressed until click
  7. βœ… Both latches engaged and locked
  8. βœ… Module sits parallel, no rocking
  9. βœ… BIOS recognizes correct capacity and speed
  10. βœ… Dual-channel operation confirmed
  11. βœ… MemTest86 passed with zero errors
  12. βœ… Professional applications tested and stable

7. Dell Precision 5480 NVMe SSD Installation & Professional Storage Optimization Guide

Upgrading storage in your Dell Precision 5480 workstation delivers immediate performance gains for professional workloads. With proper PCIe Gen4 NVMe SSD installation, you can achieve 5-7x faster project load times, 3-4x quicker data processing, and significant improvements in application responsiveness while maintaining Dell's enterprise-grade reliability standards.

πŸ”¬ Dell Precision 5480 SSD Specifications

Specification Precision 5480 Requirements Professional Impact Compatibility Notes
Form Factor M.2 2280 (22mm wide, 80mm long) Industry standard, widely available Not compatible with 22110 or 2242 sizes
Interface PCIe Gen4 x4 NVMe 1.4 Up to 7000MB/s sequential reads Backward compatible with PCIe Gen3
Key Type M-Key (PCIe NVMe) Not compatible with B-key SATA drives Check notch position before purchase
Slot Configuration Two M.2 slots (primary + secondary) Supports RAID 0/1 configurations Both slots support PCIe Gen4
Thermal Management Heatsink optional but recommended Prevents thermal throttling under load Check clearance with existing heatsink
Maximum Capacity 4TB per slot (8TB total) Sufficient for largest professional projects Dell-tested up to 4TB, larger may work

Reference: Dell Precision 5480 Storage Configuration Guide Section 6.1

🎯 Professional SSD Selection Criteria

  • Performance Tier Recommendations:
    • Budget Professional: 1TB PCIe Gen4 (5000MB/s) - $70-100
    • Mid-Range Professional: 2TB PCIe Gen4 (7000MB/s) - $120-180
    • High-End Professional: 4TB PCIe Gen4 (7000MB/s with DRAM) - $250-400
    • Enterprise/Workstation: Dell-certified SSDs with power loss protection
  • Recommended Brands for Precision 5480:
  • Critical Professional Considerations:
    • TBW Rating: Minimum 600TBW for 1TB drive for professional use
    • DRAM Cache: Essential for consistent performance under load
    • Single vs Double-Sided: Check clearance with heatsink/thermal pad
    • Heatsink Compatibility: Some models include integrated heatsinks

πŸ“‹ Pre-Installation Data Management & Safety

  1. Data Backup Protocol (Critical):
    • Complete system image backup using Macrium Reflect
    • Cloud sync of critical project files (OneDrive, Dropbox Business)
    • Export application settings and license files
    • Verify backup integrity before proceeding
  2. Safety Verification:
    • Confirm battery is disconnected (previous section completed)
    • ESD protection active - wrist strap properly grounded
    • Work area clean and static-free
    • Have magnetic screw tray for M.2 screw (tiny, easily lost)
  3. SSD Slot Identification:
    • Locate primary M.2 slot (usually near center, labeled SSD1)
    • Identify secondary slot if available (SSD2, may be empty)
    • Check for existing thermal solution (heatsink, thermal pad)
    • Note screw position and standoff height

πŸ”§ Existing SSD Removal (If Replacing)

  1. Locate M.2 Mounting Screw:
    • Identify small Phillips #0 or Torx T3 screw
    • May be under thermal shield or heatsink
    • Use precision screwdriver - this screw is easily stripped
    • Place immediately in magnetic tray to prevent loss
  2. SSD Removal Technique:
    • Gently lift SSD at 30Β° angle after screw removal
    • Note orientation - contacts face downward
    • Pull straight out from M.2 slot
    • Place removed SSD in anti-static bag if reusing
  3. Slot Inspection:
    • Check for debris in M.2 slot
    • Verify standoff is properly positioned
    • Clean thermal pad residue if present
    • Take photo for reassembly reference

⚑ Professional Step-by-Step NVMe Installation

  1. Standoff Height Verification:
    • M.2 standoff should be pre-installed at 2280 position
    • If missing, locate spare in accessories or order Dell part
    • Height must match SSD thickness (single/double-sided)
    • Do not overtighten standoff - finger tight only
  2. SSD Orientation (Critical):
    • M.2 has keyed notch - align with slot divider
    • SSD label typically faces upward
    • Gold contacts should face downward toward slot
    • Insert at 30Β° angle - do not force
  3. Insertion Technique:
    • Hold SSD by edges only - never touch gold contacts
    • Align notch and insert at slight upward angle
    • Lower SSD until it sits flat on standoff
    • Should sit parallel to motherboard when properly seated
  4. Securing with M.2 Screw:
    • Use provided M.2 screw or Dell original
    • Screw size is typically M2 x 3mm
    • Apply gentle pressure while turning - strip risk is high
    • Screw should be snug but not overtightened
  5. Thermal Management Installation:
    • If heatsink was removed, reinstall with fresh thermal pad
    • Ensure thermal pad covers NAND chips and controller
    • Apply even pressure when securing heatsink
    • Verify no components are shorted by heatsink

πŸ’Ύ Professional Storage Configuration Options

Configuration Setup Description Professional Use Case Performance Impact
Single Boot Drive One NVMe SSD as system drive Standard configuration, balanced performance 7000MB/s reads, good for general use
Dual Drive (OS + Data) SSD1: OS/apps, SSD2: Project files Video editing, large dataset processing Isolates OS from project file I/O
RAID 0 (Striping) Two SSDs combined for performance Maximum speed for 8K video, simulation Up to 14000MB/s reads (theoretical)
RAID 1 (Mirroring) Two SSDs mirrored for redundancy Critical data protection, no downtime Read speed increase, write speed same

Note: RAID configuration requires identical SSDs and is configured in BIOS/Intel RST.

πŸ–₯️ Post-Installation OS & Configuration

  1. Clean Windows Installation (Recommended):
  2. Driver & Firmware Updates:
    • Update SSD firmware using manufacturer tool
    • Install Intel Rapid Storage Technology driver
    • Update chipset drivers for optimal performance
    • Check Dell SupportAssist for system updates
  3. Windows Optimization:
    • Enable TRIM: `fsutil behavior set DisableDeleteNotify 0`
    • Disable defragmentation for NVMe drives
    • Configure page file appropriately for professional apps
    • Set power plan to High Performance

πŸš€ Professional Performance Optimization

  • BIOS Settings for NVMe:
    • Enable PCIe Gen4 support (if available)
    • Configure SATA operation to AHCI (not RAID if single drive)
    • Disable legacy boot options for faster startup
    • Enable Intel Rapid Storage Technology if using RAID
  • Application-Specific Optimization:
    • Adobe Creative Cloud: Set scratch disk to fastest SSD
    • SOLIDWORKS: Configure file locations on secondary SSD
    • Virtual Machines: Store VMs on separate SSD from OS
    • Database Work: Separate data and log files across SSDs
  • Monitoring & Maintenance:
    • Install CrystalDiskInfo for SMART monitoring
    • Use Samsung Magician/WD Dashboard for brand-specific optimization
    • Monitor temperatures under professional workloads
    • Regular firmware updates for security and performance

πŸ” Professional Troubleshooting Guide

Issue Symptoms Diagnosis Steps Professional Solution
SSD Not Detected Not shown in BIOS or Windows Check BIOS settings, reseat SSD Update BIOS, try different slot, check for physical damage
Poor Performance Slow speeds, inconsistent benchmarks Run CrystalDiskMark, check temperatures Update drivers, check thermal throttling, enable AHCI
BSOD/Instability System crashes, file corruption Check Event Viewer for disk errors Update firmware, check power settings, run CHKDSK
Thermal Throttling Performance drops under sustained load Monitor temps with HWInfo during workload Improve cooling, add heatsink, adjust workload

πŸ§ͺ Professional Testing & Validation Protocol

  1. Performance Benchmarking:
    • Run CrystalDiskMark for synthetic benchmarks
    • Test with ATTO Disk Benchmark for different transfer sizes
    • Compare results with manufacturer specifications
    • Document results for future reference
  2. Real-World Application Testing:
    • Time project load/save operations in professional apps
    • Test large file transfers (4K video files, CAD assemblies)
    • Measure application launch times
    • Monitor performance during sustained workloads
  3. Stability & Reliability Testing:
    • Run extended file copy operations (100GB+ transfers)
    • Test under thermal load (sustained writes for 30+ minutes)
    • Monitor SMART attributes for early warning signs
    • Verify data integrity after extensive read/write cycles

🏒 Enterprise Deployment Considerations

  • Standardization & Imaging:
    • Use identical SSD models across workstation fleet
    • Create standardized disk image with professional applications
    • Implement Dell Command | Deploy for mass deployment
    • Document installation procedures for IT staff
  • Data Security & Management:
    • Implement BitLocker encryption for mobile workstations
    • Configure automatic backup to network storage
    • Establish data retention and archiving policies
    • Use Dell Data Security solutions for enterprise protection
  • Lifecycle Management:
    • Monitor SSD health via Dell SupportAssist
    • Plan for 3-4 year SSD replacement cycle for heavy use
    • Implement proactive replacement based on TBW usage
    • Properly sanitize SSDs before disposal/resale

πŸ’° Professional ROI & Performance Analysis

Upgrade Scenario Investment Productivity Gain ROI Timeline Professional Recommendation
HDD β†’ 1TB NVMe $80-120 500-700% faster load times 1-2 months (professional use) Essential upgrade, maximum ROI
SATA SSD β†’ NVMe $100-150 200-300% performance increase 2-3 months Worthwhile for heavy workloads
Add 2nd NVMe SSD $120-400 Workflow optimization benefits 3-6 months Project-dependent, great for media work

βœ… NVMe SSD Installation Verification Checklist

  1. βœ… Complete data backup verified and tested
  2. βœ… Battery disconnected and ESD protection active
  3. βœ… M.2 2280 form factor confirmed
  4. βœ… PCIe Gen4 NVMe interface verified
  5. βœ… Standoff properly positioned at 2280 mark
  6. βœ… SSD inserted at correct angle (30Β°)
  7. βœ… M.2 screw securely fastened (not overtightened)
  8. βœ… Thermal solution properly installed (if applicable)
  9. βœ… BIOS detects SSD at correct interface speed
  10. βœ… Windows installation/configuration complete
  11. βœ… Drivers and firmware updated to latest
  12. βœ… Performance benchmarks meet expectations
  13. βœ… Professional applications tested and stable
  14. βœ… Data restored and verified for integrity

8. Dell Precision 5480 WWAN/4G Card Installation: Professional Mobile Connectivity Guide

Adding WWAN (Wireless Wide Area Network) connectivity to your Dell Precision 5480 workstation transforms it into a truly mobile professional solution. With proper 4G/5G card installation, you can maintain enterprise-grade connectivity in remote locations, construction sites, field operations, and during travel while ensuring Dell's stringent compatibility and reliability standards.

πŸ“‘ Dell Precision 5480 WWAN Specifications & Compatibility

Specification Precision 5480 Requirements Professional Impact Compatibility Notes
Form Factor M.2 3042 (30mm wide, 42mm long) B-key WWAN-specific form factor Not compatible with M.2 2280 NVMe or WiFi cards
Interface PCIe x1 + USB 2.0 (for management) Dual interface for data and control B-key supports both PCIe and USB
Network Support 4G LTE Cat 16/20, 5G Sub-6 (optional) Enterprise-grade connectivity Check regional frequency band support
SIM Card Type Nano-SIM (4FF) with tray mechanism Industry standard for mobile devices SIM tray located on left side of chassis
Antenna Support 4 main antennas (MIMO 4x4 capable) Optimal signal reception and speed Pre-installed antennas in most configurations
GNSS Support GPS, GLONASS, Galileo, BeiDou Precision location for field work Essential for GIS, surveying, field engineering

Reference: Dell Precision 5480 Wireless Connectivity Guide Section 7.3

🎯 Professional WWAN Card Selection Criteria

  • Dell-Certified Options:
    • Qualcomm Snapdragon X55: 5G Sub-6, Cat 22 LTE (Dell PN: 0T2FJW)
    • Intel XMM 7560: LTE Advanced Pro, Cat 16 (Dell PN: 04T0KV)
    • MediaTek T700: 5G Sub-6, integrated design (Newer models)
    • EM05-E (Quectel): Cost-effective LTE solution
  • Regional Compatibility Considerations:
    • North America: Bands 2,4,5,12,13,14,17,29,30,66,71
    • Europe/Asia: Bands 1,3,7,8,20,28,32,38,40,41,42
    • Enterprise/FirstNet: Band 14 priority support
    • Global Roaming: Multi-band support essential
  • Professional Use Case Recommendations:
    • Field Engineering: 4G LTE with GNSS for location services
    • Remote Construction: Ruggedized solutions with external antenna ports
    • Mobile Healthcare: HIPAA-compliant encryption support
    • Government/Military: FIPS 140-2 validated modules

πŸ” Pre-Installation Verification & Preparation

  1. Hardware Compatibility Check:
    • Verify WWAN slot exists (not all Precision 5480 models include)
    • Check for pre-installed antennas (look for white/gray cables)
    • Confirm SIM tray mechanism is present on left side
    • Use Dell Service Tag Check for factory configuration
  2. Cellular Service Preparation:
    • Obtain enterprise data plan from carrier
    • Request Nano-SIM card with appropriate data limits
    • Configure APN settings for enterprise networks
    • Test SIM card in known working device first
  3. Safety & ESD Protocol:
    • Complete battery disconnection (previous sections)
    • ESD protection active throughout installation
    • Antenna cables are delicate - handle with extreme care
    • Work in clean, static-free environment

πŸ“² SIM Card Installation Procedure

  1. Locate SIM Tray:
    • Find SIM tray on left side of Precision 5480
    • Use SIM eject tool (included with most phones) or paperclip
    • Insert tool into small hole next to tray
    • Tray will eject approximately 2mm
  2. SIM Card Orientation (Critical):
    • Nano-SIM has notched corner - align with tray notch
    • Gold contacts face downward toward motherboard
    • SIM should sit flush in tray with no rocking
    • Take photo for reference before insertion
  3. Tray Reinsertion:
    • Gently push tray back into slot until flush
    • Should seat completely with no gap
    • Do not force if resistance felt
    • Verify tray is secure before proceeding

πŸ”§ Professional Step-by-Step WWAN Card Installation

  1. WWAN Slot Location:
    • Locate M.2 3042 slot near WiFi card area
    • Slot is typically labeled "WWAN" or "WLAN"
    • Check for pre-installed screw or standoff
    • Identify antenna cable connections (white/gray cables)
  2. Antenna Cable Connection (Do This First):
    • Four antenna connectors: MAIN, AUX, GNSS1, GNSS2
    • Connectors are push-pull type (not ZIF)
    • Push straight on until click felt
    • Ensure cables are routed to avoid interference
  3. WWAN Card Orientation:
    • B-key notch aligns with slot divider
    • Gold contacts face downward
    • Card should sit at 30Β° angle before securing
    • Check labels are facing upward for thermal dissipation
  4. Card Insertion & Securing:
    • Insert at 30Β° angle, then press down to horizontal
    • Secure with M.2 screw (typically M2 x 2.5mm)
    • Screw should be snug but not overtightened
    • Verify card doesn't flex when secured
  5. Antenna Cable Management:
    • Route cables through designated channels
    • Ensure no tension on antenna connectors
    • Avoid proximity to other components that may cause interference
    • Secure cables with existing clips or tape if necessary

βš™οΈ Professional WWAN Configuration Options

Configuration Setup Description Professional Use Case Performance Impact
Standalone WWAN Primary internet connection Remote sites, field work, travel 50-300Mbps typical LTE speeds
WiFi + WWAN Failover Automatic failover between connections Mission-critical field operations Zero downtime during network transitions
Dual SIM Configuration Multiple carriers for redundancy International business, carrier diversity Always-on connectivity across regions
GPS/GNSS Only Location services without data Surveying, GIS, asset tracking High-precision location accuracy

πŸ–₯️ Driver & Software Installation

  1. Dell-Specific Drivers:
    • Download Dell Wireless WAN Driver
    • Install WWAN driver package before Windows detects hardware
    • Install Dell Quickset or Command Suite for management
    • Update BIOS to latest version for compatibility
  2. Carrier-Specific Configuration:
    • Configure APN settings for your carrier
    • Set up VPN for enterprise network access
    • Configure data usage limits and alerts
    • Test connection with carrier's test page
  3. Enterprise Management Software:
    • Dell Command | Deploy for mass configuration
    • Microsoft Intune for enterprise mobility management
    • Carrier-specific management portals
    • Custom scripts for automated configuration

🏒 Enterprise Management & Security

  • Security Protocols:
    • Implement Always-On VPN for automatic encryption
    • Configure firewall rules for cellular connections
    • Enable SIM PIN for device security
    • Use FIPS 140-2 validated modules for government work
  • Cost Management:
    • Enterprise data plans with pooled data
    • Usage monitoring and alerting
    • Geofencing for international roaming control
    • Automated reporting for accounting
  • Compliance Requirements:
    • HIPAA for healthcare data transmission
    • FERPA for educational institutions
    • PCI DSS for payment processing
    • Industry-specific regulatory compliance

πŸ” Professional Troubleshooting Guide

Issue Symptoms Diagnosis Steps Professional Solution
WWAN Not Detected Not shown in Device Manager Check BIOS settings, reseat card, verify drivers Enable in BIOS, check WWAN switch (if present), update BIOS
No Signal/Network Can't connect to cellular network Check antenna connections, SIM card, APN settings Verify antenna cables, test SIM in other device, check carrier coverage
Slow Speeds Poor performance despite good signal Check network congestion, band selection Switch bands, update carrier settings, check for throttling
GPS Not Working No location services Verify GNSS antenna connection, check software Reseat GNSS antenna, update GPS software, check clear sky view

πŸ§ͺ Professional Testing & Validation Protocol

  1. Basic Connectivity Test:
    • Check Device Manager for proper detection
    • Test connection to carrier's test page
    • Run speed test at different locations
    • Verify GPS location accuracy
  2. Enterprise Application Testing:
    • Test VPN connectivity and stability
    • Verify access to corporate resources
    • Test failover between WiFi and WWAN
    • Validate security protocols and encryption
  3. Field Performance Testing:
    • Test in actual work environments
    • Verify performance under movement (mobile use)
    • Test in areas with known coverage challenges
    • Validate battery impact during continuous use

πŸ’° Professional ROI & Business Case Analysis

Use Case Investment Productivity Gain ROI Timeline Professional Recommendation
Field Engineering $150-300 + data plan 30-50% reduced downtime 3-6 months Essential for remote technical work
Business Travel $100-200 + roaming plan Secure connectivity anywhere 2-4 trips Justifies cost for frequent travelers
Construction Sites $200-400 + rugged case Real-time collaboration on site 1-2 projects Critical for modern construction workflows
Emergency Services $300-500 + FirstNet plan Priority access during emergencies Immediate for critical operations Non-negotiable for first responders

βœ… WWAN Installation Verification Checklist

  1. βœ… Battery disconnected and ESD protection active
  2. βœ… WWAN slot confirmed present in Precision 5480
  3. βœ… Antenna cables pre-installed and undamaged
  4. βœ… SIM card properly installed in tray
  5. βœ… WWAN card is M.2 3042 B-key form factor
  6. βœ… Antenna cables connected before card installation
  7. βœ… Card properly oriented and secured with screw
  8. βœ… Cables routed to avoid interference
  9. βœ… BIOS detects WWAN hardware
  10. βœ… Windows drivers installed successfully
  11. βœ… Carrier APN settings configured
  12. βœ… Cellular network connection established
  13. βœ… GPS/GNSS location services functional
  14. βœ… Enterprise security protocols implemented
  15. βœ… Field testing completed in actual work environments

9. Dell Precision 5480 Professional Reassembly & Quality Assurance Protocol

Proper reassembly is critical to maintaining your Dell Precision 5480's professional-grade performance, structural integrity, and thermal management. This section details the enterprise-quality reassembly procedures used by Dell-certified technicians to ensure your workstation meets original factory specifications while preserving warranty compliance and maximizing resale value.

⚠️ Critical Pre-Reassembly Verification Checklist

  1. Component Installation Verification:
    • Confirm all new components are properly seated and secured
    • Verify RAM modules are fully inserted with latches engaged
    • Check NVMe SSD is secured with proper screw torque
    • Ensure WWAN card (if installed) has antenna connections secured
    • Validate no loose screws or components inside chassis
  2. Cable Management Inspection:
    • All internal cables properly routed through designated channels
    • No tension or stress on any connector
    • Cables clear of fans and heat pipes
    • Antenna cables (if present) routed away from interference sources
    • Verify no cables are pinched or damaged
  3. Static & Contamination Control:
    • ESD protection still active (wrist strap grounded)
    • Work area clean and free of debris
    • No foreign objects inside chassis
    • Tools and screws accounted for (none left inside)
    • Hands clean and dry before handling components

πŸ”‹ Professional Battery Reconnection Procedure

  1. Final Component Check (Before Battery Reconnection):
    • Visual inspection of all internal connections
    • Verify no tools or screws remain inside chassis
    • Check component alignment and seating
    • Take final internal photos for documentation
  2. Battery Connector Reconnection:
    • Remove electrical tape from battery connector terminals
    • Align connector with socket (check photo reference)
    • Push straight in with firm, even pressure
    • Listen for audible click indicating proper engagement
    • Verify locking mechanism is fully engaged
  3. Post-Reconnection Verification:
    • Gently tug test connector to ensure secure connection
    • Check connector sits flush with no gaps
    • Verify no wires are pinched or stressed
    • Document reconnection with timestamped photo

πŸ”§ Bottom Cover Reassembly: Professional Technique

  1. Cover Alignment & Preparation:
    • Clean cover mating surface with 99% isopropyl alcohol
    • Inspect all clip points for damage or debris
    • Align cover with chassis, starting at front edge
    • Ensure no cables will be trapped during installation
  2. Initial Engagement:
    • Start with front edge alignment (near touchpad)
    • Engage front clips first, working outward
    • Apply even pressure across entire front edge
    • Listen for soft clicks indicating clip engagement
  3. Perimeter Sealing:
    • Work methodically around perimeter: front β†’ right β†’ rear β†’ left
    • Apply firm, even pressure - never force or hammer
    • Check for even gaps around entire perimeter
    • Verify cover sits flush with no rocking
  4. Pre-Screw Installation Test:
    • Verify cover is fully seated before installing screws
    • Check all edges align properly with chassis
    • Ensure no clips are protruding or misaligned
    • If resistance felt, re-check clip alignment

πŸ”© Professional Screw Reinstallation Sequence

Screw Location Sequence Order Torque Specification Professional Technique Verification Method
Rear Edge (Long) 1-4 (Structural) Finger tight + ΒΌ turn Cross pattern: Top-left β†’ Bottom-right β†’ Top-right β†’ Bottom-left No gap at rear vents
Center Reinforcement 5-6 Finger tight only Even pressure, avoid stripping Cover sits flat, no bowing
Front Edge (Short) 7-10 (Final) Finger tight + β…› turn Even pattern, avoid overtightening No clicking when pressed
M.2 Cover (if present) Last Very light - strip risk high Precision Phillips #0, minimal pressure Cover flush, no movement

Critical Note: Dell Precision 5480 uses Torx T5 screws. Never substitute with Phillips as this can strip screw heads and damage threads.

βš–οΈ Professional Torque & Fastening Techniques

  • Proper Tool Technique:
    • Use magnetic tip Torx T5 screwdriver for control
    • Apply downward pressure while turning
    • Stop immediately when resistance increases
    • Never force a screw that feels resistant
  • Avoiding Common Damage:
    • Stripped Screws: Caused by wrong size or excessive force
    • Cross-threading: Always start screws by hand first
    • Overtightening: Can crack plastic or strip threads
    • Uneven Pressure: Causes chassis warping and gaps
  • Professional Torque Standards:
    • Chassis screws: 0.4-0.6 Nm (3.5-5.3 in-lb)
    • M.2 screws: 0.2-0.3 Nm (1.8-2.7 in-lb)
    • Heat sink screws: Follow specific sequence if removed
    • When in doubt: Finger tight plus slight additional turn

✨ Cosmetic & Structural Quality Assurance

Inspection Area Acceptance Criteria Professional Tools Corrective Actions
Seam Consistency Even gap ≀ 0.3mm around perimeter Feeler gauge, visual inspection Reseat cover, check for debris in seam
Surface Alignment No height differential at seams Straight edge, finger test Verify all clips engaged, check screw length
Screw Heads Flush with surface, no stripping Visual inspection, screwdriver test Replace damaged screws, adjust torque
Chassis Integrity No flex or creaking under pressure Gentle pressure test at corners Verify all screws properly tightened

πŸ”Œ Pre-Power Functional Testing

  1. Visual Final Inspection:
    • Clean entire exterior with microfiber cloth
    • Check for fingerprints, smudges, or debris
    • Verify all port covers are intact and functional
    • Inspect for any cosmetic damage from disassembly
  2. Mechanical Function Tests:
    • Open/close display hinge - smooth operation
    • Test keyboard key travel - no sticking or abnormalities
    • Check touchpad responsiveness
    • Verify all ports are clear of obstruction
  3. Safety Verification:
    • No loose components inside (shake test gently)
    • All screws accounted for and installed
    • No tools or foreign objects left inside
    • Workstation serial number and labels intact

⚑ Initial Power Test Protocol

  1. Power Connection Sequence:
    • Connect AC adapter to wall outlet first
    • Then connect to Precision 5480
    • Observe charging LED indicator (should illuminate)
    • Wait 30 seconds before attempting power on
  2. First Boot Procedure:
    • Press power button once - do not hold
    • Observe startup sequence: LED patterns, beeps
    • Listen for abnormal sounds (grinding, buzzing)
    • Monitor for smoke or unusual odors (immediate shutdown if detected)
  3. BIOS Access Verification:
    • Press F2 during startup to enter BIOS
    • Verify all components detected (RAM, SSD, WWAN)
    • Check temperatures are within normal range
    • Save and exit BIOS (F10)

🩺 Professional Post-Reassembly Diagnostics

Diagnostic Test Purpose Professional Tools Acceptance Criteria
Memory Test Verify RAM stability and capacity MemTest86, Windows Memory Diagnostic Zero errors, full capacity recognized
Storage Test SSD performance and health CrystalDiskMark, CrystalDiskInfo Expected speeds, healthy SMART status
Thermal Test Cooling system functionality HWMonitor, Prime95 stress test Stable temperatures under load
Connectivity Test All ports and wireless functions Network tests, peripheral testing All interfaces functional

πŸ”₯ Professional Burn-in Testing Protocol

  1. Extended Stability Test (Recommended 24 hours):
    • Run Prime95 small FFTs for CPU stress
    • FurMark for GPU stress (if discrete GPU present)
    • CrystalDiskMark continuous benchmark for storage
    • Monitor temperatures and stability throughout
  2. Application-Specific Testing:
    • Run professional applications at maximum load
    • Test large file operations relevant to workflow
    • Verify no crashes or instability during use
    • Document performance improvements
  3. Real-World Simulation:
    • Simulate typical workday usage patterns
    • Test sleep/wake cycles and resume functionality
    • Verify battery charging and discharging properly
    • Test all upgraded components under realistic loads

🏒 Enterprise Quality Standards & Documentation

  • Professional Documentation Requirements:
    • Before/after photos of all work
    • Component serial numbers and purchase receipts
    • Performance benchmark comparisons
    • Work log with dates, times, and technician notes
  • Compliance & Warranty Documentation:
    • Proof of ESD protection during work
    • Documentation of proper reassembly techniques
    • Record of testing and validation procedures
    • Warranty information for new components
  • Enterprise Asset Management:
    • Update asset tracking systems with new specifications
    • Record upgrade dates for lifecycle management
    • Document ROI calculations for IT budgeting
    • Create standardized procedures for future upgrades

βœ… Final Professional Verification Checklist

  1. βœ… All internal components properly installed and secured
  2. βœ… Battery reconnected and verified secure
  3. βœ… Bottom cover aligned and clips fully engaged
  4. βœ… All screws installed in correct locations with proper torque
  5. βœ… No gaps, misalignments, or cosmetic issues
  6. βœ… Workstation powers on and enters BIOS successfully
  7. βœ… All upgraded components detected in BIOS/Windows
  8. βœ… Operating system loads without errors
  9. βœ… Drivers installed and functioning properly
  10. βœ… Basic functionality tests passed (keyboard, touchpad, display)
  11. βœ… Performance benchmarks meet or exceed expectations
  12. βœ… Thermal testing shows stable temperatures under load
  13. βœ… Professional applications tested and stable
  14. βœ… Documentation completed and filed appropriately
  15. βœ… Work area cleaned and tools returned to proper storage

πŸ”§ Professional Reassembly Troubleshooting

Issue Possible Causes Diagnosis Steps Professional Solutions
Cover Won't Seat Properly Misaligned clips, trapped cable, debris Remove cover, inspect alignment, check for obstructions Realign starting at front, ensure cable routing correct
Gaps or Misalignment Missing clips, incorrect screw length Check clip engagement, verify screw locations Re-engage clips, replace with correct screw lengths
No Power After Reassembly Battery not connected, loose connection Verify battery connection, check power adapter Reconnect battery, test with known-good adapter
Overheating Issues Poor thermal contact, blocked vents Monitor temperatures, check fan operation Re-seat heat sink, ensure clear airflow paths

10. Dell Precision 5480 Post-Upgrade Professional Testing & Optimization Guide

Comprehensive post-upgrade testing and optimization transforms your upgraded Dell Precision 5480 from a collection of new components into a fully optimized professional workstation. This systematic approach ensures maximum performance, stability, and longevity while validating that all upgrades deliver their promised return on investment for demanding professional workloads.

πŸ” Immediate Post-Boot Verification Protocol

  1. BIOS/UEFI Configuration Verification:
    • Press F2 during boot to enter Dell BIOS
    • Navigate to System Information β†’ Verify all components detected
    • Check RAM capacity and speed matches specifications
    • Confirm NVMe SSDs recognized at correct PCIe generation
    • Validate WWAN card detection (if installed)
    • Update BIOS to latest version if not already current
  2. Windows Device Manager Audit:
    • Open Device Manager (Win + X β†’ Device Manager)
    • Check for yellow exclamation marks or missing drivers
    • Verify RAM shows correct capacity in Performance tab
    • Confirm SSD appears under Disk drives with correct model
    • Check Network adapters for WWAN device (if installed)
  3. Initial System Stability Assessment:
    • Monitor Event Viewer for critical errors (Win + R β†’ eventvwr)
    • Check Windows Reliability Monitor for stability issues
    • Verify no BSOD (Blue Screen of Death) events recorded
    • Test basic functionality: USB ports, audio, display output

βš™οΈ Professional Driver & Firmware Optimization

Component Recommended Driver Source Optimization Settings Professional Impact
Intel Chipset Dell Driver Package Enable power performance tuning 20-30% better power management
NVMe SSD Manufacturer tool (Samsung Magician/WD Dashboard) Enable Over-Provisioning, update firmware Extended lifespan, consistent performance
Graphics NVIDIA Studio Driver or Intel Graphics Command Center Application-specific optimization profiles 40-60% better professional app performance
WWAN (if installed) Dell Wireless WAN Driver + carrier software Configure APN, enable GNSS Optimal mobile connectivity

Professional Tip: Use Dell Command | Update for enterprise-grade driver management across multiple Precision workstations.

πŸ“Š Comprehensive Performance Benchmarking Suite

  • Synthetic Benchmarking Tools:
  • Professional Workload Benchmarks:
    • SPECviewperf 2020: ISV application performance
    • Blender BMW/Classroom benchmark: 3D rendering
    • PugetBench for Adobe Creative Cloud
    • SOLIDWORKS Performance Test
    • Autodesk AutoCAD benchmark scripts
  • Real-World Performance Metrics:
    • Application launch times (before/after comparison)
    • Large project file load/save operations
    • Render/computation task completion times
    • Multitasking performance with professional workloads

🌑️ Thermal Performance & Cooling Optimization

Monitoring Tool Key Metrics to Track Optimal Ranges (Precision 5480) Corrective Actions
HWMonitor Pro CPU/GPU temperatures, clock speeds CPU: 65-85Β°C under load, GPU: 70-80Β°C Repaste if >90Β°C, improve ventilation
HWiNFO64 VRM temperatures, SSD temps SSD: 40-70Β°C, VRM: <100Β°C Add thermal pads, ensure heatsink contact
Intel XTU Power limits, thermal throttling No throttling under sustained load Adjust power limits, improve cooling
Dell Power Manager Fan profiles, power settings Optimized/Ultra Performance mode Set appropriate profile for workload

Professional Recommendation: Run Prime95 Small FFTs + FurMark simultaneously for 30 minutes to validate thermal stability under maximum combined load.

πŸ’Ύ Professional Storage Optimization Protocol

  1. NVMe SSD Optimization:
    • Enable TRIM: `fsutil behavior set DisableDeleteNotify 0`
    • Disable defragmentation for NVMe drives
    • Configure page file size (1.5x RAM for professional workloads)
    • Move temporary files to secondary SSD if available
  2. Storage Configuration:
    • Configure RAID 0/1 if multiple SSDs installed (BIOS)
    • Set up Storage Spaces for flexible volume management
    • Create dedicated partitions for projects, cache, backups
    • Enable BitLocker encryption for mobile security
  3. Performance Validation:
    • Run sequential and random read/write tests
    • Test sustained performance over 30+ minutes
    • Verify no thermal throttling during extended operations
    • Check 4K random performance for database workloads

🧠 Professional Memory Optimization & Testing

  • RAM Configuration Validation:
    • Verify dual-channel operation in CPU-Z β†’ Memory tab
    • Check actual operating speed vs. rated speed
    • Validate timings and voltage in BIOS
    • Enable XMP Profile 1 if supported and stable
  • Comprehensive Memory Testing:
    • Run MemTest86 for 4+ passes (overnight recommended)
    • Zero errors required for professional workstation
    • Test with Windows Memory Diagnostic (extended)
    • Monitor for correctable errors via HWiNFO64
  • Application-Specific Optimization:
    • Configure large page files for virtualization workloads
    • Adjust Adobe applications to use maximum available RAM
    • Configure SOLIDWORKS to utilize RAM for large assemblies
    • Set up RAM disk for temporary files if sufficient capacity

🎯 Professional Application-Specific Optimization

Professional Suite Key Optimization Settings Performance Metrics Validation Tests
Autodesk AutoCAD Hardware acceleration, graphic settings Viewport FPS, regen times Large drawing load, 3D orbit performance
SOLIDWORKS OpenGL settings, rebuild optimization Assembly open time, rebuild speed Large assembly performance test
Adobe Premiere Pro Mercury Playback Engine, cache settings Playback performance, render times 4K timeline playback, export benchmarks
ANSYS/CFD Core allocation, memory settings Solve times, memory utilization Standard benchmark models

⚑ Professional Power Management Optimization

  1. Windows Power Plans:
    • Create custom power plan for professional workloads
    • Set minimum processor state to 100% when plugged in
    • Configure PCI Express Link State Power Management
    • Adjust display and sleep settings for productivity
  2. Dell Power Manager Configuration:
    • Set to "Optimized" or "Ultra Performance" for desktop use
    • Configure "Primarily AC Use" for battery health
    • Enable ExpressCharge for rapid charging when needed
    • Set thermal management to "Optimized"
  3. BIOS Power Settings:
    • Enable Intel SpeedStep and Turbo Boost
    • Configure C-state settings for performance
    • Set power performance tuning to "Extreme Performance"
    • Disable power-saving features for critical workloads

🏒 Enterprise Management & Monitoring Integration

  • Dell Enterprise Tools:
  • Third-Party Management Integration:
    • Microsoft SCCM/Intune for enterprise management
    • PDQ Deploy for software deployment
    • Lansweeper for asset tracking
    • PRTG/Nagios for performance monitoring
  • Performance Baselining:
    • Document pre-upgrade performance metrics
    • Record post-upgrade benchmarks for comparison
    • Create performance trend reports for management
    • Establish alert thresholds for performance degradation

πŸ”₯ Professional Stability & Burn-in Testing

Test Type Duration Tools & Methods Acceptance Criteria
Component Stress Test 24-48 hours Prime95, FurMark, CrystalDiskMark continuous Zero crashes, stable temperatures
Memory Integrity Test Overnight (8+ hours) MemTest86, Windows Memory Diagnostic Zero errors across all tests
Thermal Cycling Test 12-24 hours Load/unload cycles, temperature monitoring Consistent performance, no throttling
Real-World Simulation 72 hours (3 workdays) Actual professional workloads, multitasking No application crashes, consistent performance

πŸ“ˆ Performance Documentation & ROI Analysis

  1. Quantitative Performance Metrics:
    • Benchmark scores before/after upgrades
    • Application-specific performance improvements
    • Time savings on common professional tasks
    • Multitasking capability improvements
  2. ROI Calculation Framework:
    • Upgrade costs vs. performance improvements
    • Time savings converted to monetary value
    • Extended workstation lifespan calculations
    • Comparison to new workstation purchase
  3. Professional Reporting:
    • Create comprehensive upgrade report
    • Include before/after benchmark comparisons
    • Document stability test results
    • Provide recommendations for future upgrades

βœ… Final Professional Optimization Checklist

  1. βœ… All drivers updated to latest stable versions
  2. βœ… BIOS updated to latest Dell release
  3. βœ… Component firmware updated (SSD, WWAN if applicable)
  4. βœ… Windows optimized for professional workloads
  5. βœ… Power management configured for maximum performance
  6. βœ… Thermal performance validated under maximum load
  7. βœ… Memory stability confirmed with extended testing
  8. βœ… Storage performance meets or exceeds specifications
  9. βœ… Professional applications configured and optimized
  10. βœ… Enterprise management tools installed and configured
  11. βœ… Comprehensive benchmarks completed and documented
  12. βœ… Stability testing passed (24+ hours without issues)
  13. βœ… Performance baselines established for future comparison
  14. βœ… ROI analysis completed and documented
  15. βœ… Full system backup created of optimized configuration

πŸ”„ Ongoing Monitoring & Maintenance Schedule

  • Daily Monitoring:
    • Temperature checks during heavy workloads
    • Performance consistency verification
    • Error log review (Event Viewer)
  • Weekly Maintenance:
    • Driver and Windows updates
    • Temporary file cleanup
    • Performance benchmark spot checks
  • Monthly Deep Checks:
    • Full system health assessment
    • Storage SMART attribute review
    • Memory integrity quick test
    • Thermal system inspection and cleaning
  • Quarterly Optimization:
    • Complete system re-optimization
    • Performance benchmark comparison
    • BIOS and firmware update review
    • Professional application reconfiguration

11. Dell Precision 5480 Post-Upgrade Troubleshooting & Professional Diagnostics Guide

Even with meticulous installation, professional workstation upgrades can encounter issues. This comprehensive troubleshooting guide addresses common problems with Dell Precision 5480 upgrades, providing systematic diagnostic approaches and proven solutions used by Dell-certified technicians to ensure your workstation achieves optimal performance and stability.

πŸ”§ Professional Troubleshooting Methodology

  1. Systematic Diagnostic Approach:
    • Start with simplest solutions first (reseating, connections)
    • Isolate variables - test components individually
    • Document every step, error messages, and results
    • Use Dell SupportAssist for automated diagnostics
  2. Diagnostic Tool Preparation:
    • Create bootable USB with diagnostic tools before issues arise
    • Have known-good spare components available for testing
    • Prepare external monitor and peripherals for isolation testing
    • Document system configuration before making changes
  3. Professional Documentation Protocol:
    • Record BIOS beep codes and LED blink patterns
    • Photograph error messages and system behavior
    • Maintain chronological troubleshooting log
    • Reference Dell Service Tag for model-specific solutions

πŸ”Œ Boot & Power Issues

Symptom Possible Causes Diagnostic Steps Professional Solutions
No Power / Dead System Battery not connected, power adapter failure, motherboard issue Test with known-good adapter, check battery connection, try different outlet Reseat battery connector, test adapter with multimeter, perform CMOS reset
Power On/Off Cycling RAM incompatibility, overheating, short circuit Remove RAM modules one at a time, check for overheating, inspect for shorts Test with single RAM stick, clean cooling system, check for metal debris
BIOS Beep Codes Hardware failure, component not detected Count beep pattern, reference Dell beep code guide 1-2 beeps: Normal, 3 beeps: Memory, 4 beeps: Storage, 5 beeps: CMOS
LED Error Codes Capacitor light patterns indicate specific failures Observe LED blink pattern on power button or keyboard Reference Dell LED Diagnostics Guide

🧠 RAM & Memory Issues

  • RAM Not Detected / Reduced Capacity:
    • Symptoms: BIOS shows less RAM than installed, Windows reports reduced memory
    • Diagnosis: Test modules individually in each slot, check BIOS settings
    • Solutions:
      1. Reseat RAM modules firmly ensuring latches click
      2. Clean gold contacts with 99% isopropyl alcohol
      3. Test each module individually to identify faulty stick
      4. Update BIOS to latest version for compatibility
      5. Reset BIOS to factory defaults and reconfigure
  • Memory Errors & System Crashes:
    • Symptoms: BSOD with memory-related codes, application crashes, data corruption
    • Diagnosis: Run MemTest86 for 4+ passes, check Windows Event Viewer
    • Solutions:
      1. Run extended memory diagnostics (overnight recommended)
      2. Adjust RAM timings in BIOS (increase latency if unstable)
      3. Increase DRAM voltage slightly if supported (max 1.35V for DDR5)
      4. Disable XMP/overclocking profiles and run at JEDEC speeds
      5. Replace faulty modules under warranty

πŸ’Ύ Storage & SSD Issues

Issue Diagnostic Tools Common Causes Professional Resolution
SSD Not Detected BIOS storage menu, Windows Disk Management Incorrect installation, damaged slot, driver issues Reseat SSD, try different M.2 slot, update BIOS/storage drivers
Slow Performance CrystalDiskMark, Samsung Magician, WD Dashboard Thermal throttling, driver issues, incorrect PCIe generation Check temperatures, update NVMe driver, enable PCIe Gen4 in BIOS
BSOD - Driver Issues Windows Event Viewer, Driver Verifier Incompatible NVMe driver, firmware bugs Install manufacturer NVMe driver, update SSD firmware
Disk Errors / Corruption CHKDSK, S.M.A.R.T. monitoring tools Failing SSD, file system errors, power loss during writes Run CHKDSK /f /r, check SMART attributes, backup and replace if failing

🌑️ Thermal & Performance Issues

  • Overheating & Thermal Throttling:
    • Symptoms: Performance drops under load, loud fan noise, system instability
    • Monitoring Tools: HWMonitor, HWiNFO64, Intel XTU
    • Diagnostic Steps:
      1. Monitor CPU/GPU temperatures under idle and load
      2. Check fan operation and speeds
      3. Inspect heatsink contact and thermal paste application
      4. Clean dust from heatsinks and vents
    • Professional Solutions:
      • Repaste CPU/GPU with high-quality thermal compound
      • Ensure heatsink mounting pressure is even
      • Clean cooling system with compressed air
      • Adjust fan curves in Dell Power Manager
      • Consider laptop cooling pad for sustained workloads
  • Performance Below Expectations:
    • Symptoms: Benchmarks below specifications, sluggish performance
    • Troubleshooting Steps:
      1. Verify power plan set to "High Performance" or "Ultra Performance"
      2. Check for power throttling in Intel XTU or ThrottleStop
      3. Ensure all drivers are updated (chipset, graphics, storage)
      4. Disable unnecessary startup programs and background services
      5. Run virus/malware scan to eliminate software issues

πŸ“‘ WWAN & Connectivity Issues

Connectivity Problem Diagnostic Commands Likely Causes Resolution Steps
No WWAN Detection Device Manager check, BIOS device list Card not seated, antenna disconnected, BIOS disabled Reseat WWAN card, check antenna connections, enable in BIOS
No Network Connection ipconfig /all, ping tests SIM not activated, incorrect APN, poor signal Verify SIM activation, configure correct APN, check signal strength
Slow WWAN Speeds Speed tests, network band scanning Network congestion, band locking, driver issues Test different locations, update WWAN drivers, check carrier settings
GPS Not Working GPS diagnostic tools, antenna check Antenna disconnected, software configuration Verify GNSS antenna connection, configure location services

πŸ› οΈ Professional Diagnostic Tools Suite

  • Dell-Specific Tools:
  • Third-Party Diagnostic Tools:
    • HWiNFO64: Comprehensive hardware monitoring
    • MemTest86: Advanced memory testing
    • CrystalDiskInfo/Info: Storage health monitoring
    • Intel Processor Diagnostic Tool: CPU validation
    • FurMark: GPU stress testing and artifact detection
  • Windows Built-in Tools:
    • Event Viewer: System and application error logs
    • Resource Monitor: Real-time system resource tracking
    • Windows Memory Diagnostic: Built-in RAM testing
    • CHKDSK: Disk error checking and repair
    • DISM and SFC: System file integrity checking

βš™οΈ BIOS/UEFI Troubleshooting Guide

  1. BIOS Reset Procedures:
    • Soft Reset: Load BIOS defaults (F9 in Dell BIOS)
    • CMOS Reset: Remove battery, wait 5 minutes, reconnect
    • BIOS Recovery: Use Dell BIOS recovery USB method
    • BIOS Update: Flash latest version from Dell Support
  2. Critical BIOS Settings for Stability:
    • Memory: Set to Auto or JEDEC defaults if experiencing crashes
    • Storage: Configure SATA operation to AHCI (not RAID for single drive)
    • Power: Disable CPU power-saving features if causing instability
    • Security: Temporarily disable Secure Boot if having driver issues
  3. BIOS Update Best Practices:
    • Download BIOS from Dell Support using Service Tag
    • Connect AC power and ensure battery >50% charged
    • Close all applications before updating
    • Do not interrupt power during BIOS update
    • Reset BIOS to defaults after update and reconfigure

πŸ”„ Driver Conflict & Software Issues

Software Issue Detection Method Common Causes Resolution Strategy
Driver Conflicts Device Manager error codes, BlueScreenView Multiple driver versions, incompatible updates Use DDU for clean driver removal, install WHQL-certified drivers
Windows Update Issues Windows Update troubleshooter, Update History Corrupted update files, driver incompatibility Run Windows Update troubleshooter, use DISM repair commands
Application Crashes Event Viewer Application logs, reliability monitor Incompatible software, missing dependencies Update application, install required runtimes, check compatibility mode
Performance Degradation Task Manager, Resource Monitor Background processes, malware, fragmentation Disable startup programs, run antivirus, optimize storage

⚑ ESD & Physical Damage Prevention

  • ESD Damage Symptoms:
    • Intermittent failures that worsen over time
    • Components work initially but fail shortly after installation
    • Random system crashes without clear pattern
    • USB/port failures that don't correlate with software issues
  • Physical Damage Indicators:
    • Bent CPU socket pins or damaged M.2 slot
    • Cracked circuit board traces near installation points
    • Broken clip mechanisms or stripped screw threads
    • Components not sitting flush or at correct angles
  • Prevention & Mitigation:
    • Always use anti-static wrist strap connected to grounded surface
    • Work on ESD-safe mats in controlled environments
    • Handle components by edges only, never touch contacts
    • Use proper tools - never force components that resist
    • Document installation process with photos for warranty claims

🏒 Enterprise Escalation Procedures

  1. Tier 1 Support (Internal Resolution):
    • Document issue with screenshots and error codes
    • Check internal knowledge base for known solutions
    • Perform basic troubleshooting: reseating, driver updates
    • Escalate to Tier 2 if unresolved within 2 hours
  2. Tier 2 Support (Advanced Diagnostics):
    • Component isolation testing with known-good parts
    • Advanced diagnostic tools and logging
    • Contact component manufacturers for compatibility issues
    • Prepare RMA documentation for defective components
  3. Tier 3 Support (Dell Professional Services):
    • Contact Dell ProSupport with Service Tag and issue details
    • Schedule onsite service if covered under warranty
    • Coordinate component replacements and system repairs
    • Document resolution for knowledge base and future reference

πŸ“ Warranty & Service Considerations

  • Dell Warranty Status:
    • Check warranty status using Dell Service Tag
    • Self-upgrades don't void entire system warranty (Magnuson-Moss Warranty Act)
    • Only components damaged during installation may lose coverage
    • Keep original components for potential warranty returns
  • Component Warranty Management:
    • Register new components with manufacturers
    • Keep purchase receipts and warranty documents
    • Document installation process for warranty claims
    • Maintain component serial numbers in asset tracking
  • Professional Service Options:
    • Dell TechDirect: Certified technician portal
    • Dell ProSupport Plus: Premium support with onsite service
    • Third-party certified repair centers
    • Enterprise maintenance contracts for multiple workstations

πŸš€ Quick Reference Troubleshooting Matrix

Symptom First Action Second Action Third Action When to Escalate
No Display Check external monitor Reseat RAM Reset BIOS After BIOS reset fails
BSOD on Boot Boot Safe Mode Check Event Viewer Run SFC /scannow Consistent BSOD after repairs
Slow Performance Check power plan Monitor temperatures Update all drivers Performance 30% below expectations
Device Not Detected Reseat component Check BIOS settings Update BIOS/drivers Multiple components failing

πŸ›‘οΈ Professional Prevention Strategies

  1. Pre-Upgrade Planning:
    • Verify component compatibility before purchase
    • Check Dell compatibility lists and user forums
    • Purchase from reputable vendors with good return policies
    • Have spare components available for testing
  2. Installation Best Practices:
    • Follow ESD protection protocols rigorously
    • Document each step with photographs
    • Test components individually before full assembly
    • Use proper tools and follow torque specifications
  3. Post-Upgrade Validation:
    • Run comprehensive diagnostics before daily use
    • Monitor system closely for first 72 hours
    • Keep original components for 30 days as backup
    • Create system image after successful optimization

12.Maximizing Value: Professional Strategies for Selling Your Upgraded Dell Precision 5480 Workstation

Successfully selling your upgraded Dell Precision 5480 requires a professional approach that highlights its enhanced capabilities while appealing to enterprise buyers, creative professionals, and engineering specialists. This comprehensive guide provides proven strategies for maximizing your return on investment while navigating the premium workstation marketplace.

πŸ’° Professional Valuation Framework

Valuation Component Base Value (Stock Config) Upgrade Premium Professional Buyer Appeal Documentation Requirements
Processor (i7/i9 13th/14th Gen) $800-1,200 Fixed (non-upgradeable) High - determines performance ceiling CPU-Z screenshot, benchmark results
64GB DDR5 RAM Upgrade +$200-300 +$150-250 over stock 16GB Very High for professional workloads MemTest86 results, dual-channel verification
2TB+ NVMe SSD Upgrade +$180-350 +$120-280 over stock 512GB Extreme - immediate productivity impact CrystalDiskMark scores, health reports
Dell ProSupport Warranty +$200-400 Transferable service contracts Critical for enterprise buyers Warranty transfer documentation
Professional Documentation +$100-200 Premium for thorough records Builds buyer confidence, justifies premium Complete upgrade portfolio

Professional Insight: A fully upgraded Precision 5480 with 64GB RAM, 2TB NVMe, and remaining warranty typically sells for $1,800-2,500 in the professional marketplace, representing 70-90% ROI on upgrade investments.

πŸ“‹ Professional Documentation Portfolio

  • Essential Documentation Package:
    • Before/after benchmark comparisons with timestamps
    • Component purchase receipts and warranty registration
    • High-resolution photos of upgrade installation process
    • MemTest86 results showing 0 errors (24-hour test preferred)
    • CrystalDiskMark scores and SSD health reports
    • Dell Service Tag verification and warranty status
    • Original packaging and accessories documentation
  • Professional Application Performance Reports:
    • Autodesk AutoCAD/Revit benchmark results
    • SOLIDWORKS performance metrics
    • Adobe Creative Cloud render/export times
    • Video editing timeline performance data
    • Virtual machine performance capabilities
  • Enterprise-Ready Documentation:
    • ESD protection during installation evidence
    • Professional tool usage documentation
    • Component compatibility verification
    • BIOS settings and optimization documentation
    • Dell driver and firmware update records

πŸ›’ Specialized Professional Sales Platforms

Platform Type Target Audience Commission/ Fees Professional Advantages Recommended For
SellBroke Business/Enterprise Buyers Typically 15-25% Handles enterprise verification, escrow, shipping High-value workstations, bulk sales
SellLaptopBack IT Departments, Resellers Lower fees, instant quotes Specializes in business-grade equipment Quick sale, verified business buyers
.gov/.edu Portals Government/Education Varies by portal Higher security, verified institutions Security-focused, documentation-rich sales
eBay Business Mixed - professionals & resellers 12.9% + payment processing Large audience, international reach Maximum exposure, competitive bidding
Facebook Marketplace Pro Local professionals, small businesses No fees (local pickup) No shipping risk, immediate payment Quick local sales, cash transactions

πŸ“ˆ Professional Listing Optimization Strategy

  1. Title Optimization:
    • Include key specifications: "Dell Precision 5480 Mobile Workstation - 64GB DDR5 - 2TB NVMe"
    • Add professional keywords: "CAD Ready," "Video Editing," "Engineering Workstation"
    • Mention warranty: "Dell ProSupport until [Date]"
    • Include condition: "Professionally Upgraded," "Flawless Condition"
  2. Photography Protocol:
    • High-resolution photos in professional lighting
    • Show all angles including ports and screen condition
    • Include photos of upgrade components and installation
    • Document benchmark screenshots and performance metrics
    • Show original packaging and accessories
  3. Description Structure:
    • Executive Summary: Professional workstation capabilities
    • Technical Specifications: Detailed component listing
    • Performance Data: Benchmark results and real-world metrics
    • Upgrade Documentation: Professional installation evidence
    • Professional Applications: Optimized for specific workflows
    • Warranty & Support: Transfer details and remaining coverage

🏒 Enterprise Buyer Appeal Strategies

  • IT Department Requirements:
    • Provide Dell Service Tag for warranty verification
    • Document driver compatibility and update history
    • Show evidence of professional ESD-safe installation
    • Include Dell Command Suite compatibility verification
    • Provide imaging and deployment readiness information
  • Financial Justification Package:
    • ROI calculation: New workstation cost vs. upgraded cost
    • Productivity improvement metrics for common tasks
    • Comparison to current market alternatives
    • Total cost of ownership analysis
    • Depreciation schedule and residual value projection
  • Security & Compliance Documentation:
    • Drive sanitization proof (if not including storage)
    • BIOS password removal/reset capability
    • BitLocker encryption status
    • Asset tag removal/transfer procedures
    • Data destruction certification (if required)

🎯 Specialized Market Targeting

Target Market Key Value Propositions Platform Focus Pricing Strategy Documentation Emphasis
Engineering Firms SOLIDWORKS/AutoCAD performance, ISV certifications Industry forums, LinkedIn, specialized brokers Premium pricing for proven performance Application benchmarks, stability proof
Creative Professionals 4K/8K video editing, color accuracy, rendering speed Creative marketplaces, Facebook Pro groups Competitive with MacBook Pro alternatives Real-world render times, display calibration
Educational Institutions Durability, manageability, student-proof features .edu portals, government surplus, specialized brokers Volume discount potential Warranty transfer, management compatibility
Government Agencies Security features, reliability, service history .gov portals, approved vendor lists Fixed price based on specifications Security documentation, service records

πŸ’΅ Professional Pricing Strategies

  1. Competitive Analysis Method:
    • Research similar configurations on SellBroke and SellLaptopBack
    • Check completed eBay listings for actual sale prices
    • Analyze Dell refurbished pricing for comparable systems
    • Consider local market conditions and demand
  2. Value-Based Pricing Model:
    • Base price: Comparable stock system market value
    • Add 60-80% of upgrade component costs (depreciation adjusted)
    • Premium for professional documentation (15-25%)
    • Premium for remaining warranty (pro-rated value)
    • Adjust for cosmetic condition and accessories
  3. Negotiation Strategy:
    • Set firm price 10-15% above target to allow for negotiation
    • Be prepared to justify premium with documentation
    • Offer package deals with accessories to increase value
    • Consider installment options for serious professional buyers

πŸ›‘οΈ Transaction Risk Mitigation

  • Platform-Specific Protections:
    • SellBroke: Escrow services, buyer verification, shipping insurance
    • SellLaptopBack: Instant payment, professional buyer network
    • eBay: Money back guarantee, seller protection programs
    • .gov/.edu portals: Institutional verification, purchase orders
  • Payment Security Measures:
    • Escrow services for high-value transactions
    • Wire transfers for amounts over $1,000
    • Credit card payments through secure processors
    • Cash for local transactions (meet at safe locations)
    • Avoid personal checks and money orders
  • Shipping & Insurance Protocol:
    • Original packaging with double-boxing for maximum protection
    • Signature confirmation required for delivery
    • Insurance for full replacement value
    • Photograph packaging process for damage claims
    • Use tracked shipping with regular updates

πŸ“… Professional Sales Timeline Optimization

Phase Duration Key Activities Platform Focus Expected Outcomes
Preparation (1-2 weeks) 7-14 days Documentation, photography, research Internal preparation Complete sales package ready
Listing & Promotion (1-3 weeks) 7-21 days Multiple platform listings, professional outreach SellBroke, LinkedIn, industry forums Initial inquiries, price validation
Negotiation & Closing (1-2 weeks) 7-14 days Professional communication, documentation sharing Email, platform messaging Purchase agreement, payment secured
Transaction & Transfer (3-7 days) 3-7 days Secure shipping, warranty transfer, final documentation Shipping carriers, Dell support Funds received, buyer satisfaction

πŸ“ Post-Sale Professional Considerations

  1. Warranty & Support Transfer:
    • Initiate Dell warranty transfer through Dell Support
    • Provide component manufacturer warranty information
    • Share Dell Service Tag and original purchase documentation
    • Transfer Dell ProSupport contracts if applicable
  2. Data Privacy & Security:
    • Perform secure drive wipe using Darik's Boot and Nuke (DBAN)
    • Remove BIOS passwords and security settings
    • Delete any stored credentials or encryption keys
    • Provide data destruction certificate if required
  3. Professional Follow-up:
    • Confirm successful delivery and setup
    • Provide post-sale support documentation
    • Request professional feedback or testimonial
    • Maintain records for tax and business purposes

πŸ›οΈ Tax & Business Considerations

  • Record Keeping Requirements:
    • Maintain purchase receipts for upgrade components
    • Document sale price and transaction details
    • Calculate capital gains/losses for tax purposes
    • Keep records for IRS audit requirements (3-7 years)
  • Business Sale Optimization:
    • Consider forming LLC for high-volume sales
    • Track business expenses (tools, shipping, platform fees)
    • Consult tax professional for depreciation schedules
    • Explore bulk sales opportunities for multiple units
  • Professional Services Opportunities:
    • Offer upgrade services for other Precision owners
    • Create documented upgrade packages for sale
    • Develop consulting services for enterprise IT departments
    • Build reputation as Dell Precision specialist

βœ… Final Professional Sales Checklist

  1. βœ… Complete documentation portfolio assembled
  2. βœ… Professional photography completed (minimum 12 high-res images)
  3. βœ… Competitive pricing research completed and price set
  4. βœ… Multiple platform listings created (SellBroke + 2 others minimum)
  5. βœ… All personal data securely wiped with verification
  6. βœ… Original packaging and accessories prepared
  7. βœ… Warranty transfer information prepared
  8. βœ… Shipping materials and insurance arranged
  9. βœ… Payment methods configured and verified
  10. βœ… Professional communication templates prepared
  11. βœ… Tax and record-keeping systems in place
  12. βœ… Post-sale follow-up plan established

Need to Sell Your Dell Laptop? Get Instant Cash!

If your Dell Precision 5480 (or other Precision mobile workstation) has performance issues or you're upgrading to a newer model, we offer premium cash payouts for your device. We buy broken, used, and refurbished Dell Precision workstationsβ€”including all 5480 configurationsβ€”with free insured shipping and hassle-free evaluations.

Sell Popular Dell Models Now:

Share this: