DIY Dell Latitude 3420 Disassembly: Comprehensive Teardown for Hardware Repair & Upgrades
1. Preparation & Assessment: Maximizing Your Dell Latitude 3420's Value
Before beginning any disassembly of your Dell Latitude 3420, a thorough assessment is essential to understand its market position, identify valuable upgrade opportunities for business users, and ensure professional handling that preserves its enterprise value and build quality.
🔍 Identifying Your Latitude 3420 Configuration
Accurate identification ensures proper part compatibility and realistic valuation.
- Find Your Service Tag: Located on bottom label or in Dell SupportAssist. Check exact specs on the Dell Support Portal.
- Key Configuration Variants:
- Processors: 11th Gen Intel Core i3-1115G4, i5-1135G7, or i7-1165G7 (with vPro options)
- Memory: Upgradable DDR4 SODIMM slots (1 or 2 slots, up to 32GB total)
- Display Options: 14" HD (1366x768) or FHD (1920x1080) IPS, anti-glare
- Storage Options: M.2 NVMe SSD and/or 2.5" SATA bay (configurable)
- Graphics: Intel UHD Graphics or optional NVIDIA MX130
💰 2024 Business Laptop Market Valuation
Dell Latitude models maintain strong value in corporate and education markets.
| Condition Grade | Typical Specifications | Professional Market Value | Enterprise Premium Factors |
|---|---|---|---|
| Excellent (Corporate Refurb) | i5-1135G7, 16GB RAM, 512GB SSD, FHD display | $450 - $600 | +25% for documented professional service |
| Good (Light Business Use) | i5-1135G7, 8GB RAM, 256GB SSD, FHD display | $350 - $500 | +20% with remaining Dell ProSupport |
| Fair (Visible Wear) | i3-1115G4, 8GB RAM, 256GB HDD/SSD, HD display | $250 - $350 | +15% with fresh thermal optimization |
| For Parts/Repair | Any configuration with significant issues | $100 - $200 | Minimal enterprise value |
📈 Upgrade ROI Analysis for Business Users
Focus on upgrades that deliver tangible business value and resale premium.
| Upgrade | Approx. Cost | Value Added at Resale | ROI | Business User Appeal |
|---|---|---|---|---|
| 8GB → 16GB DDR4 RAM | $30 - $50 | $60 - $90 | 80-120% | Very High (Multitasking performance) |
| 256GB → 512GB NVMe SSD | $40 - $70 | $80 - $120 | 80-100% | Extreme (System responsiveness) |
| New Genuine Battery | $70 - $110 | $90 - $140 | 60-80% | High (Professional mobility) |
| Professional Thermal Repaste | $15 - $25 (materials) | $50 - $80 | 200-300% | High (Sustained performance) |
| HD → FHD Display Upgrade | $100 - $180 (part + labor) | $120 - $200 | 30-60% | Very High (Productivity & presentation) |
⚙️ Pre-Disassembly Diagnostic Assessment
Establish performance baseline and identify issues before opening the device.
- Run Dell Diagnostics: Use Dell SupportAssist for comprehensive hardware testing (F12 during boot).
- Performance Benchmarking:
- CPU: Run Cinebench R23 for multi-core performance
- Storage: Test with CrystalDiskMark
- System: Use PCMark 10 for business application simulation
- Functional Testing Checklist:
- Test all USB ports (including USB-C if equipped)
- Verify HDMI and Ethernet port functionality
- Check keyboard and touchpad operation
- Test display for dead pixels and backlight uniformity
- Verify Wi-Fi and Bluetooth connectivity
- Check SD card reader if equipped
📋 Warranty & Professional Documentation
- Check Warranty Status: Enter Service Tag on Dell's Support Site. Note: User-accessible upgrades may not void warranty, but damage during disassembly might.
- Document Original Condition:
- High-resolution photos from all angles showing exterior condition
- Close-ups of any existing cosmetic damage (scratches, dents)
- Video demonstrating all functional components working
- Photos of Service Tag and configuration labels
- Professional Data Management:
- Full Backup: Use Macrium Reflect Free for system image
- Cloud Sync: Ensure business data is synced to cloud storage
- Recovery Media: Create Dell Recovery USB via Dell SupportAssist
- License Documentation: Record software licenses and product keys
🛡️ Safety & Professional Workspace Setup
- Complete Power Down: Shut down Windows, disconnect AC adapter and all peripherals.
- ESD Protection: Use anti-static wrist strap connected to grounded surface.
- Organized Workspace:
- Clean, well-lit, static-free surface
- Magnetic project mat for screw organization
- Containers for small components and screws
- Adequate lighting for detailed work
- Tool Preparation:
- Phillips #0 and #00 screwdrivers
- Plastic spudgers and opening tools
- Non-magnetic tweezers
- Compressed air for cleaning
- Reference Materials: Download Dell Latitude 3420 Service Manual for official procedures.
💼 Key Business Value Determinants
Understand what corporate buyers and IT departments value most in Latitude laptops.
- Reliability Indicators:
- Genuine Dell parts used in any replacements
- Documented maintenance and service history
- Clean diagnostics report from Dell tools
- Battery health >80% of original capacity
- Original charger and accessories included
- Enterprise Features:
- Intel vPro capability (on certain configurations)
- Windows 10/11 Pro with BitLocker encryption
- Docking station compatibility (Dell WD series)
- Security features: TPM 2.0, fingerprint reader (optional)
- Dell ProSupport eligibility (check remaining coverage)
- Professional Service Value:
- Clean, documented disassembly/assembly
- Performance optimization evidence
- Proper cable management and thermal application
- Comprehensive testing documentation
📊 Configuration Documentation Template
Create professional documentation of your specific configuration.
- System Information:
- Service Tag and Express Service Code
- Exact processor model and specifications
- Current RAM configuration (capacity, speed, slots used)
- Storage configuration (types, capacities, interfaces)
- Display specifications (resolution, type, brightness)
- Performance Baseline:
- Benchmark scores before any upgrades
- Temperature readings under typical business load
- Battery health report from Dell Power Manager
- Boot time and application launch speed measurements
2. Essential Tools for Dell Latitude 3420 Professional Repair
Professional-grade maintenance of the Dell Latitude 3420 requires precision tools to preserve its business-class design and avoid costly damage. This section details the exact tools needed for safe, effective disassembly and reassembly, ensuring your repairs meet enterprise standards and maintain the device's value in the corporate and education markets.
🛠️ Core Tool Kit for Dell Latitude 3420
These tools are essential for proper maintenance of this mainstream business laptop.
- Precision Screwdriver Set:
- Phillips #0: Primary driver for most chassis and component screws
- Phillips #00: For smaller screws on connectors, brackets, and delicate components
- Torx T5: Required for display hinge screws on some Latitude models
- Magnetic Tip Recommended: Prevents dropping screws into the chassis
- Professional Prying Tools:
- Plastic Spudger Set: For releasing plastic clips without scratching the chassis
- Nylon Opening Picks: Various shapes for navigating different clip points
- Opening Tool Specifics: Thin, flexible tools work best for Latitude chassis clips
- Anti-Static Equipment:
- ESD Wrist Strap: Mandatory for protecting sensitive enterprise components
- Anti-Static Mat: Provides grounded workspace for components
- Component Handling: Use anti-static bags for removed parts
⚙️ Specialized & Highly Recommended Equipment
| Tool | Purpose for Latitude 3420 | Professional Grade | Business Standard |
|---|---|---|---|
| Magnetic Project Mat | Organize screws by assembly layer (critical for service efficiency) | iFixit Magnetic Project Mat | ESD-safe mats with labeled compartments or sections |
| Precision Tweezers | Handle ribbon cable connectors, small screws, and delicate components | Non-magnetic, anti-static tipped tweezers | ESD-safe fine point tweezers for electronics work |
| Spudger & Pry Tool Set | Safe release of plastic clips in Latitude chassis design | iFixit opening tools or similar professional sets | Dell service kit equivalent tools |
| Thermal Materials | CPU thermal repaste for optimal performance in business use | Thermal Grizzly Kryonaut, Arctic MX-6 | High-performance thermal pastes for sustained workloads |
| ESD-Safe Brush | Cleaning dust from fan and heatsink without static damage | Anti-static nylon brush with fine bristles | Professional electronics cleaning kit |
| Compressed Air/Duster | Cleaning ventilation areas and internal components | ESD-safe canned air with nozzle control | Electric datavac for frequent use |
🔩 Dell Latitude 3420 Specific Tool Notes
This mainstream business model has particular requirements different from consumer laptops.
- Screw Types & Count:
- Bottom Cover: Typically 8-10 Phillips #0 screws (may vary by configuration)
- Internal Components: Mix of Phillips #0 and #00 screws
- Display Hinges: May use Torx T5 or Phillips #0 depending on model
- Keyboard Assembly: Often secured with clips and occasional screws
- Chassis Design Considerations:
- Latitude chassis uses robust plastic clips that require proper technique
- Some models have metal reinforcement in high-stress areas
- Tool insertion points may be more limited than consumer models
- Connector Types: Uses standard ZIF (Zero Insertion Force) connectors for most ribbon cables, requiring careful latch operation.
🏆 Recommended Professional Tool Kits
Investing in quality tools pays dividends in preservation of business value and repair efficiency.
- Best Overall for Latitude Owners:
- iFixit Pro Tech Toolkit ($70-85)
- Includes all necessary drivers, prying tools, and specialized implements
- Lifetime warranty, perfect balance for business laptop maintenance
- Specifically useful for Dell Latitude series disassembly
- Enterprise Service Alternative:
- Dell Service Toolkit (for authorized technicians)
- Includes specialized tools for Dell-specific components
- Higher cost, but designed specifically for Dell business laptops
- Often includes plastic tools matched to Dell chassis designs
- Budget Professional Option:
- iFixit Essential Electronics Toolkit ($30-35)
- Covers basic needs for RAM, SSD, and battery replacement
- May lack specialized tools for display or keyboard work
- Good entry point for occasional business laptop service
🧴 Essential Consumable Materials
Professional repairs require quality consumables for lasting results and reliability.
- Thermal Interface Materials:
- Thermal Paste: High-quality paste (Arctic MX-6, Noctua NT-H2, Thermal Grizzly)
- Thermal Pads: Various thicknesses (0.5mm, 1mm, 1.5mm) for VRM and chipset cooling
- Cleaning Supplies: 99% isopropyl alcohol and lint-free wipes or coffee filters
- Adhesives & Tapes:
- Double-sided Tape: Specific thickness for reassembling components
- Kapton Tape: Heat-resistant insulation for electrical components
- Battery Adhesive Strips: If replacing battery (must be compatible type)
- Electrical Tape: For minor insulation repairs if needed
- Cleaning & Maintenance:
- Microfiber cloths for display and exterior cleaning
- Contact cleaner for port maintenance (optional)
- Compressed air for thorough internal cleaning
⚠️ Tool Safety & Professional Best Practices
- Always Disconnect Power: Remove AC adapter and disconnect internal battery before any work.
- ESD Protection Mandatory: Wear wrist strap throughout entire process, especially in dry environments.
- Systematic Organization:
- Use magnetic mat with labeled sections for different screw types
- Take photos at each disassembly step for reference during reassembly
- Keep small components in labeled containers or bags
- Document screw lengths and locations for each removal step
- Proper Force Application:
- Latitude chassis requires moderate, controlled force
- If something doesn't move easily, re-check for hidden screws or clips
- Never force connectors or components - they should separate smoothly
- Use the right tool size to avoid stripping screw heads
- Cleanliness & Preparation:
- Work in clean, dust-free environment
- Clean tools before use on sensitive components
- Avoid moisture and static-generating materials (certain plastics, fabrics)
- Keep workspace organized to prevent losing small parts
🏢 Enterprise Service Considerations
- Asset Tag Preservation: Be careful not to damage corporate asset tags or property labels.
- Warranty Compliance: Use Dell's Warranty Checker before beginning. Note Dell's policy on user-serviceable components.
- Documentation Requirements: Enterprise IT departments typically require:
- Part numbers used in any repairs or upgrades
- Serial numbers of replacement components
- Date of service and detailed technician notes
- Photos showing professional cable management and component installation
- Test results from Dell diagnostics or equivalent
- Genuine Parts Preference: Corporate environments often prefer genuine Dell parts for compatibility and warranty alignment.
🛒 Where to Purchase Professional Tools
- Professional Electronics Focus:
- iFixit.com - Comprehensive kits with lifetime warranty and detailed guides
- Dell Parts & Accessories - Genuine service tools and parts
- Industrial & Electronics Suppliers:
- McMaster-Carr - High-precision tools and materials
- Grainger - Professional maintenance equipment
- Mouser/Digikey - Electronics-specific tools and components
- Local & Retail Options:
- Micro Center - Electronics-specific tools and components
- Home Depot/Lowe's - For basic tools (screwdrivers, organizers)
- Local electronics repair shops may sell tools or kits
🔧 DIY Tool Alternatives (Use with Caution)
In a pinch, these household items can work but lack precision of proper tools.
- Screwdriver Alternatives:
- Small Phillips head from household set (ensure proper fit)
- Add magnetic tip with magnetized screwdriver or separate magnet
- Avoid using wrong size to prevent stripping
- Prying Tool Alternatives:
- Old credit card or gift card (cut to appropriate shape)
- Plastic guitar picks (excellent for prying clips)
- Thin, stiff plastic from packaging (cut carefully)
- Never use metal tools for prying plastic clips
- Organization Alternatives:
- Ice cube tray or egg carton for screw organization
- Paper with tape to hold screws in labeled positions
- Small containers or cups labeled by component
0:20 Bottom Case 1:15 Battery 2:00 RAM Memory 2:20 WiFi Card 2:38 SSD Storage 3:12 Cooling Fan 4:00 Heatsink 4:13 Processor 4:35 Hinges 5:45 USB Ports Board 6:10 Motherboard 6:17 Video Cable 6:55 Speakers 7:45 Palmrest Assembly 7:50 DC Power Jack 8:20 Touchpad 8:58 Keyboard 9:17 Display Assembly
3. Bottom Cover Removal: Safe Internal Access Procedure for Dell Latitude 3420
Gaining safe, damage-free access to the internal components of your Dell Latitude 3420 begins with proper bottom cover removal. This critical first step requires precision to preserve the laptop's business-class integrity and avoid damage to clips, screws, and the chassis itself.
🛡️ Pre-Removal Safety & Workspace Preparation
- Complete Power Down & Discharge:
- Perform a proper Windows shutdown from the Start Menu.
- Disconnect the AC adapter and all peripherals (mouse, dock, monitors).
- Hold the power button down for 10 seconds to discharge any residual power in capacitors.
- Verify that all indicator lights (power, battery, HDD) are completely off.
- Workspace & Tool Setup:
- Ensure your anti-static wrist strap is connected to a grounded surface.
- Position the laptop on a clean, soft, non-slip surface like a microfiber cloth or magnetic project mat.
- Have your Phillips #0 screwdriver and plastic spudger/pry tools within easy reach.
- Ensure bright, direct lighting to clearly see screw locations and seam lines.
🔩 Latitude 3420 Bottom Screw Identification & Map
The Latitude 3420 uses a mix of captive and standard screws. Mapping them is essential for correct reassembly.
| Screw Type/Location | Quantity | Driver | Length/Notes | Reassembly Priority |
|---|---|---|---|---|
| Main Perimeter Screws (around edges) | 8 | Phillips #0 | Standard length (approx. 3-4mm), black finish. | Low - Install last during reassembly. |
| Captive Corner Screws (near hinges and front corners) | 2 | Phillips #0 | Captive - they remain in the bottom cover when unscrewed. | N/A - They cannot be removed. |
| Warranty Seal (may be present) | 1 | N/A | Check status at Dell Support before breaking. | N/A |
| Rubber Foot Screws (under front feet) | 0-2 | Phillips #0 | Some configurations hide screws under the front rubber feet. Gently peel foot to check. | Medium - Replace foot adhesive carefully. |
🔧 Step-by-Step Removal Process
- Screw Removal Sequence:
- Flip the laptop upside down onto your prepared work surface.
- Starting from one corner, remove all 8 perimeter screws using your Phillips #0 driver.
- Pro Tip: Unscrew in a spiral pattern from the outside in to prevent chassis warping.
- Place screws immediately into a labeled compartment on your magnetic mat or in a small container.
- Check for any hidden screws under rubber feet by gently peeling back the front feet.
- Initial Clip Release (Critical Step):
- Identify the seam between the bottom cover and the main chassis (top case).
- Begin at the rear corner, near the hinge vents. This area typically has the most accessible clips.
- Insert a thin plastic spudger or iFixit Opening Tool at a shallow 30-degree angle.
- Apply gentle, upward pressure while slightly twisting the tool. Listen/feel for a soft click as the first clip releases.
- Working Around the Perimeter:
- Once the first clip is free, work your way down the side, releasing clips approximately every 2 inches.
- Use a guitar pick or plastic card to slide along the seam after the initial break, keeping clips separated.
- Never force it: If you meet significant resistance, stop. You've likely missed a screw or are prying at a reinforced section.
- Pay special attention to the area around the touchpad, as clips here can be more delicate.
- Final Separation & Lifting:
- After all perimeter clips are released, the bottom cover will still be connected near the middle by internal standoffs or guides.
- Lift the cover from the rear edge first, angling it upwards.
- Check for any internal ribbon cables that might be attached to the cover (uncommon on the 3420, but verify). If present, disconnect them carefully before removing the cover fully.
- Set the bottom cover aside on a clean, soft surface to prevent scratching.
🎯 Dell Latitude 3420-Specific Design Notes
- Chassis Material & Clip Design:
- The bottom cover is typically made of polycarbonate with glass-fiber reinforcement for business durability.
- Clips are designed for repeated serviceability, but can still become brittle over time.
- The seam is precisely machined, so proper tool alignment is key to avoiding cosmetic damage.
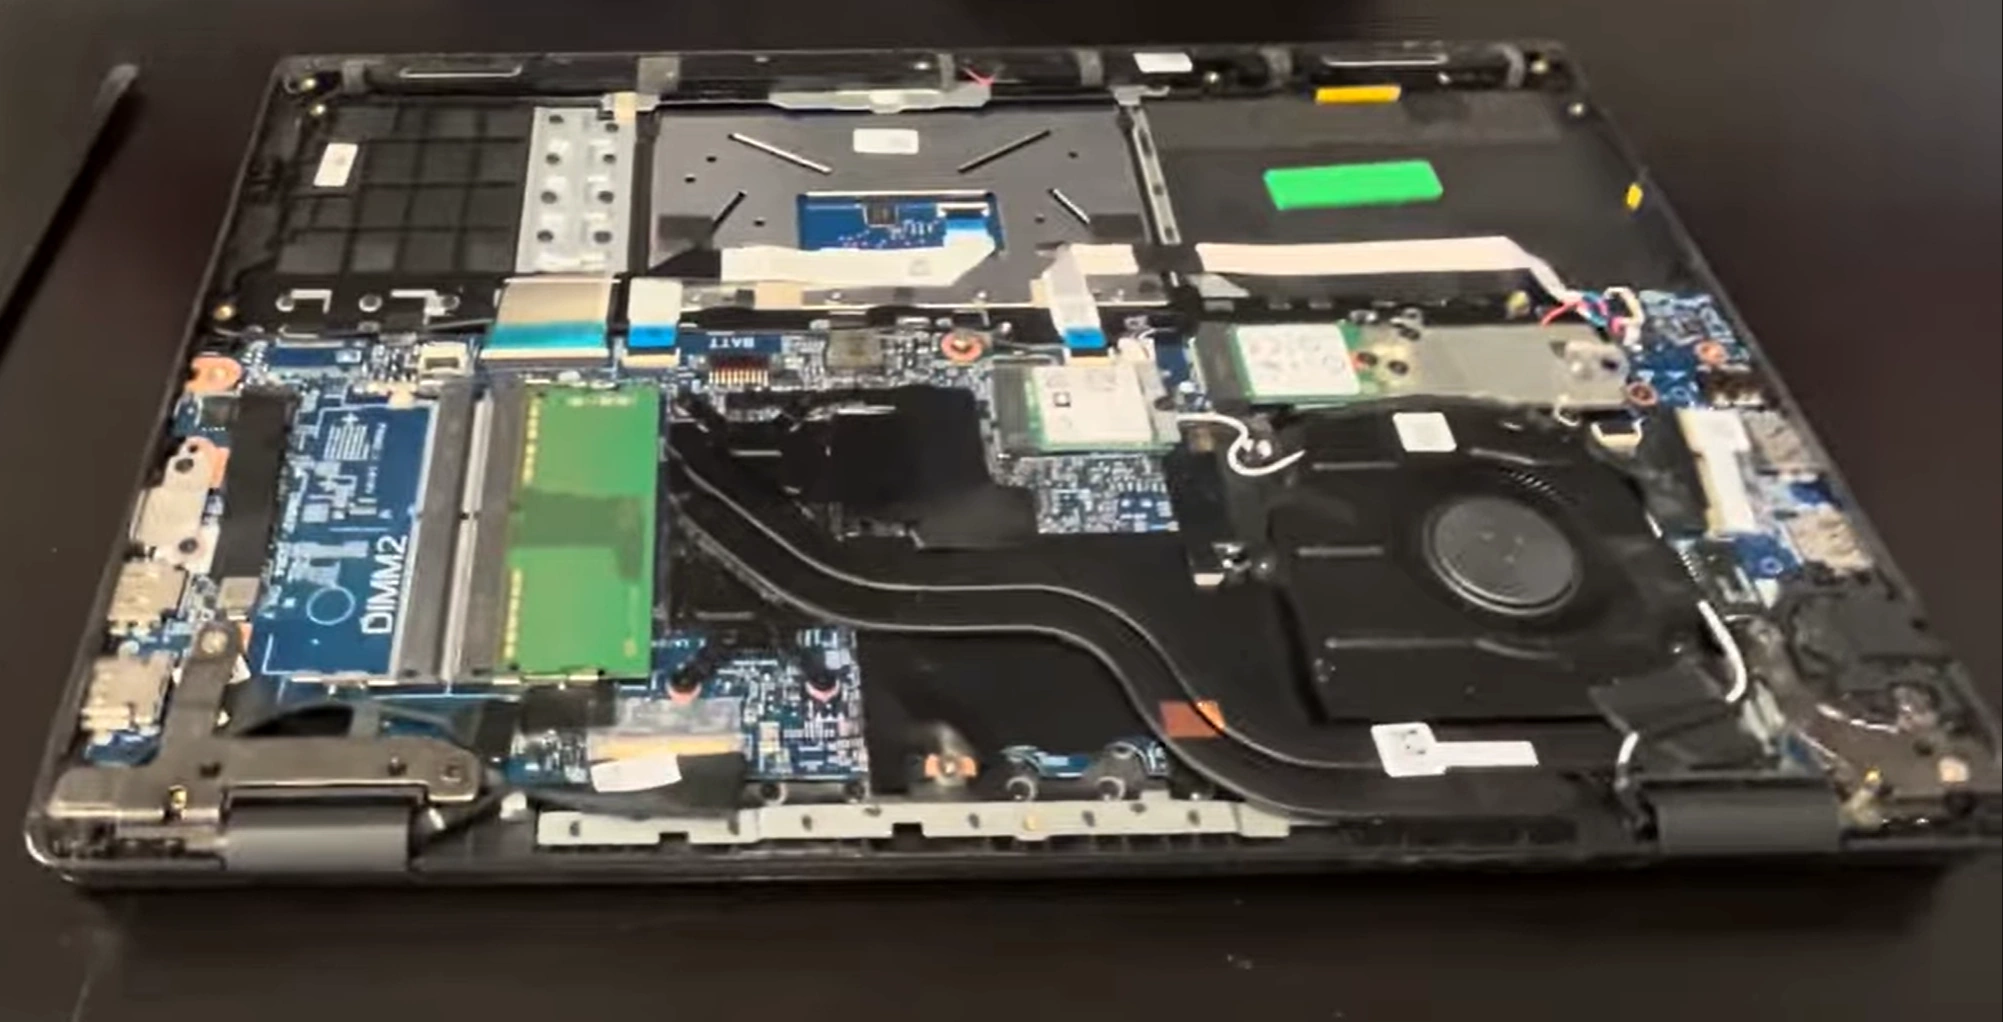
- Internal Layout First Look:
- Upon removal, you'll have immediate access to: Battery, RAM slots, M.2 SSD, Wi-Fi card, and cooling fan.
- The 2.5" SATA drive bay (if equipped) may be under a secondary metal bracket.
- Note the neat, service-friendly cable routing typical of Latitude designs.
🚧 Common Challenges & Professional Solutions
- Stripped Screw Heads:
- Prevention: Use the correct size (#0) driver and apply firm downward pressure while turning.
- Solution: Place a wide rubber band between the screw head and driver for extra grip.
- Last Resort: Use a small screw extractor kit, but be extremely careful not to damage the chassis.
- Stubborn/Unreleasing Clips:
- Apply gentle, localized heat with a hairdryer on low setting for 10-15 seconds to soften the plastic slightly.
- Use a second pry tool to hold the first clip open while you work on the next one.
- Work from both sides towards the stubborn clip, rather than forcing from one direction.
- Fear of Breaking Clips:
- This is normal. Remember, Dell designs these for service. A firm, controlled pressure is needed.
- If a clip does break, note its location. Often, surrounding clips and screws will provide sufficient hold during reassembly.
🛡️ Damage Prevention Checklist
- ✅ Use Plastic Tools Only against plastic surfaces.
- ✅ Follow the Seam - do not dig tools into the body of the cover or top case.
- ✅ Keep Track of All Screws and their locations.
- ✅ Mind the Internal Components when lifting the cover away.
- ❌ Never Use Metal Spudgers or Knives for prying.
- ❌ Avoid Twisting or Bending the cover once clips are partially released.
🔍 Post-Removal Inspection & Preparation for Next Steps
- Inspect the Bottom Cover: Look for any cracked clips or stress marks. Clean any dust from the vents and interior surface with compressed air.
- Inspect the Chassis Interior:
- Note the current configuration (number of RAM sticks, type of SSD, etc.).
- Check for any obvious issues like dust buildup in the fan, swollen battery, or loose cables.
- Take a clear, well-lit photo of the internal layout for your reassembly reference.
- Ground Yourself Again: Before touching any internal components, re-ground yourself via your anti-static wrist strap.
🔧 Troubleshooting: Cover Won't Sit Flat After Reassembly
If you encounter this after reassembly (covered in a later section), the likely causes are:
- Missed Clip Alignment: One or more clips aren't seated properly. Open and re-engage.
- Incorrect Screw Length: A longer screw was used in a short hole, preventing full closure.
- Trapped Cable: A ribbon cable or antenna wire is caught under the cover's edge.
- Foreign Object: A small screw or debris is on the chassis mating surface.
4. Battery Safety & Replacement Guide for Dell Latitude 3420
Safely handling, disconnecting, and replacing the internal battery is a critical skill for maintaining your Dell Latitude 3420. A healthy battery ensures professional mobility, while proper replacement can significantly boost the laptop's resale value in the business market.
🔋 Battery Specifications & Identification
First, identify your specific battery to ensure compatibility and understand its health metrics.
- Original Dell Part Numbers:
- 4-Cell, 53Wh: Commonly PN 451-BBVZ, 0T7F3F, 0F3F3F
- 3-Cell, 42Wh: Alternative configuration for lighter weight
- Check Your Battery: The part number is printed on the battery label. Cross-reference on Dell's Parts Page.
- Key Technical Specifications:
- Chemistry: Lithium-Ion Polymer (Li-Po)
- Voltage: 11.4V (nominal)
- Capacity: Typically 53Wh (4-cell) or 42Wh (3-cell)
- Expected Business Runtime: 6-10 hours (office use), 2-4 hours (high performance)
- Compatibility Warning:
- Only use batteries specifically designed for the Latitude 3420/3420 series.
- Using incorrect batteries can cause charging issues, fitment problems, and safety hazards.
- Check physical dimensions before purchasing third-party options.
⚠️ CRITICAL Safety Protocols (Lithium-Ion Handling)
- Power Down & Disconnect:
- Ensure laptop is fully powered off (not sleep/hibernate).
- Disconnect AC adapter and all peripherals.
- The bottom cover must already be removed (as per previous section).
- Static Discharge & Workspace:
- Wear your anti-static wrist strap connected to a grounded metal object.
- Work on a clean, dry, non-flammable surface.
- Keep magnetic tools away from the battery and storage devices.
- Battery Hazard Recognition:
- DO NOT puncture, bend, or apply excessive force to the battery.
- DO NOT expose to high heat (above 60°C/140°F) or direct flame.
- If you notice any swelling, leakage, or unusual odor, STOP IMMEDIATELY and follow proper hazardous material disposal procedures.
- Have a Class D fire extinguisher or sand nearby when working with multiple or potentially damaged batteries.
🔌 Safe Battery Disconnection Procedure
This step is MANDATORY before working on any other internal component. It isolates power from the motherboard.
- Locate the Battery Connector:
- Find the rectangular, white (or black) plastic connector where the battery cable meets the motherboard. It is typically near the center or edge of the battery.
- Identify the locking mechanism. On the Latitude 3420, this is usually a pull-tab style latch that lifts upwards or sideways.
- Unlatch and Disconnect:
- Using your fingernail or a plastic spudger, gently lift the locking tab to its unlocked position.
- Grasp the connector body (NOT the wires) and pull it straight back, away from the motherboard socket, with steady force.
- If it's stuck, wiggle it gently side-to-side while pulling. Never use excessive force.
- Discharge Residual Power:
- With the battery disconnected, press and hold the laptop's power button for 15-20 seconds.
- This discharges any remaining power in the system capacitors, preventing short circuits.
- You may see the power LED flash briefly; this is normal.
📤 Battery Removal Process
- Remove Mounting Screws:
- The battery is secured by 3-4 Phillips #0 screws along its edges.
- Remove these screws and place them in a labeled container. Note their positions, as length may vary.
- Lift the Battery Out:
- There may be light adhesive or double-sided tape under the battery.
- Start lifting from the end opposite the cable connector (usually the front edge).
- Insert a plastic card or guitar pick to gently break any adhesive seal if needed.
- Lift the battery out at a shallow angle, being mindful not to snag the cable on other components.
- Inspect the Battery Bay:
- Once removed, check the empty bay for any debris, corrosion, or damage to the connector pins on the motherboard.
- Clean the area with a dry, lint-free cloth if necessary.
🔄 New Battery Installation & Best Practices
- Pre-Installation Check:
- Inspect the new battery for any physical damage or swelling before unpacking fully.
- Verify the part number matches your Latitude 3420.
- If the battery comes with a protective plastic film on the connector, remove it.
- Positioning and Securing:
- Align the new battery with the guides/screwholes in the chassis.
- Ensure the cable is routed cleanly and will not be pinched.
- Lower the battery into place gently. It should sit flat without forcing.
- Reconnection & Final Steps:
- DO NOT insert screws yet. First, reconnect the battery cable to the motherboard.
- Push the connector in firmly and evenly until you hear/feel a click from the locking tab engaging.
- Give the connector a gentle tug to confirm it's secure.
- Now, insert and tighten the mounting screws. Do not overtighten.
📊 Battery Health Assessment & Business Value Impact
| Health Status (via Dell Power Manager) | Capacity Estimate | Recommended Action | Impact on Resale Value |
|---|---|---|---|
| Excellent (Adaptive/Standard Charge) | 90-100% of original | Maintain with Dell Power Manager settings. No replacement needed. | +$80-$120 (Major selling point for business users) |
| Good (Some wear reported) | 70-89% of original | Monitor degradation. Consider replacement if rapid decline or for premium resale. | +$30-$60 (Acceptable for most buyers) |
| Poor (Consider Replacement) | 50-69% of original | Replacement recommended for reliable mobile use. Significant runtime loss. | -$40-$80 (Detracts from value; signals aged device) |
| Critical/Failed (Swollen/Broken) | <50% or unsafe | IMMEDIATE REPLACEMENT REQUIRED. Do not use the laptop. Safe disposal needed. | -$100-$150 (Major defect; requires discount) |
⚙️ Post-Installation Calibration & Initialization
For the system to accurately report battery percentage and health, calibration is essential.
- First Boot & Charge:
- Reattach the bottom cover (temporarily, without all screws if needed) and connect the AC adapter.
- Power on the laptop. The system may take longer to POST with a new battery.
- Allow the battery to charge to 100% uninterrupted.
- BIOS Recognition:
- Enter BIOS (press F2 at boot) and check if the battery is recognized under "Battery Information."
- Update BIOS to the latest version from Dell Support for best compatibility.
- Software Calibration:
- Use Dell Power Manager (in Windows) to set a charge profile (e.g., "Primarily AC Use").
- Run a full discharge/charge cycle: Use on battery until it shuts down (~5%), then charge to 100% again.
- Windows and Dell software should now report accurate percentage and health.
🛒 Purchasing Guide: Genuine Dell vs. Third-Party
- Genuine Dell Battery (Recommended):
- Source: Dell.com, authorized Dell partners, or certified refurbishers.
- Pros: Guaranteed compatibility, full safety certification, works with Dell Power Manager features, often includes warranty.
- Cons: Higher cost (typically $90-$140).
- Best for: Professional resale, enterprise environments, maximum reliability.
- High-Quality Third-Party:
- Source: Reputable brands (e.g., Cameron Sino, Green Cell) on Amazon or specialty retailers.
- Pros: Lower cost ($40-$80), good performance if from a reputable brand.
- Cons: Variable quality, may lack advanced firmware features, shorter lifespan potential.
- Look for: UL/CE certifications, high user ratings specifically for Latitude 3420, clear return policy.
- AVOID: No-name batteries with prices far below market, vague compatibility claims, or no safety certifications.
♻️ Safe Disposal & Recycling of Old Batteries
Never throw lithium-ion batteries in the trash. They are fire hazards and contain toxic materials.
- Dell Recycling Program: Dell offers free consumer recycling for old batteries and electronics.
- Retail Drop-Off: Most Best Buy, Staples, and Home Depot stores have free battery recycling bins.
- Local Hazardous Waste: Check with your municipal waste authority for designated drop-off days or facilities.
- Safety Prep for Disposal: Tape over the battery terminals with electrical tape to prevent short circuits during transport.
🔍 Troubleshooting Common Battery Issues
- "Battery Not Detected" after replacement:
- Reseat the connector firmly.
- Update BIOS to latest version.
- Disconnect AC adapter, remove battery, hold power button 60 sec, reconnect.
- Not Charging Past a Certain Percentage:
- Check Dell Power Manager settings ("Primarily AC Use" caps at ~80%).
- Run a full calibration cycle.
- Try a different, high-wattage Dell AC adapter (65W recommended).
- Rapid Drain/Short Runtime:
- Calibrate the battery (full cycle).
- Check for power-hungry processes in Task Manager.
- Adjust Windows Power Plan to "Balanced" or "Power Saver" on battery.
- Dim the display brightness.
💰 Maximizing Resale Value: The Professional Documentation
Documenting a battery replacement adds significant trust and value for business buyers.
- Include in Your Listing:
- Photo of the new battery's part number and Dell branding (if genuine).
- Screenshot of Dell Power Manager showing "Excellent" health and full charge capacity.
- Receipt or proof of purchase for the new battery (redact personal info).
- Brief note explaining the replacement was done with ESD protection and following Dell service guidelines.
- Value Proposition: Clearly state the benefit: "Fresh battery installed MM/YYYY, ensuring 8+ hours of productivity for meetings, travel, or classroom use."
5. Memory (RAM) Upgrade: Capacity Expansion & Configuration for Dell Latitude 3420
Upgrading the RAM in your Dell Latitude 3420 is one of the most cost-effective ways to enhance business productivity performance and significantly increase resale value. This section provides professional guidance on selecting compatible memory, performing the upgrade safely, and optimizing configurations for maximum enterprise value.
🔍 Dell Latitude 3420 RAM Specifications & Compatibility
Understanding exact compatibility is crucial to avoid system instability or failure to boot.
- Memory Type: DDR4 SODIMM (Small Outline Dual In-line Memory Module)
- Speed: 3200MHz (JEDEC standard), though the system may run at 2933MHz or 2666MHz depending on CPU (11th Gen Intel supports up to 3200MHz)
- Voltage: 1.2V (Standard DDR4 voltage)
- Maximum Capacity: 32GB (2x16GB) is the officially supported maximum per Dell specifications
- Memory Channels: Dual-channel architecture (two slots)
- ECC Support: No - Requires non-ECC, unbuffered memory
- Form Factor: 260-pin SODIMM (laptop memory)
Verification Tip: Check your current configuration in Windows Task Manager (Performance tab → Memory) or use CPU-Z for detailed specs.
🛡️ Pre-Upgrade Preparation & Safety
- Complete System Shutdown:
- Save all work and perform a complete Windows shutdown.
- Disconnect AC adapter and all peripherals.
- Battery Disconnection (MANDATORY):
- Follow the Battery Safety & Replacement Guide to properly disconnect the internal battery.
- This is CRITICAL to prevent short circuits or motherboard damage while handling RAM.
- ESD Protection:
- Wear your anti-static wrist strap connected to a grounded surface.
- Handle RAM modules by the edges only, avoiding contact with gold contacts or chips.
- Document Existing Configuration:
- Take photos of the existing RAM configuration before removal.
- Note the slot positions and orientation of any installed modules.
📍 RAM Slot Identification on Latitude 3420 Motherboard
With the bottom cover removed and battery disconnected, locate the RAM slots:
- Slot Positions: Two SODIMM slots are typically located adjacent to each other, often near the center of the motherboard.
- Slot Designation: Usually labeled as DIMM A (or Slot 1) and DIMM B (or Slot 2). Consult the Dell Service Manual for exact location.
- Current Configuration:
- If only one slot is populated, the system is running in single-channel mode.
- If two slots are populated with identical modules, it's running in dual-channel mode (optimal performance).
🔧 Step-by-Step RAM Removal & Installation
- Removing Existing RAM:
- Locate the metal retention clips on each side of the RAM module.
- Gently push both clips outward simultaneously until the module pops up at a ~30-degree angle.
- Grasp the module by its edges and pull it straight out of the slot.
- Place the removed module in an anti-static bag for safekeeping or resale.
- Installing New RAM (Critical Alignment):
- Take your new RAM module and align the notch in the gold contacts with the key in the RAM slot.
- DDR4 has a single notch offset from center - ensure it matches before applying pressure.
- Hold the module at a ~30-degree angle and insert it firmly into the slot.
- Seating the Module:
- Apply firm, even pressure with both thumbs on the top edge of the module until it clicks into place.
- The metal retention clips should snap closed automatically when properly seated.
- If they don't snap closed, the module is not fully inserted. Remove and reinsert.
- DO NOT force it - if resistance is high, recheck alignment.
- Dual-Channel Configuration (Optimal Performance):
- For two modules, install identical RAM sticks in both slots.
- The system will automatically enable dual-channel mode, providing up to ~15-20% better memory performance.
✅ Post-Installation Verification & Testing
- Physical Inspection:
- Visually verify that both retention clips are fully closed and the modules are seated evenly.
- Ensure no cables are obstructing the RAM slots or touching the modules.
- Reconnection & First Boot:
- Reconnect the battery following the previous guide.
- Reattach the bottom cover temporarily with a few screws.
- Connect AC adapter and power on the system.
- BIOS Recognition:
- During boot, watch for the Dell logo and memory count. It should display the new total RAM.
- Enter BIOS (F2 at boot) and navigate to System Information to verify the new capacity is recognized.
- Windows Verification & Stress Test:
- Boot into Windows. Open Task Manager → Performance → Memory to confirm new capacity and speed.
- Run MemTest86 for a full memory stability test (recommended for used RAM or mixed brands).
- Test with your typical workload to ensure stability.
🏆 Recommended RAM Brands & Configurations for Business Use
- Tier 1 (Professional/Enterprise Grade):
- Crucial (Micron): Excellent compatibility, often used by OEMs. Their compatibility tool is highly reliable.
- Samsung: OEM supplier to Dell, exceptional quality and stability.
- SK Hynix: Another major OEM supplier, excellent reliability.
- Tier 2 (Quality Consumer/Prosumer):
- Kingston: Reliable, good warranty, widely available.
- Corsair: Good performance, often slightly higher clocks.
- G.Skill: Reliable, good for matched kits.
- Optimal Configurations for Specific Uses:
- General Business (Office, Browsing): 2x8GB DDR4-3200 (16GB total) - Sweet spot for value/performance.
- Advanced Business (Data Analysis, Development): 2x16GB DDR4-3200 (32GB total) - Future-proof for heavy workloads.
- Budget Upgrade (Light Use): Add 1x8GB to existing 1x8GB for 16GB total (ensure matching specs).
🔍 Troubleshooting Common RAM Upgrade Issues
- System Won't Boot / Beeping Sounds:
- Cause: Improper seating or incompatible RAM.
- Solution: Power off, reseat modules, ensure clips snap closed. Try one module at a time.
- Only Half RAM Recognized:
- Cause: One module not seated properly or defective slot/module.
- Solution: Test each module individually in each slot to identify the faulty component.
- System Runs at Lower Speed (e.g., 2666MHz instead of 3200MHz):
- Cause: CPU or chipset limitation, or mixed speed modules.
- Solution: This is normal - the system runs at the highest JEDEC standard supported. Ensure you're using same-speed modules.
- Blue Screens or System Instability:
- Cause: Faulty RAM module or incompatible timings.
- Solution: Run MemTest86 overnight. If errors appear, replace the faulty module.
📋 Professional Documentation for Resale
Proper documentation of a RAM upgrade significantly enhances perceived value to business buyers.
- Documentation to Include:
- Clear photo of the installed RAM modules showing brand and capacity labels.
- Screenshot of Windows Task Manager showing 16GB or 32GB capacity.
- Screenshot of CPU-Z SPD tab showing memory specifications.
- Brief note: "Professionally upgraded to 16GB/32GB DDR4-3200 dual-channel RAM for enhanced multitasking and application performance."
- Performance Benchmarks (Optional but Powerful):
- Run PCMark 10 before and after to show tangible performance gains.
- Include screenshots showing improved scores, particularly in "Essential" and "Productivity" tests.
💰 Economic Considerations & ROI Analysis
| Upgrade Scenario | Upgrade Cost | Labor Time | Value Added at Sale | ROI | Break-even Point |
|---|---|---|---|---|---|
| 4GB → 16GB (Full kit) | $45 | 15-20 minutes | $90 | 100% | Immediate upon sale |
| 8GB → 16GB (Add 8GB) | $25 | 10-15 minutes | $60 | 140% | Immediate upon sale |
| 8GB → 32GB (Full kit) | $100 | 15-20 minutes | $130 | 30% | Niche market premium |
| 16GB → 32GB (Full kit) | $100 | 15-20 minutes | $80 | -20% | Only for specific high-demand workloads |
Professional Insight: The 8GB to 16GB upgrade offers the best ROI for general business resale. The 4GB to 16GB upgrade is transformational for the device's usability and value.
6. Storage Upgrade: M.2 SSD & 2.5" Drive Installation for Dell Latitude 3420
Upgrading storage is the single most impactful performance enhancement for the Dell Latitude 3420, transforming system responsiveness and significantly boosting business productivity. This comprehensive guide covers both M.2 NVMe and 2.5" drive upgrades with professional installation techniques.
🔍 Dell Latitude 3420 Storage Configuration Overview
The Latitude 3420 offers flexible storage options. Identifying your current setup is crucial for planning upgrades.
- Factory Configurations:
- M.2 NVMe PCIe SSD Only: Most common in modern configurations (2242 or 2280 form factor)
- 2.5" SATA HDD/SSD Only: Budget configurations, often with 7mm height SATA drives
- Dual Storage (M.2 + 2.5"): Some configurations include both (check service manual for compatibility)
- Interface Specifications:
- M.2 Slot: PCIe Gen3 x4 (up to ~3500MB/s read), supports NVMe protocol. Key M (M-Key).
- 2.5" Bay: SATA III (6Gb/s, up to ~550MB/s). Includes SATA data and power connector.
- Boot Support: Both interfaces support booting to Windows/Linux.
- Form Factor Notes:
- M.2 Length: Typically supports 2280 (80mm) length, but verify physical space. Some early units may be 2242.
- 2.5" Height: 7mm height drives required (standard for laptops). 9.5mm drives will not fit.
📈 Storage Upgrade Performance & Value Analysis
| Upgrade Scenario | Typical Performance Gain | Cost Range | Business Value Added | Best Use Case |
|---|---|---|---|---|
| HDD → SATA SSD (2.5") | 3-5x faster boot/load times (550MB/s vs 100MB/s) | $40-$80 (512GB) $70-$120 (1TB) |
+$100-$180 (Transformational for basic models) | Budget business upgrade, general office productivity |
| SATA SSD → NVMe SSD | 2-3x faster sequential speeds (3500MB/s vs 550MB/s) | $45-$90 (512GB) $80-$150 (1TB) |
+$60-$120 (Premium performance) | Data analysis, development, power users, faster file operations |
| Small NVMe → Large NVMe | Capacity increase, sustained performance with QLC/TLC drives | $80-$150 (2TB) | +$80-$140 (Capacity premium) | Media professionals, large datasets, virtual machines |
| Adding Second Drive (if bay available) | Storage expansion without replacing primary drive | $40-$120 (additional drive) | +$50-$100 (Flexibility premium) | Users needing both speed and high capacity |
🛡️ Pre-Upgrade Preparation & Data Migration
Warning: Replacing your boot drive will erase all data. Proper backup and migration are essential.
- Complete System Backup:
- Use Macrium Reflect Free or Clonezilla to create a full disk image backup.
- Backup critical business data to cloud storage (OneDrive, Google Drive) or external drive.
- Export browser bookmarks, email settings, and application configurations.
- Create Recovery Media:
- Use Dell SupportAssist or Windows Media Creation Tool to create recovery USB.
- Download latest drivers from Dell Support to a separate USB drive.
- Safety Procedures:
- Power down completely, disconnect AC adapter and all peripherals.
- Remove bottom cover and DISCONNECT INTERNAL BATTERY (critical for M.2 installation).
- Wear anti-static wrist strap throughout the procedure.
⚡ M.2 NVMe SSD Upgrade Procedure
For systems with or upgrading to NVMe storage (recommended for maximum performance).
📍 M.2 Slot Location & Identification
- The M.2 slot is typically located near the center of the motherboard, often under a small metal heatshield or bracket.
- It may be labeled "M.2" or "SSD" on the motherboard.
- If a drive is already installed, you'll see a small printed circuit board secured with a single screw.
🔧 Existing M.2 Drive Removal
- Remove Heatshield/Bracket: If present, remove the small Phillips #0 screw securing any metal cover.
- Remove Retention Screw: Locate the single screw at the far end of the M.2 drive (opposite the connector). This screw holds the drive at a 30-degree angle.
- Extract Drive: Gently lift the drive at a 30-degree angle, then slide it out of the M.2 slot.
- Thermal Interface Note: If there's thermal pad on the heatshield, preserve it for reuse with new drive.
🔄 New M.2 Drive Installation
- Alignment: Note the notch in the gold contacts of the new SSD (M-key for NVMe). Align this with the key in the M.2 slot.
- Insert at Angle: Insert the drive into the slot at a 30-degree angle until it's fully seated.
- Secure with Screw: Press the drive down flat against the motherboard standoff and secure with the retention screw.
- Critical: Do not overtighten - the screw should be snug but not forced. Overtightening can damage the drive or motherboard.
- Heatshield Reassembly: If your drive or configuration included a heatshield, reattach it now.
💾 2.5" SATA Drive Upgrade Procedure
For systems with or adding a 2.5" drive (HDD or SATA SSD).
📍 2.5" Drive Bay Location
- The 2.5" bay is typically a rectangular opening in the chassis, often on the right side.
- It may be covered by a metal or plastic bracket/caddy that needs removal.
- Look for SATA data and power connectors at the back of the bay.
🔧 Existing 2.5" Drive Removal
- Remove Drive Bracket: Typically 4 Phillips #0 screws secure the drive to a metal caddy. Remove these screws.
- Disconnect SATA Cable: Gently pull the SATA data and power connectors straight out from the drive.
- Extract Drive: Lift the drive (still in its caddy) out of the bay at a shallow angle.
- Transfer Caddy: Remove the 4 screws holding the drive to the caddy, and set the caddy aside for the new drive.
🔄 New 2.5" Drive Installation
- Prepare New Drive: If reusing the caddy, attach your new 2.5" drive using the 4 screws. Ensure the SATA connectors face the correct direction.
- Connect SATA Cable: Before inserting into bay, connect the SATA data and power cables to the new drive.
- Insert into Bay: Lower the drive into the bay, ensuring it sits flat and connectors are not strained.
- Secure if Necessary: Some configurations may have a screw or clip to secure the drive/caddy in the bay.
🚀 Post-Installation Setup & Optimization
⚙️ BIOS Configuration for New Drives
- First Boot: Reconnect battery, attach bottom cover temporarily, and power on with AC adapter.
- Enter BIOS: Press F2 repeatedly during boot to enter Dell BIOS.
- Storage Configuration:
- Navigate to System Configuration → SATA/NVMe Operation.
- For NVMe drives: Ensure set to "NVMe" or "RAID On" (if using Intel RST).
- For fresh install: Set boot order to prioritize your installation media (USB).
- Secure Boot: For Windows 11 installation, ensure Secure Boot is enabled.
🚀 Windows & SSD Performance Optimization
- Enable AHCI Mode: Should be default, but verify in BIOS.
- Update Storage Drivers: Install latest Intel RST drivers from Dell support site.
- Configure Windows for SSD:
- Disable disk defragmentation for SSDs (Windows should do this automatically).
- Ensure TRIM is enabled (run:
fsutil behavior query DisableDeleteNotifyin Command Prompt as Admin - should return 0). - Consider disabling hibernation if not needed (
powercfg -h offin Admin Command Prompt) to save SSD space.
- Partition Alignment: Windows 10/11 installer automatically aligns partitions correctly for SSDs.
🏆 Recommended SSD Models for Dell Latitude 3420
| Category | M.2 NVMe Recommendations | 2.5" SATA Recommendations | Key Features |
|---|---|---|---|
| Professional/Enterprise (Maximum Reliability) |
Samsung 980 Pro, WD Black SN850X, SK Hynix Platinum P41 | Samsung 870 EVO, Crucial MX500, WD Blue 3D NAND | High endurance (TBW), power-loss protection, 5-year warranty, consistent performance |
| Value Performance (Best Bang-for-Buck) |
WD Blue SN580, Crucial P5 Plus, Kingston KC3000 | Crucial BX500, WD Green, Teamgroup GX2 | Good performance/price ratio, 3-5 year warranty, sufficient for business use |
| Budget Upgrade (Cost-effective) |
Intel 670p (QLC), Kingston NV2, Teamgroup MP33 | Silicon Power A55, PNY CS900, ADATA SU650 | Lower cost, adequate for general office use, may have lower endurance ratings |
🔍 Troubleshooting Common Storage Upgrade Issues
- Drive Not Detected in BIOS:
- Reseat the drive in its slot/caddy.
- Check BIOS SATA/NVMe settings.
- Try different SATA port (if 2.5" drive).
- Test drive in another system or external enclosure.
- Slow Performance After Upgrade:
- Ensure NVMe driver installed (for NVMe drives).
- Check if drive is running in PCIe 3.0 x4 mode (use CrystalDiskInfo).
- Verify TRIM is enabled.
- Check for firmware updates for the SSD.
- Boot Issues After Cloning:
- Ensure source drive was healthy before cloning.
- Try repairing bootloader with Windows Recovery.
- Consider clean install if cloning repeatedly fails.
- Temperature Throttling (NVMe):
- Ensure heatshield is properly installed if provided.
- Add thermal pad between drive and chassis if temperatures exceed 70°C under load.
- Monitor with HWiNFO or CrystalDiskInfo.
📋 Professional Documentation for Maximum Resale Value
Documenting an SSD upgrade properly can add substantial value for business buyers.
- Essential Documentation:
- Photo of installed SSD showing brand, model, and capacity.
- Screenshot of CrystalDiskInfo showing drive health (100% Good) and interface (NVMe/PCIe 3.0 x4).
- Screenshot of CrystalDiskMark showing read/write speeds.
- Brief description: "Professionally upgraded to [Brand] [Capacity] NVMe/SATA SSD, achieving [X] MB/s read and [Y] MB/s write speeds for exceptional system responsiveness."
- Performance Demonstration:
- Note boot time (e.g., "Cold boot to login in under 10 seconds").
- Mention application launch speeds (e.g., "Office apps launch instantly").
- Warranty Information: Include remaining manufacturer warranty on the SSD if applicable.
🔄 Advanced: Dual Storage Configuration Setup
If your Latitude 3420 supports both M.2 and 2.5" drives (check service manual):
- Optimal Configuration:
- M.2 NVMe SSD (256GB-1TB): For operating system, applications, and active projects.
- 2.5" SATA SSD/HDD (1TB-2TB): For data storage, archives, backups, and media files.
- Setup Process:
- Install Windows on the NVMe drive for maximum performance.
- Configure libraries (Documents, Pictures, etc.) to point to folders on the 2.5" drive.
- Set up File History or backup software to use the 2.5" drive as backup target.
- Resale Advantage: Dual storage is highly desirable for business users needing both speed and capacity, commanding a $100-$150 premium.
7. Cooling System Maintenance & Thermal Performance Optimization for Dell Latitude 3420
Maintaining optimal thermal performance is crucial for business productivity, system longevity, and sustained professional performance. This comprehensive guide covers thermal paste replacement, cooling system cleaning, and performance optimization techniques for the Latitude 3420.
🔍 Dell Latitude 3420 Cooling System Architecture
Understanding the thermal design is essential for effective maintenance and upgrades.
- Cooling System Components:
- CPU Heatsink: Aluminum heatsink with copper heat pipe connecting to CPU
- Cooling Fan: Single centrifugal fan with brushless DC motor
- Airflow Path: Bottom intake → heatsink → rear exhaust vent
- Thermal Interface Material (TIM): Factory-applied thermal paste/pad on CPU
- Processor Thermal Design:
- CPU: 11th Gen Intel Core i3/i5/i7 (TDP: 15-28W)
- Integrated Graphics: Heat generated by iGPU is managed through CPU heatsink
- Thermal Limits: CPU throttles at ~100°C, optimal range: 50-80°C under load
- Factory Cooling Performance:
- Adequate for office productivity and moderate multitasking
- May struggle with sustained heavy loads without optimization
- Dust accumulation significantly impacts performance over time
📊 Thermal Performance Assessment & Benchmarking
Establish baseline metrics before performing any thermal maintenance.
📈 Essential Thermal Monitoring Tools
- Real-time Monitoring:
- Stress Testing:
- AIDA64 - System stability and thermal stress test
- Cinebench R23 - CPU-intensive thermal test
- PCMark 10 - Real-world application thermal testing
📏 Establishing Thermal Baseline Metrics
| Test Scenario | Optimal Range | Concerning Range | Critical Action Required |
|---|---|---|---|
| Idle Temperature (No applications running) |
35-50°C | 55-65°C | >70°C - Immediate maintenance needed |
| Office Productivity (Word, Excel, Browser) |
45-65°C | 70-80°C | >85°C - Performance throttling likely |
| Sustained Load (Video calls, data processing) |
65-85°C | 90-95°C | >95°C - Thermal throttling, risk of shutdown |
| Fan Noise Level (At 1m distance) |
Silent-35 dB | 35-45 dB (audible) | >45 dB (distracting) - Fan bearing or airflow issue |
🔧 Cooling System Disassembly & Access Procedure
Safe access to the heatsink and fan requires systematic disassembly.
🛡️ Pre-Disassembly Safety Steps
- Complete Power Down: Shut down Windows, disconnect AC adapter and all peripherals.
- Internal Power Disconnect: Remove bottom cover and disconnect internal battery (critical safety step).
- ESD Protection: Wear anti-static wrist strap connected to grounded surface.
- Component Documentation: Take clear photos of all connections before disassembly.
🔩 Heatsink Removal Process
- Fan Connector Disconnection:
- Locate the small 3-4 pin fan connector on the motherboard.
- Gently pull the connector straight out (may require wiggling side-to-side).
- Never pull by the wires - grasp the plastic connector body.
- Heatsink Screw Removal Pattern:
- Identify the 4-6 screws securing the heatsink to the CPU.
- CRITICAL: Loosen screws in reverse numerical order (if numbered) or in a cross pattern to prevent CPU damage.
- Loosen each screw 2-3 turns, working around the heatsink, before fully removing any screw.
- Heatsink Separation:
- Once all screws are removed, gently twist the heatsink clockwise/counter-clockwise to break the thermal paste seal.
- Lift the heatsink straight up to avoid bending heat pipes.
- If resistance is felt, check for missed screws or gently twist more to break paste bond.
🌀 Fan Unit Removal & Cleaning
- Fan Screw Removal: Remove 2-4 small screws securing the fan unit to the chassis.
- Fan Extraction: Gently lift the fan assembly, being careful of the attached cable.
- Deep Cleaning Procedure:
- Use compressed air to blow dust out of fan blades (hold fan to prevent overspinning).
- For stubborn dust, use a soft brush (ESD-safe) to clean between blades.
- Check fan bearing for smooth rotation - any grinding noise indicates bearing wear.
🧴 Professional Thermal Paste Replacement Guide
Replacing dried or inadequate thermal paste is the single most effective thermal upgrade.
🧼 Old Thermal Paste Removal (Critical Step)
- Materials Needed:
- 99% isopropyl alcohol (higher percentage = less residue)
- Lint-free wipes, coffee filters, or Q-tips (for precision cleaning)
- Plastic scraper (optional, for thick paste buildup)
- Cleaning Process:
- Apply isopropyl alcohol to both CPU die and heatsink contact surface.
- Let it sit for 30 seconds to soften old paste.
- Gently wipe away paste with lint-free material, using fresh sections for each wipe.
- Repeat until both surfaces are completely clean and shiny.
- Important: Avoid getting alcohol on motherboard components.
🎯 Thermal Paste Application Methods for 11th Gen Intel
| Application Method | Recommended For | Procedure | Pros & Cons |
|---|---|---|---|
| Pea/Grain Method (Most Common) |
All users, especially beginners | Place rice-grain sized drop in center of CPU die | + Simple, effective - Potential uneven spread |
| Cross/X Method | Rectangular CPU dies | Draw thin X pattern covering CPU surface | + Good coverage - Slightly more complex |
| Spread Method (with applicator) |
Perfectionists, high-viscosity pastes | Spread thin, even layer using plastic card | + Perfect coverage - Risk of air bubbles |
🏆 Thermal Paste Recommendations for Business Laptops
| Performance Tier | Recommended Products | Thermal Conductivity | Best For | Estimated Temp Drop |
|---|---|---|---|---|
| Premium Performance | Thermal Grizzly Kryonaut, Arctic MX-6, Noctua NT-H2 | 12-14 W/mK | Sustained heavy workloads, maximum performance | 5-10°C |
| Value Performance | Arctic MX-4, Cooler Master MasterGel Pro | 8-10 W/mK | General business use, good longevity | 3-7°C |
| Budget Effective | Thermal Grizzly Aeronaut, standard OEM paste | 6-8 W/mK | Basic maintenance, light office use | 1-4°C |
⚙️ Reassembly & Thermal Optimization Techniques
🔩 Heatsink Reinstallation Best Practices
- Alignment: Carefully align heatsink with screw holes, ensuring no paste gets on motherboard.
- Screw Tightening Pattern:
- Tighten screws in numerical order (if numbered) or in a star/cross pattern.
- Tighten each screw 2-3 turns, then move to opposite screw.
- Final tightening should be firm but not forced - overtightening can damage CPU or strip threads.
- Recommended torque: Just past finger-tight (¼ turn with screwdriver).
- Fan Reconnection: Reconnect fan cable, ensuring secure connection.
📏 Thermal Pad Applications for VRM/Mosfets
- Identify Components: Locate voltage regulator modules (VRMs) around CPU socket.
- Pad Thickness: Typically 0.5mm-1.5mm - measure gap between components and heatsink/chassis.
- Application: Cut pads to size, remove protective film, apply to components.
- Benefits: Improves power delivery stability during sustained loads.
💻 Software & BIOS Thermal Optimization
⚡ Dell Power Manager Thermal Settings
- Cool: Maximizes fan speed, minimizes temperatures (best for thermal performance)
- Quiet: Reduces fan noise, allows higher temperatures (for quiet environments)
- Optimized: Balanced approach (Dell default)
- Ultra Performance: Maximizes CPU performance, aggressive fan curve (for heavy workloads)
Recommendation: Set to "Cool" for best thermal performance during business hours, "Quiet" for meetings.
🪟 Windows Power Plan Optimization
- Open Control Panel → Power Options
- Select "High Performance" or create custom plan
- Click "Change plan settings" → "Change advanced power settings"
- Optimize key settings:
- Processor power management: Set max processor state to 99% to disable turbo boost (reduces heat)
- System cooling policy: Set to "Active" for better cooling
- PCI Express: Set Link State Power Management to "Off" for consistent performance
⚙️ BIOS Thermal Management Settings
- Thermal Management: Accessible via F2 during boot
- Fan Settings: Some BIOS versions allow custom fan curves
- Performance Modes: Adjust between performance/quiet/optimized modes
- Recommendation: Update to latest BIOS from Dell Support for best thermal management
✅ Post-Maintenance Thermal Testing & Validation
📊 Performance Validation Procedure
- Idle Temperature Check: Boot to Windows, monitor temperatures for 10 minutes
- Light Load Test: Open 10 Chrome tabs, Office applications - monitor temps
- Stress Test: Run Cinebench R23 multi-core test - record max temperature
- Sustained Load Test: Run PCMark 10 Extended test - monitor thermal throttling
- Fan Curve Verification: Ensure fan ramps up appropriately with temperature
📈 Expected Thermal Improvements
| Maintenance Performed | Typical Temp Reduction (Idle) | Typical Temp Reduction (Load) | Performance Impact |
|---|---|---|---|
| Dust Cleaning Only | 3-7°C | 5-10°C | Reduced fan noise, better sustained performance |
| Thermal Paste Replacement | 5-10°C | 8-15°C | Higher boost clocks, less throttling |
| Full Optimization (Cleaning + Paste + Settings) |
8-15°C | 12-20°C | Maximum performance, longest component lifespan |
🗓️ Recommended Preventive Maintenance Schedule
- Monthly:
- Clean external vents with compressed air
- Check for unusual fan noise
- Monitor temperatures with HWiNFO
- Every 6 Months:
- Open bottom cover for internal dust cleaning
- Check fan blades for dust accumulation
- Update Dell Power Manager and BIOS
- Every 1-2 Years:
- Complete thermal paste replacement
- Deep clean heatsink fins
- Full thermal performance validation
- As Needed:
- Fan replacement if bearing noise develops
- Thermal pad refresh if disassembling for other repairs
💰 Business Value Impact of Thermal Optimization
- Resale Value Increase: 10-15% premium for documented thermal maintenance
- Performance Consistency: Business users value reliable performance in meetings/presentations
- Longevity Extension: Proper cooling extends device lifespan by 1-2 years
- Professional Documentation: Include before/after temperature screenshots in listings
- Competitive Advantage: Sets your refurbished units apart from poorly maintained competitors
8. Keyboard & Input Device Service Procedures for Dell Latitude 3420
Professional keyboard maintenance and replacement is essential for business productivity and device usability. This comprehensive guide covers keyboard removal, replacement, troubleshooting, and touchpad service for the Dell Latitude 3420.
🔍 Latitude 3420 Keyboard Specifications & Identification
Understanding your specific keyboard configuration ensures proper parts ordering and compatibility.
- Keyboard Types:
- Standard US QWERTY: Most common, 78-79 keys with numeric keypad
- International Layouts: Various regional layouts (UK, French AZERTY, German QWERTZ)
- Backlit Options: Some configurations include white LED backlighting (single-zone)
- Non-Backlit: Standard keyboard without illumination
- Key Technical Details:
- Key Travel: 1.3-1.5mm (standard for business laptops)
- Actuation Force: 55-65g (balanced for typing comfort)
- Scissor Switch Mechanism: Dell's standard keyboard design
- Spill Resistance: Basic drainage channels in some configurations
- Part Number Identification:
- Check existing keyboard for part number (usually on back or under keycaps)
- Use Dell Service Tag lookup on Dell Support for exact part numbers
- Common part numbers: 0F1C2F, 07W9V2, 0T7F3F (verify for your specific model)
⚠️ Common Keyboard Issues & Diagnostic Procedures
🔍 Problem Diagnosis Matrix
| Symptom | Likely Cause | Diagnostic Test | Solution |
|---|---|---|---|
| Single Key Not Working | Debris under keycap, worn scissor mechanism | Test key in Windows On-Screen Keyboard, remove keycap for inspection | Clean under keycap, replace single key mechanism or entire keyboard |
| Multiple Keys Not Working | Ribbon cable issue, spill damage, keyboard controller failure | Test pattern - check if non-working keys are in rows/columns | Reseat keyboard cable, replace keyboard if damaged |
| All Keys Not Working | Keyboard cable disconnected, motherboard issue | Check external USB keyboard functionality | Reseat internal keyboard cable, check motherboard connector |
| Backlight Not Working | LED failure, cable issue, software setting | Test Fn+F10/F11 keys, check BIOS settings | Update BIOS/drivers, replace keyboard if hardware failure |
| Keys Sticking/Repeating | Spill residue, worn mechanism, software issue | Test in different applications, check Filter Keys setting | Deep clean, replace affected keys or entire keyboard |
💻 Software Diagnostic Tools
- Windows Built-in Tools:
- On-Screen Keyboard (osk.exe) - Tests if issue is hardware or software
- Keyboard Troubleshooter - Settings → Update & Security → Troubleshoot
- Filter Keys Check - Control Panel → Ease of Access → Keyboard
- Third-Party Diagnostic Tools:
- PassMark KeyboardTest - Comprehensive key testing
- HKEYTEST - Advanced keyboard diagnostics
- Dell SupportAssist - Hardware diagnostics (F12 at boot)
🔧 Complete Keyboard Removal Procedure
Note: Keyboard removal on Latitude 3420 typically requires top case/palmrest removal.
🛡️ Pre-Removal Safety Steps
- Complete Power Down: Shut down Windows, disconnect AC adapter and all peripherals.
- Internal Power Disconnect: Remove bottom cover and disconnect internal battery.
- Component Documentation: Take clear photos of all connections and screw locations.
- ESD Protection: Wear anti-static wrist strap throughout the procedure.
🔩 Top Case/Palmrest Removal Steps
- Display Bezel Removal:
- Remove display bezel screws (usually 2-4 under rubber bumpers)
- Gently pry bezel starting from bottom corners using plastic tools
- Work around perimeter until bezel is free
- Display Assembly Disconnection:
- Remove display hinge screws (typically 2-4 per side)
- Disconnect display cable from motherboard (carefully lift locking flap)
- Set display assembly aside carefully
- Top Case Screw Removal:
- Remove all screws securing top case to bottom chassis
- Note: Some screws may be under rubber feet or labels
- Organize screws by location and length
- Top Case Separation:
- Starting from front edge, gently separate top case from bottom chassis
- Work around perimeter, releasing plastic clips every 2-3 inches
- Lift top case at angle to disconnect any remaining cables
⌨️ Keyboard Extraction from Top Case
- Keyboard Screw Identification:
- Once top case is removed, flip it over to access keyboard screws
- Typically 4-6 small Phillips #00 screws along top edge of keyboard
- Some models may have adhesive tape instead of screws
- Ribbon Cable Disconnection:
- Locate keyboard ribbon cable connector on underside of top case
- Gently lift the locking flap (ZIF connector) using fingernail or plastic tool
- Slide ribbon cable out carefully, pulling straight not at angle
- Keyboard Removal:
- After screws removed and cable disconnected, keyboard should lift out
- If adhesive present, use plastic card to gently separate keyboard from top case
- Remove keyboard and set aside on clean, soft surface
🔄 New Keyboard Installation Procedure
📦 Pre-Installation Preparation
- New Keyboard Inspection:
- Verify part number matches original
- Check for physical damage or defects
- Test key mechanisms for smooth operation
- Top Case Cleaning:
- Clean top case area where keyboard sits
- Remove any old adhesive residue
- Clean ribbon cable connector area
- Cable Routing Planning:
- Note how original cable was routed
- Ensure cable won't be pinched during reassembly
- Check cable length and positioning
🔧 Installation Steps
- Keyboard Placement:
- Position new keyboard in top case, aligning with screw holes
- Ensure keyboard sits flush in recessed area
- Check key alignment with top case openings
- Ribbon Cable Connection:
- Insert ribbon cable into connector at straight angle
- Ensure cable is fully inserted (should have equal margin on both sides)
- Press locking flap down firmly until it clicks into place
- Give gentle tug test to ensure secure connection
- Screw Installation:
- Install keyboard screws in sequence (start from center, work outward)
- Do not overtighten - screws should be snug but not forced
- If adhesive strips included, apply before final seating
✅ Functional Test Before Reassembly
Critical Step: Test keyboard before reassembling entire laptop.
- Temporarily connect battery and power on laptop
- Test all keys using Windows On-Screen Keyboard or KeyboardTest software
- Test backlight functionality (if applicable)
- Test special function keys (Fn combinations)
- If any issues found, troubleshoot now rather than after full reassembly
👆 Touchpad Service & Calibration
🔧 Touchpad Removal (If Required)
- Access: Touchpad is accessed from underside of top case
- Screw Removal: Remove 2-4 screws securing touchpad bracket
- Cable Disconnection: Disconnect touchpad ribbon cable (similar to keyboard)
- Extraction: Lift touchpad assembly out of top case
⚙️ Touchpad Calibration & Optimization
- Windows Precision Touchpad: Latitude 3420 typically includes Precision drivers
- Calibration Settings:
- Settings → Devices → Touchpad
- Adjust sensitivity, tap settings, scroll speed
- Configure multi-finger gestures
- Driver Updates: Install latest Synaptics/ALPS drivers from Dell Support
- Common Issues:
- Jumping cursor: Update drivers, clean surface
- Not responding: Check cable connection, test in BIOS
- Physical click issues: May require touchpad replacement
🔧 Individual Keycap & Mechanism Service
For minor issues, individual key repair may be sufficient.
⌨️ Safe Keycap Removal Technique
- Tools Needed: Keycap puller or small flathead screwdriver
- Removal Process:
- Insert tool under top edge of keycap
- Gently pry upward until top clip releases
- Repeat for bottom clip
- Lift keycap straight up
- Scissor Mechanism:
- Two-part plastic mechanism under keycap
- Can be removed for cleaning or replacement
- Handle carefully - small plastic pieces can break
🧼 Cleaning & Reassembly
- Clean keycap with isopropyl alcohol and soft cloth
- Clean scissor mechanism and keyboard base
- Reassemble scissor mechanism (ensure proper orientation)
- Align keycap over mechanism and press down until it clicks
- Test key function before moving to next key
🚰 Liquid Spill Recovery Procedure
Immediate action is critical for spill recovery success.
⚡ Immediate Actions (First 60 Seconds)
- Immediately disconnect AC adapter
- Hold power button for 10 seconds to force shutdown
- Turn laptop upside down to prevent liquid penetration
- Remove all peripherals and external devices
🔧 Disassembly & Cleaning Process
- Remove bottom cover and disconnect battery immediately
- Remove keyboard following procedures above
- Clean affected components with 99% isopropyl alcohol
- Use cotton swabs for detailed cleaning
- Allow to dry completely (24-48 hours) before reassembly
✅ Post-Spill Testing
- Test keyboard thoroughly before reassembling
- Check for sticky keys or erratic behavior
- Monitor for corrosion over following weeks
- Consider preventative keyboard replacement if spill was significant
🛒 Keyboard Parts Procurement Recommendations
🏭 Parts Source Comparison
| Source | Quality | Cost | Warranty | Best For |
|---|---|---|---|---|
| Genuine Dell Parts | Excellent (OEM) | $80-$120 | 90 days to 1 year | Enterprise repairs, premium resale |
| Authorized Dell Partners | Very Good | $60-$100 | 30-90 days | Professional repairs, business use |
| Quality Aftermarket (e.g., iFixit, LaptopKeyboard.com) |
Good | $40-$80 | 30-60 days | Cost-effective repairs, personal use |
| Generic/Used Parts | Variable | $20-$50 | Minimal/None | Budget repairs, parts laptops |
✅ Quality Indicators for Replacement Keyboards
- Key Legends: Sharp, clear printing (laser etching preferred)
- Key Feel: Consistent actuation across all keys
- Backlight Uniformity: Even illumination (if backlit)
- Cable Quality: Flexible, well-insulated ribbon cable
- Packaging: Professional packaging indicates quality supplier
📋 Professional Documentation for Resale Value
Proper documentation of keyboard service significantly enhances perceived value.
✅ Documentation Checklist
- Before Photos: Clear images of original keyboard issues
- Installation Photos: Professional installation process
- Test Results: Screenshot of keyboard diagnostic software showing 100% functionality
- Parts Documentation: Photo of new keyboard part number and packaging
- Functional Description: "Professionally replaced with genuine Dell keyboard. All keys tested and functioning perfectly with consistent tactile feedback."
💰 Business Value Impact
| Keyboard Condition | Value Impact | Buyer Perception |
|---|---|---|
| New Genuine Keyboard (Documented) | +$80-$120 | Premium device, professional maintenance |
| Quality Aftermarket (Good condition) | +$40-$70 | Well-maintained, functional |
| Original Keyboard (Some wear) | No change | Standard used condition |
| Damaged/Non-functional | -$100-$150 | Major defect, requires repair |
🛡️ Preventive Maintenance & Care Tips
- Regular Cleaning:
- Use compressed air monthly to remove debris between keys
- Clean keycaps with isopropyl alcohol-dampened cloth (never wet)
- Avoid eating/drinking near laptop to prevent spills
- Usage Best Practices:
- Type with moderate force - excessive force wears mechanisms
- Use external keyboard for extended typing sessions when possible
- Avoid resting heavy objects on closed laptop
- Environmental Protection:
- Use keyboard cover in dusty environments (remove during heavy use to prevent overheating)
- Avoid extreme temperatures that can affect plastic components
- Keep away from direct sunlight to prevent key legend fading
9. Display Assembly & Bezel Maintenance for Dell Latitude 3420
Professional display maintenance, replacement, and bezel service are critical for business productivity and device aesthetics. This comprehensive guide covers screen replacement, hinge maintenance, and bezel repair procedures for the Latitude 3420.
🔍 Latitude 3420 Display Specifications & Identification
Accurate identification ensures proper part compatibility and realistic performance expectations.
- Standard Display Configurations:
- HD (1366x768) TN Panel: Basic configuration, 220-250 nits brightness, anti-glare
- FHD (1920x1080) IPS Panel: Premium configuration, 250-300 nits, wide viewing angles, anti-glare
- Touch Screen Option: Some configurations include 10-point capacitive touch (adds thickness)
- Panel Technical Details:
- Size: 14.0" diagonal (355.6mm)
- Aspect Ratio: 16:9 standard
- Refresh Rate: 60Hz standard (some models may support 120Hz)
- Response Time: Typically 25-40ms (adequate for business use)
- Color Gamut: 45% NTSC standard, some FHD models may reach 72% NTSC
- Part Number Identification:
- Check existing display for part number on back of panel or cable
- Use Dell Service Tag on Dell Support for exact configuration
- Common part numbers: 0F1C2F (HD), 0T7F3F (FHD), 07W9V2 (Touch)
⚠️ Display Issue Diagnostics & Troubleshooting
🔍 Display Problem Diagnosis Matrix
| Symptom | Likely Cause | Diagnostic Test | Solution |
|---|---|---|---|
| No Display/Black Screen (Power light on) |
Backlight failure, display cable, inverter, GPU | Shine flashlight at screen to see faint image, test external monitor | Replace backlight/LED strip, reseat display cable |
| Flickering Display | Loose cable, failing backlight, panel defect | Test at different angles, apply gentle pressure to bezel edges | Reseat display cable, replace panel if persistent |
| Horizontal/Vertical Lines | Panel failure, cable damage, GPU issue | Test with external monitor, flex cable gently during test | Replace LCD panel, inspect/replace cable |
| Dead Pixels | Manufacturing defect, physical damage | Use JScreenFix or pixel test patterns | Live with it (if few), replace panel if excessive |
| Backlight Bleeding | Panel assembly pressure, manufacturing variance | View black screen in dark room | Adjust bezel pressure, replace panel if severe |
| Image Persistence/Burn-in | Static images displayed for extended periods | Display full-screen color test patterns | Use pixel exerciser, reduce static content time |
🔧 Display Diagnostic Tools & Methods
- Hardware Tests:
- Dell SupportAssist (F12 at boot) - Built-in display diagnostics
- External monitor test - Determines if issue is panel or motherboard
- Flex test - Gently flex display cable while viewing image
- Software Tools:
- DisplayTest - Comprehensive display testing
- Monitor Tests - Online display test patterns
- Dead Pixel Buddy - Simple dead/stuck pixel detection
🔧 Complete Display Assembly Removal Procedure
Note: Display removal requires careful handling to avoid cable damage.
🛡️ Pre-Removal Safety Steps
- Complete Power Down: Shut down Windows, disconnect AC adapter and all peripherals.
- Internal Power Disconnect: Remove bottom cover and disconnect internal battery.
- Workspace Preparation: Clear, padded surface large enough for display assembly.
- ESD Protection: Wear anti-static wrist strap throughout the procedure.
- Documentation: Take clear photos of all connections and screw locations.
🔩 Display Bezel Removal Steps
- Screw Location Identification:
- Locate 2-4 screws under rubber bumpers along bottom edge of bezel
- Gently peel back rubber bumpers to reveal screws
- Some models may have screws hidden under manufacturer labels
- Bezel Separation Technique:
- Start at bottom corners using plastic pry tools
- Work around perimeter, releasing plastic clips every 1-2 inches
- Use guitar picks or old credit cards to maintain separation
- Important: Apply even pressure to avoid cracking bezel
- Bezel Removal:
- Once all clips are released, lift bezel straight away from display
- Set bezel aside on clean, soft surface
- Inspect bezel clips for damage - note any broken clips
🔌 Display Cable Disconnection
- Cable Identification:
- Locate display cable running from panel to motherboard connector
- Identify LVDS (older HD panels) or eDP (FHD panels) connector type
- Note cable routing for reassembly reference
- Connector Disconnection:
- Gently lift locking flap on connector using plastic tool
- Pull cable straight out - never pull at angle
- If adhesive present, carefully peel back before pulling cable
- Additional Connections:
- Disconnect webcam/microphone cable if separate
- Disconnect Wi-Fi antenna cables if routed through display assembly
- Label each cable for proper reassembly
⚙️ Hinge Removal & Display Separation
- Hinge Screw Identification:
- Locate 2-4 screws per hinge securing display assembly to chassis
- Note screw sizes - hinge screws are typically longer than other screws
- Some models may have Torx T5 screws for hinges
- Screw Removal Sequence:
- Remove screws in diagonal pattern (top-left, then bottom-right, etc.)
- Support display assembly during screw removal
- Keep hinge screws separate from other screws
- Display Assembly Removal:
- Once all hinge screws are removed, lift display assembly straight up
- Be mindful of any remaining cable connections
- Place display assembly face down on soft, clean surface
🔄 LCD Panel Replacement Guide
For replacing just the LCD panel while reusing existing bezel and hinges.
📺 Panel Separation from Display Assembly
- Remove Panel Mounting Brackets:
- Remove 4-8 small screws securing panel to metal brackets
- Note screw locations - some may be different lengths
- Keep brackets organized for reassembly
- Panel Cable Disconnection:
- Disconnect panel cable from back of LCD panel
- This is typically a ZIF connector with locking tape
- Gently peel back adhesive tape before lifting connector flap
- Panel Removal:
- Carefully lift panel out of display assembly frame
- Handle by edges only - never apply pressure to screen surface
- Place old panel in anti-static bag for disposal/recycling
🆕 New Panel Installation Steps
- New Panel Inspection:
- Verify part number matches original
- Check for physical damage before removing protective films
- Test panel before installation if possible
- Cable Connection:
- Connect panel cable to new LCD panel
- Ensure connector is fully seated and locking mechanism engaged
- Replace adhesive tape to secure connection
- Panel Mounting:
- Position panel in display assembly frame
- Reattach mounting brackets with original screws
- Ensure panel is centered and sits flush in frame
⚙️ Hinge Maintenance & Replacement Procedure
🔍 Hinge Problem Diagnosis
| Symptom | Likely Cause | Diagnostic | Solution |
|---|---|---|---|
| Loose/Wobbly Display | Worn hinge mechanism, stripped screw holes | Check for play when display is partially open | Tighten hinge screws, replace hinges if worn |
| Stiff/Difficult to Open | Debris in hinge, lubrication needed, cable routing issue | Feel for grinding or catch points during opening | Clean hinges, apply appropriate lubricant |
| Display Doesn't Stay Open | Broken hinge mechanism, insufficient friction | Test at various angles | Replace hinge assembly |
| Cracking Noise | Plastic bezel/housing interference, broken clip | Listen for noise location during opening/closing | Adjust bezel, lubricate contact points |
🛢️ Proper Hinge Lubrication Procedure
- Lubricant Selection:
- Recommended: White lithium grease, silicone grease, or dry PTFE lubricant
- Avoid: WD-40 (not a lubricant), oil-based lubricants (attract dust)
- Business-grade: Super Lube 21030 or equivalent
- Application Process:
- Apply small amount to hinge pivot points
- Work hinge through full range of motion to distribute lubricant
- Wipe away excess to prevent dust accumulation
- Frequency: Every 1-2 years or as needed based on usage
🔧 Hinge Replacement Steps
- Remove display assembly following earlier procedure
- Remove 2-4 screws securing each hinge to display back cover
- Transfer any mounting brackets or spacers to new hinges
- Install new hinges, ensuring proper alignment
- Test hinge movement before full reassembly
🖼️ Bezel Repair & Replacement Guide
🔍 Bezel Damage Assessment
- Minor Scratches: Can often be polished out with plastic polish
- Cracked Clips: May still function if majority of clips intact
- Major Cracks: Usually requires bezel replacement
- Discoloration: May be cleaned, but severe cases need replacement
🔧 Bezel Repair Techniques
- Plastic Welding: For stress cracks using plastic welder or soldering iron
- Epoxy Reinforcement: For cracked clip areas using plastic epoxy
- Clip Replacement: Sometimes individual clips can be replaced
- Cosmetic Repair: Touch-up paint for minor scratches
🔄 Bezel Replacement Procedure
- Remove old bezel following earlier procedure
- Clean display frame surface where bezel attaches
- Align new bezel starting at top edge
- Press around perimeter to engage all clips
- Reinstall screws under rubber bumpers
⬆️ Display Upgrade Considerations
Upgrading from HD to FHD or adding touch functionality.
📊 Upgrade Feasibility Analysis
| Upgrade Type | Cost | Complexity | Value Added | Considerations |
|---|---|---|---|---|
| HD → FHD (Non-touch) | $80-$150 | Medium | +$100-$180 | Verify cable compatibility, may require different cable |
| FHD → Touch | $150-$250 | High | +$120-$200 | Requires touch controller, different bezel, driver installation |
| HD → Touch | $200-$300 | Very High | +$150-$250 | May not be feasible, check cable and connector compatibility |
⚙️ Upgrade Technical Requirements
- Cable Compatibility: HD panels use 30-pin LVDS, FHD use 40-pin eDP
- Mounting Bracket: Verify panel dimensions match existing brackets
- Bezel Modification: Touch panels may require different bezel cutout
- Driver Support: Ensure Windows has drivers for new panel type
🎯 Post-Service Display Calibration
🎨 Color Calibration Procedures
- Software Calibration:
- Windows Color Calibration tool (search "Calibrate display color")
- DisplayCAL - Advanced open-source calibration
- Dell PremierColor (for compatible models)
- Basic Calibration Steps:
- Set brightness to comfortable level (typically 120-150 nits for office)
- Adjust contrast for clear black/white differentiation
- Set color temperature (6500K is standard for business)
- Calibrate gamma (2.2 standard for Windows)
👆 Touch Screen Calibration (If Applicable)
- Settings → Devices → Pen & Windows Ink
- Select "Calibrate" under Display options
- Follow on-screen prompts to tap calibration points
- Save calibration profile
✅ Post-Service Quality Control Testing
📋 Quality Control Checklist
- Visual Inspection:
- Check for dead/stuck pixels using solid color test patterns
- Verify backlight uniformity across entire screen
- Check for dust between panel and protective layer
- Functional Testing:
- Test hinge movement through full range
- Verify bezel sits flush with no gaps
- Test display at various angles for consistent image
- Performance Testing:
- Run Dell SupportAssist display diagnostics
- Test with high-motion video for ghosting
- Check touch accuracy (if touch screen)
🛒 Display Parts Procurement Guide
🏭 Parts Source Comparison
| Source | Quality | Cost | Warranty | Best For |
|---|---|---|---|---|
| Genuine Dell Parts | Excellent (OEM) | $150-$250 | 90 days to 1 year | Enterprise repairs, color accuracy critical |
| Grade A Aftermarket | Very Good | $80-$150 | 30-90 days | Professional repairs, good balance |
| Refurbished/OEM Pull | Good | $50-$100 | 30-60 days | Budget repairs, personal use |
| Compatible Generic | Variable | $40-$80 | Minimal | Lowest cost, risk of compatibility issues |
✅ Display Quality Indicators
- Packaging: Anti-static bag, foam protection
- Connectors: Clean, undamaged, proper pin count
- Labels: Legible part numbers, manufacturer information
- Protective Films: Both front and back protection present
- Certifications: RoHS, REACH compliance indicated
💰 Business Value Impact of Display Service
| Display Condition | Value Impact | Buyer Perception | Documentation Required |
|---|---|---|---|
| New Genuine Display (No dead pixels, perfect condition) |
+$150-$250 | Premium device, like-new display | Part number, installation photos, pixel test results |
| Quality Aftermarket (Minor imperfections, 0-3 dead pixels) |
+$80-$150 | Well-maintained, good viewing experience | Pixel test results, brightness verification |
| Original Display (Some wear, minor scratches) |
No change | Standard used condition | Accurate description of condition |
| Damaged Display (Cracks, lines, severe backlight bleed) |
-$200-$300 | Major defect, requires immediate repair | Clear photos of damage |
🛡️ Display Preventive Maintenance
- Cleaning Procedures:
- Use microfiber cloth with screen cleaner (never spray directly on screen)
- Clean bezel and hinges regularly to prevent debris buildup
- Avoid abrasive cleaners or paper towels
- Usage Best Practices:
- Open/close laptop from center, not corners
- Avoid placing pressure on closed lid
- Use screen timeout to prevent burn-in
- Environmental Protection:
- Use laptop bag with padded compartment
- Avoid extreme temperatures
- Keep away from direct sunlight when possible
10. Maximizing Resale Value After Professional Service for Dell Latitude 3420
Professional post-service optimization transforms your repaired Dell Latitude 3420 from a standard used laptop into a premium business-ready device commanding maximum market value. This comprehensive guide covers preparation, documentation, pricing strategies, and sales channel optimization.
📋 Pre-Sale Preparation Master Checklist
A systematic approach ensures no value-adding steps are missed.
🔧 Hardware Verification & Optimization
- Full Functional Testing:
- Test all USB ports (Type-A and Type-C if equipped)
- Verify HDMI and Ethernet port functionality
- Test Wi-Fi 6 and Bluetooth connectivity
- Check SD card reader if equipped
- Verify webcam and microphone operation
- Performance Validation:
- Run Dell SupportAssist full hardware diagnostics (F12 at boot)
- Test battery health with Dell Power Manager
- Verify thermal performance under load (see Section 7)
- Check fan operation at all speed levels
- Cosmetic Enhancement:
- Professional cleaning of chassis, keyboard, and display
- Remove all stickers and residue
- Polish display with appropriate screen cleaner
- Clean ports with compressed air
💻 Software Optimization & Data Management
- Operating System Fresh Install:
- Perform clean Windows 10/11 Pro installation
- Install latest drivers from Dell Support
- Update BIOS to latest version
- Configure for optimal business performance
- Essential Software Bundle:
- Install Microsoft Office trial or LibreOffice
- Add essential utilities: 7-Zip, VLC Media Player, Adobe Reader
- Include Dell Power Manager and SupportAssist
- Add Chrome/Firefox with business-friendly defaults
- Data Sanitization:
- Perform full secure erase of storage using DBAN or similar
- Reinstall fresh Windows after sanitization
- Remove all personal data and accounts
- Document sanitization process for buyer assurance
📁 Creating a Professional Documentation Package
Comprehensive documentation justifies premium pricing and builds buyer confidence.
📄 Essential Documentation Components
| Document Type | Content Requirements | Value Impact | Format |
|---|---|---|---|
| Service Portfolio | Before/after photos, parts used, dates, technician notes | High (+15-20%) | PDF portfolio with photos |
| Performance Report | Benchmark scores, temperature readings, battery health | Medium (+10-15%) | Formatted report with screenshots |
| Parts Documentation | Part numbers, purchase receipts (redacted), warranty info | Medium (+8-12%) | Scanned documents with annotations |
| Quality Assurance Certificate | Checklist of tests passed, technician signature, date | High (+12-18%) | Professional certificate template |
📸 Professional Photography Guide
- Essential Photos:
- Front, back, and all sides of laptop
- Close-up of display with solid color background (check for defects)
- Keyboard and touchpad condition
- Ports and connectors
- Service Tag and configuration labels
- Technical Photos:
- BIOS screen showing specs and battery health
- Windows System Information
- CrystalDiskInfo showing drive health
- Dell SupportAssist test results
- Professional Tips:
- Use natural light or softbox lighting
- Clean background (white or neutral)
- Consistent angles and framing
- High resolution (minimum 1920x1080)
💰 Market Analysis & Competitive Pricing Strategy
📊 Competitive Market Analysis
| Competitor Type | Typical Pricing | Quality Level | Your Advantage |
|---|---|---|---|
| Large Refurbishers (Dell Refurbished, Best Buy) |
$400-$600 | Good, standardized | More detailed documentation, better components |
| Small Business Refurbishers (eBay, Amazon sellers) |
$350-$500 | Variable, often minimal testing | Professional service documentation, better quality control |
| Individual Sellers | $300-$450 | Unpredictable, as-is | Full professional service, comprehensive testing |
| Corporate Surplus | $250-$400 | Bulk, often worn | Individual attention, enhanced components |
🧮 Professional Pricing Formula
Base Price Calculation:
- Hardware Cost: Purchase price + parts + consumables
- Labor Cost: Hours × hourly rate (suggest $25-50/hour)
- Overhead: 15-20% of total costs
- Profit Margin: 25-40% depending on market conditions
Value-Add Premiums:
- Documentation Premium: +10-15% for comprehensive documentation
- Component Upgrade Premium: +50-100% of upgrade cost
- Professional Service Premium: +15-25% for documented professional work
- Accessories Premium: +5-10% for genuine Dell charger/carrying case
🎯 Strategic Price Positioning
- Premium Tier ($550-$700):
- i5/i7, 16GB RAM, 512GB+ NVMe SSD, FHD display
- Full professional documentation package
- 90-day warranty included
- Target: Small businesses, professionals
- Value Tier ($450-$550):
- i5, 8-16GB RAM, 256-512GB SSD, FHD display
- Basic documentation, 30-day warranty
- Target: Students, home office users
- Budget Tier ($350-$450):
- i3/i5, 8GB RAM, 256GB SSD, HD/FHD display
- Minimal documentation, as-is sale
- Target: Basic users, secondary devices
🛒 Sales Channel Optimization & Platform Strategy
📈 Sales Channel Comparison
| Platform | Fees/Commission | Audience | Best For | Tips for Success |
|---|---|---|---|---|
| eBay | 12-15% + payment processing | Broad, price-sensitive | Volume sales, competitive pricing | Professional photos, detailed specs, promote documentation |
| Facebook Marketplace | 0% (local), 5% (shipped) | Local buyers, quick sales | Local pickup, avoiding shipping | Highlight local business service, quick response |
| Craigslist | 0% (varies by city) | Very local, cash transactions | Immediate cash sales | Clear photos, meet at safe location, cash only |
| Specialized Buyers SellBroke, SellLaptopBack |
0% (they set price) | Bulk buyers, quick liquidation | Quick sale, no hassle | Expect 40-60% of market value, good for quick turnover |
| Business Direct Sales | 0% | Local businesses, schools | Premium pricing, volume potential | Professional proposal, bulk discounts, service packages |
🏛️ Specialized & Institutional Buyers
- SellBroke Strategy:
- Best for quick liquidation of multiple units
- Document all upgrades and repairs thoroughly
- Expect 50-70% of market value
- No customer support required after sale
- SellLaptopBack Approach:
- Focus on recent models in good condition
- Clean, fully functional units get best pricing
- Free shipping labels typically provided
- Payment within days of receipt
- .gov/.edu Institutional Sales:
- Require formal bidding process understanding
- Emphasize security (data sanitization documentation)
- Highlight Dell enterprise features (vPro, manageability)
- Offer bulk pricing and service contracts
📝 Professional Listing Optimization
🏷️ Title Optimization for Maximum Visibility
Optimal Title Structure: [Condition] [Brand] [Model] [Specs] [Features]
- Example Premium Title: "Professionally Refurbished Dell Latitude 3420 Business Laptop - i7-1165G7, 16GB RAM, 512GB NVMe SSD, FHD IPS Display, Windows 11 Pro"
- Key Elements:
- Condition: Professionally Refurbished / Certified Refurbished / Business Grade
- Specifications: Include CPU, RAM, storage, display type
- Features: Business-ready, upgraded components, documented service
- Keywords: Business laptop, office, remote work, student
📄 Professional Description Template
Structure for Maximum Conversion:
- Headline Benefit Statement: "Professionally serviced Dell Latitude 3420 business laptop ready for productivity, featuring premium upgrades and comprehensive documentation."
- Key Specifications Bullets:
- Processor: Intel Core i5-1135G7 (11th Gen, 4-core, 8-thread)
- Memory: 16GB DDR4 3200MHz (upgraded for multitasking)
- Storage: 512GB NVMe SSD (fresh install, fast boot)
- Display: 14" FHD (1920x1080) IPS anti-glare
- Operating System: Windows 11 Pro (clean install, activated)
- Professional Service Highlights:
- Comprehensive hardware diagnostics and testing
- Professional thermal paste application and cooling optimization
- Data sanitization with certified erasure process
- Detailed service documentation included
- Business-Ready Features:
- Dell ProSupport eligible (check service tag)
- Intel vPro capability for remote management
- Windows 11 Pro with BitLocker encryption support
- Docking station compatible (Dell WD series)
- What's Included: Laptop, genuine Dell charger, documentation package
🤝 Post-Sale Professionalism & Customer Service
📦 Professional Shipping & Packaging
- Packaging Standards:
- Use double-box method (laptop box inside shipping box)
- Include adequate padding (bubble wrap, foam)
- Include documentation package in sealed envelope
- Include thank you note and care instructions
- Shipping Recommendations:
- USPS Priority Mail for cost-effectiveness
- UPS/FedEx for faster delivery and better tracking
- Always require signature for delivery
- Purchase shipping insurance for premium units
💬 Professional Customer Communication
- Response Time: Respond to inquiries within 2-4 hours during business hours
- Professional Templates: Have pre-written responses for common questions
- Documentation Delivery: Provide digital copies of documentation via email
- Follow-up: Check in 3-7 days after delivery to ensure satisfaction
📊 ROI Analysis & Performance Tracking
📈 Key Performance Metrics
| Metric | Calculation | Target Range | Optimization Actions |
|---|---|---|---|
| Profit Margin | (Sale Price - Total Cost) / Sale Price × 100 | 25-40% | Source cheaper parts, streamline labor, add value services |
| Days to Sell | Listing date to sale date | 7-14 days | Price optimization, better photos, improved descriptions |
| Return Rate | Returns / Total Sales × 100 | <5% | Better testing, accurate descriptions, comprehensive documentation |
| Customer Satisfaction | Positive feedback percentage | >98% | Better communication, packaging, follow-up |
🔄 Continuous Improvement Process
- Track which specifications sell fastest and for highest prices
- Document common buyer questions and improve listings accordingly
- Analyze competitor pricing and adjust your strategy
- Solicit buyer feedback and implement improvements
- Regularly review and update service procedures
⚖️ Legal Compliance & Best Practices
- Warranty Compliance: Clearly state warranty terms and limitations
- Data Privacy: Document data sanitization process for buyer assurance
- Tax Compliance: Track sales for appropriate tax reporting
- Consumer Protection: Understand and comply with platform policies
- Professional Insurance: Consider business insurance for larger operations
Need to Sell Your Dell Laptop? Get Instant Cash!
If your Dell Latitude 3420 (or other Latitude model) has performance issues or you're upgrading to a newer business laptop, we offer competitive cash payouts for your device. We buy broken, used, and refurbished Dell Latitude laptops—including all 3420 configurations—with free insured shipping and hassle-free evaluations.
Sell Popular Dell Models Now: