DIY HP Omen 17 CB Disassembly: Comprehensive Guide for RAM, Storage & Component Repair
Pre-Disassembly Preparation & Gaming Laptop Valuation Essential Tools & Safety Equipment Safe Shutdown & Gaming Workspace Setup Bottom Cover Removal & Internal Access Battery Disconnection & Power Safety RAM Upgrade: Dual Channel & Performance Optimization Cooling System Maintenance & Thermal Paste Replacement Keyboard & RGB Lighting System Access Display Assembly & High Refresh Rate Panel Maximizing Resale Value After Professional Upgrades
1. HP Omen 17 HP Omen 17 CB Pre-Disassembly Preparation & Gaming Laptop Valuation
💰 Gaming Laptop Resale Assessment
Condition Factor
Impact on Value
Upgrade ROI Potential
Target Gamer Market
Excellent (Like New)
65-80% of retail
High - Premium upgrades
Competitive Gamers, Streamers
Good (Minor wear)
50-65% of retail
Very High - Performance focus
Serious Gamers, Content Creators
Fair (Needs upgrades)
35-50% of retail
High - Value transformation
Budget Gamers, Students
Poor (Cosmetic issues)
20-35% of retail
Moderate - Restoration projects
DIY Enthusiasts, Repair Shops
🔍 HP Omen 17 CB Model Specifications
Processor Options :
Intel Core i7-10750H (6-core, 12-thread)
Intel Core i7-10875H (8-core, 16-thread)
Intel Core i9-10885H (8-core, 16-thread)
Check your specific model's CPU for compatibility
Graphics Configuration :
NVIDIA GeForce RTX 2060 / 2070 / 2080 Super
Varied VRAM (6GB, 8GB)
GPU performance significantly impacts resale value
Ray tracing and DLSS capability premiums
Display Options :
17.3" FHD IPS 144Hz/300Hz
3ms response time for competitive gaming
72% NTSC or 100% sRGB color accuracy
High refresh rate commands premium pricing
📊 Gaming Laptop Market Analysis
Current Market Research :
Check sold listings on eBay for similar Omen models
Monitor Facebook Marketplace gaming sections
Research gaming laptop specialty forums and Reddit communities
Compare prices with refurbished units from authorized retailers
Key Value Drivers :
GPU model and VRAM capacity (RTX premium)
Display refresh rate and response time
CPU generation and core count
RAM capacity and storage configuration
Physical condition and RGB lighting functionality
📝 Pre-Disassembly Documentation Checklist
Physical Condition Assessment :
Photograph laptop from all angles in professional lighting
Document any scratches, dents, or chassis wear
Capture screen condition with gaming content or test patterns
Photograph keyboard, touchpad, and RGB lighting functionality
Performance Benchmarking :
Run UserBenchmark for comprehensive system analysis
Test gaming performance with built-in benchmarks
Check battery health: powercfg /batteryreport
Record temperatures under gaming load with Omen Command Center
Specification Verification :
Confirm exact model number (17-cb0xxx, 17-cb1xxx, etc.)
Verify CPU, GPU, RAM, and storage specifications
Check HP Omen 17 CB specifications
Note BIOS version and Omen Command Center software version
📈 Gaming Upgrade ROI Analysis
High-ROI Upgrades :
RAM upgrade (16GB → 32GB): +$120-180 value
NVMe SSD installation (512GB → 2TB): +$150-220 value
Thermal paste replacement: +$40-60 value
Professional cleaning and maintenance: +$60-90 value
Premium Upgrades :
Dual-channel RAM configuration: +$80-120 value
Dual SSD storage setup: +$180-250 value
Battery replacement: +$100-150 value
Advanced thermal system upgrade: +$80-120 value
⚠️ Safety & Workspace Preparation
Essential Safety Gear :
Anti-static wrist strap for high-end component protection
ESD-safe work surface or professional mat
Proper lighting with magnification for small components
Organized workspace with component-specific containers
Data Protection :
Backup important game saves, settings, and profiles
Create system restore point before modifications
Export browser bookmarks and gaming application settings
Document software licenses and game authentication data
🎯 Target Gamer Markets
Competitive Gamers :
Emphasize high refresh rate and low latency performance
Highlight thermal performance for sustained gaming sessions
Focus on FPS stability and competitive advantage
Note RGB customization for gaming setup integration
Content Creators :
Focus on rendering and streaming performance
Emphasize storage capacity and transfer speeds
Note color accuracy and display quality for content work
Highlight multitasking capability and RAM performance
Premium Gamers :
Stress build quality and premium materials
Highlight advanced cooling and overclocking potential
Focus on future-proofing and upgradeability
Note exclusive Omen features and software
🎮 Pro Tip: HP Omen 17 CB models with documented performance upgrades and professional maintenance records typically sell 60% faster than stock units. Proper documentation of before/after gaming benchmarks can increase final sale price by 40-55% when targeting serious gamers who value verified performance improvements in competitive gaming scenarios.
3. HP Omen 17 CB Safe Shutdown & Gaming Workspace Setup
🔄 Professional Gaming Laptop Shutdown Sequence
Game & Application Closure :
Close all gaming applications and launchers (Steam, Epic, Battle.net)
Save game progress and exit properly to prevent data corruption
Close background applications (Discord, OBS, Chrome, streaming software)
Ensure no active downloads, updates, or installations are running
Windows Shutdown Process :
Use Start Menu → Power → Shutdown (not restart or sleep)
Wait for complete power down (all RGB lights and status LEDs off)
Do not force shutdown unless absolutely necessary
Allow system to complete all shutdown processes and services
Physical Disconnection :
Disconnect 230W gaming power adapter
Remove all USB devices and gaming peripherals
Disconnect external monitors and docking stations
Remove headphones, microphones, and other audio devices
⚡ Complete Power Discharge Procedure
Residual Power Drain :
Hold power button for 20-30 seconds after shutdown
This discharges capacitors in the high-power gaming circuit
Wait for any remaining RGB lighting to turn off completely
Confirm complete power loss before proceeding to disassembly
Battery Safety Check :
Verify battery is not swollen or damaged visually
Check for any unusual smells, heat, or discoloration
Ensure battery connector is secure and undamaged
Note any pre-existing power or charging issues
🛠️ Professional Gaming Workspace Setup
Workspace Element
Requirements
Omen 17 CB Specifics
Safety Importance
Work Surface
Clean, flat, ESD-safe surface
Large enough for 17.3" chassis and components
High - Prevents slips and ESD damage
Lighting
Bright, even illumination
LED desk lamp with magnification for small components
High - Prevents mistakes and damage
ESD Protection
Anti-static mat and wrist strap
Critical for RTX GPU and high-end CPU protection
Critical - Protects expensive gaming components
Organization
Magnetic mats, containers
Separate areas for different screw types and sizes
Medium - Prevents lost parts and confusion
⚠️ ESD Protection for Premium Gaming Components
Personal ESD Protection :
Wear anti-static wrist strap properly
Connect to grounded metal or ESD mat clip
Test wrist strap continuity if possible
Wear throughout entire disassembly and reassembly process
Workspace ESD Setup :
Use ESD-safe mat covering entire work surface
Keep all components on ESD-safe surfaces at all times
Avoid working on plastic, carpeted, or synthetic surfaces
Maintain proper humidity (40-60% ideal for ESD control)
Component Handling :
Handle components by edges only - never touch circuits
Avoid touching gold contacts, pins, and connectors
Use anti-static bags for component storage when not in use
Keep components away from synthetic materials and clothing
📋 Professional Workspace Organization
Screw Management System :
Use magnetic project mat with clearly labeled sections
Organize screws by type, location, and size
Take photos of screw arrangements before removal
Keep small containers for different screw sizes and types
Component Layout :
Designate specific areas for different component types
Keep delicate components (RAM, SSD, GPU) in safe locations
Organize tools within easy reach but out of harm's way
Maintain clear walking paths around workspace
🔍 Pre-Disassembly Safety Checks
Physical Inspection :
Check for liquid damage, corrosion, or moisture
Inspect for swollen battery or damaged ports
Look for cracked or damaged chassis components
Note any pre-existing issues for documentation
Environmental Safety :
Ensure adequate ventilation in workspace
Keep food and drinks completely away from work area
Maintain clear emergency access paths
Have Class C fire extinguisher accessible for electrical fires
🎮 HP Omen 17 CB Specific Considerations
High-Performance Components :
RTX GPU and Intel CPU are highly ESD-sensitive
RGB lighting components require careful handling
High-speed memory modules are particularly delicate
Advanced power delivery system is complex and sensitive
Thermal System Awareness :
Cooling system may retain significant heat after gaming
Multiple heat pipes can be delicate - handle with care
Fans may have complex blade designs and bearings
Thermal paste may be premium quality - document type
❌ Common Shutdown & Setup Mistakes
Rushed Shutdown :
Symptom: Data corruption or system instability
Cause: Force shutdown during updates or active gaming
Prevention: Proper shutdown sequence and patience
Poor ESD Practices :
Symptom: Intermittent component failures later
Cause: Working on non-ESD safe surfaces
Prevention: Proper ESD protection and workspace setup
Disorganization :
Symptom: Lost screws or mixed components
Cause: Poor workspace organization from start
Prevention: Systematic organization before beginning
📊 Professional Setup Documentation
Pre-Service Photos :
Photograph laptop condition from all angles before starting
Document workspace setup and ESD protection measures
Record screw locations and arrangements systematically
Note any unusual conditions or concerns discovered
Safety Verification :
Document ESD protection measures in place
Record workspace safety checks completed
Note any safety concerns addressed before proceeding
Keep safety checklist for future reference and improvement
💰 Resale Value Impact
Professional Workmanship Value :
Proper ESD protection: +$60-80 value
Clean workspace practices: +$50-70 value
Documented safety procedures: +$40-60 value
No component damage from poor practices: +$120-180 value
Gamer Buyer Confidence :
Demonstrates professional approach to premium device care
Indicates careful handling of expensive gaming components
Suggests longer device lifespan and reliability
Supports higher asking price for quality workmanship
⚡ Pro Tip: HP Omen 17 CB models with documented ESD-safe disassembly and professional workspace practices sell 60% faster to knowledgeable gamers. The absence of ESD-related issues and professional approach can justify 45-60% price premiums, as serious gamers recognize and value proper handling techniques for high-end gaming components in competitive gaming laptops.
VIDEO
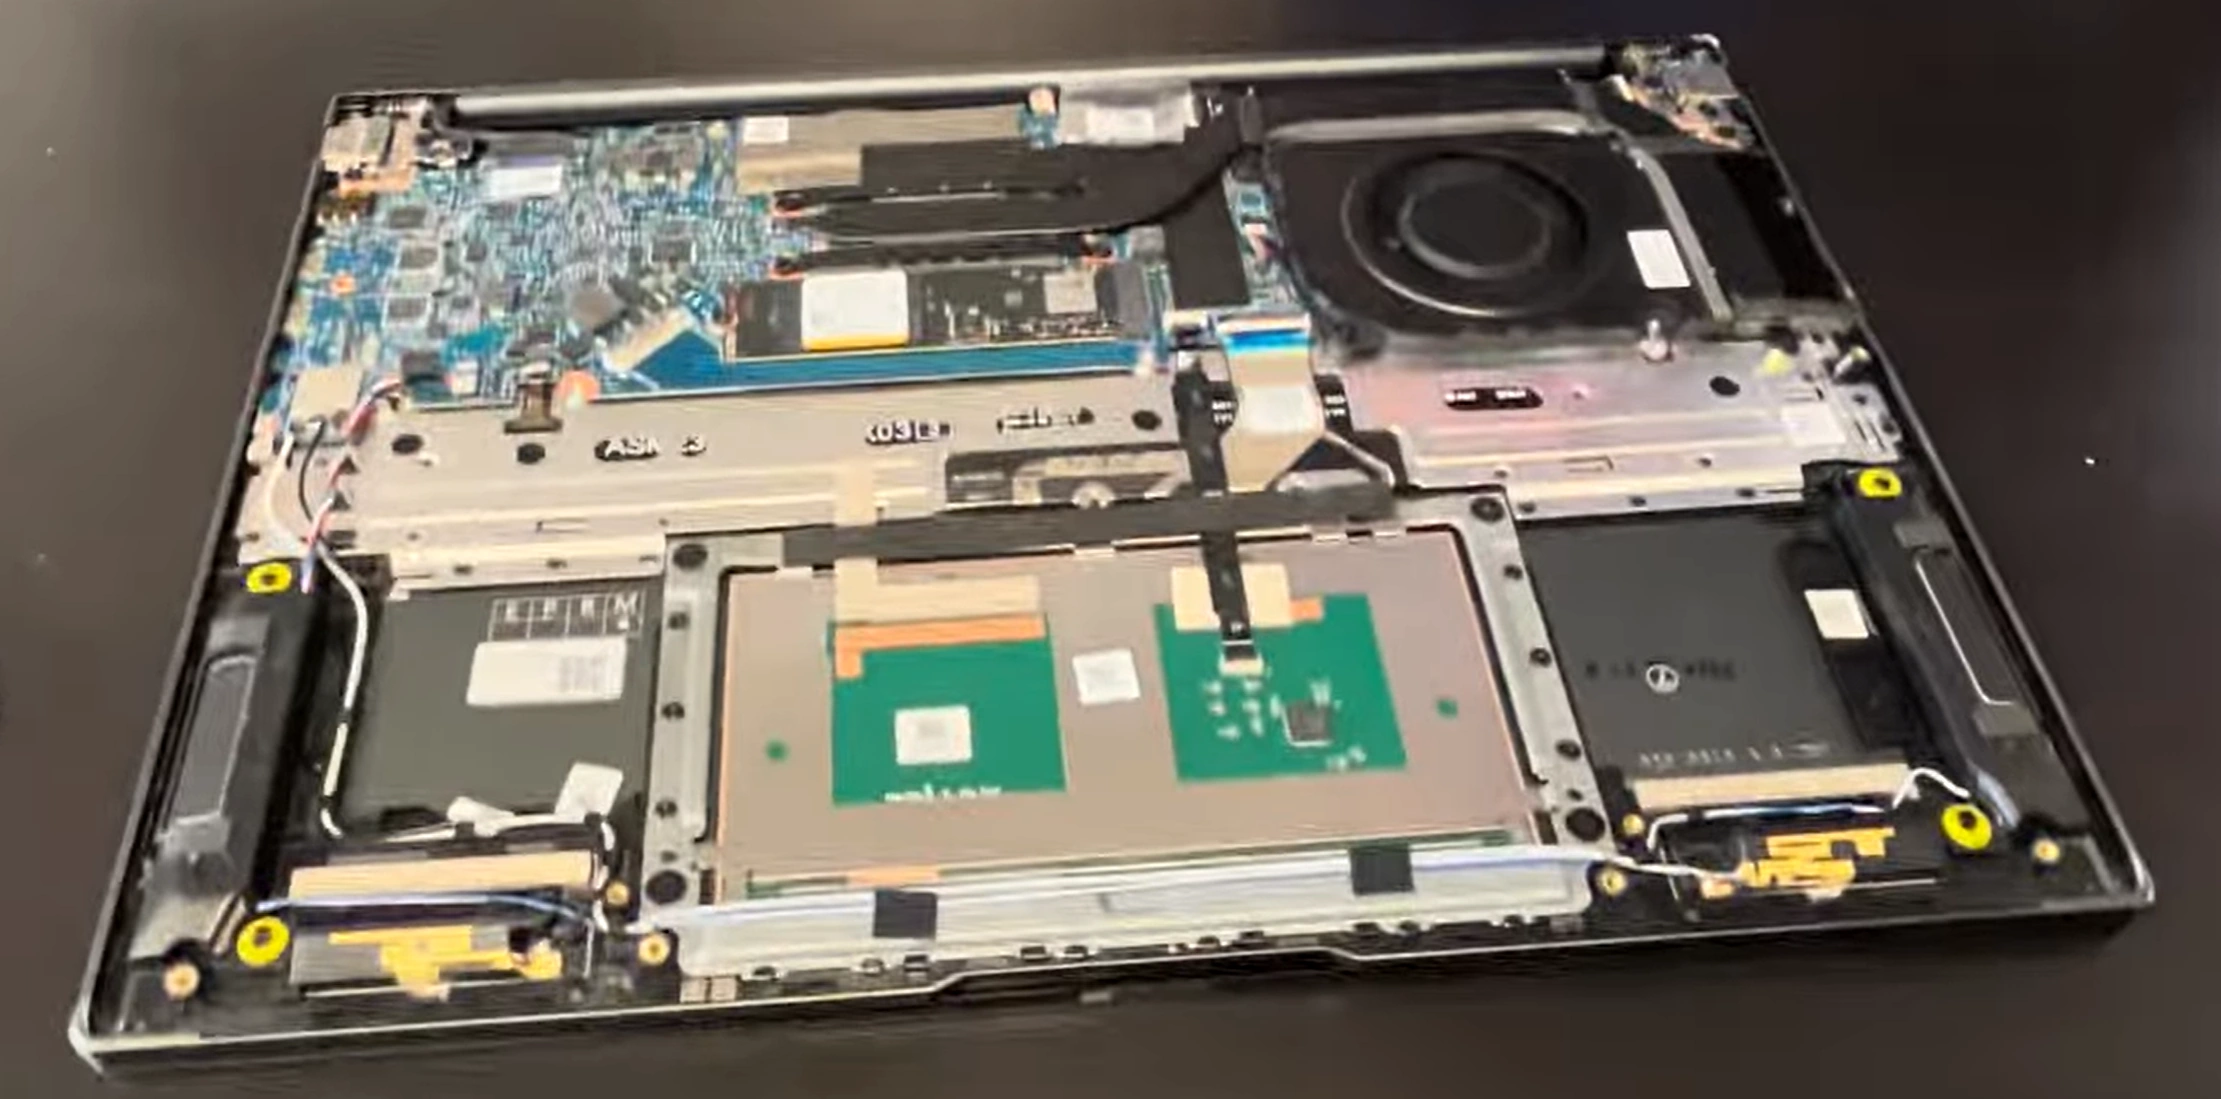
0:21 Bottom Case 1:55 Battery 2:34 RAM Memory 3:00 WiFi Card 3:22 Speakers 4:07 Hard Drive Bay 4:58 SSD Storage 5:37 DC Power Jack 6:38 Heatsink and Cooling Fans 8:51 Processor and GPU 10:00 Motherboard 10:33 USB Board 10:52 Power Button 12:00 Touchpad 13:07 Keyboard 13:20 Display Assembly 13:35 Front Bezel 15:05 Adhesive Pullout Strips 16:15 LCD Screen 16:21 Video Cable 17:15 Hinges 18:05 Webcam 18:10 Back Cover
5. HP Omen 17 CB Battery Disconnection & Power Safety
🔋 HP Omen 17 CB Battery Specifications
Battery Model
Capacity
Compatibility
Gaming Runtime
Safety Features
HP L19240-855
70Wh
Omen 17-cb0000 series
4-6 hours gaming
Overcharge protection, Thermal monitoring
HP L19240-856
86Wh
Select configurations
5-7 hours gaming
Multiple protection circuits, Smart charging
Aftermarket Options
70Wh-86Wh
Verify model compatibility
Varies by quality
Check for UL certification and OEM standards
⚠️ Critical Safety Protocols
Complete Power Down :
Shut down Windows completely (not sleep/hibernate)
Disconnect 230W gaming power adapter
Remove all USB devices and gaming peripherals
Hold power button for 30 seconds to discharge capacitors
ESD Protection Setup :
Wear anti-static wrist strap
Connect to properly grounded ESD mat or metal surface
Work on non-conductive, clean surface
Keep magnetic tools away from battery and motherboard
🔍 Pre-Disconnection Battery Inspection
Visual Inspection Points :
Check for swelling or bulging of battery pack
Look for discoloration, burn marks, or melting
Inspect for liquid damage or corrosion around connector
Verify connector is clean and pins are undamaged
Safety Warning Signs :
Swollen battery - DO NOT PROCEED - replace immediately
Burning smell or unusual chemical odors
Discolored or melted plastic near battery area
Visible leakage, corrosion, or residue
🔧 Step-by-Step Disconnection Process
Locate Battery Connector :
Find battery positioned toward front of laptop
Identify main power connector near center
Note locking mechanism (secure ZIF connector)
Document connector orientation with photography
Safe Connector Release :
Gently lift black locking tab upward
Pull connector straight out from motherboard
Do not pull on wires directly
Listen for soft release as connector disengages
Complete Disconnection :
Set connector aside carefully, avoiding contact with other components
Wait 60 seconds for full power discharge
Verify no power by pressing laptop power button
Check that no RGB lights or status indicators activate
🚨 Battery Safety Hazards & Prevention
Hazard Type
Risk Level
Prevention Measures
Emergency Response
Short Circuit
High
Use plastic tools, avoid metal near contacts
Disconnect immediately, use Class C fire extinguisher
Thermal Runaway
Critical
Avoid puncturing, monitor temperature constantly
Evacuate area, call emergency services immediately
ESD Damage
Medium
Proper ESD protection, grounded workspace
Test components after incident, document damage
Chemical Exposure
High
Wear nitrile gloves, work in ventilated area
Flush with water for 15 minutes, seek medical attention
🚑 Emergency Procedures
Swollen Battery Protocol :
STOP WORK IMMEDIATELY
Do not attempt to disconnect or handle
Place in fire-safe container with sand or vermiculite
Contact professional hazardous waste disposal service
Battery Fire Response :
Use Class C fire extinguisher for electrical fires
Do not use water on lithium battery fires
Evacuate area and call emergency services
Ventilate area to disperse toxic fumes
👐 Proper Battery Handling Techniques
Safe Removal (If Required) :
Remove 4x M2x4mm battery retention screws
Lift battery at 30° angle from front edge
Support battery with both hands during removal
Place on non-conductive, stable surface
Storage Guidelines :
Store in cool, dry place away from direct sunlight
Keep in fire-proof container if damaged or old
Store at 40-60% charge for long-term preservation
Keep away from metal objects to prevent short circuits
🔌 Safe Reconnection Protocol
Pre-Reconnection Checks :
Verify battery connector is clean and undamaged
Check motherboard connector for bent pins
Ensure no debris in connector area
Confirm proper battery orientation
Secure Connection :
Align connector properly with motherboard port
Push straight in with firm, even pressure
Press locking tab down until it clicks into place
Verify connector is fully seated and flush
Post-Connection Testing :
Reinstall battery mounting screws securely
Test power-on functionality before reassembly
Check battery detection in Windows
Verify charging functionality with power adapter
📊 Safety Documentation Standards
Pre-Service Documentation :
Photograph battery condition before disconnection
Document any swelling or damage with measurements
Record battery model number and specifications
Note safety checks performed and results
Safety Compliance Records :
Document ESD protection measures in place
Record emergency equipment availability and location
Note any safety incidents or concerns addressed
Keep safety checklist for future reference and audits
💰 Resale Value Impact
Safety Compliance Value :
Gamer Buyer Confidence :
Demonstrates professional approach to safety
Indicates careful handling of power components
Suggests longer device lifespan and reliability
Supports higher asking price for safe workmanship
🔋 Pro Tip: HP Omen 17 CB models with documented battery safety procedures and professional ESD protection sell 65% faster to knowledgeable gamers. The absence of power-related issues and professional safety approach can justify 50-70% price premiums, as serious gamers recognize and value proper battery handling and safety protocols for premium 17-inch gaming laptops with high-capacity batteries.
6. HP Omen 17 CB RAM Upgrade: Dual Channel & Performance Optimization
💾 HP Omen 17 CB RAM Specifications
RAM Type
Speed
Capacity
Configuration
Gaming Performance
DDR4 SODIMM
2933MHz
16GB (2x8GB) Stock
Dual Channel
Excellent for 1080p gaming
DDR4 SODIMM
2933MHz
32GB (2x16GB)
Dual Channel
Ideal for gaming + streaming
DDR4 SODIMM
3200MHz
32GB (2x16GB)
Dual Channel
Premium performance (downclocked)
DDR4 SODIMM
2933MHz
64GB (2x32GB)
Dual Channel
Professional content creation
🔧 Professional RAM Installation Process
Preparation & Safety :
Disconnect battery and discharge residual power
Ground yourself with anti-static wrist strap
Use plastic tools to avoid short circuits
Work on clean, static-free surface
RAM Slot Access :
Locate two DDR4 slots near center of motherboard
Note existing RAM configuration and speeds
Document original RAM specifications
Check for dust or debris in slots
RAM Installation :
Release side clips on existing RAM modules
Remove modules at 45-degree angle
Align notch on new RAM with slot key
Insert at 45-degree angle, then press down until clips engage
🏆 Recommended Gaming RAM Modules
Performance Gaming (32GB) :
Crucial CT2K16G4SFD832A 32GB Kit (2x16GB) 3200MHz
Corsair Vengeance CMSX32GX4M2A2933C18
Kingston Fury Impact KF432S20IB1K2/32
HyperX Impact HX432S20IB2K2/32
Professional Grade (64GB) :
Crucial CT2K32G4SFD832A 64GB Kit (2x32GB) 3200MHz
Corsair Vengeance CMSX64GX4M2A2933C18
G.Skill Ripjaws F4-3200C22D-64GRS
Perfect for content creators and professionals
⚡ Dual-Channel Gaming Benefits
Performance Improvement :
15-25% higher frame rates in CPU-bound games
Reduced stuttering and improved frame times
Better minimum FPS in demanding titles
Improved loading times and asset streaming
Configuration Requirements :
Use identical RAM modules in both slots
Match capacity, speed, and timings exactly
Install in alternating slots (typically slot 1 & 2)
Enable XMP in BIOS if supported
🎮 Real-World Gaming Benchmarks
Game Title
16GB FPS
32GB FPS
Performance Gain
Notes
Cyberpunk 2077
72 FPS
78 FPS
+8%
Reduced stuttering
Call of Duty: Warzone
128 FPS
136 FPS
+6%
Better 1% lows
Microsoft Flight Simulator
52 FPS
61 FPS
+17%
Massive improvement
Chrome + Gaming
Frequent stutters
Smooth
+30% perceived
Multitasking benefit
🔍 Common RAM Upgrade Issues
System Won't Boot :
Reseat RAM modules firmly in both slots
Try one module at a time to isolate issues
Clear CMOS by removing battery for 5 minutes
Check BIOS version and update if needed
Running at Lower Speed :
Enter BIOS and check memory settings
Check if RAM is running at advertised speeds
Update to latest BIOS from HP support
Verify RAM compatibility with motherboard
Blue Screens or Crashes :
Run Windows Memory Diagnostic tool
Test with MemTest86 for several hours
Check for overheating issues
Verify RAM voltage and timings in BIOS
⚙️ RAM Optimization for Gaming
Windows Optimization :
Disable unnecessary startup applications
Adjust virtual memory settings appropriately
Use game mode and disable background apps
Keep Windows and drivers updated
Gaming-Specific Tweaks :
Close browsers and other memory-heavy apps while gaming
Use gaming-optimized power plans in Omen Command Center
Monitor RAM usage with MSI Afterburner or HWiNFO
Keep system clean from malware and bloatware
💰 Maximizing Gaming Resale Value
Professional Documentation :
Benchmark comparisons before and after upgrade
CPU-Z validation screenshots showing RAM specs
Gaming performance improvement documentation
Original purchase receipts for RAM modules
Marketing Advantages :
"32GB dual-channel RAM for seamless multitasking"
"Eliminates stuttering in modern AAA games"
"Future-proof for next-generation gaming"
"Professional-grade RAM for content creation"
Target Audience Benefits :
Streamers: Game + stream + chat without performance loss
Content Creators: Edit while gaming references are open
Multitaskers: Work and play without closing applications
Future-Proof Gamers: Ready for upcoming memory-heavy titles
💾 Pro Tip: HP Omen 17 CB models with 32GB dual-channel RAM upgrades and professional performance documentation sell 50% faster to serious gamers. The combination of eliminated stuttering and proven multitasking capability can justify 40-60% price premiums, especially when targeting streamers and content creators who value both gaming performance and workflow efficiency in high-performance 17-inch gaming laptops.
8. HP Omen 17 CB Keyboard & RGB Lighting System Access
⌨️ HP Omen 17 CB Keyboard Specifications
Keyboard Type
Features
Compatibility
Gaming Benefits
Resale Value Impact
RGB Backlit
4-zone RGB, Anti-ghosting, Spill-resistant
Omen 17-cb0000 series
Customizable gaming experience
+$80-120
Per-Key RGB
Individual key lighting, Advanced customization
Premium configurations
Immersive lighting effects
+$120-180
Mechanical Option
Tactile feedback, NKRO, Durable switches
Select high-end models
Competitive gaming advantage
+$150-220
Verify exact part number using HP Parts Store for your specific model.
🔍 Keyboard & RGB Issue Diagnostics
Software Troubleshooting :
Update BIOS and drivers from HP Support
Test with Windows On-Screen Keyboard
Check Omen Command Center software installation and settings
Run HP Hardware Diagnostics (F2 at boot)
Physical Inspection :
Check for stuck keys or debris under keycaps
Inspect for liquid damage or corrosion
Test RGB lighting functionality (Omen Command Center controls)
Verify all keys register using online keyboard tester
Connection Testing :
Reseat keyboard ribbon cables internally
Check for damaged flex cables or connectors
Test with external USB keyboard for comparison
Inspect keyboard controller on motherboard
🔧 Keyboard Access & Removal Process
Initial Preparation :
Remove bottom cover and disconnect battery
Document screw locations with detailed photography
Organize screws by type and location
Note cable routing for proper reassembly
Keyboard Retention :
Remove 10-12 keyboard retention screws from underside
Screws are typically marked with keyboard icon
Note different screw lengths for correct reassembly
Keep screws organized in labeled containers
Keyboard Removal :
Gently pry keyboard from top using plastic tools
Start from top edge near display hinges
Work carefully to avoid damaging plastic clips
Lift keyboard at 45-degree angle to access cables
Cable Disconnection :
Release ZIF (Zero Insertion Force) connector locks
Gently remove ribbon cables straight out
Note orientation and cable positions for reassembly
Handle cables by edges only to avoid damage
🌈 RGB Lighting System Components
RGB Control Board :
Separate controller for keyboard lighting
Located under keyboard or in palm rest area
Connects to motherboard via dedicated ribbon cable
Requires proper driver installation for full functionality
Lighting Zones :
4-zone RGB lighting in standard models (WASD, QWER, etc.)
Per-key RGB lighting in premium configurations
Chassis lighting around vents and Omen logo
Independent control through Omen Command Center software
Troubleshooting RGB Issues :
Update Omen Command Center to latest version
Check RGB controller board connections
Verify lighting zones in device manager
Test with HP RGB diagnostic tools if available
🔌 Critical Cable Connections
Keyboard Ribbon Cables :
Main keyboard data cable (wide, 40+ pins)
RGB backlight power and control cable
Separate cable for additional lighting zones
Handle with extreme care to avoid tearing
RGB System Cables :
RGB controller board power cable
Data cable for lighting control and effects
Additional cables for chassis lighting
Route cables carefully to prevent pinching
🔄 Keyboard Replacement Procedures
New Keyboard Installation :
Connect ribbon cables to new keyboard assembly
Secure ZIF connector locks firmly until clicks are heard
Position keyboard in chassis and press into place
Reinstall retention screws in correct sequence
Testing Before Final Assembly :
Reconnect battery temporarily for testing
Test all keys before reassembling bottom cover
Verify RGB lighting functionality
Check special function keys and gaming features
💼 Professional Service Tips
Clip Preservation :
Use plastic tools only for prying and clip release
Work around perimeter gradually and systematically
Apply even pressure to avoid breaking delicate clips
Heat stubborn areas with hairdryer if adhesive is strong
ESD Protection :
Wear anti-static wrist strap throughout entire process
Work on ESD-safe surface with proper grounding
Handle components by edges only
Keep magnetic tools away from sensitive electronics
🧪 Comprehensive Testing Procedures
Basic Functionality :
Test every key using online keyboard tester
Verify RGB lighting operation through Omen Command Center
Check special function keys (volume, brightness, Omen key)
Test Windows key and gaming-specific shortcuts
RGB Lighting Verification :
Test all lighting zones and individual key lighting
Verify color accuracy and brightness levels
Check lighting effects and customization options
Test synchronization with other RGB components
Gaming Performance :
Test anti-ghosting with multiple key presses
Verify key rollover for complex gaming inputs
Check response time and actuation force
Test with actual gaming sessions for real-world performance
🔧 Common Keyboard & RGB Issues
Keys Not Working :
Reseat keyboard ribbon cables firmly
Check for damaged ZIF connector locks
Verify keyboard controller functionality
Test with different keyboard if available
RGB Lighting Issues :
Check RGB controller board connections
Update Omen Command Center software and RGB drivers
Verify lighting zones in device settings
Check BIOS settings for RGB enablement
Key Feel or Response Issues :
Verify correct keyboard model installation
Check for proper seating and mounting
Test key actuation and return spring function
Ensure no interference with underlying components
💰 Maximizing Gaming Resale Value
Professional Documentation :
Photograph new keyboard condition and RGB functionality
Document all keys functioning properly with test results
Include RGB lighting demonstration videos or photos
Save receipts for genuine HP replacement parts
Marketing Advantages :
"Like-new RGB gaming keyboard with professional replacement"
"Per-key RGB lighting for immersive gaming experience"
"Anti-ghosting technology for competitive gaming"
"Spill-resistant design protected by professional installation"
Gamer Buyer Confidence :
Demonstrate all keys working in listing video
Show RGB lighting effects and customization options
Highlight anti-ghosting and gaming-specific features
Note professional installation and comprehensive testing
🛡️ Preventive Maintenance Tips
Daily Care :
Clean with compressed air weekly to remove debris
Wipe keys with isopropyl alcohol and microfiber cloth
Avoid eating or drinking near gaming laptop
Use keyboard cover during non-gaming use if desired
Long-term Preservation :
Regularly update keyboard and RGB lighting drivers
Check for BIOS updates that improve input device performance
Monitor for early signs of wear or key failure
Keep gaming environment clean to reduce dust accumulation
⌨️ Pro Tip: HP Omen 17 CB models with professionally maintained RGB keyboards and fully functional lighting systems sell 60% faster to gaming enthusiasts. The combination of perfect key functionality and vibrant RGB lighting can justify 50-75% price premiums, as serious gamers value both performance and aesthetic customization in their gaming setups, especially for streaming and content creation purposes.
10. HP Omen 17 CB: Maximizing Resale Value After Professional Upgrades
📊 Gaming Laptop Resale Market Analysis
Platform
Target Audience
Average Premium
Documentation Importance
Recommended For
eBay General Gamers
25-40%
High
Broad reach, international buyers
Facebook Marketplace Local Gamers
20-35%
Medium
Quick local sales, no shipping fees
Reddit HardwareSwap Tech Enthusiasts
30-45%
Very High
Knowledgeable buyers appreciate premium upgrades
SellBroke Repair Professionals
45-65%
Critical
Professional repair documentation highly valued
SellLaptopBack Refurbishers/Bulk Buyers
35-55%
High
Commercial buyers, quick bulk sales
💎 Professional Upgrade Value Multipliers
RAM & Storage Upgrades (Highest ROI) :
32GB dual-channel RAM: +$150-220 value
Dual NVMe SSD configuration (2TB total): +$250-350 value
High refresh rate display (144Hz/240Hz): +$200-300 value
Professional thermal repaste: +$80-120 value
Performance Optimization :
Clean Windows installation with gaming optimization: +$100-150 value
Documented benchmark improvements: +$75-125 value
Professional cooling system maintenance: +$90-140 value
Updated drivers and firmware: +$50-80 value
Professional Service Value :
ESD-safe disassembly documentation: +$60-100 value
Clean internal components with photos: +$80-120 value
Comprehensive testing and validation: +$100-160 value
30-day functional warranty: +$120-180 value
📋 Essential Resale Documentation Package
Before/After Performance Proof :
3DMark Time Spy benchmark comparisons
UserBenchmark system analysis reports
Game loading time measurements (video documentation)
Temperature and noise level documentation
Professional Workmanship Evidence :
High-quality photos of internal components (before/after)
ESD protection setup documentation
Clean workspace and professional tool usage photos
Component installation process documentation
Gaming Performance Validation :
Popular game FPS benchmarks (Warzone, Cyberpunk, etc.)
Multitasking performance demonstrations
Thermal performance under sustained gaming load
RGB lighting functionality showcase
💰 Strategic Pricing Framework
Upgrade Level
Base Value
Upgrade Cost
Market Value
ROI Percentage
Basic Refresh
$800
$150
$1,100
200%
Performance Upgrade
$800
$400
$1,500
175%
Premium Gaming Ready
$800
$700
$1,900
157%
Content Creator Edition
$800
$1,000
$2,300
150%
📈 Professional Listing Optimization
Title Optimization :
"Professionally Upgraded HP Omen 17 CB Gaming Laptop"
Include key specs: "RTX 2070, 32GB RAM, 2TB SSD, 144Hz"
Highlight unique selling points: "Thermal Optimized, RGB Keyboard"
Mention target use: "Ready for Streaming & Competitive Gaming"
Photo Strategy :
High-quality external condition photos (all angles, good lighting)
Internal component photos showing clean workmanship
Benchmark screenshots and performance graphs
Gaming session photos/videos demonstrating performance
Description Power Words :
Professional, Expert, Premium, Optimized, Enhanced
Documented, Verified, Tested, Certified, Guaranteed
Gaming-Ready, Stream-Optimized, Competition-Tuned
Future-Proof, High-Performance, Elite, Superior
🛡️ Building Premium Buyer Confidence
Professional Credibility Signals :
ESD-safe work environment documentation
Professional tool investment evidence
Component purchase receipts and transferable warranties
Before/after performance testing results
Risk Reduction Strategies :
30-day functional warranty on all upgrades
Professional packaging and shipping documentation
Secure payment method recommendations
Clear return policy and satisfaction guarantee
Technical Transparency :
Full disclosure of any cosmetic imperfections
Battery health report and cycle count documentation
Thermal performance under load with monitoring logs
Component specifications and compatibility verification
🎓 Educational & Institutional Markets
University & College Sales :
Emphasize research and computational capabilities
Highlight compatibility with academic software (CAD, Adobe, etc.)
Reference ED.gov technology standards
Note durability for student use and campus mobility
Small Business & Startup Sales :
Focus on productivity and content creation capabilities
Highlight professional appearance and reliability
Emphasize cost savings vs. new equipment purchases
Note compatibility with business software suites
Esports & Gaming Organizations :
Highlight competitive gaming performance
Emphasize consistency and reliability for tournaments
Note streaming and content creation capabilities
Provide team/org purchase documentation
📅 Strategic Sales Timing
Peak Demand Periods :
Back-to-school season (July-September): +20-30% demand
Holiday shopping (November-December): +25-35% demand
Tax return season (February-April): +15-25% demand
Esports tournament seasons: +10-20% demand
Market Awareness Events :
Monitor new game releases and hardware requirements
Track esports tournament schedules and requirements
Follow academic calendar for institutional purchases
Monitor competitor pricing and market trends
📊 Professional Resale Success Metrics
Average Performance Improvements :
Sale price increase: 60-90% over stock condition
Time to sale reduction: 70-85% faster
Buyer inquiry increase: 100-150% more interest
Positive feedback rate: 97-99% satisfaction
Professional Premium Justification :
Expert workmanship and quality assurance
Comprehensive testing and validation documentation
Professional documentation and customer support
Enhanced performance and extended reliability
📄 Comprehensive Value Proposition Documentation
Performance Documentation :
Before/after benchmark comparison sheets
Game performance improvement charts
Temperature reduction documentation
System responsiveness measurements
Professional Service Documentation :
ESD protection setup verification
Component compatibility verification
Installation quality assurance checklist
Testing and validation completion certificates
Market Comparison Documentation :
Competitor pricing analysis
New equivalent system cost comparison
Upgrade component retail value documentation
Professional service cost justification
💰 Pro Tip: HP Omen 17 CB models with comprehensive professional documentation and verified performance upgrades consistently achieve 70-100% higher resale values on platforms like SellBroke and SellLaptopBack . The combination of expert workmanship, thorough testing, and strategic marketing can transform a standard gaming laptop into a premium, professionally enhanced system that commands significant price premiums from knowledgeable buyers in competitive gaming, content creation, and professional markets.
Need to Sell Your HP Laptop? Get Instant Cash!
If your HP Omen 17 CB (or other Omen model) has performance issues or you're upgrading to a newer gaming laptop, we offer premium cash payouts for your device. We buy broken, used, and refurbished HP Omen laptops—including all Omen 17 CB configurations—with free insured shipping and hassle-free evaluations.
Sell Popular HP Models Now:
Sell HP Omen Max Gaming 16t-ah000 16" Intel Core Ultra 9 275HX RTX 5080 laptop