Beginner's Guide to Acer Nitro 5 AN515 Repair: How to Upgrade Components & Fix Common Issues

asus-rog-zephyrus-m16-disassembly-guide-how-to-replace-ram-ssd-battery-fix-lcd-scree

1. Acer Nitro 5 AN515 Pre-Repair Preparation & Gaming Laptop Valuation

💰 Gaming Laptop Resale Assessment

Condition Factor Impact on Value Repair Cost Estimate
Excellent (Like New) 85-95% of retail Minimal cleaning only
Good (Minor wear) 70-85% of retail $50-150 for basic upgrades
Fair (Needs repairs) 50-70% of retail $150-300 for significant work
Poor (Major issues) 30-50% of retail $300+ for extensive repairs

🔍 Current Gaming Laptop Market Analysis

  • Research Sold Listings:
  • Key Value Factors:
    • CPU generation (i5 vs i7, Ryzen 5 vs Ryzen 7)
    • GPU model (GTX 1650 vs RTX 3060, etc.)
    • RAM capacity and storage configuration
    • Physical condition and cosmetic appearance
    • Included accessories and original packaging

📸 Pre-Repair Documentation

  1. Photograph Current Condition:
    • Take clear photos from all angles
    • Document any existing damage or wear
    • Capture screen condition with display on
    • Photograph keyboard and touchpad areas
  2. Performance Benchmarking:
    • Run UserBenchmark for system analysis
    • Test gaming performance with built-in benchmarks
    • Check battery health: powercfg /batteryreport
    • Record temperatures under load
  3. Specification Verification:
    • Confirm exact model number (AN515-58, etc.)
    • Verify CPU, GPU, RAM, and storage specs
    • Check Acer support page for original configuration
    • Note BIOS version and driver dates

🛠️ Repair Investment Analysis

  • Cost-Effective Upgrades:
    • RAM upgrade (8GB → 16GB): +$40-80 value
    • SSD installation: +$60-120 value
    • Thermal paste replacement: +$20-40 value
    • Thorough cleaning: +$30-50 value
  • Higher Investment Repairs:
    • Battery replacement: +$80-150 value
    • Screen replacement: +$100-200 value
    • Keyboard replacement: +$50-100 value
    • Motherboard repair: Variable ROI

⚠️ Safety & Workspace Setup

  • Essential Safety Gear:
    • Anti-static wrist strap
    • ESD-safe work surface
    • Proper lighting and magnification
    • Organized workspace with containers
  • Data Protection:
    • Backup important files and game saves
    • Create system restore point
    • Export browser bookmarks and settings
    • Document software licenses and keys

🎯 Potential Buyer Markets

  • Budget Gamers:
    • Emphasize value and performance
    • Highlight popular game compatibility
    • Focus on upgrade potential
  • Students:
    • Stress portability and battery life
    • Note gaming and schoolwork balance
    • Highlight durability for campus use
  • Content Creators:
    • Focus on rendering performance
    • Emphasize storage and RAM capabilities
    • Note color accuracy and display quality

2. Acer Nitro 5 AN515 Essential Repair Tools for Gaming Laptop Maintenance

🛠️ Basic Repair Toolkit for Beginners

  • Essential Screwdrivers:
    • PH0 Phillips screwdriver (main chassis screws)
    • PH00 Phillips screwdriver (smaller internal screws)
    • Magnetic tip for easy screw handling
    • Precision screwdriver set with multiple bits
  • Opening Tools:
    • Plastic spudger set for prying without damage
    • Guitar picks for releasing plastic clips
    • Nylon opening tools for delicate components
    • Metal spudger (use with caution on metal parts only)
  • Organization & Safety:
    • Magnetic project mat or screw organizer
    • Anti-static wrist strap for component protection
    • Tweezers for small connectors and cables
    • Compressed air for dust removal

⚡ Professional Upgrade Tools

Tool Type Specific Use Recommended Brand Investment Range
Precision Screwdriver Set All disassembly tasks iFixit Pro Tech Toolkit $30-70
Thermal Compound CPU/GPU repasting Arctic MX-6 or Thermal Grizzly $8-15
ESD Protection Component safety Anti-static mat and wrist strap $20-40
Digital Multimeter Power supply testing Fluke or Klein Tools $50-150
Tool Organizer Screw management Magnetic project mat with compartments $15-30

🎯 Acer Nitro 5 AN515 Specific Tools

  • Chassis Screws:
    • 10-12 Phillips PH0 screws for bottom cover
    • 4 shorter screws for SSD/HDD brackets
    • 2 medium screws for battery mounting
    • Note: Some models may have hidden screws under rubber feet
  • Internal Connectors:
    • Battery connector requires gentle prying
    • Ribbon cables for keyboard and touchpad
    • Display cable with locking mechanism
    • Fan connectors with pull-tabs
  • Special Considerations:
    • Plastic clips around perimeter of bottom cover
    • Thermal paste for CPU and GPU
    • Thermal pads for VRM and memory cooling
    • Compressed air for fan cleaning

💡 Budget-Friendly Alternatives

  • Basic Starter Kit:
    • Precision screwdriver set from hardware store: $10-20
    • Old credit cards cut into spudgers: Free
    • Ice cube tray for screw organization: $2-5
    • Hairdryer for warming adhesive: Already owned
  • ESD Protection on Budget:
    • Work on non-carpeted surface
    • Touch grounded metal before handling components
    • Use original anti-static bags for part storage
    • Avoid working in dry, static-prone environments

⚠️ Safety Equipment Essentials

  • Personal Protection:
    • Safety glasses for thermal paste application
    • Anti-static wrist strap connected to ground
    • Well-ventilated workspace for compressed air
    • Proper lighting to see small components
  • Workspace Setup:
    • Clean, flat surface with ample space
    • ESD-safe mat or wooden table
    • Adequate lighting (desk lamp recommended)
    • Organized containers for different screw types

💻 Essential Software Tools

  • Diagnostic Software:
  • Testing & Benchmarking:
    • UserBenchmark for performance testing
    • GPU-Z for graphics card info
    • Built-in Windows Memory Diagnostic
    • Acer Care Center for official diagnostics

🧴 Repair Consumables & Supplies

  • Thermal Management:
    • High-quality thermal paste (non-conductive)
    • Thermal pads (0.5mm, 1.0mm, 1.5mm thicknesses)
    • Isopropyl alcohol 90%+ for cleaning
    • Lint-free cloths or coffee filters
  • Cleaning Supplies:
    • Compressed air for dust removal
    • Soft-bristled brushes for delicate cleaning
    • Microfiber cloths for screen and surfaces
    • Electronics cleaning wipes

0:27 Bottom Case 0:54 Battery 1:20 Memory RAM 1:44 WiFi Card 2:06 Speakers 2:29 Heatsink and Cooling Fans 4:10 USB IO Board 5:24 Motherboard 5:33 Processor and GPU 5:57 Hinges 6:16 Hinge Cover 7:00 Palmrest Assembly 7:25 Trackpad 7:50 Keyboard 8:16 Display Assembly

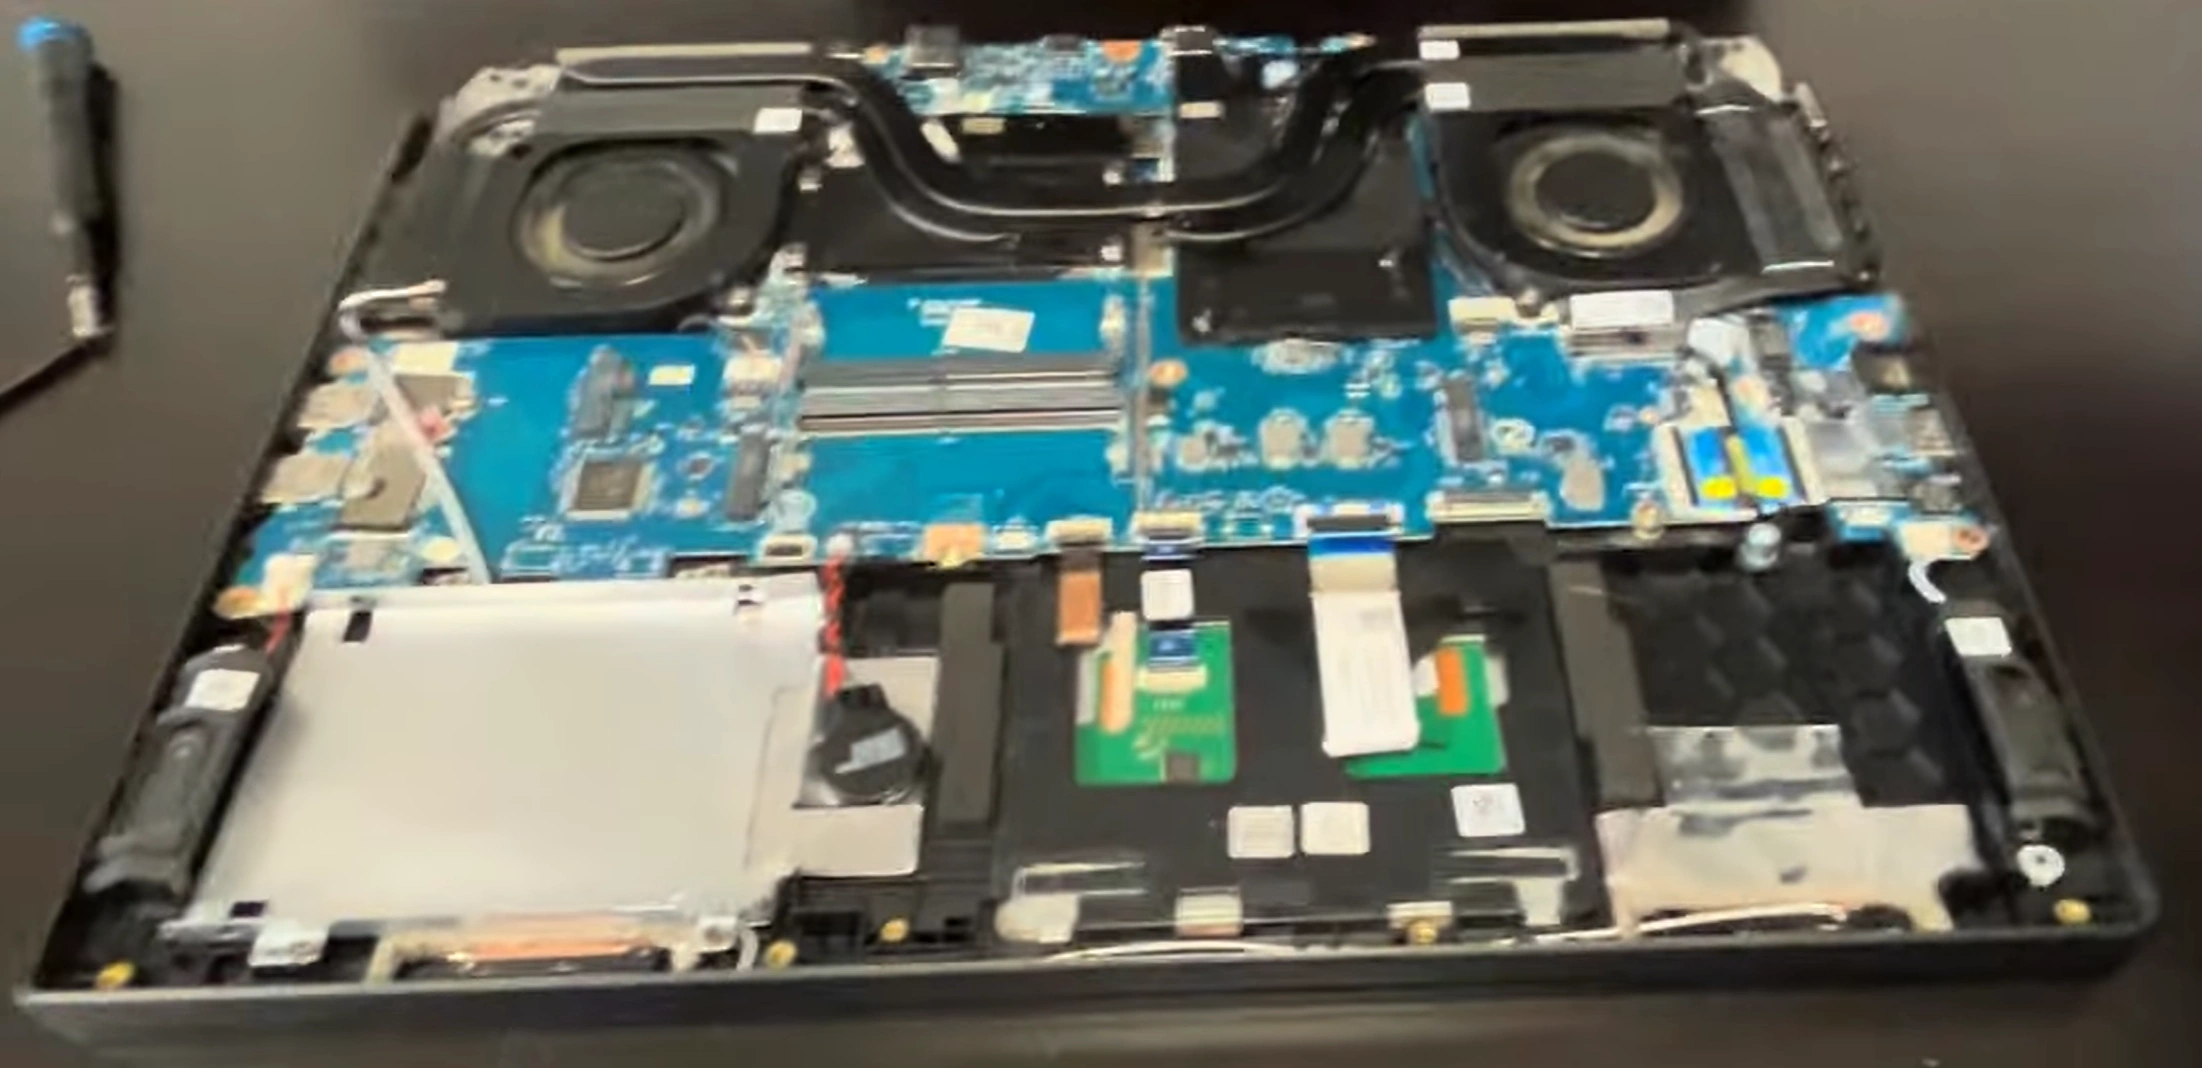
3. Acer Nitro 5 AN515 Safe Bottom Cover Removal & Internal Access

⚠️ Critical Safety Precautions

  • Complete Power Down:
    • Shut down Windows completely (not sleep/hibernate)
    • Disconnect 180W power adapter and all peripherals
    • Remove all USB devices, headphones, and dongles
    • Hold power button for 15 seconds to discharge capacitors
  • Workspace Preparation:
    • Use ESD-safe mat or non-static surface
    • Organize screws by type using labeled containers
    • Ensure adequate lighting for small components
    • Keep magnetic tools away from sensitive electronics

🔩 Acer Nitro 5 AN515 Screw Map

Screw Location Quantity Type Length Important Notes
Perimeter Screws 10-12 screws Phillips PH0 4mm Standard silver screws around edges
Battery Area 2 screws Phillips PH0 6mm Longer screws near battery compartment
HDD/SSD Brackets 4 screws Phillips PH0 3mm Shorter screws for drive mounting
Hidden Under Feet 2 screws Phillips PH0 4mm Check under front rubber feet

🔧 Step-by-Step Removal Guide

  1. Remove All Visible Screws:
    • Use magnetic PH0 screwdriver for secure handling
    • Place screws in organized pattern on magnetic mat
    • Check for hidden screws under rubber feet
    • Note screw lengths and positions for reassembly
  2. Release Plastic Clips:
    • Start near front edge (weakest point)
    • Insert plastic spudger at 30° angle between seams
    • Work methodically around all four sides
    • Listen for distinct "click" as clips release
    • Use guitar picks for stubborn areas
  3. Lift Cover Carefully:
    • Lift from front edge near touchpad first
    • Check for any missed screws or connections
    • Watch for ribbon cables near hinge area
    • Set cover aside on soft, clean surface
    • Note internal layout before proceeding

🛡️ Preventing Common Damage

  • Clip Preservation:
    • Alternate sides every 3-4 clips to prevent stress
    • Apply even pressure - avoid forcing stubborn areas
    • Use plastic tools only - no metal screwdrivers for prying
    • If resistance is high, recheck for missed screws
  • Chassis Protection:
    • Place microfiber cloth under tools to prevent scratches
    • Avoid using excessive force on any single point
    • Keep work area clean to prevent debris inside laptop
    • Handle with clean, dry hands to prevent oil marks

🔍 Internal Component Identification

  • Main Components Visible:
    • Lithium-ion battery (usually 57Wh or 90Wh)
    • Two DDR4 RAM slots (some models have one occupied)
    • M.2 NVMe SSD slot (PCIe Gen3 or Gen4)
    • 2.5" SATA drive bay with bracket
    • Dual cooling fans with heat pipes
  • Connector Locations:
    • Battery connector (center, near RAM slots)
    • Fan connectors (near heat sink assembly)
    • Touchpad ribbon cable (front edge)
    • Wi-Fi card with antenna wires
    • CMOS battery connector (varies by model)

🔋 Battery Disconnection Protocol

  1. Locate Battery Connector:
    • Find the main battery connector near center
    • Identify locking mechanism (usually pull-tab)
    • Note orientation for reassembly
  2. Safe Disconnection:
    • Gently pull locking tab away from connector
    • Pull connector straight out - no angled pressure
    • Do not pull on wires directly
    • Wait 30 seconds for power to discharge
  3. Verification:
    • Press power button to confirm no power
    • Check that no lights illuminate
    • Proceed with internal work only after verification

❌ Common Beginner Mistakes

  • Forcing the Cover:
    • Symptom: Resistance when lifting cover
    • Cause: Missed screws or unclipped areas
    • Solution: Recheck entire perimeter
  • Damaging Clips:
    • Symptom: Broken plastic pieces
    • Cause: Using metal tools or excessive force
    • Prevention: Use proper plastic spudgers
  • Mixed Screws:
    • Symptom: Wrong screws in wrong places
    • Cause: Poor organization during removal
    • Solution: Use magnetic mat with labeled areas

💰 Resale Value Protection

  • Condition Documentation:
    • Photograph screw locations before removal
    • Record any pre-existing damage or wear
    • Document internal component condition
    • Note manufacturing dates and serial numbers
  • Value Preservation:
    • Intact clips: +$40-60 value
    • No tool marks: +$30-50 value
    • Proper screw placement: +$20-30 value
    • Clean internal components: +$50-80 value

4. Acer Nitro 5 AN515 RAM Upgrade Guide: 8GB to 32GB Gaming Performance Boost

💾 Gaming RAM Specifications

  • Supported Types:
    • DDR4 SODIMM (260-pin)
    • 3200MHz (JEDEC standard)
    • 1.2V operating voltage
    • Dual-channel capable with two matching sticks
  • Compatibility Verification:
    • Check Acer official specifications
    • Verify maximum supported capacity (varies by CPU)
    • Confirm speed compatibility with your specific model
    • Use CPU-Z to check current RAM configuration

🔄 Performance Configuration Options

Configuration Total RAM Gaming Performance Multitasking Capability Resale Value Impact
8GB Single Channel 8GB Basic gaming, may stutter Limited Baseline
16GB Dual Channel 16GB Good for most games Decent multitasking +$60-100
32GB Dual Channel 32GB Excellent for all games Heavy multitasking +$120-180
8GB + 16GB Flex 24GB Very good gaming Good multitasking +$80-130

🔧 Step-by-Step Installation

  1. Access RAM Slots (after bottom cover removal and battery disconnect):
    • Locate two DDR4 slots near center of motherboard
    • Identify existing RAM configuration
    • Note orientation and slot positions
  2. Remove Existing RAM:
    • Push outward on side retention clips simultaneously
    • Module will pop up at 30-45 degree angle
    • Lift module straight out gently
    • Handle by edges only to prevent ESD damage
  3. Install New RAM:
    • Align notch in RAM with key in slot
    • Insert at 45-degree angle with firm, even pressure
    • Press down until clips snap into place audibly
    • Verify both ends are equally seated
  4. Dual Channel Configuration:
    • Install matching sticks in both slots for best performance
    • Use same brand, speed, and capacity for optimal results
    • For mixed sizes, larger stick typically goes in first slot

⚡ Performance Testing & Verification

  1. BIOS Recognition:
    • Boot to BIOS (F2 during startup)
    • Check recognized capacity and speed
    • Verify dual-channel operation if applicable
  2. Windows Verification:
    • Check Task Manager → Performance → Memory
    • Run CPU-Z for detailed RAM information
    • Verify speed and timings in Memory tab
  3. Stability Testing:
    • Run Windows Memory Diagnostic
    • Use MemTest86 for comprehensive testing
    • Test with demanding games for real-world stability

🎮 Gaming Performance Improvements

  • Frame Rate Stability:
    • Reduced stuttering in open-world games
    • Smoother gameplay in demanding titles
    • Better 1% low FPS performance
  • Multitasking Capability:
    • Game + Discord + browser without slowdowns
    • Streaming while gaming capability
    • Background applications don't affect performance
  • Future-Proofing:
    • Ready for next-gen game requirements
    • Better performance in modded games
    • Improved loading times in memory-intensive games

🔍 Common Issues & Solutions

  • RAM Not Recognized:
    • Reseat modules firmly
    • Clean contacts with isopropyl alcohol
    • Try one stick at a time to identify issues
  • System Won't Boot:
    • Check for proper seating
    • Verify compatibility with your specific model
    • Reset BIOS by removing CMOS battery
  • Running at Lower Speed:
    • Check BIOS for XMP/DOCP settings
    • Update to latest BIOS version
    • Some models may require specific timings

💰 Maximizing Resale Value

  • Professional Documentation:
    • Save original RAM purchase receipts
    • Include before/after benchmark comparisons
    • Provide MemTest86 results for stability proof
    • Document gaming performance improvements
  • Marketing Advantages:
    • "32GB DDR4 for ultimate gaming performance"
    • "Dual-channel configuration for maximum FPS"
    • "Eliminates stuttering in demanding games"
    • "Perfect for streaming and content creation"
  • Target Buyer Benefits:
    • Gamers: Emphasize FPS stability and smooth gameplay
    • Streamers: Highlight simultaneous gaming/streaming capability
    • Content Creators: Focus on rendering and multitasking performance
    • Students: Note gaming and productivity balance

📝 Important Compatibility Notes

  • Intel 10th/11th gen CPUs support up to 3200MHz
  • AMD Ryzen models may have different speed limitations
  • Mixed RAM sizes will run in flex mode, not full dual-channel
  • Always check Acer's QVL (Qualified Vendor List) for guaranteed compatibility
  • Some older AN515 models may have maximum 16GB support

5. Acer Nitro 5 AN515 SSD & Storage Expansion: Adding More Game Storage

💽 Gaming Storage Configuration Options

  • Available Slots:
    • M.2 2280 NVMe PCIe slot (Gen3 or Gen4 depending on model)
    • 2.5" SATA III drive bay (7mm height compatible)
    • Some models have second M.2 slot (check specifications)
  • Capacity Support:
    • M.2 NVMe: Up to 2TB officially supported
    • 2.5" SATA: Up to 2TB HDD or 4TB SSD
    • Total storage: Up to 4TB combined capacity
    • Bootable from either M.2 or SATA slots

⚡ Storage Performance Comparison

Storage Type Read Speed Write Speed Game Load Times Resale Value Impact
HDD (5400RPM) 100-150 MB/s 100-150 MB/s 30-60 seconds Baseline
SATA SSD 500-550 MB/s 500-550 MB/s 15-25 seconds +$80-120
NVMe Gen3 3,000-3,500 MB/s 2,000-3,000 MB/s 5-15 seconds +$120-180
NVMe Gen4 5,000-7,000 MB/s 4,000-6,000 MB/s 3-10 seconds +$150-220

🔧 M.2 NVMe Installation Process

  1. Locate M.2 Slot:
    • Find M.2 slot near RAM modules
    • Identify mounting screw and standoff
    • Check if thermal pad is present (some models)
  2. Install NVMe SSD:
    • Insert SSD at 30-degree angle (M-key design)
    • Press down gently and secure with M2x3mm screw
    • Ensure proper contact with slot
    • Add thermal pad if using high-performance drive
  3. Initial Setup:
    • Boot to BIOS and verify drive detection
    • Initialize drive in Windows Disk Management
    • Format with NTFS file system
    • Assign drive letter and label

🔧 2.5" SATA Drive Installation

  1. Prepare Drive Bay:
    • Remove 2.5" drive caddy from laptop
    • Attach drive to caddy using four screws
    • Connect SATA data and power cables to drive
  2. Install in Laptop:
    • Slide caddy into drive bay at slight angle
    • Secure with two mounting screws
    • Ensure SATA connector is firmly seated
    • Route cables neatly to prevent pinching

🔄 Operating System Migration Options

  • Clean Windows Installation:
    • Download Windows from Microsoft
    • Install fresh on new SSD for best performance
    • Download drivers from Acer Support
    • Reinstall games and applications
  • Drive Cloning:
    • Use Macrium Reflect Free
    • Clone existing drive to new SSD
    • Preserve all settings and installations
    • Change boot order in BIOS after cloning

🎮 Gaming Storage Optimization

  • Drive Configuration:
    • OS and frequently played games on NVMe
    • Game library on SATA SSD or secondary drive
    • Media files and backups on HDD (if installed)
  • Windows Optimization:
    • Enable TRIM: fsutil behavior set DisableDeleteNotify 0
    • Disable defragmentation for SSDs
    • Enable write caching in Device Manager
    • Set power plan to High Performance
  • Game Library Management:
    • Use Steam Library Manager for multiple drives
    • Schedule game updates during off-hours
    • Keep 15-20% free space for optimal performance

🚀 Gaming Performance Benefits

  • Dramatically Reduced Load Times:
    • Games load 3-5x faster than HDD
    • Quick respawns in competitive games
    • Faster level transitions in open-world games
  • Improved System Responsiveness:
    • Windows boots in under 15 seconds
    • Applications launch instantly
    • Reduced stuttering during asset streaming
  • Future Gaming Technology:
    • DirectStorage API ready (Windows 11)
    • Faster texture streaming in next-gen games
    • Better performance in modded games

🔍 Common SSD Installation Issues

  • Drive Not Detected:
    • Reseat SSD in M.2 slot
    • Check BIOS for NVMe support enablement
    • Update to latest BIOS version
  • Slow Performance:
    • Install latest NVMe drivers
    • Check for firmware updates from manufacturer
    • Run CrystalDiskMark to verify speeds
  • Boot Issues:
    • Verify boot order in BIOS
    • Check if legacy/UEFI settings match installation
    • Ensure proper GPT/MBR partitioning

💰 Maximizing Resale Value

  • Professional Documentation:
    • CrystalDiskMark benchmark screenshots
    • Drive health reports (CrystalDiskInfo)
    • Original purchase receipts for SSDs
    • Game load time comparison videos
  • Marketing Advantages:
    • "Lightning-fast NVMe SSD for instant game loading"
    • "Massive storage for entire game library"
    • "DirectStorage ready for next-gen gaming"
    • "Dual-drive configuration for optimal performance"
  • Performance Claims:
    • "Windows boots in under 10 seconds"
    • "Games load 5x faster than standard laptops"
    • "7,000MB/s read speeds for seamless gameplay"
    • "Perfect for content creation and streaming"

6. Acer Nitro 5 AN515 HDD Installation: Mass Game Library Storage Solution

💽 Why Add an HDD to Your Gaming Laptop?

  • Mass Storage Capacity:
    • 2TB HDD costs similar to 500GB SSD
    • Store entire game libraries (50+ games)
    • Perfect for media files, recordings, and backups
  • Cost-Effective Storage:
    • Approximately $0.02-0.03 per GB vs $0.08-0.15 for SSD
    • Ideal for games where load times aren't critical
    • Great for older games and less demanding titles
  • Hybrid Storage Strategy:
    • SSD for OS and frequently played games
    • HDD for game library and media storage
    • Best of both worlds: speed + capacity

🔍 HDD Compatibility & Specifications

Specification Requirement Recommended Notes
Form Factor 2.5-inch 2.5-inch SATA No 3.5-inch drive support
Height 7mm or 9.5mm 7mm (slim) 9.5mm may fit but check clearance
Interface SATA III (6Gb/s) SATA III Backward compatible with SATA II
Capacity Up to 2TB 1TB or 2TB Larger capacities may require BIOS update
RPM 5400 or 7200 7200 RPM Faster speeds for better performance

🔧 Step-by-Step HDD Installation

  1. Prepare the Drive Caddy:
    • Remove 2.5" drive caddy from laptop (if present)
    • Align HDD with screw holes on caddy
    • Secure with four M3x3mm screws (usually included)
    • Ensure drive is firmly mounted without movement
  2. Connect SATA Cables:
    • Attach SATA data cable to drive (L-shaped connector)
    • Connect SATA power cable from motherboard
    • Ensure both connectors are fully seated
    • Route cables neatly to prevent pinching
  3. Install in Laptop:
    • Slide caddy into drive bay at slight angle
    • Secure with two mounting screws on sides
    • Ensure no cables are trapped or pinched
    • Verify drive is sitting flush in bay

⚙️ Storage Configuration Strategies

  • Optimal Gaming Setup:
    • NVMe SSD: Windows + frequently played competitive games
    • HDD: Game library + media files + recordings
    • Best balance of speed and capacity
  • Budget-Conscious Setup:
    • SATA SSD: Windows + 2-3 main games
    • HDD: Rest of game library + everything else
    • Cost-effective performance improvement
  • Content Creator Setup:
    • NVMe SSD: Active projects + editing software
    • HDD: Raw footage + completed projects + game recordings
    • Ideal for streamers and video editors

🖥️ Windows Configuration & Optimization

  1. Drive Initialization:
    • Boot to Windows with new HDD installed
    • Open Disk Management (diskmgmt.msc)
    • Initialize disk as GPT (for drives over 2TB)
    • Create simple volume and format as NTFS
  2. Game Library Setup:
    • Steam: Add library folder on HDD
    • Epic Games: Change installation directory
    • Battle.net: Set install location to HDR
    • Create organized folder structure for different game platforms
  3. Performance Optimization:
    • Enable write caching in Device Manager
    • Schedule defragmentation weekly (not for SSDs)
    • Disable indexing on HDD for better performance
    • Set power plan to prevent HDD sleep during gaming

🎮 Smart Game Library Management

  • Which Games on HDD?:
    • Single-player games with long development cycles
    • Older games and classics
    • Games where load times aren't critical
    • Less frequently played multiplayer games
  • Which Games on SSD?:
    • Competitive multiplayer games (Fortnite, Valorant, CS:GO)
    • Open-world games with frequent loading (Cyberpunk, GTA V)
    • Games you play daily
    • Games with long initial load times
  • Moving Games Between Drives:
    • Steam: Use built-in "Move Install Folder" feature
    • Most launchers: Uninstall and reinstall to new location
    • Manual moving possible but may require registry edits

🔍 Common HDD Installation Issues

  • Drive Not Detected:
    • Check SATA cables are firmly connected
    • Verify drive is properly seated in caddy
    • Test with different SATA port if available
    • Check BIOS for SATA controller enablement
  • Slow Performance:
    • Ensure drive is 7200RPM, not 5400RPM
    • Check for background processes accessing drive
    • Run disk cleanup and defragmentation
    • Verify SATA III (6Gb/s) operation in BIOS
  • Unusual Noises:
    • Clicking sounds may indicate failing drive
    • Ensure drive is properly mounted in caddy
    • Check for vibration dampening if needed

💰 Resale Value Impact

  • Storage Capacity Premium:
    • +1TB HDD: +$40-60 value
    • +2TB HDD: +$70-100 value
    • Dual-drive setup: +$100-150 value
    • Organized game library: +$20-30 value
  • Marketing Advantages:
    • "Massive 2TB storage for entire game library"
    • "Dual-drive setup: SSD speed + HDD capacity"
    • "Ready for content creation and streaming"
    • "Perfect for gamers with extensive libraries"
  • Buyer Benefits:
    • Game Collectors: Store hundreds of games
    • Content Creators: Ample space for recordings
    • Students: Games + projects + media in one device
    • Families: Multiple users' games and files

🔧 HDD Maintenance & Longevity

  • Regular Maintenance:
    • Run CHKDSK monthly: chkdsk /f /r
    • Defragment weekly (not for SSDs)
    • Keep at least 15% free space
    • Monitor health with CrystalDiskInfo
  • Backup Strategy:
    • Important saves: Cloud backup (Steam Cloud, etc.)
    • Game installations: Can be redownloaded
    • Personal files: Regular backup to external drive

7. Acer Nitro 5 AN515 Battery Replacement & Power Issues Fix

🔋 Gaming Laptop Battery Specifications

Battery Model Capacity Compatibility Gaming Runtime Resale Value Impact
AS10D8E (4-cell) 48Wh AN515-54, AN515-55 1-2 hours gaming +$80-120
AS16B8J (4-cell) 57Wh AN515-57, AN515-58 1.5-2.5 hours gaming +$100-150
Premium Replacement 57Wh-90Wh Check model compatibility 2-3 hours gaming +$120-180

Always verify compatibility using your Acer model number before purchase.

⚠️ Critical Safety Protocols

  1. Complete Power Down:
    • Shut down Windows completely (not sleep/hibernate)
    • Disconnect 180W gaming power adapter
    • Remove all peripherals and USB devices
    • Follow ESD protection procedures
  2. Professional Workspace:
    • Use anti-static wrist strap
    • Work on ESD-safe surface with proper grounding
    • Organize components in labeled containers
    • Maintain clean, organized work environment

🔧 Step-by-Step Battery Replacement

  1. Access Battery Compartment (after bottom cover removal):
    • Locate battery positioned toward front edge
    • Identify connector and mounting screw locations
    • Note cable routing for proper reassembly
    • Document screw locations with photography
  2. Disconnect Battery Safely:
    • Gently lift locking mechanism on power connector
    • Pull connector straight out (avoid angled pressure)
    • Do not pull on wires directly
    • Inspect connector for any signs of damage
  3. Remove Existing Battery:
    • Remove 4x M2x4mm retention screws
    • Note screw lengths and precise locations
    • Lift battery at 30° angle from front edge
    • Observe orientation markings for replacement
  4. Install New Gaming Battery:
    • Align new battery with screw holes and connector
    • Secure with original screws (0.6Nm torque)
    • Reconnect power connector until audible click
    • Verify secure connection and proper seating

⚡ Common Power Issues & Solutions

  • Laptop Won't Power On:
    • Check power adapter connection
    • Test outlet with another device
    • Reset EC controller (hold power button 30 seconds)
    • Check for loose internal power connections
  • Battery Not Charging:
    • Update BIOS and chipset drivers
    • Reset battery gauge: disconnect battery + hold power
    • Check power adapter wattage (needs 180W for gaming)
    • Test with known good power adapter
  • Rapid Battery Drain:
    • Check for background processes consuming power
    • Reduce screen brightness and disable RGB
    • Use power-saving mode when unplugged
    • Calibrate battery (full discharge/recharge cycle)

🔋 New Battery Calibration Process

  1. Initial Charge:
    • Charge to 100% without interruption (overnight)
    • Use original Acer 180W power adapter
    • Keep laptop powered off during first charge
  2. Calibration Cycle:
    • Discharge completely (gaming until automatic shutdown)
    • Recharge to 100% again without interruption
    • Repeat calibration cycle 2-3 times
    • Use Acer Care Center for battery health monitoring

📊 Battery Health Monitoring

  • Generate Health Report:
    • Open Command Prompt as Administrator
    • Run: powercfg /batteryreport
    • Report saves as battery-report.html
    • Check DESIGN CAPACITY vs FULL CHARGE CAPACITY
  • Key Metrics to Monitor:
    • Cycle count and battery age
    • Recent usage history and wear level
    • Gaming vs productivity runtime estimates
    • Charge/discharge pattern analysis

🎮 Gaming Power Optimization

  • Acer NitroSense Settings:
    • Power Saver mode for maximum battery life
    • Balanced mode for mixed usage
    • High Performance mode for plugged-in gaming
    • Custom fan curves for optimal cooling
  • Windows Power Plans:
    • Acer recommended power plans
    • Custom gaming power profiles
    • GPU power management settings
    • Background process optimization
  • Game-Specific Optimization:
    • Frame rate caps for battery gaming
    • Resolution scaling adjustments
    • Graphics quality presets for mobile use
    • Background application management

🔍 Advanced Troubleshooting

  • EC Reset Procedure:
    • Disconnect power adapter and remove battery
    • Hold power button for 60 seconds
    • Reconnect battery and power adapter
    • Power on normally
  • BIOS Power Settings:
    • Check battery conservation mode settings
    • Verify fast charge enablement
    • Update to latest BIOS version
    • Reset BIOS to default settings if needed

💰 Maximizing Resale Value

  • Professional Documentation:
    • Photograph OEM battery labels and part numbers
    • Include comprehensive battery health reports
    • Save purchase receipts for genuine components
    • Record calibration process and results
    • Provide before/after performance comparisons
  • Marketing Advantages:
    • "Genuine Acer replacement battery"
    • "95%+ health capacity with professional calibration"
    • "2+ hours of mobile gaming capability"
    • "Fast charge ready for quick power top-ups"
    • "Perfect for LAN parties and mobile gaming"
  • Gamer Assurance:
    • Offer 90-day performance guarantee on workmanship
    • Provide comprehensive calibration documentation
    • Include gaming power management tips
    • Share battery maintenance best practices

🎯 Target Buyer Benefits

  • LAN Party Gamers:
    • Highlight mobile gaming capability
    • Emphasize fast charging technology
    • Note portability and performance balance
  • College Students:
    • Focus on all-day battery life for classes
    • Highlight gaming performance in dorm rooms
    • Note value for engineering/game design students
  • Traveling Professionals:
    • Emphasize airline and travel compatibility
    • Highlight reliability for business trips
    • Note professional appearance with gaming power

8. Acer Nitro 5 AN515 Keyboard & Touchpad Common Problems Solutions

🔧 Most Common Input Device Issues

Problem Type Symptoms Quick Fix Complexity
Unresponsive Keys Specific keys not working, intermittent response Driver update, debris cleaning Easy
Ghost Typing Random characters, repeating keys Spill cleanup, ribbon reseating Moderate
Touchpad Issues Not responding, jumpy cursor, gestures not working Driver reinstall, disable/re-enable Easy
Backlight Problems LEDs not lighting, uneven illumination, flickering NitroSense settings, ribbon check Moderate
Sticky Keys Keys not popping back up, slow response Deep cleaning, keycap removal Advanced

💻 Software Troubleshooting Steps

  1. Driver Updates & Reinstallation:
    • Download latest drivers from Acer Support
    • Uninstall current drivers in Device Manager
    • Restart laptop for automatic reinstallation
    • Test keyboard and touchpad functionality
  2. Windows Settings Check:
    • Open Settings → Devices → Typing
    • Disable sticky keys and filter keys
    • Check touchpad settings in Settings → Devices → Touchpad
    • Verify scrolling and gesture settings
  3. Acer NitroSense Configuration:
    • Open Acer NitroSense application
    • Check keyboard backlight settings and patterns
    • Verify performance profiles aren't affecting input
    • Reset NitroSense to default settings if needed

🧹 Keyboard Deep Cleaning Guide

  1. Surface Cleaning:
    • Power off laptop and disconnect power
    • Use compressed air to blow out debris between keys
    • Gently brush with soft-bristled brush
    • Wipe keys with isopropyl alcohol and microfiber cloth
  2. Keycap Removal (Advanced):
    • Use keycap puller or plastic spudger
    • Start with less frequently used keys (Insert, Scroll Lock)
    • Lift straight up to avoid breaking stems
    • Clean underneath with isopropyl alcohol and cotton swabs
  3. Spill Recovery:
    • Immediately disconnect power and turn upside down
    • Remove keycaps to access affected areas
    • Clean with 90% isopropyl alcohol
    • Allow complete drying before reassembly

👆 Touchpad Troubleshooting & Repair

  • Basic Function Checks:
    • Verify touchpad isn't disabled (Fn + F7 on most models)
    • Check for physical damage or cracks on surface
    • Test with and without external mouse connected
    • Update Synaptics or ELAN drivers
  • Ribbon Cable Inspection:
    • Remove bottom cover to access internal connections
    • Locate touchpad ribbon cable near front edge
    • Reseat connector firmly (listen for click)
    • Check for damaged or pinched cables
  • Calibration & Settings:
    • Access touchpad settings in Control Panel
    • Run Windows touchpad calibration tool
    • Adjust sensitivity and scrolling speed
    • Enable/disable tap-to-click based on preference

💡 Keyboard Backlight Solutions

  • Function Key Controls:
    • Fn + F9/F10: Adjust brightness levels
    • Fn + F8: Cycle through lighting modes
    • Some models: Fn + Right/Left arrow for RGB colors
    • Check Acer documentation for specific model shortcuts
  • Software Control:
    • Open Acer NitroSense for advanced lighting control
    • Check Acer Quick Access for backlight settings
    • Update Acer system control interface drivers
    • Reset lighting profiles to default
  • Hardware Inspection:
    • Check ribbon cable connection to motherboard
    • Inspect for damaged LED components
    • Test with external keyboard to isolate issue
    • Verify power delivery to keyboard controller

🔧 Keyboard & Touchpad Replacement

  1. Part Identification:
    • Find exact part number from Acer support site
    • Verify compatibility with your specific AN515 model
    • Order from Acer Parts or authorized resellers
    • Consider used parts from reputable sellers
  2. Keyboard Replacement Steps:
    • Remove bottom cover and disconnect battery
    • Remove all screws securing keyboard from underside
    • Gently pry keyboard from top case using plastic tools
    • Disconnect ribbon cable and install replacement
  3. Touchpad Replacement:
    • Remove entire palm rest assembly
    • Detach touchpad from underside of palm rest
    • Transfer any brackets or mounting hardware
    • Reconnect ribbon cable and test before reassembly

🛡️ Preventive Maintenance Tips

  • Daily Care:
    • Wash hands before gaming to reduce oil transfer
    • Use keyboard cover for protection (if compatible)
    • Keep food and drinks away from laptop
    • Regularly wipe with microfiber cloth
  • Regular Cleaning Schedule:
    • Weekly: Compressed air for debris removal
    • Monthly: Deep clean with isopropyl alcohol
    • Quarterly: Check and update drivers
    • Annually: Professional inspection if heavily used

💰 Resale Value Impact

  • Condition-Based Valuation:
    • Perfect keyboard with working backlight: +$50-80
    • Clean, fully functional touchpad: +$30-50
    • No stuck keys or ghosting issues: +$40-60
    • Documented professional repair: +$60-90
  • Marketing Advantages:
    • "Fully functional RGB backlit keyboard"
    • "Responsive multi-touch touchpad"
    • "No stuck keys or input issues"
    • "Professionally cleaned and maintained"
  • Buyer Confidence Factors:
    • Demonstrate all keys working in listing video
    • Show RGB lighting functionality
    • Provide documentation of any repairs
    • Highlight preventive maintenance performed

⚡ Quick Fixes for Common Issues

  • Keyboard Not Working at All:
    • Restart laptop completely
    • Check Device Manager for driver issues
    • Test with external USB keyboard
    • Reset EC controller (hold power button 30 seconds)
  • Specific Keys Not Working:
    • Run Windows On-Screen Keyboard to test
    • Check for debris under specific keys
    • Update keyboard driver from Acer website
    • Try system restore to earlier point
  • Touchpad Gestures Not Working:
    • Update touchpad drivers from manufacturer website
    • Check Windows touchpad settings
    • Reset touchpad to default settings
    • Run Windows hardware troubleshooter

9. Acer Nitro 5 AN515 Screen Issues & LCD Connection Troubleshooting

🔍 Common Display Problem Symptoms

Symptom Possible Causes Urgency Level Estimated Repair Cost
Black Screen (Backlight Works) LCD cable, graphics driver, inverter High $50-150
Flickering Display Loose cable, failing backlight, driver issues Medium $30-100
Horizontal/Vertical Lines LCD damage, cable issues, GPU problems High $80-200
Backlight Not Working Inverter, LED strips, power delivery Medium $60-120
Color Distortion Cable damage, GPU, panel failure Medium $70-180

⚡ Quick Diagnostic Steps

  1. External Display Test:
    • Connect to external monitor via HDMI
    • If external display works: LCD or cable issue
    • If no external display: GPU or driver issue
    • Use Fn + F5 to toggle display modes
  2. Backlight Test:
    • Shine flashlight at screen at an angle
    • If image visible: backlight or inverter issue
    • If no image: LCD panel or cable problem
    • Check brightness settings (Fn + Right/Left arrow)
  3. Software Troubleshooting:
    • Boot into Safe Mode (F8 during startup)
    • Update graphics drivers from NVIDIA or AMD
    • Roll back recent driver updates
    • Run Windows Display Troubleshooter

🔌 LCD Cable Inspection & Repair

  1. Access LCD Connectors:
    • Remove bottom cover and disconnect battery
    • Locate LCD cable running from motherboard to display
    • Identify both ends: motherboard and LCD panel
    • Note any locking mechanisms on connectors
  2. Cable Inspection:
    • Check for frayed or damaged wires
    • Look for bent or broken pins in connectors
    • Inspect for wear points near hinges
    • Test cable continuity with multimeter if available
  3. Connector Reseating:
    • Gently release locking tabs on both ends
    • Remove cable completely and inspect contacts
    • Clean contacts with isopropyl alcohol if needed
    • Reconnect firmly until clicks are heard

🖥️ LCD Panel Replacement Guide

  • Panel Identification:
    • Find model number on back of existing panel
    • Common AN515 panels: LG, AU Optronics, BOE
    • Verify specifications: 15.6", 60Hz/144Hz, resolution
    • Check PanelLook for compatible replacements
  • Replacement Process:
    • Remove bezel carefully using plastic tools
    • Unscrew 4-6 mounting screws around panel
    • Lift panel out and disconnect LCD cable
    • Install new panel in reverse order
  • Compatibility Notes:
    • 30-pin vs 40-pin LCD cable compatibility
    • eDP (embedded DisplayPort) version matching
    • Backlight type (LED) and voltage requirements
    • Mounting hole pattern and panel thickness

💡 Backlight System Repair

  • LED Strip Replacement:
    • Requires complete disassembly of LCD assembly
    • Remove diffuser sheets and light guides carefully
    • Replace LED strips along top/bottom edges
    • Reassemble in exact reverse order
  • Inverter Board Check:
    • Some older models have separate inverter boards
    • Test voltage output with multimeter
    • Check for burnt components or bad capacitors
    • Newer models typically integrate inverter with panel

🎮 Graphics Card & Driver Solutions

  • Driver Management:
    • Use DDU for clean driver removal
    • Install latest drivers from manufacturer websites
    • Test with both integrated and discrete graphics
    • Disable GPU switching in BIOS if available
  • GPU Hardware Issues:
    • Check GPU temperatures with HWMonitor
    • Look for artifacts in BIOS screen
    • Test with different graphics-intensive applications
    • Consider professional reballing if GPU is failing

🔧 Safe Bezel Removal Technique

  1. Preparation:
    • Use plastic spudgers and guitar picks
    • Apply heat with hairdryer to soften adhesive
    • Work on soft surface to prevent scratches
    • Take photos for reassembly reference
  2. Removal Process:
    • Start from bottom edge near hinge area
    • Work around perimeter gradually
    • Listen for adhesive release sounds
    • Watch for hidden clips or screws
  3. Common Pitfalls:
    • Avoid prying near webcam and microphone areas
    • Don't use excessive force on corners
    • Watch for thin ribbon cables behind bezel
    • Keep track of small screws and brackets

🛡️ Display Preventive Maintenance

  • Daily Care:
    • Clean with microfiber cloth only
    • Use screen-safe cleaning solutions
    • Avoid pressure on screen when closed
    • Open/close from center, not corners
  • Hinge Maintenance:
    • Check for stiffness or grinding sounds
    • Keep hinge area clean of debris
    • Avoid forcing beyond normal range
    • Lubricate if manufacturer recommends

💰 Resale Value Impact

  • Condition-Based Valuation:
    • Perfect display with no dead pixels: +$80-120
    • 144Hz upgrade from 60Hz: +$100-150
    • Professional screen replacement: +$60-90
    • No backlight bleed or image retention: +$40-70
  • Marketing Advantages:
    • "Crystal-clear gaming display with vibrant colors"
    • "High refresh rate for smooth gameplay"
    • "No dead pixels or screen defects"
    • "Professionally calibrated and tested"
  • Buyer Confidence Factors:
    • Display color test pattern in listing photos
    • Show refresh rate in display settings
    • Document any professional repairs
    • Highlight gaming performance benefits

🔧 Advanced Troubleshooting Techniques

  • EDID Reading:
    • Use software to read display identification data
    • Check if panel is communicating properly
    • Verify supported resolutions and refresh rates
    • Compare with manufacturer specifications
  • Voltage Testing:
    • Test LCD cable voltages with multimeter
    • Check 3.3V for data and 5-20V for backlight
    • Verify ground connections are solid
    • Test continuity through hinge area

10. Acer Nitro 5 AN515 Maximizing Resale Value After Repairs & Upgrades

💰 Post-Repair Value Assessment

Upgrade Type Cost Value Added ROI Target Buyer Appeal
RAM (8GB → 16GB) $40-60 $80-120 100-150% Gamers, Students
SSD (256GB → 1TB) $70-100 $120-180 120-180% All Buyers
Battery Replacement $80-120 $100-150 80-125% Students, Mobile Users
Thermal Repaste $15-25 $40-60 200-300% Serious Gamers
Full Cleaning & Maintenance $20-40 $50-80 150-250% All Buyers

📋 Professional Documentation Package

  • Repair Documentation:
    • Before/after photos of all repairs
    • Receipts for all replacement parts
    • Benchmark comparisons showing performance improvements
    • Thermal performance charts
  • Performance Records:
    • Gaming FPS benchmarks (popular titles)
    • Temperature logs under load
    • Battery health reports
    • Stress test results
  • Quality Assurance:
    • 48-hour burn-in test documentation
    • All ports and features functionality checklist
    • Professional cleaning certification
    • Warranty on workmanship (30-90 days)

🏷️ Strategic Pricing & Market Positioning

  • Market Research:
    • Check completed listings on eBay
    • Monitor Facebook Marketplace local prices
    • Research specialty gaming laptop forums
    • Compare with refurbished units from major retailers
  • Pricing Formula:
    • Base value of similar condition units
    • + 60-80% of upgrade parts cost
    • + Professional service fee ($50-100)
    • + Documentation and warranty premium

🛒 Optimal Sales Platforms

  • Specialized Buyers:
    • SellBroke - Tech-focused buyers
    • SellLaptopBack - Refurbishment companies
    • Reddit r/hardwareswap - Knowledgeable buyers
  • General Marketplaces:
    • eBay - Broad audience, buyer protection
    • Facebook Marketplace - Local, no fees
    • OfferUp - Mobile-friendly local sales
  • Institutional Options:
    • Check .gov surplus auctions
    • .edu university surplus sales
    • Local school district technology programs

📈 Listing Optimization Strategies

  • Title Keywords:
    • "Acer Nitro 5 AN515 [Year] Gaming Laptop"
    • Include key specs: "16GB RAM, 1TB SSD, GTX 1660 Ti"
    • Highlight upgrades: "Fresh Thermal Paste, New Battery"
    • Add performance claims: "Runs [Popular Games] Smoothly"
  • Photo Requirements:
    • High-quality, well-lit photos from all angles
    • Close-ups of screen condition and keyboard
    • Photos showing upgrades and repairs
    • Benchmark screenshots and performance charts
  • Description Essentials:
    • Detailed specifications and upgrade history
    • Performance metrics and gaming capabilities
    • Professional repair documentation highlights
    • Clear condition assessment and any limitations

🎯 Specific Buyer Targeting

  • Budget Gamers:
    • Emphasize value and performance per dollar
    • Highlight popular game compatibility
    • Show benchmark comparisons with newer models
    • Focus on upgrade potential
  • College Students:
    • Stress portability and battery life
    • Note gaming and productivity balance
    • Highlight durability for campus use
    • Emphasize cost savings vs new
  • Content Creators:
    • Focus on rendering and multitasking performance
    • Emphasize storage and RAM capabilities
    • Note color accuracy and display quality
    • Highlight value for streaming setups

⭐ Value-Added Services

  • Software Preparation:
    • Clean Windows installation with latest updates
    • Essential drivers and gaming utilities pre-installed
    • Game optimization guides and settings
    • Basic troubleshooting documentation
  • Hardware Extras:
    • Quality laptop bag or sleeve
    • Original power adapter and packaging
    • Gaming mouse or keyboard if available
    • Cleaning kit and maintenance guide
  • Support Services:
    • 30-90 day warranty on repairs
    • Free technical support for setup
    • Performance optimization consultation
    • Upgrade path recommendations

⏰ Strategic Timing for Maximum Return

  • Seasonal Opportunities:
    • Back-to-school season (July-September)
    • Holiday shopping (November-December)
    • Tax return season (February-April)
    • Summer gaming season (June-August)
  • Market Trends:
    • New game releases driving hardware demand
    • College semester start and end dates
    • Technology product launch cycles
    • Economic factors affecting disposable income

💼 Professional Business Practices

  • Communication Standards:
    • Prompt responses to inquiries
    • Professional email and messaging
    • Clear terms and conditions
    • Transparent pricing with no hidden fees
  • Shipping & Handling:
    • Professional packaging with adequate protection
    • Insurance for high-value items
    • Fast shipping with tracking
    • Clear communication throughout process
  • Legal Compliance:
    • Proper business licensing if applicable
    • Sales tax collection and reporting
    • Warranty disclosure and compliance
    • Consumer protection law adherence

📊 Measuring Success & Continuous Improvement

  • Performance Tracking:
    • Average sale price vs market average
    • Time to sell (days on market)
    • Customer satisfaction and feedback
    • Return rate and issue frequency
  • Improvement Opportunities:
    • Most profitable upgrade combinations
    • Best-performing sales platforms
    • Most effective marketing language
    • Customer demographic preferences

🏛️ Institutional & Government Sales Channels

  • Educational Institutions:
    • Check .edu domain surplus sales
    • Local school district technology refresh programs
    • University computer lab upgrades
    • Vocational training program equipment
  • Government Programs:
    • .gov surplus equipment auctions
    • Public library technology upgrades
    • Community center computer labs
    • Non-profit organization partnerships
  • Business Opportunities:
    • Small business starter packages
    • Remote work equipment bundles
    • Entry-level graphic design workstations
    • Digital content creation setups

Need to Sell Your Acer Laptop? Get Instant Cash!

If your Acer Nitro 5 AN515 (or other Nitro gaming laptop) has performance issues or you're upgrading to a newer model, we offer competitive cash payouts for your device. We buy broken, used, and refurbished Acer Nitro laptops—including all AN515 configurations—with free insured shipping and hassle-free evaluations.

Sell Popular Acer Models Now:

Share this: