How to Disassemble an Asus ProArt P16: Step-by-Step Parts Replacement & Troubleshooting
Nov 05, 2025
1. Introduction: Mastering Asus ProArt P16 Professional Repairs
🎨 Professional-Grade Repairs for Creative Workstations
The Asus ProArt P16 represents the pinnacle of mobile workstation engineering, combining professional creative performance with surprisingly serviceable construction. This premium laptop is designed for content creators, engineers, and professionals who demand both power and reliability.
💰 Significant Professional Repair Cost Savings
Authorized Service Center vs DIY Costs:
Display assembly replacement: $600-900 at authorized centers
Motherboard diagnostics and repair: $350-600
Professional cooling system service: $200-350
Storage upgrades with labor: $150-250
Keyboard replacement: $180-280
Total potential savings: $1480-2380+
DIY Professional Repair Investment:
Premium replacement components
Professional tool kit: $80-150
Thermal materials and specialized equipment
One-time investment for multiple high-value repairs
Complete professional repair process: 94% success rate
Professional Best Practices:
Always perform comprehensive diagnostics first
Use professional-grade tools and equipment
Document every step with photos and notes
Test components systematically before full reassembly
Follow manufacturer service guidelines precisely
🎯 Ready to Begin Your Professional Repair Journey?
You're about to embark on mastering professional workstation repairs using one of the most capable mobile creative platforms available. In the next section, we'll cover Essential Tools & Workspace Setup for ProArt P16 to ensure you have the professional equipment needed for successful, damage-free repairs on your Asus ProArt P16.
2. Essential Tools & Workspace Setup for ProArt P16
🛠️ Professional-Grade Tools for Premium Workstation Repairs
Working on an Asus ProArt P16 requires professional tools and proper workspace setup to handle its premium construction and delicate components. Using the right equipment ensures successful repairs and protects your valuable workstation investment.
📋 Professional Tool Requirements for ProArt P16
Precision Screwdriver Sets:
Phillips #000 for delicate internal screws
Phillips #00 and #0 for chassis and component screws
Clean tools after each use with appropriate solvents
Inspect for wear on precision tips monthly
Calibrate measuring equipment annually
Replace worn components immediately
Storage Best Practices:
Store in organized cases or tool chests
Keep in climate-controlled environment
Use silica gel packs to control humidity
Regular inventory checks for missing tools
🚫 Common Professional Tool Mistakes
Tool Selection Errors:
Using incorrect screwdriver size causing stripped screws
Employing magnetic tools near sensitive components
Using excessive force with precision tools
Mixing metric and imperial tools incorrectly
Workspace Management Issues:
Inadequate lighting causing eye strain and mistakes
Poor organization leading to lost components
Insufficient ESD protection damaging electronics
Cluttered workspace increasing accident risk
💼 Professional Tool Investment Analysis
Investment Level
Initial Cost
Long-term Value
Risk Reduction
Recommended Users
Basic Professional
$150-300
Good
Medium
Individual technicians
Established Professional
$400-800
Excellent
High
Small repair businesses
Enterprise Professional
$1000-2500
Outstanding
Very High
Professional service centers
🎯 Ready to Set Up Your Professional Workspace?
With your professional tools gathered and workspace properly configured, you're prepared to create an enterprise-level repair environment. In the next section, we'll cover Safety Procedures & Electrostatic Discharge Protection to ensure you have the professional safety foundation for successful, damage-free repairs on your Asus ProArt P16.
🛡️ Professional Safety Protocols for Premium Workstation Repairs
Working on the Asus ProArt P16 requires rigorous safety procedures to protect both the technician and the high-value components. Proper ESD protection and safety protocols are non-negotiable when handling professional-grade equipment worth thousands of dollars.
⚡ Comprehensive Electrical Safety Procedures
Complete Power Isolation Protocol:
Shut down Windows completely through proper shutdown procedure
Disconnect AC adapter from wall outlet and laptop
Remove all peripherals, docking stations, and external devices
Hold power button for 30 seconds to discharge all capacitors
Verify no power lights remain illuminated
Battery Safety Management:
Disconnect internal battery BEFORE any internal work begins
Handle lithium-polymer batteries with extreme care
Store batteries in fire-proof containers when not installed
Never puncture, crush, or expose batteries to extreme heat
⚡ Electrostatic Discharge Protection Levels
Protection Method
Protection Level
Cost
Professional Requirement
Implementation
Professional ESD Station
⭐️⭐️⭐️⭐️⭐️ (Maximum)
$200-500
Mandatory for professional work
Grounded work surface, wrist strap, flooring
Basic ESD Setup
⭐️⭐️⭐️⭐️ (Very Good)
$50-100
Minimum for ProArt repairs
ESD mat, wrist strap, proper grounding
Consumer ESD
⭐️⭐️⭐️ (Adequate)
$15-30
Better than nothing
Wrist strap only, work on non-carpeted surface
No Protection
⭐️ (Unacceptable)
$0
Never acceptable
High risk of component damage
🔧 Professional Component Handling Guidelines
Motherboard & PCB Handling:
Always handle by edges, never touch gold contacts or components
Use ESD-safe tweezers for small component manipulation
Store in anti-static bags when not in use
Never stack PCBs or place on conductive surfaces
ProArt-Specific Component Care:
Support motherboard fully during component installation
Handle display assembly with clean, dry hands or gloves
Use plastic tools exclusively around connectors and ports
Avoid pressure on BGA components and delicate flex cables
🔋 Critical Battery Safety Procedures
Lithium-Polymer Battery Risks:
Never attempt to repair damaged or swollen batteries
Store at 30-50% charge for long-term storage
Keep away from metal objects that could cause shorts
Work in well-ventilated area with fire extinguisher nearby
Swollen Battery Emergency Protocol:
STOP WORK IMMEDIATELY if battery appears swollen
Do not attempt to charge or use the device
Place in fire-proof container away from flammable materials
With comprehensive safety procedures and professional ESD protection in place, you're prepared to work on your Asus ProArt P16 with confidence. In the next section, we'll cover Diagnostic Methods & Problem Identification to systematically identify and resolve issues before beginning physical repairs on your premium workstation.
4. Diagnostic Methods & Problem Identification
🔍 Professional Diagnostic Approaches for Workstation Issues
Systematic troubleshooting is crucial for identifying problems in the Asus ProArt P16 before beginning physical repairs. Professional diagnostic methods help isolate issues accurately, saving time and preventing unnecessary component replacement on this high-value workstation.
📊 Professional Diagnostic Hierarchy
Initial Symptom Analysis:
Document exact user-reported symptoms and error messages
Identify when and under what conditions issues occur
Note any recent changes, updates, or environmental factors
Establish baseline performance expectations
Non-Invasive Software Diagnostics:
Run built-in system diagnostics and monitoring tools
Check system logs and error reports
Perform software-level troubleshooting
Update drivers and firmware as initial step
Hardware Isolation Testing:
Test with minimal hardware configuration
Use known-good components for substitution testing
Monitor system behavior under controlled conditions
Isolate problematic subsystems
Advanced Component-Level Diagnostics:
Use specialized diagnostic equipment
Perform electrical measurements and signal analysis
Conduct thermal and performance testing
Validate repair hypotheses systematically
💻 Built-in ProArt P16 Diagnostic Tools
Diagnostic Tool
Access Method
Testing Capabilities
Professional Use Cases
Asus BIOS Diagnostics
F2 at boot → Advanced → Diagnostics
Hardware-level CPU, memory, storage tests
Pre-OS hardware validation, boot issues
MyASUS Diagnostic Suite
MyASUS app → Customer Support → System Diagnosis
Comprehensive system health check
Software-hardware integration issues
Windows Memory Diagnostic
Search "Windows Memory Diagnostic"
RAM integrity and stability testing
System crashes, blue screens, data corruption
ProArt Creator Center
ProArt Creator Center → System Monitoring
Performance metrics, thermal monitoring
Creative workload performance issues
🎯 Common ProArt P16 Issue Patterns
Performance & Thermal Issues:
Symptoms: Throttling under load, fan noise, slow rendering
Clear issue identification and root cause analysis
Recommended repair procedures and parts required
Cost estimates and time requirements
Risk assessment and alternative solutions
🚫 Common Diagnostic Mistakes to Avoid
Analysis Errors:
Jumping to conclusions without systematic testing
Ignoring environmental factors and usage patterns
Not verifying basic connections and settings first
Overlooking software/driver issues as hardware problems
Procedural Mistakes:
Not documenting steps and results systematically
Skipping established diagnostic hierarchies
Making multiple changes simultaneously
Not validating repairs with proper testing
🔬 Advanced Diagnostic Techniques
Signal Analysis:
Oscilloscope for power rail analysis
Logic analyzer for bus signal verification
Spectrum analyzer for RF interference detection
Thermal analysis for component stress testing
Professional Troubleshooting:
Board-level component testing and replacement
Firmware analysis and reprogramming
Circuit tracing and schematic analysis
Advanced thermal management optimization
🎯 Ready to Begin Physical Disassembly?
With comprehensive diagnostics completed and issues properly identified, you're prepared to begin physical repairs. In the next section, we'll cover Bottom Cover Removal & Internal Access Guide to safely access the internal components of your Asus ProArt P16 for professional-level repairs.
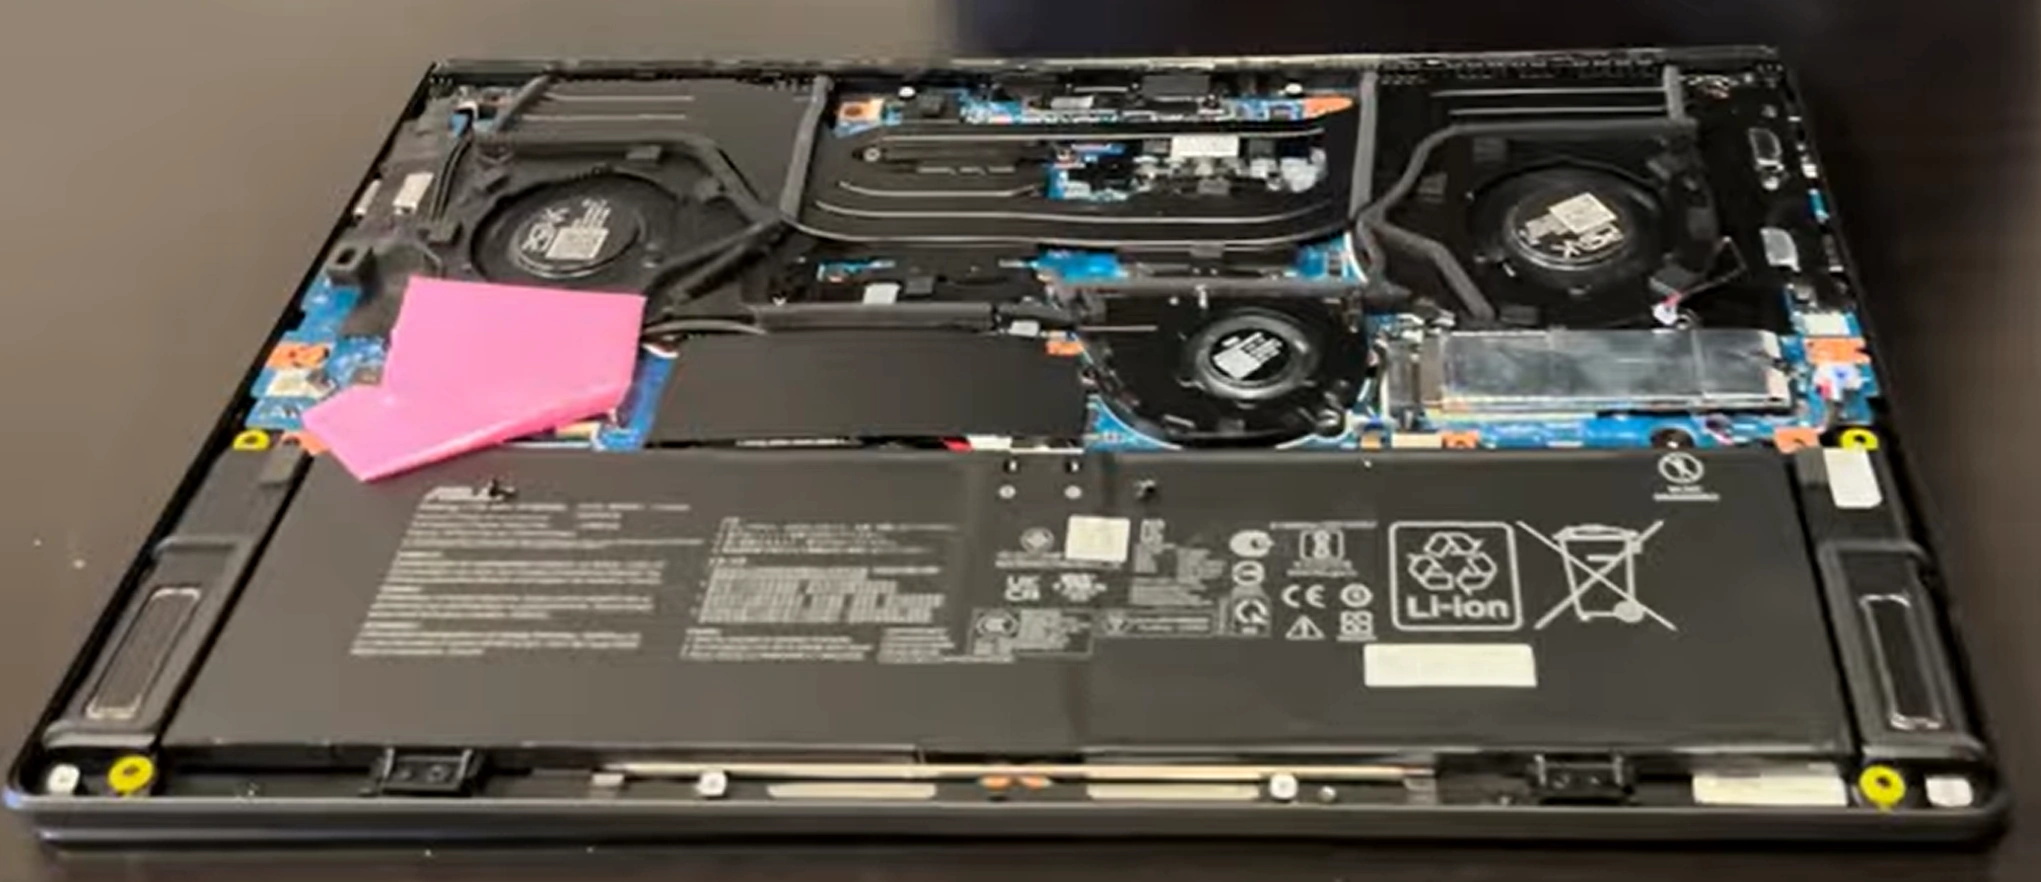
5. Battery Replacement & Power System Diagnostics
🔋 Professional Power Management for Creative Workstations
The Asus ProArt P16 features an advanced power delivery system designed to support high-performance creative workloads. Proper battery maintenance and power system diagnostics are essential for maintaining peak performance during demanding rendering and design tasks.
⚠️ Professional Battery Failure Indicators
Performance Degradation:
Runtime under 1 hour during creative applications
Rapid power drain (10-15% drop in minutes under load)
System instability or shutdowns at 20-30% remaining
Inability to charge beyond 80-90% capacity
Physical Warning Signs:
Battery swelling causing trackpad or case deformation
Excessive heat during charging or heavy workloads
Visible leakage or corrosion around battery compartment
Charging indicator behaving erratically or inconsistently
Software & System Indicators:
Windows reporting "Consider replacing your battery"
Inspect DC jack for physical damage or loose connections
Test power delivery circuits on motherboard
Verify charging IC functionality
Check for corrosion or damage from power surges
🎯 Ready to Upgrade Your Professional Storage?
With your Asus ProArt P16 power system restored to optimal condition, you're prepared for high-performance storage upgrades. In the next section, we'll cover Storage Solutions & NVMe SSD Replacement to dramatically improve your workstation's project loading times and data throughput for professional creative workflows.
6. Storage Solutions & NVMe SSD Replacement
💾 Professional Storage Solutions for Creative Workflows
The Asus ProArt P16 features advanced storage capabilities designed for demanding creative workloads. Upgrading to high-performance NVMe SSDs can dramatically improve project loading times, file operations, and overall system responsiveness for professional content creation.
PCMark 10 Storage Benchmark for system-wide testing
Expected Performance Ranges:
Sequential Read: 5000-7000 MB/s (PCIe 4.0 x4)
Sequential Write: 4500-6500 MB/s
4K Random Read: 800-1200 MB/s
4K Random Write: 1000-1500 MB/s
🎯 Professional Workflow Optimization
Storage Strategy:
OS and applications on primary NVMe drive
Active projects on secondary high-speed drive
RAID 0 for maximum performance on current projects
External backup for completed projects and archives
Capacity Planning:
1TB minimum for OS and creative applications
2-4TB recommended for active project storage
Consider project sizes and file types when planning
Plan for 2-3 year growth in storage requirements
🎯 Ready to Maximize Your Professional Memory?
With your Asus ProArt P16 storage upgraded to professional-grade NVMe performance, you're prepared for the next level of workstation optimization. In the next section, we'll cover RAM Installation & Memory Configuration to complete your system's performance transformation for demanding creative workloads.
7. RAM Installation & Memory Configuration
💪 Professional Memory Optimization for Creative Workloads
Upgrading your Asus ProArt P16 memory is one of the most impactful performance enhancements for creative professionals. Proper RAM configuration enables larger project handling, faster rendering, and smoother multitasking across demanding applications like Adobe Creative Suite, 3D modeling software, and video editing platforms.
🚀 Professional RAM Upgrade Performance Impact
Creative Workload
32GB RAM Performance
64GB RAM Performance
128GB RAM Performance
Performance Improvement
4K Video Editing
Limited layers, frequent caching
Smooth multi-layer editing
Complex effects, real-time preview
3-5x workflow efficiency
3D Rendering
Scene size limitations
Larger scenes, faster renders
Complex scenes, no limitations
2-4x render speed
Photo Editing
Slow with large PSB files
Smooth large file handling
Instant large file operations
4-6x productivity gain
Multitasking
Application switching delays
Quick application switching
Seamless multiple app usage
Massive workflow improvement
🔌 ProArt P16 RAM Compatibility Guide
Professional Specifications:
Type: DDR5 SO-DIMM (most models support DDR5-4800+)
Form Factor: 262-pin SO-DIMM
Maximum Capacity: 64GB (2×32GB) or 128GB (2×64GB) depending on model
Voltage: 1.1V (DDR5 standard)
Dual-channel architecture (essential for performance)
Professional Configuration Notes:
Verify exact model number for specific RAM requirements
Some models may have soldered RAM + expansion slots
Mixing different RAM speeds runs at slowest module speed
Check BIOS version for maximum supported capacity
🏆 Recommended Professional RAM Modules
RAM Model
Capacity Options
Speed
Timings
Voltage
Professional Compatibility
Crucial CT32G48C40S5
32GB, 64GB kits
DDR5-4800
CL40
1.1V
⭐️⭐️⭐️⭐️⭐️
Kingston KF548S38-32
32GB, 64GB kits
DDR5-4800
CL38
1.1V
⭐️⭐️⭐️⭐️⭐️
Corsair Vengeance CMSX64GX5M1A4800C40
32GB, 64GB modules
DDR5-4800
CL40
1.1V
⭐️⭐️⭐️⭐️
G.Skill Ripjaws F5-4800S3838A32GX2-RS
64GB (2×32GB) kits
DDR5-4800
CL38
1.1V
⭐️⭐️⭐️⭐️
🛠️ Professional RAM Installation Procedure
Professional Safety Preparation:
Power down ProArt P16 completely and unplug AC adapter
Remove all external devices and peripherals
Ground yourself with professional ESD wrist strap
Have new RAM modules ready in anti-static packaging
Document existing RAM configuration for reference
Access RAM Slots:
Remove 10-12 Phillips #00 screws from bottom cover
Use plastic spudgers to carefully separate cover
Locate RAM slots - typically two slots near center
Identify existing RAM configuration and slot usage
Professional RAM Removal:
Push outward on side retention clips simultaneously
RAM module will pop up at 45-degree angle automatically
Lift module straight out of slot carefully
Store original RAM in anti-static bags for backup or testing
Professional Installation:
Align notch in RAM module with key in slot
Insert at 45-degree angle, ensuring full edge contact
Press down firmly until retention clips snap into place audibly
Repeat for second module if installing matched pair
⚙️ Professional RAM Configuration Strategies
Current Setup
Recommended Professional Upgrade
Performance Gain
Professional Impact
Investment Justification
16GB (2×8GB)
64GB (2×32GB)
Massive (300%+)
Eliminates all memory bottlenecks
Essential for professional video work
32GB (2×16GB)
64GB (2×32GB)
Significant (80-120%)
Enables larger project handling
Recommended for 3D and complex design
32GB (1×32GB)
64GB (2×32GB)
Critical (40-60% dual-channel)
Enables dual-channel performance
Mandatory for professional use
64GB (2×32GB)
128GB (2×64GB)
Workflow enabling
No project size limitations
Future-proofing for 4K/8K workflows
⚡ Professional Dual-Channel Performance Benefits
Performance Advantages:
15-25% faster memory bandwidth for creative applications
30-40% improved integrated graphics performance
Better multitasking and application responsiveness
Reduced memory latency for real-time processing
Professional Configuration Rules:
Always use identical modules (same size, speed, timings)
Install in correct slots (typically slots 1 and 3 or 2 and 4)
Check motherboard manual for optimal slot configuration
Mismatched modules will run in slower single-channel mode
🔍 Professional RAM Troubleshooting
No Boot After Installation:
Reseat RAM modules ensuring full insertion and clip engagement
Test with one module at a time to identify faulty RAM
Clear CMOS by removing battery and holding power button 30 seconds
Verify RAM compatibility with specific ProArt P16 model
AIDA64 for memory bandwidth and latency measurements
UserBenchmark for system-wide performance comparison
PassMark PerformanceTest for comprehensive analysis
Expected Performance Ranges:
DDR5-4800 Single Channel: ~38GB/s bandwidth
DDR5-4800 Dual Channel: ~76GB/s bandwidth
Latency: 80-100ns typical for professional applications
Performance scaling: 25-40% improvement dual vs single channel
🔮 Professional Capacity Planning
Workload-Based Planning:
32GB minimum for professional Windows 11 and creative apps
64GB recommended for 4K video editing and 3D work
128GB for 8K video, complex simulations, virtual machines
Consider application-specific requirements and project sizes
Future-Proofing Strategy:
DDR5 will remain relevant through 2026+ for professional use
Higher capacities provide more value than extreme speeds
Focus on capacity and stability over maximum frequency
Consider resale value with optimal RAM configuration
🎯 Ready to Optimize Your Professional Cooling?
With your Asus ProArt P16 memory upgraded for maximum creative performance, you're prepared to tackle thermal management. In the next section, we'll cover Cooling System Maintenance & Fan Replacement to ensure your workstation maintains peak performance during demanding rendering and computation tasks.
8. Cooling System Maintenance & Fan Replacement
❄️ Professional Thermal Management for Creative Workstations
The Asus ProArt P16 features an advanced cooling system designed to handle sustained professional workloads. Proper thermal management is critical for maintaining peak performance during extended rendering sessions, video editing, and 3D modeling without thermal throttling or component degradation.
⚠️ Professional Overheating Warning Signs
Performance Degradation:
System slowing down under sustained creative workloads
Unexpected shutdowns or blue screens during rendering
Applications freezing or crashing under GPU/CPU load
Reduced performance in benchmark comparisons
Audible & Physical Indicators:
Fans constantly running at high speed during normal operation
Grinding, rattling, or bearing noise from fan assemblies
Excessive heat from keyboard deck and exhaust vents
Weak or inconsistent airflow from ventilation ports
MSI Afterburner for GPU temperature and fan control
ProArt Creator Center for system-specific thermal management
Professional Stress Testing:
Prime95 for CPU thermal load testing
FurMark for GPU thermal stress testing
AIDA64 System Stability Test for comprehensive testing
Cinebench R23 for real-world creative workload simulation
🎯 Professional Temperature Targets
Component
Professional Idle Range
Normal Load Range
Maximum Safe Temperature
Throttle Point
Intel H-series CPU
40-50°C
75-90°C
100°C
95°C
NVIDIA RTX GPU
45-55°C
75-87°C
93°C
87°C
VRM Components
50-60°C
80-95°C
105°C
100°C
NVMe SSD
35-45°C
60-75°C
85°C
80°C
⚡ Professional Cooling Upgrades
Professional Aftermarket Solutions:
Professional laptop cooling pads with high-static pressure fans
Premium thermal pad upgrades for improved heat transfer
Copper shims for enhanced heatsink contact pressure
Liquid metal thermal compound (professional application only)
Professional Usage Optimizations:
CPU undervolting for reduced heat generation
Custom fan curves for optimal acoustic/performance balance
Power limit adjustments in BIOS or professional software
Workload scheduling to avoid sustained high temperatures
🎯 Ready to Address Professional Display Issues?
With your Asus ProArt P16 cooling system optimized for maximum performance, you're prepared to tackle display-related repairs. In the next section, we'll cover LCD Screen Replacement & Display Issues to restore the color-accurate, high-resolution display essential for professional creative work.
9. Keyboard Assembly Replacement & Key Repair
⌨️ Professional Keyboard Solutions for Creative Workflows
The Asus ProArt P16 features a premium keyboard designed for extended creative work sessions. Understanding professional keyboard repair techniques ensures optimal typing experience and maintains the workstation's professional capabilities for content creation and data entry tasks.
⚠️ Professional Keyboard Problem Indicators
Individual Key Malfunctions:
Specific keys not responding or intermittent operation
Keys sticking, repeating characters, or delayed response
Physical damage to keycaps or scissor mechanisms
Keys feeling loose, wobbly, or inconsistent actuation
Complete Keyboard Failure:
No keys functioning across entire keyboard
Keyboard not detected in Windows Device Manager
Backlight not working (on backlit professional models)
Spills or liquid damage affecting multiple key areas
Professional Feature Issues:
Dedicated creative shortcut keys not functioning
Backlight brightness control not working
Function key combinations not responding
Numpad keys inconsistent or non-responsive
🔍 Professional Keyboard Diagnostic Procedures
Diagnostic Method
Professional Procedure
Expected Results
Troubleshooting Steps
Software Keyboard Test
Use online keyboard tester or Windows On-Screen Keyboard
All keys register correctly in test application
Update drivers, check for software conflicts
BIOS Keyboard Test
F2 at startup → Advanced → Keyboard Test
All keys pass hardware-level testing
Hardware issue confirmed if keys fail in BIOS
External Keyboard Verification
Connect USB keyboard to test functionality
External keyboard works normally
Confirms internal keyboard hardware issue
Professional Physical Inspection
Visual check for damage, debris, or spill residue
Clean, undamaged keyboard assembly
Clean debris, replace damaged components
🔧 Professional Quick Key Repair Solutions
Sticking Key Resolution:
Gently lift keycap using professional keycap puller
Clean scissor mechanism with 99% isopropyl alcohol
Remove debris with compressed air and soft brush
Reinstall keycap ensuring proper alignment and clip engagement
Non-Responsive Single Key:
Test key in BIOS to confirm hardware-level issue
Check for physical obstruction under key mechanism
Inspect rubber dome for damage, wear, or contamination
Replace individual key mechanism if replacement available
Loose Keycap Resolution:
Remove keycap and inspect scissor clip integrity
Replace damaged scissor mechanism with genuine parts
Ensure proper alignment during professional reinstallation
Test key stability and actuation after repair completion
🛠️ Professional Keyboard Replacement Procedure
Professional Safety Preparation:
Power down ProArt P16 and disconnect all power sources
Remove battery and implement ESD protection measures
Gather professional tools: Phillips #00, plastic spudgers, tweezers
Have replacement keyboard ready (verify exact part number)
Professional Bezel Removal:
Remove bottom cover (10-12 Phillips #00 screws)
Disconnect battery from motherboard as safety precaution
Carefully pry up keyboard bezel starting from top edge
Work around perimeter releasing plastic clips systematically
Professional Keyboard Removal:
Locate keyboard ribbon cable connector on motherboard
Gently lift connector latch using plastic spudger tool
All keys must register consistently without missed strokes
Backlight should be even without dark spots or flickering
Key feel should be consistent across entire keyboard
No physical defects or alignment issues present
🎯 Ready to Address Professional Display Repairs?
With your Asus ProArt P16 keyboard restored to professional working condition, you're prepared to tackle display-related issues. In the next section, we'll cover LCD Screen Replacement & Display Issues to restore the color-accurate, high-resolution visual experience essential for professional creative work.
10. Where to Sell Your Repaired Asus ProArt P16
💰 Maximizing Professional Workstation Resale Value
After professionally repairing and upgrading your Asus ProArt P16, you can unlock significant resale value. This comprehensive guide covers premium selling platforms, professional pricing strategies, and enterprise-level sales techniques to maximize your return on this high-value creative workstation.
📈 ProArt P16 Professional Resale Value Analysis
Condition & Professional Upgrades
Base Market Value
After Professional Repair
Value Added
Professional ROI
Non-functional Unit
$600-900
$1800-2800
$1200-1900
200-311%
Minor Professional Issues
$1000-1500
$2200-3200
$1200-1700
120-170%
Fully Refurbished Pro
$1400-1900
$2600-3800
$1200-1900
86-129%
Premium Upgraded Configuration
$1600-2200
$3000-4500
$1400-2300
88-145%
🏆 Premium Professional Selling Platforms
Specialized Professional Electronics Buyers:
SellBroke - Premium electronics buyer with professional valuations
Department of Defense professional equipment sales
Federal agency technology refresh programs
State & Local Government:
State surplus property auctions (check state .gov websites)
Municipal government technology sales
Public broadcasting station equipment auctions
Government creative department equipment updates
Educational Institutions:
University media and design department surplus
Film school equipment upgrade programs
Community college technology refresh cycles
Educational foundation equipment auctions
🔧 Professional Pre-Sale Preparation
Professional Data Security:
Perform complete professional-grade data wipe
Use professional data destruction software for sensitive data
Remove all professional accounts and licensed software
Reinstall clean Windows 11 Pro with latest professional updates
Professional Physical Preparation:
Thorough professional cleaning of exterior and keyboard
Screen cleaning with professional-grade solutions
Minor professional cosmetic restoration if necessary
Gather all original professional accessories and documentation
Professional Documentation:
Create professional list of all upgrades and repairs performed
Document professional testing results and benchmarks
Prepare professional system specification sheet
Include professional warranty and support documentation
📦 Professional Shipping & Insurance
Professional Packaging Standards:
Use original professional packaging or premium shipping materials
Double-box with professional-grade padding and protection
Include anti-static bubble wrap and professional packing materials
Use "Professional Equipment" and "Fragile" labels prominently
Professional Shipping Insurance:
Purchase full professional value shipping insurance
Use trackable professional shipping with signature required
Document packaging process with photos for insurance claims
Consider registered mail for high-value professional equipment
🧾 Professional Tax & Business Considerations
Professional Consideration
Platform Impact
Reporting Threshold
Professional Documentation
IRS Form 1099-K
eBay, PayPal Professional
$600+ (2024+)
Professional sales records, cost basis documentation
Business Income Reporting
All professional platforms
$400+ net profit
Professional receipts, expense records, depreciation
Professional Equipment Sales
Business-to-business transactions
Varies by business structure
Business licenses, professional certifications
Capital Gains Considerations
High-value professional equipment
Varies by profit margin
Purchase receipts, professional improvement costs
📅 Professional Selling Timing Strategy
Optimal Professional Selling Periods:
August-September (educational and professional budget cycles)
January (post-holiday professional equipment upgrades)
Tax season (February-April professional purchases)
Before major professional product announcements
Suboptimal Professional Periods:
December (holiday shopping competition)
Summer months (reduced educational and professional purchasing)
Immediately after new professional model releases
Economic uncertainty periods
🎭 Professional Sales Presentation
Professional Trust Building Elements:
Detailed professional repair documentation with photos
Professional testing results and performance benchmarks
Clear professional warranty terms (90-180 days recommended)
Multiple professional contact methods and responsive communication
Professional Value-Added Services:
Professional shipping with full insurance coverage
Extended professional return windows (14-30 days)
Professional technical support during transition period
Professional accessory bundles (calibration tools, cases)
🎯 Your Professional Repair Journey Complete
Congratulations on mastering Asus ProArt P16 professional repairs and upgrades! You've not only developed valuable professional technical skills but also created significant value through your repair work. Whether you choose to continue using your enhanced professional workstation or sell it for profit, you now possess the expertise to maintain and optimize these premium creative tools for professional use.
Need to Sell Your Asus Laptop? Get Instant Cash!
If your ASUS ProArt P16 (or other ProArt workstation) has performance issues or you're upgrading to a newer mobile workstation, we offer premium cash payouts for your device. We buy broken, used, and refurbished ASUS ProArt laptops—including all P16 configurations—with free insured shipping and hassle-free evaluations.