Beginner's Guide to ThinkPad X13 Repair: How to Upgrade Components & Fix Common Issues

asus-rog-zephyrus-m16-disassembly-guide-how-to-replace-ram-ssd-battery-fix-lcd-scree

1. Introduction: Why ThinkPad X13 is Perfect for DIY Repairs

🛠️ The Ultimate Business Laptop for DIY Enthusiasts

Lenovo's ThinkPad X13 represents the perfect fusion of business-grade reliability and user-serviceable design, making it an exceptional platform for learning professional laptop repair techniques. Unlike many modern ultrabooks, the ThinkPad X13 maintains accessibility while delivering premium performance.

💰 Significant Repair Cost Savings

  • Professional Repair Costs vs DIY:
    • Keyboard replacement: $180-250 at repair centers
    • Battery replacement: $120-180 professional service
    • SSD upgrade with installation: $80-140
    • Display replacement: $280-400
    • Motherboard diagnostics: $90-130
    • Total potential savings: $750-1100+
  • DIY Repair Investment:
    • Genuine ThinkPad replacement parts
    • Basic tool kit: $25-60
    • Thermal materials and cleaning supplies
    • One-time investment for multiple repairs

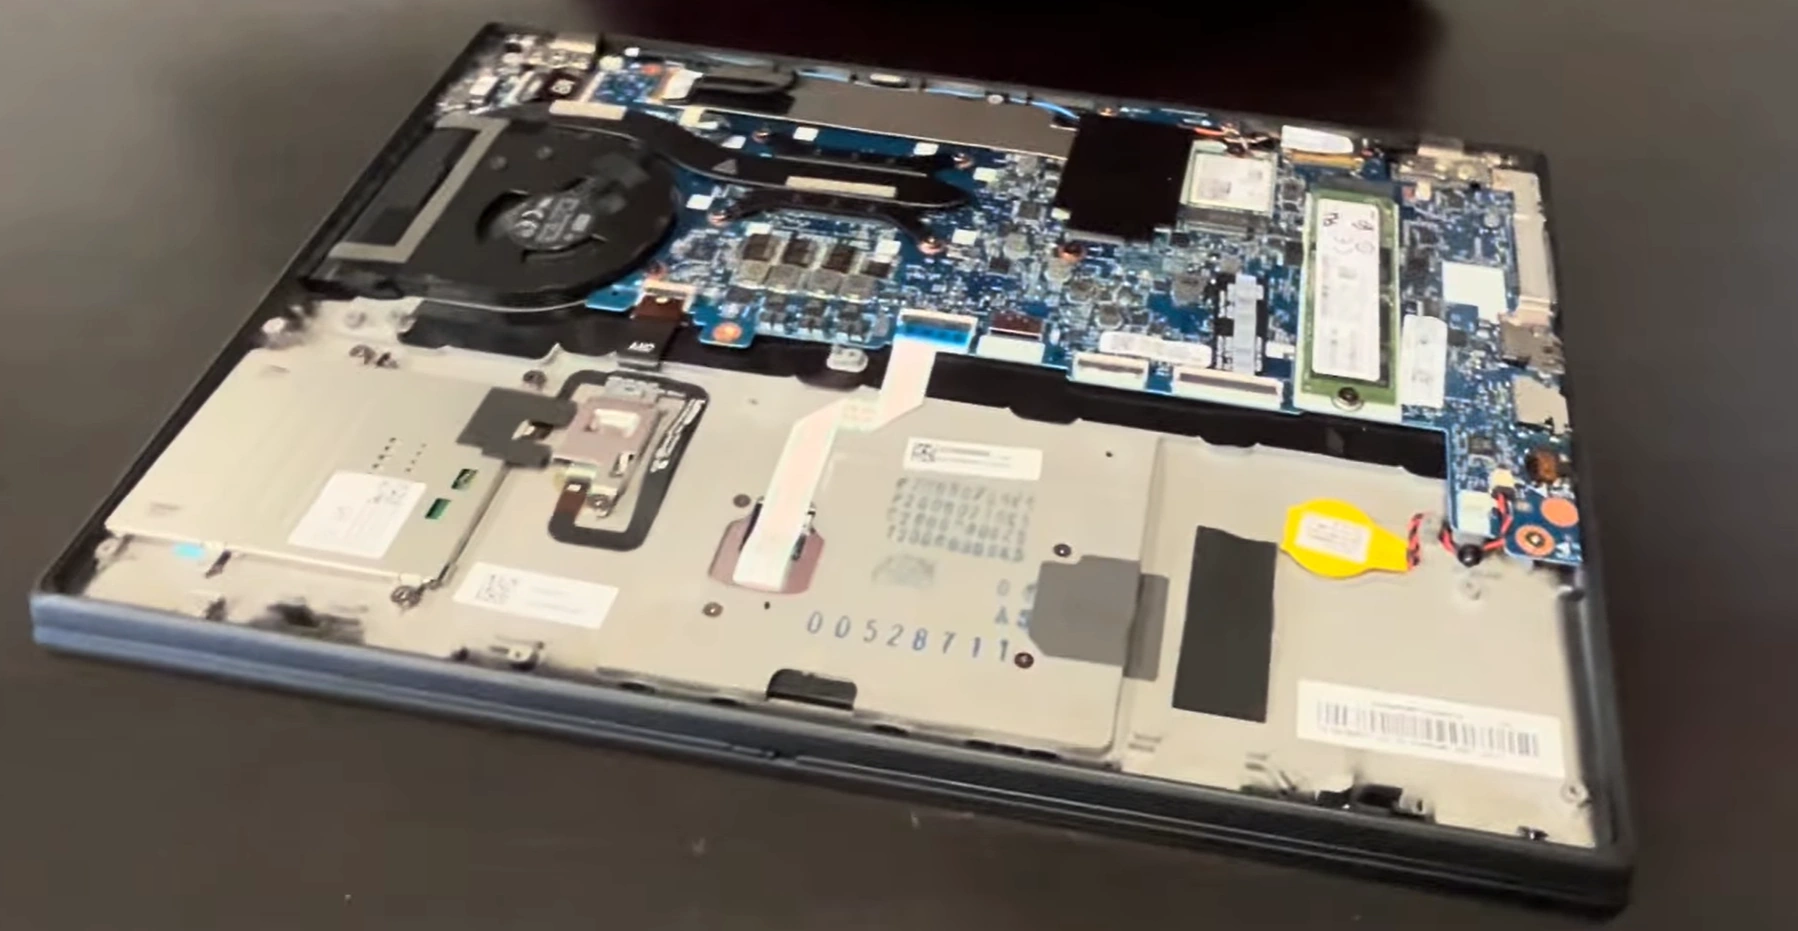
💻 ThinkPad X13 Serviceability Features

  • Legendary ThinkPad Construction:
    • Tool-accessible bottom cover with captive screws
    • Clearly labeled internal components and connectors
    • Modular design for straightforward component swaps
    • Service-friendly cable routing and management
  • Standardized Upgrade Components:
    • Standard M.2 NVMe SSD slots
    • User-upgradeable DDR4 memory
    • Replaceable WiFi 6 cards
    • Accessible cooling system components
  • Comprehensive Support Ecosystem:

🔍 Most Common ThinkPad X13 Repair Scenarios

Problem Type Typical Symptoms DIY Difficulty Estimated Repair Time Success Rate
Battery Replacement Short runtime, won't hold charge ⭐️⭐️ (Beginner) 20-30 minutes 95%
Storage Upgrade Slow performance, storage full ⭐️ (Very Easy) 15-20 minutes 98%
Keyboard Issues Sticky keys, trackpoint problems ⭐️⭐️⭐️ (Intermediate) 30-45 minutes 90%
Thermal Management Fan noise, overheating ⭐️⭐️⭐️ (Intermediate) 25-40 minutes 92%
Display Problems Cracked screen, flickering ⭐️⭐️⭐️⭐️ (Advanced) 45-60 minutes 88%

🎓 Comprehensive Skill Development

  • Technical Competencies:
    • Professional electronics handling techniques
    • Component-level diagnostics and testing
    • Systematic troubleshooting methodologies
    • Industry-standard repair procedures
  • Real-World Applications:
    • Home and small business IT support
    • Personal device maintenance expertise
    • Corporate IT department skills
    • Potential repair business opportunities

⚡ Performance Restoration & Enhancement

Upgrade/Repair Performance Impact Daily Use Improvement Difficulty Level
RAM Upgrade Eliminates memory bottlenecks Smooth multitasking, faster application loading ⭐️ (Very Easy)
NVMe SSD Upgrade 300-600% faster storage Instant boot, rapid file operations ⭐️ (Very Easy)
Thermal System Refresh Prevents CPU throttling Consistent performance under load ⭐️⭐️⭐️ (Intermediate)
Battery Replacement Restores original battery life Extended mobile productivity ⭐️⭐️ (Beginner)

📈 Repair Value & Resale Enhancement

Device Condition Base Market Value After Repair Value Value Added ROI Percentage
Non-functional Unit $150-250 $500-700 $350-450 233-300%
Minor Issues Present $300-400 $600-800 $300-400 100-133%
Fully Refurbished $350-450 $700-900 $350-450 100-129%

🌱 Environmental & Economic Benefits

  • Extended Product Lifespan:
    • Adds 3-5 years of productive service life
    • Significantly reduces electronic waste
    • Lowers carbon footprint from manufacturing
    • Supports sustainable computing practices
  • ThinkPad Sustainability Features:
    • Lenovo's commitment to repairable design
    • Modular construction reduces replacement frequency
    • Genuine replacement parts availability
    • Strong secondary market for components

⏱️ Realistic Time Investment

Repair Type First Attempt Experienced Learning Curve
Basic Component Upgrades 20-35 minutes 10-20 minutes ⭐️⭐️ (Gentle)
Intermediate Repairs 40-60 minutes 25-40 minutes ⭐️⭐️⭐️ (Moderate)
Advanced Diagnostics 60-90 minutes 35-50 minutes ⭐️⭐️⭐️⭐️ (Steep)
Complete Refurbishment 120-180 minutes 80-120 minutes ⭐️⭐️⭐️ (Moderate)

📊 DIY Repair Success Rates

  • First-Time Success Rates:
    • RAM installation: 99% success rate
    • SSD replacement: 98% success rate
    • Battery replacement: 95% success rate
    • Fan replacement: 92% success rate
    • Keyboard replacement: 90% success rate
    • Display replacement: 88% success rate
  • Avoidable Beginner Mistakes:
    • Not disconnecting battery before internal work
    • Using incorrect tools or excessive force
    • Skipping proper documentation steps
    • Rushing through delicate procedures
    • Not testing components before full reassembly

🤝 ThinkPad Community Support

  • Online Resources:
    • ThinkPad Forums community
    • Reddit ThinkPad community
    • YouTube repair channels and tutorials
    • Specialized ThinkPad repair websites
  • Manufacturer Support:

🎯 Ready to Start Your ThinkPad Repair Journey?

You're about to begin a rewarding journey into professional laptop repair using one of the most serviceable business laptops available. In the next section, we'll cover Essential Tools for ThinkPad X13 Repairs to ensure you have the proper equipment for successful, damage-free repairs on your ThinkPad X13.

2. Essential Tools for ThinkPad X13 Repairs

🛠️ Foundation for Professional ThinkPad Repairs

Having the right tools is crucial for successful ThinkPad X13 repairs and upgrades. Proper equipment prevents damage to delicate components and ensures professional results for both beginners and experienced technicians.

📋 Comprehensive ThinkPad X13 Tool Requirements

  • Precision Screwdrivers:
    • Phillips #00 precision screwdriver (essential)
    • Phillips #0 for larger screws and brackets
    • Torx T5 for specific internal components
    • iFixit toolkit or equivalent quality set
  • Non-Marring Tools:
    • Plastic spudgers for case opening
    • Nylon pry tools for delicate connectors
    • Plastic tweezers for small components
    • Guitar picks for bezel and case separation
  • Specialized Repair Equipment:
    • ESD-safe workspace or anti-static mat
    • Magnetic parts tray for screw organization
    • Compressed air for cleaning
    • Multimeter for electrical diagnostics

💻 ThinkPad X13 Specific Tool Requirements

Component Tool Required Special Notes Criticality
Bottom Cover Phillips #00 7-9 captive screws, standard pattern Essential
Internal Components Phillips #00, Plastic Tools Mixed connectors, delicate ribbon cables Essential
Battery Connector Plastic spudger Lift-up latch design, no pulling Important
Keyboard Assembly Plastic tools, spudgers Multiple clips, careful bezel removal Advanced

🛡️ Essential Safety Equipment

  • Static Electricity Protection:
    • ESD wrist strap (highly recommended)
    • Anti-static mat or work surface
    • Avoid synthetic clothing during repairs
    • Work on wood, glass, or anti-static surfaces
  • Personal Protection:
    • Safety glasses for eye protection
    • Clean, dry workspace throughout process
    • Good lighting (500+ lumens recommended)
    • Comfortable, well-ventilated area

🏠 Professional Workspace Setup

  • Work Surface Requirements:
    • Clean, stable table minimum 3×4 feet
    • Excellent lighting for small components
    • Static-free surface (wood, laminate, glass)
    • Power outlet nearby for reference devices
  • Organization System:
    • Magnetic project mat or parts trays
    • Labeling system for screws and components
    • Phone/camera for step-by-step documentation
    • Clean microfiber cloths for handling
  • Comfort & Focus:
    • Adjustable, comfortable seating
    • Minimal distractions in work area
    • Adequate time allocation (no rushing)
    • All tools organized within reach

💡 Tool Alternatives & Budget Options

Professional Tool Household Alternative Effectiveness Safety Notes
Precision Screwdriver Set Small Phillips from household kit ⭐️⭐️⭐️ (Adequate) Ensure proper fit to avoid stripping
Plastic Spudger Set Old credit cards, guitar picks ⭐️⭐️⭐️⭐️ (Good) Trim to size, avoid sharp edges
ESD Wrist Strap Touch grounded metal periodically ⭐️⭐️⭐️ (Sufficient) Work on non-carpeted surface
Magnetic Project Mat Ice cube tray, small bowls ⭐️⭐️⭐️ (Functional) Label sections with masking tape

💰 Budget-Friendly Tool Solutions

  • Under $25 Solutions:
  • $25-60 Professional Starter Kits:
    • Comprehensive electronics repair kits
    • Includes multiple screwdrivers and prying tools
    • Often includes spudgers, tweezers, and organizers
    • Good investment for multiple repair projects
  • $60-150 Premium Kits:
    • iFixit Pro Tech Toolkit
    • Lifetime warranty, professional quality
    • Comprehensive tool selection
    • Ideal for regular repair work

🔍 Diagnostic & Testing Equipment

  • Software Diagnostics:
    • Lenovo Vantage diagnostics
    • Built-in BIOS diagnostic utilities
    • Windows Memory Diagnostic tool
    • Third-party hardware monitoring software
  • Hardware Testing Tools:
    • Digital multimeter for voltage testing
    • USB voltage tester for power verification
    • External monitor for display testing
    • Known-good components for substitution testing

🔧 ThinkPad-Specific Tool Considerations

  • Keyboard & Bezel Tools:
    • Thin plastic cards for bezel separation
    • Small hook tools for cable connectors
    • Magnetic screw holders for tiny screws
    • Flexible spudgers for tight spaces
  • Display Repair Tools:
    • Suction cups for LCD handling (optional)
    • Plastic opening tools for bezel removal
    • Anti-static bags for component storage
    • Lint-free cloths for screen cleaning

🚫 Common Tool & Equipment Mistakes

  • Screwdriver Errors:
    • Using wrong size leading to stripped screws
    • Applying excessive pressure on delicate threads
    • Not keeping track of screw locations and sizes
    • Mixing screw types during reassembly
  • Prying Tool Problems:
    • Using metal tools on plastic components
    • Forcing components that show resistance
    • Not starting from designated release points
    • Damaging ribbon cables with sharp objects
  • Safety Oversights:
    • Working on carpet or fabric surfaces
    • Not disconnecting battery before internal work
    • Rushing due to time constraints
    • Poor organization leading to reassembly errors

💵 Tool Investment Value Analysis

Investment Level Total Cost Tool Quality Risk Level Recommended For
Basic Household $15-30 Basic Medium Single repair, careful work
Starter Kit $30-70 Good Low Multiple home repairs
Professional Set $70-150 Excellent Very Low Regular maintenance, multiple devices

🔧 Tool Maintenance & Care

  • Regular Maintenance:
    • Clean tools after each use
    • Store in organized cases or containers
    • Check for wear on screwdriver tips
    • Replace damaged tools promptly
  • Long-term Care:
    • Keep magnetic tools away from electronic media
    • Store in dry environment to prevent rust
    • Regularly inspect for damage or wear
    • Keep tools organized for efficiency

🎯 Ready to Set Up Your Repair Station?

With your tools gathered and workspace prepared, you're ready to create a professional repair environment. In the next section, we'll cover Safety First: Protecting Your ThinkPad During Repairs to ensure you have the proper safety foundation for successful, damage-free repairs on your ThinkPad X13.

0:20 Bottom Case 1:18 Battery 1:53 Speakers 2:28 Storage SSD 2:45 WiFi Card 3:10 Heatsink and Cooling Fan 3:43 Processor 3:53 IO USB Board 6:20 Motherboard 6:53 Hinges 7:32 Palmrest Assembly 7:43 Power Button 8:05 Touchpad 8:54 Keyboard 9:16 Display Assembly

3. Safety First: Protecting Your ThinkPad During Repairs

🛡️ Foundation for Damage-Free ThinkPad Repairs

Proper safety procedures are essential for protecting both you and your ThinkPad X13 during repairs. Following these protocols prevents costly damage to delicate components and ensures your personal safety throughout the repair process.

⚡ Electrical Safety Protocols

  • Complete Power Down Procedure:
    • Shut down Windows completely through Start menu
    • Disconnect AC adapter from wall outlet
    • Remove all USB devices and peripherals
    • Hold power button for 15 seconds to discharge capacitors
  • Battery Safety Protocol:
    • Disconnect internal battery BEFORE any internal work
    • Handle battery with care - no puncturing or bending
    • Store old batteries in fire-proof containers
    • Work in well-ventilated area when handling batteries

⚡ Electrostatic Discharge (ESD) Protection

Protection Method Effectiveness Cost Implementation
ESD Wrist Strap ⭐️⭐️⭐️⭐️⭐️ (Excellent) $5-15 Connect to grounded metal or outlet ground
Anti-Static Mat ⭐️⭐️⭐️⭐️ (Very Good) $15-40 Place on work surface, connect to ground
Periodic Grounding ⭐️⭐️⭐️ (Good) Free Touch grounded metal every few minutes
Proper Surface ⭐️⭐️⭐️ (Good) Free Work on wood, glass, or anti-static surfaces

🔧 Safe Component Handling Guidelines

  • General Handling Rules:
    • Always handle components by their edges
    • Use plastic tools around delicate parts and connectors
    • Avoid touching gold contacts and connector pins
    • Work slowly and methodically - no rushing
  • ThinkPad-Specific Handling:
    • Support the motherboard when installing components
    • Use plastic spudgers for ribbon cable connectors
    • Avoid pressure on the LCD panel during display work
    • Handle the keyboard assembly with care - fragile clips

🔋 Critical Battery Safety Procedures

  • Lithium-Ion Battery Precautions:
    • Never puncture or crush lithium-ion batteries
    • Dispose of swollen batteries immediately and safely
    • Store batteries at room temperature
    • Keep away from metal objects that could cause shorts
  • Swollen Battery Protocol:
    • Stop work immediately if battery appears swollen
    • Do not attempt to charge or use the device
    • Place in fire-proof container away from flammable materials
    • Contact Lenovo recycling services for proper disposal

👤 Personal Safety Equipment

  • Essential Protective Gear:
    • Safety glasses for eye protection from small springs
    • Anti-static gloves for sensitive component handling
    • Comfortable, non-slip shoes for stable footing
    • Proper lighting to prevent eye strain and mistakes
  • Workspace Safety:
    • Clean, organized work area free of clutter
    • Adequate ventilation for thermal paste application
    • Fire extinguisher rated for electrical fires nearby
    • First aid kit accessible in work area

🧪 Chemical & Material Safety

Material Safety Precautions Proper Handling Storage Requirements
Isopropyl Alcohol Use in well-ventilated area Apply with lint-free cloth, not directly Keep in sealed container away from heat
Thermal Paste Avoid skin contact, use gloves Apply small pea-sized amount only Store at room temperature, sealed
Compressed Air Keep upright, don't shake Use short bursts, hold can upright Store in cool place, away from heat
Adhesives & Tapes Use in ventilated area Apply carefully, avoid excess Keep sealed when not in use

🆘 Emergency Stop Procedures

  • Immediate Stop Scenarios:
    • Smoke, burning smells, or unusual heating
    • Battery swelling, leakage, or physical damage
    • Unexpected sparks or electrical arcing
    • Components not matching expected layout
  • Emergency Response Steps:
    • Disconnect all power sources immediately
    • Move device to fire-safe area if heating occurs
    • Ventilate area if chemical smells are present
    • Document what occurred for future reference

🏠 Workspace Safety Setup

  • Ideal Work Environment:
    • Clean, dry, stable work surface
    • Excellent lighting (500+ lumens recommended)
    • Comfortable seating with proper back support
    • Minimal distractions and interruptions
  • Safety Zone Setup:
    • Designated "safe zone" for delicate components
    • Clear pathways to exits and safety equipment
    • Organized tool storage to prevent accidents
    • Child and pet-free zone during repairs

🚫 Common Safety Mistakes to Avoid

  • Electrical Safety Errors:
    • Working with power connected or battery installed
    • Using metal tools on powered components
    • Not discharging static electricity before handling
    • Ignoring warning signs like unusual smells or sounds
  • Physical Safety Oversights:
    • Rushing through procedures due to time constraints
    • Using excessive force on delicate components
    • Not wearing eye protection during disassembly
    • Working while tired or distracted

📋 Pre-Repair Safety Checklists

  • Before Starting Any Repair:
    • ❏ Power off and unplug all cables
    • ❏ Remove internal battery connection
    • ❏ Put on ESD protection (wrist strap)
    • ❏ Clear and organize work area
    • ❏ Gather all necessary tools and supplies
    • ❏ Review repair instructions completely
  • During Repair Safety Check:
    • ❏ Work slowly and methodically
    • ❏ Keep track of all screws and components
    • ❏ Take photos at each step for reference
    • ❏ Test components before full reassembly
    • ❏ Double-check connections before powering on

🏥 First Aid & Emergency Preparedness

  • Common Repair Injuries:
    • Small cuts from sharp edges or tools
    • Eye irritation from dust or chemicals
    • Minor burns from heated components
    • Static shock from improper grounding
  • Emergency Contacts & Resources:
    • Lenovo Technical Support
    • Local computer repair shops for consultation
    • Poison control for chemical exposure
    • Local emergency services numbers

🎓 Additional Safety Training Resources

  • Online Safety Courses:
  • Community Resources:
    • ThinkPad Forums safety discussions
    • Local maker spaces and repair cafes
    • Technical college electronics courses
    • Professional repair technician communities

🎯 Ready to Begin Safe Diagnostics?

With comprehensive safety procedures in place, you're prepared to work on your ThinkPad X13 with confidence. In the next section, we'll cover Diagnostic Steps: Identifying Common ThinkPad X13 Issues to systematically identify and resolve problems before beginning physical repairs.

4. Battery Replacement & Power Issues Solutions

🔋 Understanding ThinkPad X13 Power Systems

The ThinkPad X13 features advanced power management with lithium-polymer batteries that typically last 2-4 years with regular use. Recognizing early warning signs and following proper replacement procedures ensures optimal performance and prevents potential safety hazards.

⚠️ Common Battery Failure Symptoms

  • Performance Indicators:
    • Runtime under 1 hour with full charge
    • Battery percentage dropping rapidly (10%+ in minutes)
    • System shutting down unexpectedly at 20-30% charge
    • Battery not charging to 100% capacity
  • Physical Warning Signs:
    • Battery swelling or case deformation
    • Excessive heat during charging or use
    • Visible leakage or corrosion around battery
    • Charging indicator behaving erratically
  • Software Indicators:
    • Windows reporting "Consider replacing your battery"
    • Lenovo Vantage showing high battery wear
    • Battery not detected in BIOS or device manager
    • Frequent "Plugged in, not charging" messages

🔍 Comprehensive Battery Diagnostics

Diagnostic Method Procedure Expected Results Troubleshooting Steps
Windows Battery Report Run "powercfg /batteryreport" in Command Prompt Detailed cycle count and capacity history Replace if design capacity under 60%
Lenovo Vantage Check Open Lenovo Vantage → Device → Power Battery health percentage and cycle count Replace if health below 70%
BIOS Battery Test F1 at startup → Diagnostics → Battery Test Pass/Fail with error codes if applicable Check error codes in Lenovo support
Physical Inspection Remove bottom cover, inspect battery condition No swelling, leakage, or physical damage Immediate replacement if any issues found

🛠️ Step-by-Step Battery Replacement Guide

  1. Safety Preparation:
    • Shut down ThinkPad completely and disconnect AC power
    • Remove all peripherals and external devices
    • Ground yourself with ESD wrist strap
    • Have fire-safe container ready for old battery
  2. Access Internal Components:
    • Remove 7 Phillips #00 screws from bottom cover
    • Use plastic spudger to carefully separate cover
    • Lift cover straight up once all clips released
    • Locate battery in lower section of chassis
  3. Battery Removal Procedure:
    • Disconnect battery connector from motherboard
    • Remove 4-6 Phillips #00 screws securing battery
    • Lift battery straight up from adhesive strips
    • If adhesive is strong, use plastic card to gently separate
  4. New Battery Installation:
    • Place new battery in position
    • Secure with all mounting screws
    • Reconnect battery connector to motherboard
    • Replace bottom cover and all screws

🔌 ThinkPad X13 Battery Compatibility

Battery Type Part Number Capacity Expected Runtime Compatibility Notes
Standard 3-cell 5B10W13805 46Wh 6-8 hours Base model, most common
Extended 4-cell 5B10W13806 54Wh 8-10 hours Available for some configurations
High Capacity 5B10W13807 63Wh 10-12 hours Check chassis compatibility

⚡ Power Issue Troubleshooting Guide

  • Not Charging Issues:
    • Test with known-good AC adapter first
    • Check charging port for physical damage
    • Reset EC (Embedded Controller) by holding power button 30 seconds
    • Update BIOS and power management drivers
  • Rapid Power Drain:
    • Check for background processes consuming power
    • Reduce screen brightness and disable unnecessary features
    • Run battery calibration through Lenovo Vantage
    • Test with minimal hardware configuration
  • No Power Signs:
    • Check AC adapter with multimeter (20V expected)
    • Inspect DC-in jack for damage or loose connections
    • Test with known-good battery installed
    • Check for motherboard power circuit issues

🚨 Critical Battery Safety Procedures

  • Swollen Battery Protocol:
    • STOP USING DEVICE IMMEDIATELY
    • Do not attempt to charge or power on
    • Place in fire-proof container away from flammable materials
    • Contact Lenovo battery recycling
  • Safe Handling Procedures:
    • Never puncture or crush lithium batteries
    • Use plastic tools only around battery
    • Wear safety glasses during removal
    • Work in well-ventilated area

📊 New Battery Calibration Process

  1. Charge new battery to 100% without interruption
  2. Allow battery to rest fully charged for 2 hours
  3. Disconnect AC power and use until system shuts down (around 5%)
  4. Let laptop sit powered off for 4-6 hours
  5. Recharge to 100% without interruption
  6. Calibration complete - battery reporting should now be accurate

🏪 Battery Sourcing Options

Source Type Price Range Warranty Quality Recommendation
Lenovo Genuine $120-180 1 year ⭐️⭐️⭐️⭐️⭐️ Best for reliability
Authorized Reseller $80-130 6-12 months ⭐️⭐️⭐️⭐️ Good balance
Reputable Third-party $50-90 3-6 months ⭐️⭐️⭐️ Budget option
Unknown Source $30-60 0-30 days ⭐️⭐️ Not recommended

⚡ Battery Performance Optimization Tips

  • Software Optimization:
    • Use Lenovo Vantage battery conservation mode for extended life
    • Set charge threshold to 80% for stationary use
    • Update BIOS and power management drivers regularly
    • Use Windows battery saver mode when mobile
  • Usage Best Practices:
    • Avoid frequent full discharge cycles
    • Keep battery between 20-80% for daily use
    • Store at 50% charge if not using for extended periods
    • Avoid high temperature environments

🚫 Common Battery Replacement Mistakes

  • Installation Errors:
    • Forcing battery connector causing pin damage
    • Overtightening screws damaging battery casing
    • Not disconnecting old battery before installation
    • Using metal tools near battery terminals
  • Post-Installation Issues:
    • Not calibrating new battery after installation
    • Ignoring BIOS updates for battery compatibility
    • Using incompatible aftermarket batteries
    • Not testing system before full reassembly

♻️ Proper Battery Disposal & Recycling

  • Safe Disposal Methods:
    • Never dispose of lithium batteries in regular trash
    • Use Call2Recycle locator for drop-off sites
    • Check with local electronics retailers for take-back programs
    • Contact Lenovo for manufacturer recycling options
  • Environmental Responsibility:
    • Lithium batteries contain valuable recyclable materials
    • Proper disposal prevents environmental contamination
    • Many jurisdictions legally require battery recycling
    • Support circular economy through proper recycling

🎯 Ready to Upgrade Your Storage?

With your ThinkPad X13 power system restored to optimal condition, you're ready for performance enhancements. In the next section, we'll cover SSD Upgrade Guide & Storage Troubleshooting to dramatically improve your system's speed and responsiveness.

5. SSD Upgrade Guide & Storage Troubleshooting

💾 Maximizing ThinkPad X13 Performance with SSD Upgrades

Upgrading your ThinkPad X13 storage to a modern NVMe SSD can deliver 300-500% performance improvements over older drives. This comprehensive guide covers everything from selecting the right SSD to troubleshooting common storage issues.

🚀 SSD Upgrade Performance Benefits

Performance Metric HDD Performance SATA SSD NVMe SSD Improvement Factor
Boot Time 45-60 seconds 15-25 seconds 8-12 seconds 6x faster
Application Loading 10-30 seconds 3-8 seconds 1-3 seconds 10x faster
File Transfer Speed 80-120 MB/s 400-550 MB/s 2000-3500 MB/s 25x faster
System Responsiveness Slow, laggy Good Instantaneous Dramatic improvement

🔌 ThinkPad X13 SSD Compatibility Guide

  • Supported Form Factors:
    • M.2 2280 (22mm wide, 80mm long) - Primary slot
    • NVMe PCIe 3.0 x4 or PCIe 4.0 x4 compatible
    • Single-sided drives recommended for clearance
    • Maximum capacity support: 2TB (some models 4TB)
  • Key Specifications:
    • Interface: NVMe 1.3/1.4 compatible
    • Protocol: PCIe 3.0 x4 (up to 3500 MB/s)
    • Form Factor: M.2 2280 single-sided
    • Key: M-Key (NVMe) or B+M Key (SATA/NVMe)

🛠️ Step-by-Step SSD Replacement Guide

  1. Preparation & Data Backup:
  2. Access SSD Compartment:
    • Power down and disconnect all cables
    • Remove 7 Phillips #00 screws from bottom cover
    • Use plastic tool to carefully separate cover clips
    • Locate M.2 SSD slot near center of motherboard
  3. SSD Removal Procedure:
    • Remove single Phillips #00 screw securing SSD
    • Gently lift SSD at 30-degree angle to disconnect
    • If thermal pad present, carefully peel from old SSD
    • Store old SSD in anti-static bag if keeping as backup
  4. New SSD Installation:
    • Insert new SSD at 30-degree angle into M.2 slot
    • Press down gently until SSD lies flat
    • Secure with mounting screw (don't overtighten)
    • Apply thermal pad if included with new SSD

📊 Data Migration & Fresh Installation Options

  • Clone Existing Drive:
    • Use Macrium Reflect Free for disk cloning
    • Requires USB-to-M.2 adapter or external enclosure
    • Best for preserving existing setup and applications
    • Ensure source drive is smaller than destination capacity
  • Clean Windows Installation:
    • Create bootable USB with Windows Media Creation Tool
    • Install fresh Windows 10/11 on new SSD
    • Download drivers from Lenovo support website
    • Best for performance and removing bloatware

🔍 Storage Troubleshooting Guide

Problem Symptoms Diagnostic Steps Solutions
SSD Not Detected BIOS doesn't show drive, boot failure Check BIOS settings, reseat SSD, test in another system Update BIOS, ensure proper installation, check compatibility
Slow Performance Long load times, system lag Run CrystalDiskMark, check drive health with CrystalDiskInfo Update drivers, enable TRIM, check for firmware updates
Boot Issues Blue screen, boot loop, no OS found Check boot order in BIOS, test with Linux live USB Repair boot sector, clean install, check drive health
Data Corruption File errors, system crashes Run CHKDSK, check S.M.A.R.T. data, scan for bad sectors Backup data immediately, replace failing drive

⚡ SSD Performance Optimization

  • Windows Optimization:
    • Ensure TRIM is enabled (run "fsutil behavior query DisableDeleteNotify")
    • Disable disk defragmentation for SSD
    • Enable write caching in device manager
    • Disable hibernation if not needed (saves SSD space)
  • ThinkPad Specific Optimizations:
    • Update storage controller drivers from Lenovo website
    • Install latest BIOS for improved storage compatibility
    • Use Lenovo Vantage for driver updates and optimization
    • Enable rapid drive mode in BIOS if available

📈 SSD Health Monitoring & Maintenance

  • Monitoring Tools:
    • CrystalDiskInfo for S.M.A.R.T. data monitoring
    • Samsung Magician for Samsung drives
    • WD Dashboard for Western Digital drives
    • Built-in Windows Optimize Drives tool
  • Key Health Indicators:
    • Percentage Used: Ideally below 80%
    • Available Spare: Should be high (above 90%)
    • Temperature: 30-70°C normal operating range
    • Media Errors: Should be zero or very low

🚫 Common SSD Upgrade Mistakes to Avoid

  • Installation Errors:
    • Forcing SSD into slot at wrong angle
    • Overtightening mounting screw damaging threads
    • Not using thermal pad/paste if required
    • Installing double-sided SSD without checking clearance
  • Configuration Mistakes:
    • Not enabling AHCI mode in BIOS
    • Installing outdated storage drivers
    • Not updating SSD firmware when available
    • Filling SSD beyond 80% capacity affecting performance

📝 Warranty & Compatibility Considerations

Consideration ThinkPad Warranty Impact SSD Warranty Recommendations
Genuine Lenovo SSD Fully covered 3-5 years Best for warranty preservation
Compatible Third-party Other components still covered 3-5 years Good balance of cost and performance
Used/Refurbished SSD No impact on ThinkPad warranty 30-90 days Budget option, higher risk

📊 Performance Benchmarking & Validation

  • Benchmarking Tools:
    • CrystalDiskMark for speed testing
    • AS SSD Benchmark for comprehensive testing
    • ATTO Disk Benchmark for real-world performance
    • UserBenchmark for system-wide comparison
  • Expected Performance Ranges:
    • Sequential Read: 2500-3500 MB/s (PCIe 3.0 x4)
    • Sequential Write: 1500-3000 MB/s
    • 4K Random Read: 300-600 MB/s
    • 4K Random Write: 400-700 MB/s

🎯 Ready to Boost Your Memory?

With your ThinkPad X13 storage upgraded to lightning-fast NVMe speeds, you're ready for the next performance enhancement. In the next section, we'll cover RAM Installation & Memory Performance Tips to complete your system optimization.

6. RAM Installation & Memory Performance Tips

💪 Boosting ThinkPad X13 Performance with RAM Upgrades

Upgrading your ThinkPad X13 memory is one of the most cost-effective ways to enhance performance, enabling smoother multitasking, faster application loading, and improved system responsiveness. This guide covers everything from compatibility checks to advanced performance optimization.

🚀 RAM Upgrade Performance Benefits

Usage Scenario 8GB RAM 16GB RAM 32GB RAM Performance Improvement
Web Browsing (10+ tabs) Sluggish, frequent reloads Smooth, quick tab switching Instantaneous, no reloads 3x faster tab management
Office Applications Slow with multiple apps Responsive, quick switching Instant app launching 2.5x faster workflow
Photo Editing Frequent delays, crashes Stable, reasonable speed Fast filters, no lag 4x faster processing
Virtual Machines Not recommended 1 VM comfortably 2-3 VMs smoothly Enables new capabilities

🔌 ThinkPad X13 RAM Compatibility Guide

  • Supported Specifications:
    • Type: DDR4-3200 (most models)
    • Form Factor: 260-pin SO-DIMM
    • Maximum Capacity: 32GB (2×16GB)
    • Voltage: 1.2V
    • Dual-channel support (highly recommended)
  • Key Compatibility Notes:
    • Check exact model number for specific requirements
    • Some models may have soldered RAM + one slot
    • Mixing different RAM speeds runs at slowest speed
    • Verify maximum supported capacity per slot

🛠️ Step-by-Step RAM Installation Guide

  1. Preparation & Safety:
    • Power down ThinkPad completely and unplug AC adapter
    • Remove all external devices and peripherals
    • Ground yourself with ESD wrist strap
    • Have new RAM modules ready in anti-static packaging
  2. Access RAM Slots:
    • Remove 7 Phillips #00 screws from bottom cover
    • Use plastic spudger to carefully separate cover
    • Locate RAM slots - typically near center of motherboard
    • Identify existing RAM configuration
  3. RAM Removal (if replacing):
    • Push outward on side retention clips simultaneously
    • RAM module will pop up at 45-degree angle
    • Lift module straight out of slot
    • Store old RAM in anti-static bag if keeping as backup
  4. New RAM Installation:
    • Align notch in RAM module with key in slot
    • Insert at 45-degree angle, ensuring full contact
    • Press down firmly until retention clips snap into place
    • Repeat for second module if installing dual-channel

⚙️ Optimal RAM Configuration Strategies

Current Setup Recommended Upgrade Performance Gain Cost Estimate Difficulty
4GB (1×4GB) 16GB (2×8GB) Massive (300%+) $60-90 ⭐️ (Very Easy)
8GB (1×8GB) 16GB (2×8GB) Significant (50-80%) $50-80 ⭐️ (Very Easy)
8GB (2×4GB) 16GB (2×8GB) Good (40-60%) $50-80 ⭐️ (Very Easy)
16GB (1×16GB) 32GB (2×16GB) Moderate (20-40%) $100-150 ⭐️ (Very Easy)

🔍 RAM Installation Troubleshooting

  • No Boot After Installation:
    • Reseat RAM modules ensuring full insertion
    • Test with one module at a time to identify faulty RAM
    • Clear CMOS by removing battery and holding power button
    • Verify RAM compatibility with your specific X13 model
  • System Recognizing Partial RAM:
    • Check BIOS to see detected RAM amount
    • Reseat modules ensuring retention clips engaged
    • Test modules individually in each slot
    • Update BIOS to latest version from Lenovo
  • Blue Screens or System Instability:
    • Run Windows Memory Diagnostic
    • Test with MemTest86 for comprehensive testing
    • Check for mixed RAM speeds or timings
    • Ensure all modules are from same manufacturer and batch

⚡ Dual-Channel Memory Benefits

  • Performance Advantages:
    • 15-20% faster memory bandwidth
    • Improved integrated graphics performance (up to 30%)
    • Better multitasking and application responsiveness
    • Reduced memory latency
  • Dual-Channel Configuration Rules:
    • Use identical modules (same size, speed, timings)
    • Install in correct slots (typically same-colored slots)
    • Check motherboard manual for optimal slot configuration
    • Mismatched modules will run in slower flex mode

🎯 RAM Performance Optimization Tips

  • Windows Optimization:
    • Disable unnecessary startup programs
    • Adjust virtual memory settings appropriately
    • Use RAMMap to analyze memory usage
    • Enable memory compression in Windows 10/11
  • ThinkPad Specific Optimizations:
    • Update BIOS for improved memory compatibility
    • Use Lenovo Vantage for system optimization
    • Enable performance mode in power settings
    • Monitor RAM temperatures in demanding applications

📊 RAM Health Monitoring

  • Monitoring Tools:
    • Windows Task Manager for real-time usage
    • HWiNFO64 for detailed memory statistics
    • CPU-Z for SPD information and timings
    • Built-in Windows Reliability Monitor for error tracking
  • Key Health Indicators:
    • Memory usage should be below 80% during normal operation
    • No correctable errors in system logs
    • Stable operating temperatures (40-85°C normal range)
    • Consistent performance in benchmark tests

🚫 Common RAM Installation Mistakes

  • Installation Errors:
    • Not fully seating modules (most common issue)
    • Mixing different RAM speeds and timings
    • Installing in wrong slots for dual-channel
    • Using excessive force damaging slots or modules
  • Compatibility Issues:
    • Purchasing wrong form factor (DIMM vs SO-DIMM)
    • Not checking maximum supported capacity
    • Ignoring voltage requirements
    • Buying used RAM without testing thoroughly

📝 Warranty & Compatibility Considerations

RAM Source ThinkPad Warranty Impact RAM Warranty Support Level Recommendation
Lenovo Genuine Fully covered Lifetime Full support Best for warranty preservation
Compatible Brand Other components still covered Lifetime Good support Excellent balance
Third-party Generic RAM-related issues not covered 1-3 years Limited support Budget option
Used/Refurbished No warranty on RAM 0-30 days No support Not recommended

🧪 RAM Performance Testing & Validation

  • Benchmarking Tools:
    • MemTest86 for stability testing
    • AIDA64 for memory bandwidth and latency tests
    • UserBenchmark for system-wide performance comparison
    • PassMark PerformanceTest for comprehensive analysis
  • Expected Performance Ranges:
    • DDR4-3200 Single Channel: ~24GB/s bandwidth
    • DDR4-3200 Dual Channel: ~48GB/s bandwidth
    • Latency: 70-90ns typical
    • Performance scaling: 15-25% improvement dual vs single

🔮 Future-Proofing Your RAM Investment

  • Capacity Planning:
    • 16GB minimum for modern Windows 10/11 usage
    • 32GB recommended for power users and future needs
    • Consider your typical workload and applications
    • Plan for 3-5 year usage horizon
  • Technology Considerations:
    • DDR4 will remain relevant through 2025+
    • Higher speeds provide minimal real-world benefits
    • Focus on capacity over extreme speed for productivity
    • Consider resale value with optimal RAM configuration

🎯 Ready to Enhance Your Cooling System?

With your ThinkPad X13 memory upgraded for maximum performance, you're prepared to optimize thermal management. In the next section, we'll cover Fan Replacement & Overheating Solutions to ensure your system runs cool and stable under heavy loads.

7. Keyboard Replacement & Key Fix Solutions

⌨️ Mastering ThinkPad X13 Keyboard Repairs

The legendary ThinkPad keyboard is renowned for its exceptional typing experience, but like any mechanical component, it can develop issues over time. This comprehensive guide covers everything from simple key fixes to complete keyboard replacement, preserving the iconic ThinkPad typing feel.

⚠️ Common Keyboard Problem Symptoms

  • Individual Key Issues:
    • Specific keys not responding or intermittent
    • Keys sticking or repeating characters
    • Physical damage to keycaps or scissor mechanisms
    • Keys feeling loose or wobbly
  • Complete Keyboard Failure:
    • No keys working at all
    • Keyboard not detected in Device Manager
    • Backlight not functioning (on backlit models)
    • Spills or liquid damage affecting multiple keys
  • TrackPoint Issues:
    • Red TrackPoint not responding
    • Pointer drifting or erratic movement
    • TrackPoint buttons not working
    • Physical damage to pointing stick

🔍 Keyboard Diagnostic Procedures

Diagnostic Method Procedure Expected Results Troubleshooting Steps
Software Test Use online keyboard tester or Windows On-Screen Keyboard All keys register correctly in test application Update drivers, check for software conflicts
BIOS Keyboard Test F1 at startup → Diagnostics → Keyboard Test All keys pass hardware-level test Hardware issue confirmed if keys fail in BIOS
External Keyboard Test Connect USB keyboard to test functionality External keyboard works normally Confirms internal keyboard hardware issue
Physical Inspection Visual check for damage, debris, or spills Clean, undamaged keyboard assembly Clean debris, replace damaged components

🔧 Quick Key Fix Solutions

  • Sticking Keys:
    • Gently lift keycap with plastic spudger
    • Clean scissor mechanism with isopropyl alcohol
    • Remove debris with compressed air
    • Reinstall keycap, ensuring proper alignment
  • Non-Responsive Single Key:
    • Test key in BIOS to confirm hardware issue
    • Check for physical obstruction under key
    • Inspect rubber dome for damage or wear
    • Replace individual key mechanism if available
  • Loose Keycaps:
    • Remove keycap and inspect scissor clips
    • Replace damaged scissor mechanism
    • Ensure proper alignment during reinstallation
    • Test key stability after repair

🛠️ Complete Keyboard Replacement Guide

  1. Safety Preparation:
    • Power down ThinkPad and disconnect all cables
    • Remove battery and discharge static electricity
    • Gather tools: Phillips #00, plastic spudgers, tweezers
    • Have replacement keyboard ready (ensure correct part number)
  2. Bezel Removal:
    • Remove bottom cover (7 Phillips #00 screws)
    • Disconnect battery from motherboard
    • Carefully pry up keyboard bezel starting from top edge
    • Work around perimeter releasing plastic clips
  3. Keyboard Removal:
    • Locate keyboard connector on motherboard
    • Gently lift connector latch with plastic tool
    • Remove 4-6 Phillips #00 screws securing keyboard
    • Lift keyboard assembly straight up from chassis
  4. New Keyboard Installation:
    • Place new keyboard in position
    • Secure with mounting screws
    • Reconnect keyboard ribbon cable to motherboard
    • Replace bezel and bottom cover

🔌 ThinkPad X13 Keyboard Compatibility

Keyboard Type Part Number Features Backlight Compatibility Notes
Standard US English 5N20V53801 TrackPoint, standard layout No Base model, most common
Backlit US English 5N20V53802 TrackPoint, white backlight Single-stage Mid-range models
Premium Backlit 5N20V53803 TrackPoint, multi-level backlight Dual-stage High-end configurations
International Layouts Varies by region Language-specific keys Varies Check specific country codes

🔴 TrackPoint (Pointing Stick) Repair Guide

  • TrackPoint Not Responding:
    • Check TrackPoint settings in Lenovo Vantage
    • Update pointing device drivers
    • Test in BIOS to confirm hardware issue
    • Replace keyboard assembly if TrackPoint faulty
  • Pointer Drifting:
    • Recalibrate TrackPoint in control panel
    • Clean around TrackPoint base
    • Replace TrackPoint cap if worn
    • Check for physical damage to sensor mechanism
  • TrackPoint Button Issues:
    • Test middle button scrolling functionality
    • Clean around button mechanisms
    • Replace entire keyboard if buttons faulty
    • Check ribbon cable connection to motherboard

💧 Liquid Spill Recovery Procedure

  1. Immediate Response:
    • Power off immediately (hold power button 5+ seconds)
    • Disconnect AC adapter and all cables
    • Remove battery if easily accessible
    • Turn laptop upside down to drain liquid
  2. Disassembly & Cleaning:
    • Remove bottom cover and keyboard
    • Clean affected areas with 99% isopropyl alcohol
    • Use cotton swabs for detailed cleaning
    • Allow components to dry completely (24-48 hours)
  3. Reassembly & Testing:
    • Reinstall keyboard and all components
    • Test keyboard functionality before full reassembly
    • Replace keyboard if spill damage is severe
    • Monitor for future issues from corrosion

🏪 Keyboard Sourcing Options

Source Type Price Range Quality Warranty Recommendation
Lenovo Genuine $80-150 ⭐️⭐️⭐️⭐️⭐️ 90 days - 1 year Best for authenticity and feel
Authorized Reseller $60-120 ⭐️⭐️⭐️⭐️ 30-90 days Good balance of cost and quality
Compatible Third-party $40-80 ⭐️⭐️⭐️ 30-60 days Budget option, may feel different
Used/Refurbished $25-60 ⭐️⭐️⭐️ 0-30 days Risk of worn keys, shorter lifespan

💡 Keyboard Backlight Repair

  • Backlight Not Working:
    • Check Fn + Spacebar backlight toggle
    • Verify backlight settings in Lenovo Vantage
    • Test in dark room to see if dimly lit
    • Replace keyboard if LED failure confirmed
  • Uneven Lighting:
    • Check for physical damage to light guide
    • Ensure keyboard is properly seated
    • Replace keyboard if light guide damaged
    • Verify ribbon cable connection
  • Backlight Flickering:
    • Check power management settings
    • Update BIOS and drivers
    • Test with external power (not battery)
    • Replace keyboard if issue persists

🚫 Common Keyboard Repair Mistakes

  • Installation Errors:
    • Forcing ribbon cable connectors causing pin damage
    • Not properly seating keyboard before screwing down
    • Overtightening screws damaging plastic mounts
    • Installing wrong regional layout keyboard
  • Damage During Repair:
    • Using metal tools on plastic bezel clips
    • Pulling ribbon cables instead of releasing latches
    • Not disconnecting battery before internal work
    • Rushing bezel removal and breaking clips

🛡️ Keyboard Preventive Maintenance

  • Regular Cleaning:
    • Use compressed air monthly to remove debris
    • Clean keycaps with isopropyl alcohol dampened cloth
    • Avoid eating over keyboard to prevent crumb buildup
    • Use keyboard cover if in dusty environments
  • Usage Best Practices:
    • Avoid excessive force when typing
    • Keep liquids away from laptop
    • Wash hands before use to reduce oil transfer
    • Store in clean, dry environment when not in use

⌨️ Individual Keycap Replacement

  • Keycap Removal Technique:
    • Use keycap puller or plastic spudger
    • Lift straight up gently from bottom edge
    • Don't twist or use excessive force
    • Note orientation for proper reinstallation
  • Scissor Mechanism Repair:
    • Clean mechanism with isopropyl alcohol
    • Replace broken scissor clips
    • Ensure proper alignment before reassembly
    • Test key function before replacing keycap

🎯 Ready to Fix Display Issues?

With your ThinkPad X13 keyboard restored to perfect working condition, you're prepared to tackle display repairs. In the next section, we'll cover Screen Replacement & Display Problem Fixes to address screen issues and restore crystal-clear visuals.

8. Screen Replacement & Display Problem Fixes

🖥️ Mastering ThinkPad X13 Display Repairs

The ThinkPad X13 features high-quality displays ranging from FHD to 4K resolution, but screen issues can occur from physical damage, connection problems, or component failure. This comprehensive guide covers everything from simple troubleshooting to complete display replacement.

⚠️ Common Display Problem Symptoms

  • Physical Damage:
    • Cracked or shattered glass
    • Pressure marks or white spots
    • Dead pixels or pixel clusters
    • Discoloration or staining
  • Performance Issues:
    • Flickering or intermittent display
    • Lines, artifacts, or distortion
    • Backlight failure or dim display
    • Ghosting or image retention
  • Connection Problems:
    • No display (black screen)
    • Intermittent connection
    • Color distortion or banding
    • Resolution scaling issues

🔍 Comprehensive Display Diagnostics

Diagnostic Method Procedure Expected Results Troubleshooting Steps
External Monitor Test Connect to external display via USB-C/HDMI External display works normally Internal display or connection issue confirmed
BIOS Display Test Boot to BIOS (F1 at startup) BIOS displays correctly on internal screen Hardware issue if BIOS doesn't display
Pressure Test Gently flex bezel near edges No change in display quality Loose connection if display changes
Backlight Test Shine flashlight at screen at angle Faint image visible with external light Backlight failure if image visible with flashlight

🔧 Quick Display Fix Solutions

  • Flickering Screen:
    • Update graphics drivers from Lenovo website
    • Adjust refresh rate in display settings
    • Disable display power saving features
    • Check for loose display cable connections
  • Backlight Issues:
    • Adjust brightness settings (Fn + brightness keys)
    • Check power management settings
    • Test with AC power (not battery)
    • Invert display colors to test backlight functionality
  • Color Problems:
    • Calibrate display using Windows color management
    • Reset graphics driver (Win + Ctrl + Shift + B)
    • Check for magnetic interference
    • Update BIOS and display firmware

🛠️ Complete Display Replacement Guide

  1. Safety Preparation:
    • Power down ThinkPad and disconnect all cables
    • Remove battery and discharge static electricity
    • Work on clean, soft surface to prevent scratches
    • Have replacement display ready (verify exact model)
  2. Bezel Removal:
    • Use plastic spudger to carefully separate bezel clips
    • Start from bottom edge and work around perimeter
    • Apply even pressure to avoid breaking plastic clips
    • Set bezel aside in safe location
  3. Display Removal:
    • Remove 4-6 Phillips #00 screws securing display
    • Carefully disconnect display cable from back of panel
    • Lift display assembly straight up from hinges
    • Disconnect antenna cables if present
  4. New Display Installation:
    • Connect display cable to new panel
    • Position display in lid assembly
    • Secure with mounting screws
    • Replace bezel, ensuring all clips engage properly

🔌 ThinkPad X13 Display Compatibility Guide

Display Type Part Number Resolution Features Compatibility Notes
FHD IPS 02DN477 1920×1200 300 nits, Anti-glare Base model, most common
FHD IPS Touch 02DN478 1920×1200 300 nits, 10-point touch Touch-enabled models
FHD Low Power 02DN479 1920×1200 400 nits, Low Power Enhanced brightness & battery
UHD IPS 02DN480 3840×2400 500 nits, HDR400 Premium models, 4K resolution

🔌 Display Cable & Connection Repair

  • Cable Inspection:
    • Check for frayed or damaged cables
    • Inspect connector pins for bending or corrosion
    • Test cable continuity with multimeter
    • Look for pinch points along cable routing
  • Connection Issues:
    • Reseat display cable at both ends
    • Clean connector contacts with isopropyl alcohol
    • Check cable routing through hinges
    • Test with known-good cable if available

👆 Touch Screen Specific Repairs

  • Touch Not Working:
    • Calibrate touch screen in Windows settings
    • Update touch controller drivers
    • Check for physical damage to digitizer
    • Test touch functionality in BIOS
  • Inaccurate Touch:
    • Recalibrate touch settings
    • Remove screen protectors or films
    • Clean screen surface thoroughly
    • Check for electromagnetic interference
  • Ghost Touches:
    • Update touch firmware
    • Check for screen grounding issues
    • Test with different power sources
    • Replace digitizer if issue persists

🏪 Display Sourcing Options

Source Type Price Range Quality Warranty Recommendation
Lenovo Genuine $180-400 ⭐️⭐️⭐️⭐️⭐️ 90 days - 1 year Best for color accuracy & brightness
Authorized Reseller $120-300 ⭐️⭐️⭐️⭐️ 30-90 days Good balance of cost and quality
Compatible Third-party $80-200 ⭐️⭐️⭐️ 30-60 days Budget option, may have variations
Used/Refurbished $50-150 ⭐️⭐️⭐️ 0-30 days Risk of dead pixels or backlight wear

💡 Backlight System Repair

  • Backlight Failure Symptoms:
    • Very dim or no display (image visible with flashlight)
    • Backlight flickering at specific brightness levels
    • Uneven lighting or dark spots
    • Backlight turns off after few seconds
  • Backlight Components:
    • LED strips along display edges
    • Light guide panel for even distribution
    • Inverter circuit (older models) or LED driver
    • Backlight power circuitry on motherboard

🚫 Common Display Repair Mistakes

  • Installation Errors:
    • Using metal tools and scratching display surface
    • Overtightening screws causing pressure marks
    • Not disconnecting battery before working on display
    • Forcing connectors causing pin damage
  • Compatibility Issues:
    • Purchasing wrong display size or resolution
    • Not verifying connector type and pin count
    • Ignoring mounting hole alignment
    • Mixing touch and non-touch displays incorrectly

🎨 Display Calibration & Optimization

  • Software Calibration:
    • Use Windows Display Color Calibration tool
    • Adjust gamma, brightness, and contrast settings
    • Set appropriate color profile for your display
    • Calibrate for your specific lighting environment
  • ThinkPad Specific Settings:
    • Use Lenovo Vantage display optimization features
    • Enable blue light reduction for eye comfort
    • Adjust power-saving display features
    • Update display firmware through Lenovo support

🔩 Hinge & Lid Assembly Repair

  • Hinge Issues:
    • Loose hinges causing display wobble
    • Stiff hinges requiring excessive force
    • Broken hinge mounts on lid or base
    • Strange noises during opening/closing
  • Hinge Replacement:
    • Remove display assembly first
    • Access hinge screws from inside display lid
    • Replace both hinges as a set for even tension
    • Apply appropriate thread locker to screws

🛡️ Display Protection & Preventive Care

  • Daily Protection:
    • Use microfiber cloth for cleaning (no paper towels)
    • Avoid pressure on closed lid when in bag
    • Use screen protector for touch models
    • Keep magnets away from display area
  • Long-term Maintenance:
    • Regularly clean display with approved cleaners
    • Check hinge tension periodically
    • Avoid extreme temperatures
    • Store in appropriate cases when transporting

🧪 Display Performance Testing

  • Test Tools:
    • Dead pixel test websites for pixel inspection
    • Color gradient tests for banding issues
    • Gray scale tests for backlight uniformity
    • Motion tests for ghosting and response time
  • Quality Standards:
    • 0-3 dead pixels acceptable for consumer displays
    • Backlight uniformity within 10-15%
    • Color accuracy delta E < 3 for professional use
    • No noticeable flickering at any brightness

🎯 Ready to Fix Audio Issues?

With your ThinkPad X13 display restored to perfect condition, you're prepared to tackle audio system repairs. In the next section, we'll cover Speaker & Audio Jack Repair to restore crystal-clear sound quality to your ThinkPad.

9. Fan Replacement & Overheating Solutions

❄️ Mastering ThinkPad X13 Thermal Management

Proper cooling is essential for maintaining ThinkPad X13 performance and longevity. Overheating can cause thermal throttling, system instability, and component damage. This comprehensive guide covers everything from simple cleaning to complete cooling system replacement.

⚠️ Overheating Warning Signs

  • Performance Issues:
    • System slowing down under load (thermal throttling)
    • Unexpected shutdowns or blue screens
    • Applications freezing or crashing
    • Reduced battery life due to excessive heat
  • Audible & Physical Signs:
    • Fan constantly running at high speed
    • Grinding, rattling, or whining fan noises
    • Excessive heat from keyboard and bottom case
    • Hot air not exhausting properly from vents
  • Software Indicators:
    • CPU/GPU temperatures exceeding 90°C in monitoring software
    • Thermal throttling alerts in Lenovo Vantage
    • High system temperatures reported in BIOS
    • Performance degradation in benchmark tests

🔍 Comprehensive Cooling System Diagnostics

Diagnostic Method Procedure Normal Results Problem Indicators
Temperature Monitoring Use HWiNFO64 or Core Temp to monitor CPU/GPU temps 40-70°C under load, 30-45°C idle Sustained >85°C, rapid temperature spikes
Fan Speed Test Monitor fan RPM in BIOS or monitoring software Gradual speed changes, stable operation Max speed at idle, erratic RPM, no rotation
Airflow Check Feel air exhaust during heavy load Strong, consistent hot air flow Weak airflow, no airflow, intermittent flow
Physical Inspection Visual check of vents and internal components Clean vents, undamaged fan blades Dust buildup, obstructed vents, damaged fan

🔧 Quick Overheating Solutions

  • Immediate Software Fixes:
    • Update BIOS and chipset drivers from Lenovo website
    • Adjust power plan to balanced or power saver
    • Close unnecessary background applications
    • Clean temporary files and optimize startup programs
  • Physical Quick Fixes:
    • Elevate laptop for better airflow (use stand or books)
    • Clean external vents with compressed air
    • Ensure laptop used on hard, flat surfaces only
    • Keep away from direct sunlight and heat sources
  • Advanced Software Settings:
    • Adjust maximum processor state in power options
    • Use Lenovo Vantage thermal settings
    • Disable turbo boost for temporary heat reduction
    • Update graphics drivers for better power management

🛠️ Complete Fan Replacement Guide

  1. Safety Preparation:
    • Power down ThinkPad and disconnect all power sources
    • Remove battery and discharge static electricity
    • Gather tools: Phillips #00, thermal paste, isopropyl alcohol
    • Have replacement fan/heatsink assembly ready
  2. Access Cooling System:
    • Remove bottom cover (7 Phillips #00 screws)
    • Disconnect battery from motherboard
    • Locate cooling system near CPU/GPU area
    • Identify fan connector and heatsink mounting points
  3. Cooling System Removal:
    • Disconnect fan power cable from motherboard
    • Remove 4-6 Phillips #00 screws securing heatsink
    • Lift heatsink assembly straight up carefully
    • Clean old thermal paste from CPU/GPU and heatsink
  4. New Cooling System Installation:
    • Apply pea-sized thermal paste to CPU/GPU
    • Position new heatsink/fan assembly
    • Secure with mounting screws in criss-cross pattern
    • Reconnect fan cable and battery

🔌 ThinkPad X13 Cooling System Compatibility

Cooling Type Part Number CPU Compatibility Fan Size Heat Pipes
Standard Cooling 5W10V58612 Intel i3/i5 U-series 50mm fan Single heat pipe
Enhanced Cooling 5W10V58613 Intel i7 U-series 55mm fan Dual heat pipes
Performance Cooling 5W10V58614 Intel i7 P-series 60mm fan Dual heat pipes + vapor chamber
AMD Variant 5W10V58615 AMD Ryzen series 55mm fan Dual heat pipes

🧪 Thermal Paste Application Guide

  • Paste Selection:
    • High-performance: Arctic MX-6, Thermal Grizzly Kryonaut
    • Mid-range: Noctua NT-H1, Arctic MX-4
    • Budget: Cooler Master MasterGel, Deepcool Z5
    • Avoid conductive pastes (liquid metal) for laptops
  • Application Methods:
    • Pea-sized dot method (most common and reliable)
    • X pattern for larger CPU/GPU dies
    • Thin spread for direct-die cooling
    • Use isopropyl alcohol and lint-free cloth for cleaning
  • Curing & Performance:
    • Most pastes cure over 50-200 hours of use
    • Performance stabilizes after several thermal cycles
    • Replacement recommended every 2-3 years
    • Monitor temperatures for first week after application

🧹 Regular Cleaning & Maintenance Schedule

Maintenance Task Frequency Tools Required Time Required Performance Impact
External Vent Cleaning Monthly Compressed air, soft brush 5 minutes 5-10°C improvement
Internal Dust Removal Every 6 months Compressed air, plastic tools 15 minutes 10-15°C improvement
Thermal Paste Replacement Every 2 years Thermal paste, isopropyl alcohol 30 minutes 15-25°C improvement
Full Cooling System Service As needed Complete tool set, replacement parts 45-60 minutes 20-30°C improvement

🔍 Fan Specific Troubleshooting

  • Fan Not Spinning:
    • Check fan connector on motherboard
    • Test fan with external power source if possible
    • Update BIOS and EC firmware
    • Check for physical obstruction in fan blades
  • Noisy Fan Operation:
    • Clean dust from fan blades and bearings
    • Check for worn bearings (side-to-side play)
    • Lubricate bearings with appropriate oil (if accessible)
    • Replace fan if noise persists after cleaning
  • Intermittent Fan Operation:
    • Check temperature sensor readings
    • Test fan curve settings in BIOS
    • Inspect fan cable for damage or loose connection
    • Update thermal management drivers

🏪 Cooling System Sourcing Options

Source Type Price Range Quality Warranty Recommendation
Lenovo Genuine $60-120 ⭐️⭐️⭐️⭐️⭐️ 90 days - 1 year Best for exact fit and performance
Authorized Reseller $40-90 ⭐️⭐️⭐️⭐️ 30-90 days Good balance of cost and quality
Compatible Third-party $25-60 ⭐️⭐️⭐️ 30-60 days Budget option, may have noise variations
Used/Refurbished $15-40 ⭐️⭐️⭐️ 0-30 days Risk of worn bearings, shorter lifespan

📏 Thermal Pad Replacement Guide

  • Pad Thickness Requirements:
    • VRM components: 0.5mm - 1.0mm
    • Memory chips: 1.0mm - 1.5mm
    • Chipset: 0.5mm - 1.0mm
    • Always measure original pad thickness
  • Pad Material Selection:
    • Silicone-based: Good performance, easy to work with
    • Graphite: High performance, conductive (be careful)
    • Phase-change: Excellent performance, premium price
    • Avoid pads that are too hard or too soft

🚫 Common Cooling System Mistakes

  • Installation Errors:
    • Using too much or too little thermal paste
    • Overtightening heatsink screws damaging motherboard
    • Not cleaning old thermal paste completely
    • Forgetting to reconnect fan power cable
  • Maintenance Mistakes:
    • Using vacuum cleaners that can static damage components
    • Spinning fans with compressed air damaging bearings
    • Using inappropriate lubricants on fan bearings
    • Not testing system before full reassembly

📊 Performance Monitoring & Benchmarking

  • Monitoring Software:
    • HWiNFO64 for comprehensive sensor data
    • Core Temp for CPU temperature monitoring
    • MSI Afterburner for GPU temperature and usage
    • Lenovo Vantage for system-specific thermal data
  • Stress Testing:
    • Prime95 for CPU thermal testing
    • FurMark for GPU thermal testing
    • AIDA64 for system stability testing
    • Cinebench for real-world performance benchmarking

🎯 Optimal Temperature Targets

Component Ideal Idle Normal Load Maximum Safe Throttle Point
Intel CPU 35-45°C 65-80°C 95-100°C 90-95°C
AMD CPU 40-50°C 70-85°C 95°C 90°C
Integrated GPU 40-50°C 75-85°C 95°C 90°C
SSD 30-40°C 50-70°C 85°C 80°C

⚡ Advanced Cooling Upgrades

  • Aftermarket Solutions:
    • Laptop cooling pads with additional fans
    • Thermal pad upgrades for better heat transfer
    • Copper shims for improved heatsink contact
    • Liquid metal thermal compound (advanced users only)
  • Usage Optimizations:
    • Undervolting CPU for reduced heat generation
    • Custom fan curves for better acoustic/performance balance
    • Power limit adjustments in BIOS or software
    • Workload scheduling to avoid sustained high temperatures

🎯 Ready to Fix Wireless Connectivity?

With your ThinkPad X13 cooling system optimized for peak performance, you're prepared to tackle connectivity issues. In the next section, we'll cover WiFi/Bluetooth Card Replacement to restore fast, reliable wireless connections.

10. Where to Sell Your Upgraded ThinkPad X13

💰 Maximizing Your ThinkPad X13 Resale Value

After successfully upgrading and repairing your ThinkPad X13, you can unlock significant resale value. This comprehensive guide covers the best platforms, pricing strategies, and professional selling techniques to help you get top dollar for your refurbished laptop.

📈 ThinkPad X13 Resale Value Analysis

Condition & Upgrades Base Value After Repair Value Value Added ROI Percentage
Non-functional Unit $150-250 $500-700 $350-450 233-300%
Minor Issues Present $300-400 $600-800 $300-400 100-133%
Fully Refurbished + Upgrades $350-450 $700-900 $350-450 100-129%
Premium Configuration $400-500 $800-1000 $400-500 100-125%

🏆 Top Recommended Selling Platforms

  • Specialized Electronics Buyers:
    • SellBroke - Professional electronics buyer with quick payments
    • SellLaptopBack - Laptop-specific buyer with good rates
    • Gazelle - Established electronics trade-in service
    • ItsWorthMore - Competitive pricing for business laptops
  • Government & Educational Programs:
    • GovLiquidation - Government surplus equipment sales
    • PublicSurplus - Municipal and government asset sales
    • Local university surplus sales - Check .edu websites for surplus auctions
    • State government surplus auctions - Often listed on state .gov websites

⚖️ Selling Platform Comparison

Platform Type Average Sale Price Fees & Commission Time to Sell Best For
Direct Buyers (SellBroke) 70-80% of retail 0% (built into offer) 1-3 days Quick, hassle-free sales
eBay Auctions 80-90% of retail 12.9% + $0.30 7-10 days Maximum profit potential
Facebook Marketplace 75-85% of retail 0% 3-14 days Local sales, no shipping
Craigslist 70-80% of retail 0% 7-21 days Cash transactions, local

💵 Professional Pricing Strategy

  • Market Research:
    • Check completed eBay listings for same model/specs
    • Research SellBroke valuation tools
    • Monitor Facebook Marketplace comparable listings
    • Consider current market demand and seasonality
  • Pricing Factors:
    • Original configuration and specifications
    • Upgrades performed (RAM, SSD, battery)
    • Physical condition and cosmetic appearance
    • Remaining warranty or service coverage
    • Included accessories and original packaging

📝 Professional Listing Optimization

  • Title Optimization:
    • Include key search terms: "ThinkPad X13", "upgraded", "refurbished"
    • Specify important features: "16GB RAM", "1TB SSD", "new battery"
    • Mention condition: "excellent condition", "professionally refurbished"
    • Example: "Lenovo ThinkPad X13 - 16GB RAM / 1TB SSD - New Battery - Excellent Condition"
  • Description Best Practices:
    • Detailed specifications list with all upgrades highlighted
    • Professional repair documentation and testing results
    • High-quality photos showing condition and upgrades
    • Clear return policy and warranty information

📸 Professional Photography Guidelines

Photo Type Purpose Key Elements Tips
Front View Show overall condition Display lid, ThinkPad logo, bezel condition Clean screen, good lighting, neutral background
Keyboard Close-up Demonstrate wear level Key condition, trackpoint, touchpad Show minimal wear, clean keys
Screen On Prove functionality Display working, no dead pixels Use solid color backgrounds to show screen quality
Upgrade Proof Build trust BIOS screens, system information Show RAM, SSD, battery health in system info

🏢 Specialized Business Laptop Buyers

  • Enterprise Focused:
  • Bulk Sales Options:
    • Electronics recyclers with buyback programs
    • Business equipment auctions
    • Corporate IT asset management firms
    • Educational institution surplus programs

🏛️ Government & Educational Sales Channels

  • Federal Programs:
    • GSA Auctions - Government Services Administration
    • GovLiquidation - DoD and federal surplus
    • USPS Surplus - Postal Service equipment
  • State & Local:
    • State surplus property auctions (check your state's .gov website)
    • Municipal government surplus sales
    • Public school district equipment auctions
    • Community college surplus sales
  • Educational Institutions:
    • University surplus stores (check .edu websites)
    • Campus computer store trade-in programs
    • Student government equipment sales
    • Educational foundation auctions

🔧 Pre-Sale Preparation Checklist

  • Data Security:
    • Perform complete factory reset
    • Use data destruction software for sensitive data
    • Remove all personal accounts and information
    • Reinstall clean Windows with latest updates
  • Physical Preparation:
    • Thorough cleaning of exterior and keyboard
    • Screen cleaning with appropriate solutions
    • Minor cosmetic touch-ups if necessary
    • Gather all original accessories and documentation
  • Documentation:
    • Create list of all upgrades and repairs performed
    • Take before/after photos if available
    • Prepare system specification sheet
    • Document any remaining warranty information

📦 Professional Shipping & Protection

  • Packaging Standards:
    • Use original box or high-quality shipping box
    • Double-box with adequate padding
    • Include anti-static bubble wrap
    • Use "fragile" labels and proper orientation markings
  • Shipping Insurance:
    • Always purchase full-value shipping insurance
    • Use trackable shipping methods with signature required
    • Take photos of packaging process for insurance claims
    • Consider registered mail for high-value items

🧾 Tax & Legal Considerations

Consideration Platform Reporting Threshold Documentation Required
IRS Form 1099-K eBay, PayPal $600+ (2024+) Sales records, cost basis
Business Income All platforms $400+ net profit Receipts, expense records
Hobby Income All platforms Any amount Minimal documentation
Capital Gains High-value items Varies by profit Purchase receipts, improvement costs

📅 Optimal Selling Timing

  • Best Selling Periods:
    • August-September (back-to-school season)
    • January (post-holiday upgrades)
    • Tax return season (February-April)
    • Before new model releases
  • Worst Selling Periods:
    • December (holiday shopping competition)
    • Summer months (lower business demand)
    • Immediately after new model announcements
    • Economic downturn periods

🎭 Professional Sales Presentation

  • Trust Building Elements:
    • Detailed repair documentation with photos
    • Professional testing results and benchmarks
    • Clear warranty terms (30-90 days recommended)
    • Multiple contact methods and quick response times
  • Value-Added Services:
    • Free shipping with insurance
    • Extended return windows (7-14 days)
    • Technical support during transition
    • Accessory bundles (charger, case, mouse)

🎯 Your ThinkPad Repair Journey Complete

Congratulations on mastering ThinkPad X13 repairs and upgrades! You've not only saved significant money on repairs but also developed valuable technical skills. Whether you choose to keep your upgraded ThinkPad for personal use or sell it for profit, you now have the expertise to maintain and enhance these excellent business laptops for years to come.

Need to Sell Your Lenovo Laptop? Get Instant Cash!

If your ThinkPad X13 (or other ThinkPad model) has performance issues or you're upgrading to a newer business laptop, we offer competitive cash payouts for your device. We buy broken, used, and refurbished ThinkPad laptops—including all X13 configurations—with free insured shipping and hassle-free evaluations.

Sell Popular Lenovo Models Now:

Share this: