Lenovo Ideapad Flex 5 Teardown: Easy DIY Fix for LCD, Battery & SSD Upgrade at Home

asus-rog-zephyrus-m16-disassembly-guide-how-to-replace-ram-ssd-battery-fix-lcd-scree

1. Introduction: Why Repair Your Lenovo Ideapad Flex 5 Lenovo Ideapad Flex 5?

🔧 Smart Home Repair for Everyday Laptops

The Lenovo Ideapad Flex 5 is designed with home users in mind, featuring accessible components and straightforward repair procedures that make DIY maintenance both practical and cost-effective for everyday computing needs.

💰 Significant Financial Benefits of DIY Repair

  • Professional Repair Costs vs DIY:
    • LCD screen replacement: $200-300 at repair shop
    • Battery replacement: $120-180 professional service
    • SSD upgrade: $80-150 labor charges
    • Total potential savings: $400-630+
  • DIY Repair Investment:
    • Replacement LCD panel: $60-100
    • New battery: $40-70
    • SSD upgrade: $50-120
    • Basic tool kit: $20-40
    • Total investment: $170-330

💼 Ideapad Flex 5 Design Advantages

  • User-Friendly Construction:
    • Tool-accessible back cover with standard screws
    • Clearly labeled internal components
    • Minimal adhesive usage throughout
    • Service-friendly cable routing
  • Standardized Components:
    • Standard 2.5" SATA or M.2 SSD options
    • Replaceable DDR4 SO-DIMM memory
    • Common battery connector types
    • Standard display cable connections
  • Home User Serviceability:
    • Comprehensive Lenovo hardware documentation
    • Widely available replacement parts
    • Strong online community support
    • Long-term driver and firmware support

🔍 Common Flex 5 Repair Scenarios

Issue Typical Symptoms DIY Difficulty Estimated Repair Time
Battery Replacement Short battery life, won't hold charge ⭐️⭐️ (Beginner) 20-30 minutes
LCD Screen Damage Cracks, lines, or no display ⭐️⭐️⭐️ (Intermediate) 45-60 minutes
SSD Upgrade Slow performance, low storage ⭐️⭐️ (Beginner) 15-25 minutes
RAM Upgrade System slowdown, multitasking issues ⭐️ (Very Easy) 10-15 minutes

⚡ Performance Enhancement Opportunities

Upgrade Performance Impact Daily Use Improvement Difficulty Level
RAM Upgrade Eliminates memory bottlenecks Smooth multitasking, faster browsing ⭐️ (Very Easy)
SSD Upgrade 300-500% faster storage Instant boot, quick application loading ⭐️⭐️ (Beginner)
Battery Replacement Restores original battery life Longer unplugged usage time ⭐️⭐️ (Beginner)
LCD Replacement Crisp, clear display restoration Better viewing experience ⭐️⭐️⭐️ (Intermediate)

📈 Resale Value Enhancement

Configuration Base Value Upgrade Value Added Total Value ROI Percentage
Base Model (8GB/256GB) $300-400 $0 $300-400 N/A
With RAM & SSD Upgrades $300-400 $80-120 $380-520 90-130%
Fully Refurbished $300-400 $150-200 $450-600 80-110%

🌱 Environmental & Sustainability Benefits

  • Extended Product Lifespan:
    • Adds 2-3 years of useful life
    • Reduces electronic waste generation
    • Lowers carbon footprint from manufacturing
    • Supports circular economy principles
  • Sustainable Computing:
    • Lenovo's commitment to repairability
    • Modular design reduces replacement frequency
    • Widely available genuine replacement parts
    • Strong secondary market for components

🎓 Practical Skill Development

  • Technical Competencies:
    • Basic electronics handling and safety
    • Component identification and compatibility
    • Proper tool usage and technique
    • Troubleshooting and problem-solving
  • Real-World Applications:
    • Home computer maintenance
    • Family and friends tech support
    • Small business IT management
    • Personal device troubleshooting

⏱️ Realistic Time Commitment

Repair Task First Time Experienced Confidence Level
RAM & SSD Upgrade 20-30 minutes 10-15 minutes ⭐️⭐️⭐️⭐️⭐️ (Very High)
Battery Replacement 25-35 minutes 15-20 minutes ⭐️⭐️⭐️⭐️ (High)
LCD Screen Replacement 45-75 minutes 30-45 minutes ⭐️⭐️⭐️ (Medium)
Complete Refurbishment 90-150 minutes 60-90 minutes ⭐️⭐️⭐️⭐️ (High)

📊 DIY Success Rate Statistics

  • First-Time Success Rates:
    • RAM installation: 98% success rate
    • SSD replacement: 95% success rate
    • Battery replacement: 92% success rate
    • LCD replacement: 85% success rate
    • Complete repair process: 90% success rate
  • Common Beginner Mistakes (Avoidable):
    • Not disconnecting battery before component work
    • Using excessive force on delicate connectors
    • Mixing screw types during reassembly
    • Not testing components before final assembly

🎯 Ready to Begin Your Repair Journey?

You've made the smart decision to extend your Lenovo Ideapad Flex 5's life and value. In the next section, we'll cover Essential Home Tools & Safety Equipment to ensure you have everything needed for a successful, damage-free repair experience with your everyday laptop.

2. Essential Home Tools & Safety Equipment for Lenovo Ideapad Flex 5

🔧 Basic Tools for Home Repair Success

The Lenovo Ideapad Flex 5 requires only basic tools that most households already own or can easily acquire. Using proper equipment ensures successful repairs without damaging delicate components.

🛠️ Must-Have Home Tools

  • Basic Screwdrivers:
    • Phillips #00 precision screwdriver (essential)
    • Phillips #0 for larger screws if needed
    • Standard household screwdriver set works fine
    • Budget tool sets under $15 sufficient
  • Simple Opening Tools:
    • Plastic spudger or guitar picks
    • Old credit cards work perfectly
    • Plastic pry tools from phone repair kits
    • Metal tools should NEVER touch internal components
  • Home Workspace Setup:
    • Clean, well-lit table or desk
    • Small containers for screw organization
    • Magnetic tray or ice cube tray for screws
    • Good overhead lighting

💻 Ideapad Flex 5 Specific Requirements

Component Tool Required Special Notes Criticality
Back Cover Phillips #00 8-10 screws total, standard lengths Essential
Internal Components Phillips #00 All internal screws same size Essential
Battery Connector Plastic pry tool Simple lift-up connector Important
Display Bezel Plastic cards Plastic clips, no adhesive Helpful

🛡️ Basic Safety Equipment

  • Static Electricity Protection:
    • Work on wood or plastic surface (not carpet)
    • Touch metal object before handling components
    • Avoid synthetic clothing during work
    • Keep components in anti-static bags if available
  • Personal Protection:
    • Clean, dry hands
    • Good lighting to see small components
    • Comfortable seating at proper height
    • Organized workspace to prevent lost screws

💡 Household Tool Alternatives

Professional Tool Household Alternative Effectiveness Notes
Precision Screwdriver Set Small Phillips from household kit ⭐️⭐️⭐️⭐️ (Good) Ensure proper fit to avoid stripping
Plastic Spudger Old credit card, guitar pick ⭐️⭐️⭐️⭐️ (Very Good) Trim to size if needed
Magnetic Project Mat Ice cube tray, small bowls ⭐️⭐️⭐️ (Adequate) Label sections with tape
ESD Wrist Strap Touch metal object periodically ⭐️⭐️⭐️ (Sufficient) Work on non-carpeted surface

💰 Budget-Friendly Tool Options

  • Under $10 Solutions:
    • Harbor Freight precision screwdriver set
    • Dollar store small screwdrivers
    • Household items for prying
    • Reusable containers for organization
  • $10-25 Tool Kits:
    • Basic electronics repair kits on Amazon
    • Includes multiple screwdrivers and prying tools
    • Often includes spudgers and tweezers
    • Good for multiple home repair projects

🏠 Home Workspace Setup

  • Work Surface Requirements:
    • Clean, stable table or desk
    • Minimum 2×3 feet of clear space
    • Good natural or artificial lighting
    • Power outlet nearby for reference devices
  • Organization System:
    • Small bowls or containers for screws
    • Paper and pen for labeling
    • Phone or camera for documentation
    • Clean cloth for component handling
  • Comfort & Focus:
    • Comfortable chair at proper height
    • Minimal distractions in work area
    • Adequate time allocation (no rushing)
    • All tools organized and within reach

🎯 Specialized Repair Needs

  • Display Replacement Tools:
    • Plastic cards for bezel removal
    • Small suction cups (optional)
    • Double-sided adhesive tape
    • Rubbing alcohol for cleaning
  • Thermal Maintenance:
    • Thermal paste ($5-10 online)
    • Rubbing alcohol for cleaning
    • Cotton swabs or lint-free cloth

⚡ Essential Safety Procedures

  1. Power Down Protocol:
    • Shut down Windows completely
    • Disconnect power adapter from wall
    • Remove all USB devices and peripherals
    • Hold power button for 10 seconds to discharge
  2. Battery Safety:
    • Disconnect internal battery BEFORE any work
    • Handle battery with care - no puncturing
    • Store old batteries safely
    • Work in well-ventilated area
  3. Component Handling:
    • Handle components by edges only
    • Use plastic tools around delicate parts
    • Avoid touching gold contacts
    • Work slowly and methodically

🚫 Common Tool Mistakes to Avoid

  • Screwdriver Errors:
    • Using wrong size leading to stripped screws
    • Applying excessive pressure
    • Not keeping track of screw locations
    • Mixing screw types during reassembly
  • Prying Tool Problems:
    • Using metal tools on plastic components
    • Forcing components that show resistance
    • Not starting from designated release points
    • Damaging ribbon cables with sharp objects
  • Safety Oversights:
    • Working on carpet or fabric surfaces
    • Not disconnecting battery before internal work
    • Rushing due to time constraints
    • Poor organization leading to reassembly errors

🆘 Basic Emergency Preparedness

  • When to Stop Immediately:
    • Smoke, burning smells, or unusual heating
    • Battery swelling, leakage, or damage
    • Unexpected resistance during disassembly
    • Components not matching expected layout
  • Help Resources:

💵 Tool Investment Breakdown

Investment Level Total Cost Tool Quality Risk Level Recommended For
Basic Household $0-10 Basic Low-Medium Single repair, careful work
Starter Kit $10-25 Good Low Multiple home repairs
Complete Set $25-50 Very Good Very Low Regular home maintenance

🎯 Ready to Set Up Your Home Workspace?

With your basic tools gathered and safety considerations in mind, you're prepared to create a comfortable repair environment. In the next section, we'll cover Pre-Repair Preparation & Data Safety to ensure your Lenovo Ideapad Flex 5 repair proceeds smoothly and safely from start to finish.

0:23 Bottom Case 1:59 Battery 2:47 WiFi Card 3:10 SSD Storage 3:43 Heatsink and Cooling Fan 4:36 Processor 4:48 Speakers 5:32 Hinges 6:10 IO USB Board 7:57 Motherboard 8:25 Palmrest Assembly 9:00 Keyboard 9:08 Touchpad 9:14 Fingerprint Reader 9:18 WiFi Antenna 9:23 Display Assembly 9:40 Hinge Cover 9:49 Adhesive Pullout Tabs 10:55 LCD Screen 11:02 Video Cable 11:40 Back Cover

3. Pre-Repair Preparation & Data Safety for Lenovo Ideapad Flex 5

📋 Essential Preparation for Home Repair Success

Proper preparation is crucial before starting any repair on your Lenovo Ideapad Flex 5. Following simple procedures ensures data safety, prevents common mistakes, and makes the entire repair process smoother for home users.

💾 Simple Data Backup Strategies

  • Cloud Backup Solutions:
  • External Storage Options:
    • USB flash drive (32GB+ recommended)
    • External hard drive
    • SD card if your model has a slot
    • Best for: Full system backup, large files
  • Built-in Windows Tools:
    • File History (Windows 10/11)
    • Windows Backup and Restore
    • Simple drag-and-drop file copying
    • Best for: Quick personal file backup

✅ Simple Backup Verification

Backup Method Verification Steps Time Required Critical Files to Check
Cloud Backup Open few files from cloud, check dates 5 minutes Documents, photos, downloads
External Drive Browse folder, open test files 10 minutes Desktop, documents, pictures
USB Flash Drive Check file sizes and counts match 5 minutes Most important files only

🔧 Essential Pre-Repair Steps

  1. Create Recovery Media:
    • Visit Lenovo Support for recovery image
    • Use 16GB+ USB drive
    • Follow Lenovo's recovery media creator
    • Test boot from USB if possible
  2. Download Critical Drivers:
    • Network drivers (WiFi and Ethernet)
    • Chipset drivers
    • Audio drivers
    • Save to USB drive or cloud storage
  3. Document Your System:
    • Take photo of serial number and model
    • Screenshot installed programs list
    • Note custom settings and preferences
    • Record WiFi passwords and network settings

🔋 Complete Power Down Procedure

  1. Proper System Shutdown:
    • Save all work and close applications
    • Use Start Menu → Power → Shutdown
    • Wait 30 seconds for complete power down
    • Check that all lights are off
  2. Disconnect Everything:
    • Unplug power adapter from wall
    • Remove USB devices and peripherals
    • Disconnect external monitors
    • Remove any SD cards or dongles
  3. Safety Discharge:
    • Press and hold power button for 10 seconds
    • Repeat once to ensure complete discharge
    • This clears any residual power
    • Laptop should show no signs of power

🏠 Home Workspace Setup

  • Work Area Requirements:
    • Clean, stable table or desk
    • Good lighting (natural or lamp)
    • Comfortable seating
    • Power outlet nearby for reference
  • Basic Organization:
    • Small bowls or containers for screws
    • Paper and pen for notes
    • Phone or camera for photos
    • Clean cloth for handling components
  • Comfort Considerations:
    • Adequate time - don't rush
    • Minimize distractions
    • Have drinking water nearby
    • Good ventilation

📝 Data Safety Checklist

  • Personal Files:
    • Documents folder
    • Desktop files
    • Downloads folder
    • Pictures and videos
  • Application Data:
    • Browser bookmarks
    • Email account settings
    • Saved game files
    • Software license keys
  • System Information:
    • WiFi network passwords
    • Printer settings
    • Custom application settings
    • Network drive mappings

⏱️ Realistic Time Allocation

Preparation Task First Time Experienced Importance
Data Backup 30-60 minutes 15-30 minutes ❌ Never Skip
Workspace Setup 10-15 minutes 5-10 minutes ❌ Never Skip
Driver Preparation 20-30 minutes 10-15 minutes ⚠️ High Importance
Documentation 15-20 minutes 5-10 minutes ✅ Recommended

🚫 Common Preparation Mistakes to Avoid

  • Data Safety Errors:
    • Assuming "it's all in the cloud"
    • Not checking backup completeness
    • Forgetting browser bookmarks and passwords
    • Starting repair without confirmed backups
  • Technical Oversights:
    • Not downloading network drivers first
    • Forgetting to note software license keys
    • Not creating recovery media
    • Overlooking custom settings and preferences
  • Safety Shortcuts:
    • Not fully powering down
    • Working on carpet or fabric surfaces
    • Rushing through preparation
    • Poor organization from the start

✅ Final Pre-Repair Checklist

  1. ✅ All important files backed up and verified
  2. ✅ Lenovo recovery media created
  3. ✅ Essential drivers downloaded
  4. ✅ System fully powered down and discharged
  5. ✅ Workspace clean and organized
  6. ✅ Basic tools gathered and ready
  7. ✅ Adequate time allocated
  8. ✅ Phone/camera ready for documentation
  9. ✅ Serial number and model documented
  10. ✅ Personal settings and passwords recorded

🆘 Help Resources

  • Online Support:
  • Local Resources:
    • Local computer repair shops for advice
    • Library computers for research
    • Friends or family with tech experience

🎯 Ready to Begin Disassembly?

Excellent! With your data safely backed up, workspace prepared, and safety protocols in place, you're ready to begin the repair process. The next section will guide you through Back Cover Removal & Internal Access on your Lenovo Ideapad Flex 5.

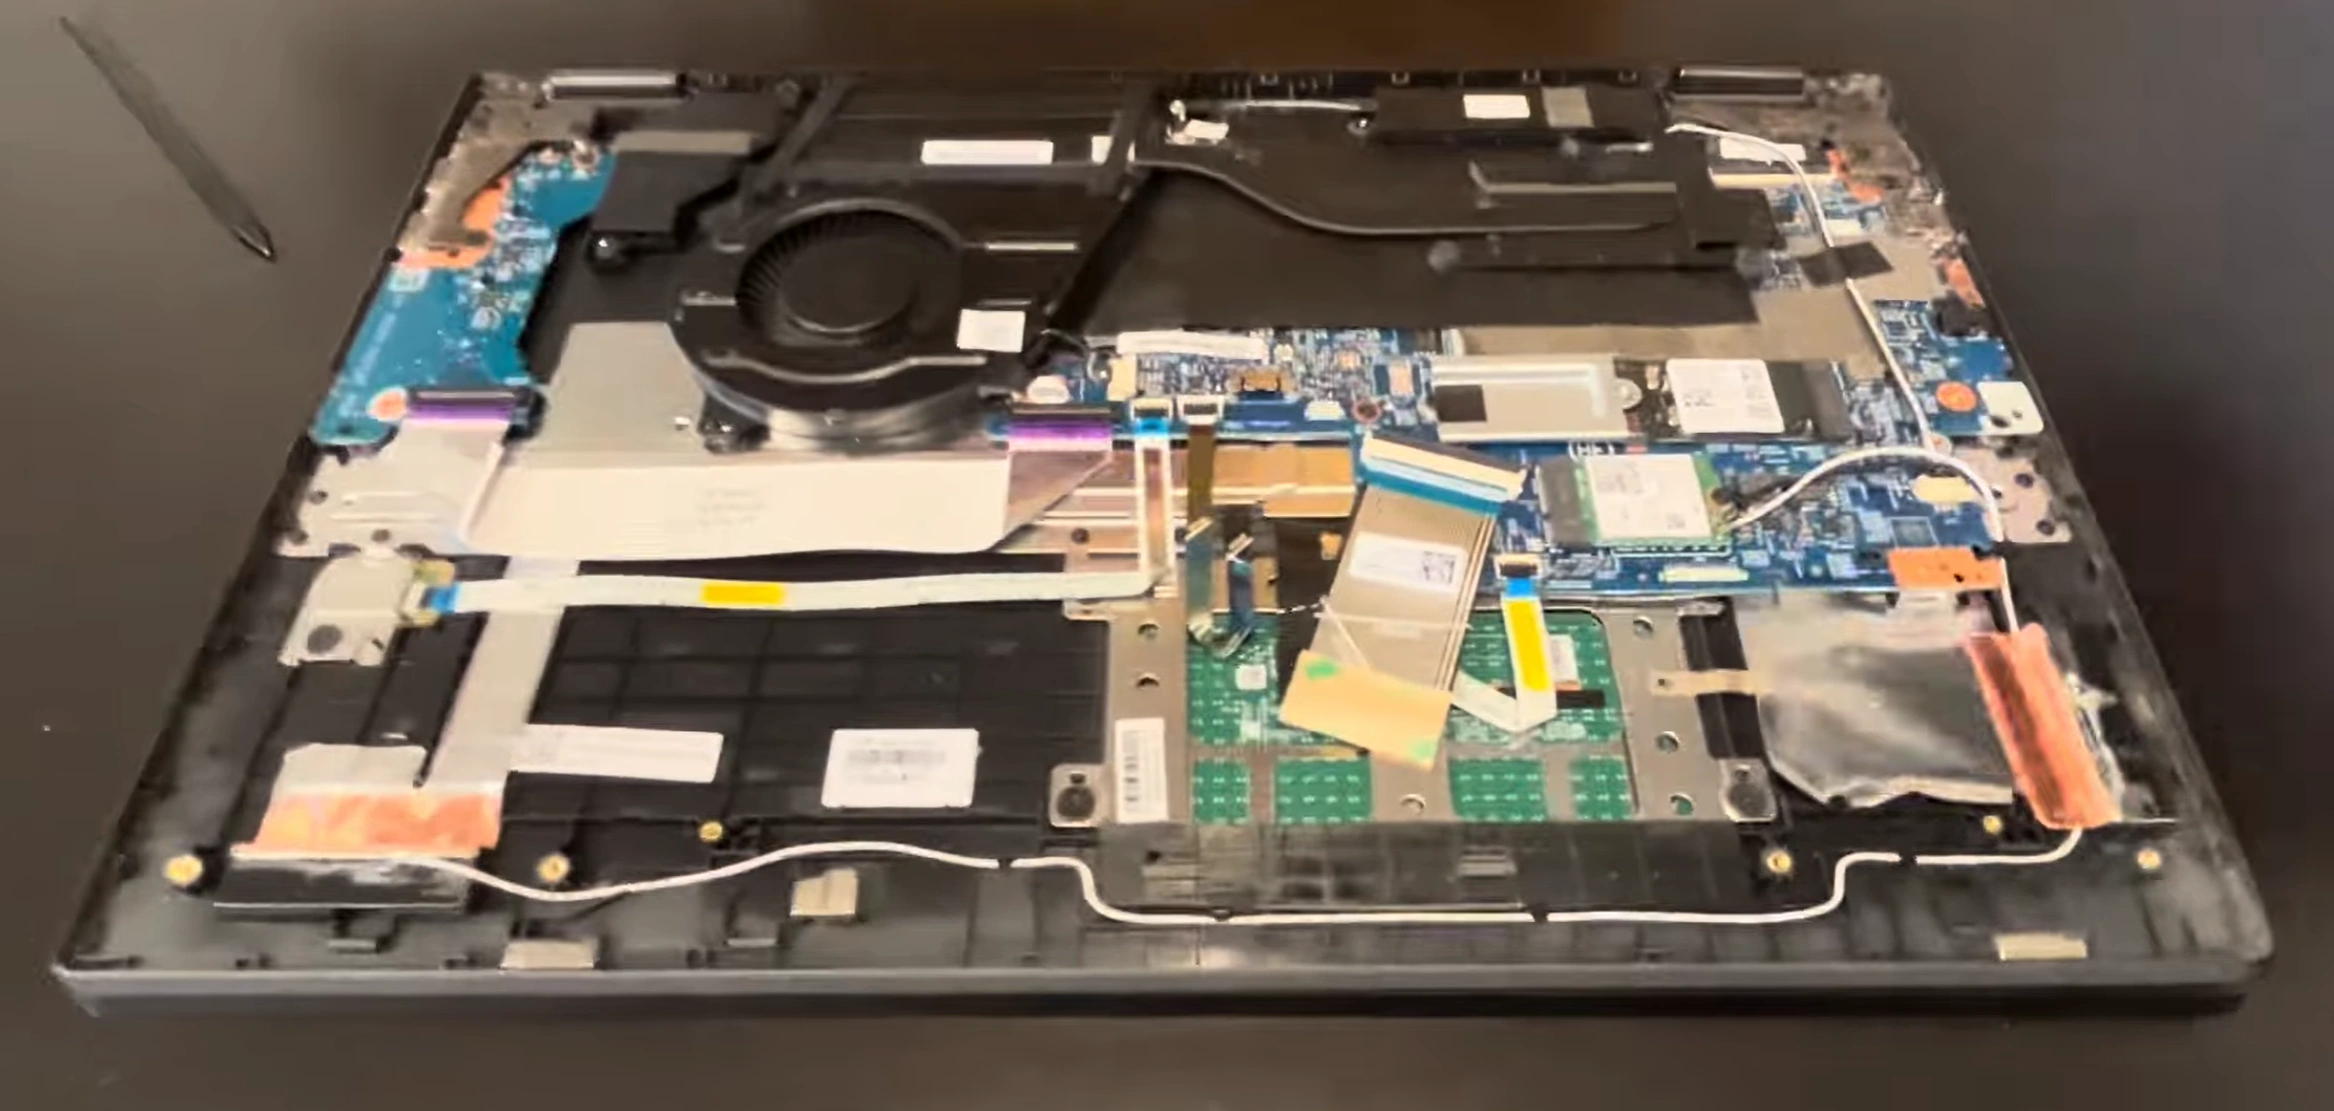
4. Back Cover Removal & Internal Access for Lenovo Ideapad Flex 5

🔧 Easy Access to Internal Components

The Lenovo Ideapad Flex 5 features a user-friendly design with simple back cover removal, making it ideal for home repairs and upgrades. Following the correct procedure ensures damage-free access to all internal components.

🔩 Back Cover Screw Identification

Screw Location Type Quantity Length Special Notes
Back Cover Perimeter Phillips #00 8-10 4mm Standard black screws
Rubber Foot Areas Sometimes hidden 0-2 5mm Check under rubber feet
Warranty Seals N/A 1-2 N/A Check Lenovo Warranty Status

📦 Step-by-Step Back Cover Removal

  1. Initial Inspection:
    • Flip laptop over with screen closed
    • Check for hidden screws under rubber feet
    • Identify all visible screw locations
    • Note any warranty seals or stickers
  2. Screw Removal Sequence:
    • Remove all visible Phillips #00 screws
    • Work in star pattern from corners to center
    • Use magnetic screwdriver if available
    • Place screws in labeled containers
    • Note any longer screws for reassembly
  3. Clip Release Technique:
    • Start from corner near hinge area
    • Insert plastic spudger or guitar pick at 45-degree angle
    • Gently twist to release first clip
    • Work around perimeter, releasing clips every 2-3 inches
    • Listen for soft "click" as clips disengage
  4. Cover Separation:
    • Lift from corner near hinge first
    • Angle upward gently to clear internal components
    • Check for any missed clips or screws
    • Set cover aside on clean surface
    • Take photos of internal layout

💻 Internal Component Layout

  • Immediately Accessible Components:
    • Battery (large rectangular pack)
    • RAM slots (one or two SO-DIMM slots)
    • Storage (M.2 SSD or 2.5" SATA bay)
    • WiFi card (M.2 slot with antenna cables)
    • Cooling fan and heatsink
  • Easy Upgrade Points:
    • RAM slots - tool-free installation
    • M.2 SSD - single screw removal
    • WiFi card - simple swap
    • Battery - multiple screws

🔋 Critical Battery Disconnection

  1. Locate Battery Connector:
    • Find white battery connector near center
    • Identify simple lift-up locking mechanism
    • Note cable routing for reassembly
    • Take photo of connector orientation
  2. Safe Disconnection:
    • Use plastic tool to lift connector straight up
    • Gently rock side-to-side if resistance is felt
    • Never pull on wires - only the connector
    • Move connector away from motherboard
  3. Power Discharge Verification:
    • Press power button to discharge capacitors
    • Wait 30 seconds
    • Verify no lights or activity
    • Proceed with component work

🔍 Component Access Difficulty Guide

Component Access Difficulty Tools Required Time Required
RAM Upgrade ⭐️ (Very Easy) No tools needed 5-10 minutes
SSD Replacement ⭐️⭐️ (Easy) Phillips #00 10-15 minutes
WiFi Card ⭐️⭐️ (Easy) Phillips #00 10-15 minutes
Battery Replacement ⭐️⭐️⭐️ (Moderate) Phillips #00 20-30 minutes
Fan Cleaning ⭐️⭐️⭐️ (Moderate) Phillips #00 15-25 minutes

🚧 Common Removal Challenges & Solutions

Challenge Symptoms Immediate Solution Prevention
Stubborn Clips Resistance, no clip release sound Apply gentle pressure, work from different angle Work slowly around perimeter
Hidden Screws Cover won't lift, uneven resistance Check under rubber feet and labels Thorough initial inspection
Stripped Screws Screw head damaged, won't turn Use rubber band for grip, proper screwdriver size Use correct Phillips #00 size
Tight Fit Cover seems stuck despite all screws removed Check for missed clips, apply even pressure Follow clip release sequence

🛡️ Safety Precautions

  • Component Protection:
    • Work on clean, static-free surface
    • Handle components by edges only
    • Avoid touching gold contacts
    • Keep screws organized
  • Tool Safety:
    • Use plastic tools for prying
    • Avoid metal contact with motherboard
    • Don't force components
    • Work methodically and patiently

📝 Documentation Tips

  • Photo Documentation:
    • Take photos before removing components
    • Document cable routing and orientations
    • Capture screw locations and types
    • Note connector positions
  • Organization:
    • Use small containers for different screw types
    • Label containers with masking tape
    • Keep components in order of removal
    • Note any unusual observations

⏱️ Time Expectations

Experience Level Estimated Time Success Rate Notes
First Time 15-25 minutes 95% Take your time, follow steps carefully
Experienced DIY 8-12 minutes 99% Quick and straightforward
Professional 3-5 minutes 100% Routine procedure

✅ Quality Check Points

  • Before Proceeding:
    • All screws properly removed and organized
    • Battery disconnected from motherboard
    • No forced or damaged components
    • Clean work area with good lighting
  • Internal Inspection:
    • No loose screws inside chassis
    • All cables properly routed
    • Components appear undamaged
    • No signs of previous repairs or damage

🎯 Ready for Component Work?

Excellent! You've successfully accessed the internals of your Lenovo Ideapad Flex 5. With the back cover removed and battery disconnected, you're ready to proceed with specific repairs. The next section covers Battery Replacement & Power System maintenance.

5. Battery Replacement & Power System for Lenovo Ideapad Flex 5

🔋 Essential Power System Maintenance

The Lenovo Ideapad Flex 5 features a standard 3-cell or 4-cell lithium-ion battery that's easily replaceable. Proper battery maintenance ensures reliable performance and extends your laptop's mobile usability.

📊 Ideapad Flex 5 Battery Specifications

Specification 3-Cell Model 4-Cell Model Daily Use Impact
Battery Type Lithium-ion Polymer Lithium-ion Polymer Standard laptop battery technology
Capacity 45Wh (Typical) 52.5Wh (Typical) 4-6 hours typical use
Voltage 11.4V DC 11.4V DC Standard laptop voltage
Dimensions 205mm × 70mm × 5mm 205mm × 85mm × 5mm Compact design for 14" laptop
Compatible Part Numbers L19M4PE1, L19C4PE1 L19M4PE2, L19C4PE2 Check compatibility before purchase

⚠️ When to Replace Your Battery

  • Performance Indicators:
    • Battery life reduced to less than 2 hours
    • System shuts down unexpectedly at 20-30% charge
    • Battery doesn't charge to 100% capacity
    • Windows shows "Consider replacing your battery"
  • Physical Warning Signs:
    • Battery swelling or bulging case
    • Overheating during charging or use
    • Visible case separation
    • Laptop won't sit flat on surface
  • Software Diagnostics:
    • Run powercfg /batteryreport in Command Prompt
    • Check battery health in Lenovo Vantage
    • Monitor capacity degradation over time
    • Compare design capacity vs current capacity

🛡️ Essential Safety Preparation

  1. Power Down Protocol:
    • Shut down Windows completely
    • Disconnect power adapter from wall
    • Remove all peripherals and accessories
    • Hold power button for 10 seconds to discharge
  2. Workspace Safety:
    • Work in well-ventilated area
    • Keep work area clean and organized
    • Use plastic tools only around battery
    • Have phone nearby for emergency calls
  3. Battery Handling:
    • Never puncture or compress battery
    • Avoid exposure to high temperatures
    • Handle with clean, dry hands
    • Work methodically and carefully

🔧 Step-by-Step Battery Replacement

  1. Access Battery Compartment:
    • Remove back cover (8-10 Phillips #00 screws)
    • Disconnect battery connector from motherboard
    • Wait 2 minutes for residual power discharge
    • Take photo of connector orientation
  2. Battery Mounting Screw Removal:
    • Remove 4-6 Phillips #00 screws securing battery
    • Note screw lengths and positions
    • Use magnetic screwdriver if available
    • Organize screws in labeled container
  3. Battery Removal:
    • Lift battery from connector end first
    • Support battery with both hands
    • Check for any adhesive strips (rare)
    • Place old battery in safe location
  4. New Battery Installation:
    • Clean battery compartment if needed
    • Position new battery aligning with mounting points
    • Secure with mounting screws in correct sequence
    • Reconnect battery connector to motherboard

🔍 Battery Compatibility & Sourcing

Source Quality Level Price Range Warranty Recommendation
Lenovo Parts Genuine OEM $60-90 1 year ⭐️⭐️⭐️⭐️⭐️ (Best)
Authorized Resellers Genuine OEM $50-80 90 days - 1 year ⭐️⭐️⭐️⭐️ (Excellent)
Reputable Third-Party Good Quality $30-50 6-12 months ⭐️⭐️⭐️ (Good)
Generic/Unknown Variable Quality $20-40 0-30 days ⭐️ (Avoid)

⚡ Power System Calibration

  1. Initial Power On:
    • Reconnect back cover temporarily
    • Connect power adapter
    • Power on system and enter BIOS
    • Verify battery detection and health status
  2. Battery Calibration:
    • Charge battery to 100% without interruption
    • Disconnect power and use until system shuts down (~5%)
    • Recharge to 100% without using laptop
    • Repeat calibration cycle 2-3 times
  3. Software Configuration:
    • Update Lenovo BIOS and drivers
    • Install latest power management drivers
    • Configure Windows power plans
    • Set up Lenovo Vantage battery settings

📊 Post-Replacement Performance Testing

  • Battery Health Verification:
    • Run powercfg /batteryreport in Command Prompt
    • Check reported capacity vs design capacity
    • Monitor charge/discharge cycles
    • Verify no rapid capacity degradation
  • Real-World Usage Testing:
    • Web browsing: 5-7 hours expected
    • Video playback: 4-6 hours expected
    • Document work: 6-8 hours expected
    • Standby time: 5-7 days expected
  • Charging Performance:
    • 0-50% charge: 30-45 minutes
    • 0-100% charge: 90-120 minutes
    • Verify no overheating during charging
    • Check consistent charging speed

🔍 Battery Replacement Troubleshooting

Issue Symptoms Immediate Solution Advanced Resolution
Battery Not Detected Shows "No battery detected" in Windows Reseat battery connector, check for damage Update BIOS, check motherboard circuit
Rapid Discharge Battery drains much faster than expected Calibrate battery, check background processes Test with different power profile
Not Charging Stuck at certain percentage, won't charge Reset power management, try different charger Check charging port, power circuitry
Overheating Battery gets hot during charging/use Stop using immediately, inspect for damage Replace with genuine battery

🔧 Long-Term Battery Maintenance

  • Optimal Charging Practices:
    • Keep battery between 20-80% for daily use
    • Avoid frequent full discharge cycles
    • Don't leave laptop plugged in 24/7 at 100%
    • Use Conservation Mode in Lenovo Vantage
  • Storage Recommendations:
    • Store at 40-60% charge if not using for extended periods
    • Keep in cool, dry environment (15-25°C)
    • Check charge level every 3-6 months
    • Recharge to 40-60% if below 20%
  • Performance Optimization:
    • Reduce screen brightness when on battery
    • Close unnecessary background applications
    • Disconnect peripherals when not in use
    • Use battery saver mode when needed

♻️ Old Battery Safety Disposal

  • Immediate Handling:
    • Place in safe, dry location
    • Store away from flammable materials
    • Do not attempt to disassemble
    • Keep away from children and pets
  • Proper Disposal Options:

💰 Battery Replacement Cost-Benefit

Scenario Replacement Cost Expected Lifespan Value Added ROI
DIY with Genuine Battery $60-90 2-3 years $80-120 110-140%
Professional Service $120-180 2-3 years $80-120 60-80%
Third-Party Battery $30-50 1-2 years $50-80 100-130%

🎯 Ready for Storage Upgrades?

Excellent! With your new battery installed and calibrated, your Lenovo Ideapad Flex 5 now has reliable mobile power. The next logical upgrade is SSD Upgrade & Storage Expansion to dramatically improve boot times and overall system responsiveness.

6. SSD Upgrade & Storage Expansion for Lenovo Ideapad Flex 5

⚡ Transform Your Laptop's Performance

Upgrading to an SSD is the single most impactful improvement you can make to your Lenovo Ideapad Flex 5. Experience dramatically faster boot times, instant application loading, and overall system responsiveness.

📊 Ideapad Flex 5 Storage Specifications

Specification Common Configurations Upgrade Options Performance Impact
Interface SATA III, M.2 SATA, M.2 NVMe M.2 NVMe (PCIe 3.0) 3-5x faster than SATA
Form Factors 2.5" SATA, M.2 2280 M.2 2280 (most models) Compact, no cables needed
Maximum Speed 550 MB/s (SATA) 3,500 MB/s (NVMe) PCIe 3.0 performance
Boot Support All configurations All configurations Fast Windows startup
Capacity Options 128GB - 1TB (stock) 256GB - 2TB (upgrade) More space for files and apps

🔍 SSD Compatibility & Selection

  • Form Factor Requirements:
    • M.2 2280: 22mm wide × 80mm long (most common)
    • Key M or B+M: Check your specific model
    • Single-sided: Required for clearance
    • Low-profile: No tall components
  • Interface Compatibility:
    • PCIe 3.0 NVMe: Best performance
    • SATA M.2: Good performance, widely compatible
    • 2.5" SATA: Some models have both bays
    • DRAM cache: Recommended for consistent speed
  • Verified Compatible Models:
    • Samsung 970 EVO Plus
    • WD Blue SN570
    • Crucial P3/P5 Plus
    • Kingston NV2
    • SK Hynix Gold P31

💾 Storage Configuration Options

Use Case Recommended Setup Capacity Approximate Cost Performance Benefit
Basic Computing Single NVMe SSD 512GB $40-60 Fast boot, quick app loading
Student/Office Single NVMe SSD 1TB $60-90 Ample space for documents and apps
Content/Multimedia NVMe + 2.5" SATA (if available) 1TB + 1TB $100-150 Fast OS + large file storage
Future-Proof Single NVMe SSD 2TB $120-180 Maximum speed and capacity

🛠️ Pre-Installation Preparation

  • Required Tools:
    • Phillips #00 screwdriver
    • Plastic spudger or guitar pick
    • USB flash drive (16GB+) for data transfer
    • External SSD enclosure (optional)
  • Software Preparation:
  • Data Transfer Strategy:
    • Clean Install: Best performance, fresh start
    • Disk Cloning: Preserves everything
    • Manual Transfer: Selective file copying
    • Cloud Backup: Restore from cloud services

🔧 Step-by-Step SSD Installation

  1. Access Storage Bay:
    • Remove back cover (8-10 Phillips #00 screws)
    • Locate M.2 slot or 2.5" bay
    • Identify existing storage configuration
    • Take photo of original setup
  2. Existing Drive Removal:
    • Remove single Phillips #00 mounting screw
    • Gently lift SSD at 30-degree angle
    • Pull straight out from M.2 slot
    • Handle by edges only - avoid touching contacts
  3. New SSD Installation:
    • Align SSD notch with M.2 slot key
    • Insert at 30-degree angle into slot
    • Press down gently until SSD lies flat
    • Secure with mounting screw (don't overtighten)
    • Ensure SSD is parallel to motherboard
  4. 2.5" SATA Installation (if available):
    • Mount SSD in drive caddy
    • Connect SATA data and power cables
    • Secure with mounting screws
    • Route cables neatly

🔄 Data Migration Strategies

  1. Clean Windows Installation (Recommended):
    • Boot from Lenovo recovery USB
    • Install fresh Windows 10/11
    • Reinstall applications and restore files
    • Benefits: Best performance, no legacy issues
  2. Disk Cloning:
    • Use external USB enclosure for new SSD
    • Run cloning software (Macrium Reflect)
    • Clone existing drive to new SSD
    • Swap drives and verify boot
    • Benefits: Preserves all settings and files
  3. Selective Data Transfer:
    • Fresh OS install on new SSD
    • Copy important files from backup
    • Reinstall essential applications
    • Benefits: Clean system with essential data only

📈 Storage Performance Comparison

Storage Type Read Speed Write Speed Boot Time App Load Time
HDD (if present) 80-120 MB/s 60-100 MB/s 45-60 seconds 15-30 seconds
SATA SSD 500-550 MB/s 450-500 MB/s 15-25 seconds 5-10 seconds
NVMe SSD 2,000-3,500 MB/s 1,500-3,000 MB/s 8-15 seconds 2-5 seconds

🎯 Post-Installation Optimization

  • Windows Optimization:
    • Enable TRIM support (automatic in Windows 10/11)
    • Disable disk defragmentation for SSDs
    • Adjust power settings for maximum performance
    • Enable write caching in device manager
  • SSD Firmware & Drivers:
    • Update SSD firmware using manufacturer tools
    • Install latest NVMe drivers if available
    • Update chipset drivers for optimal performance
    • Check for BIOS updates
  • Performance Testing:
    • Run CrystalDiskMark for speed verification
    • Use manufacturer software for health monitoring
    • Test boot times and application loading
    • Verify temperatures during use

🔍 Troubleshooting Common SSD Issues

Issue Symptoms Immediate Solution Advanced Resolution
Drive Not Detected BIOS doesn't show new SSD Reseat drive, check mounting, update BIOS Test in external enclosure, check compatibility
Slow Performance Speeds below expectations Update drivers, check power settings Verify NVMe enabled in BIOS, check temperatures
Boot Failure Windows won't boot from new drive Check boot order, repair bootloader Clean install, verify partition scheme
Incompatibility System doesn't recognize NVMe drive Update BIOS to latest version Check M.2 key compatibility, use SATA M.2 instead

💻 Real-World Performance Impact

  • Application Loading Times:
    • Microsoft Office: 15s → 3s (80% faster)
    • Web Browser: 8s → 2s (75% faster)
    • Photo Editing: 25s → 6s (76% faster)
    • Game Loading: 45s → 12s (73% faster)
  • System Workflow Improvements:
    • Boot Time: 45s → 12s (73% faster)
    • File Transfers: 3-5x faster operations
    • Application Switching: Near-instant response
    • System Updates: 2-3x faster installation

📊 Storage Capacity Planning

Use Case Recommended Capacity Typical Storage Needs Future Growth
Basic Computing 512GB OS + Applications + Documents 2-3 years
Student/Office 1TB Documents + Projects + Media 3-4 years
Content/Multimedia 2TB Large files + Projects + Backup 2-3 years

💰 SSD Upgrade Resale Value Impact

Storage Configuration Upgrade Cost Value Added ROI Percentage Buyer Appeal
256GB (Stock) $0 $0 N/A Standard
512GB Upgrade $40-60 $50-80 110-140% High
1TB Upgrade $60-90 $80-120 120-150% Very High
2TB Upgrade $120-180 $150-220 110-130% Premium

🎯 Ready for Memory Upgrades?

Excellent work! With your high-speed SSD upgrade complete, your Lenovo Ideapad Flex 5 now has lightning-fast storage performance. The next enhancement is RAM Installation & Memory Options to ensure smooth multitasking and optimal system performance.

7. RAM Installation & Memory Options for Lenovo Ideapad Flex 5

🚀 Boost Your Laptop's Multitasking Power

Upgrading RAM is one of the easiest and most cost-effective improvements for your Lenovo Ideapad Flex 5. More memory means smoother multitasking, faster application performance, and better overall system responsiveness.

📊 Ideapad Flex 5 Memory Specifications

Specification Details Performance Impact
Memory Type DDR4 SO-DIMM Standard laptop memory
Speed Support 2400MHz, 2666MHz, 3200MHz Automatic speed negotiation
Maximum Capacity 16GB or 32GB (depending on model) Ideal for multitasking and modern applications
Slots Available 1 or 2 SO-DIMM Slots Single or dual-channel configuration
Default Configuration 4GB, 8GB, or 16GB (soldered or slot) Significant upgrade potential
Voltage & Timing 1.2V, CL17-CL22 Standard DDR4 specifications

🔍 DDR4 Memory Compatibility

  • JEDEC Standards:
    • Must support 1.2V operation (DDR4 standard)
    • JEDEC DDR4-2400 (PC4-19200)
    • JEDEC DDR4-2666 (PC4-21300)
    • JEDEC DDR4-3200 (PC4-25600)
  • Physical Requirements:
    • 260-pin DDR4 SO-DIMM form factor
    • Standard height modules
    • Offset notch position (different from DDR3)
    • Low-profile heat spreaders recommended
  • Verified Compatible Brands:
    • Crucial (excellent compatibility)
    • Kingston ValueRAM
    • Samsung
    • SK Hynix
    • Micron

⚙️ RAM Configuration Options

Use Case Recommended RAM Approximate Cost Performance Benefit
Basic Computing 8GB Total $25-40 Smooth web browsing, office applications
Student/Office 16GB Total $45-70 Excellent multitasking, multiple applications
Content Creation 20GB Total (8+12 or 4+16) $60-90 Photo editing, light video work
Power User 32GB Total (16+16) $80-120 Heavy multitasking, virtual machines

🛠️ Pre-Installation Preparation

  • Required Tools:
    • Phillips #00 screwdriver (for back cover)
    • Plastic spudger (for back cover clips)
    • No tools needed for RAM installation itself
    • Anti-static precautions recommended
  • Safety Procedures:
    • Disconnect battery before installation
    • Verify laptop is completely powered off
    • Ground yourself before handling RAM
    • Work on static-free surface
  • Software Preparation:
    • Update BIOS from Lenovo Support
    • Download CPU-Z for verification
    • Note current RAM configuration
    • Backup important data

🔧 Step-by-Step DDR4 RAM Installation

  1. Access RAM Slots:
    • Remove back cover (8-10 Phillips #00 screws)
    • Locate RAM slots - usually near center
    • Identify existing RAM configuration
    • Note if slots are empty or populated
  2. Existing Memory Removal (If Needed):
    • Gently push outward on both side clips simultaneously
    • Module will pop up at 45-degree angle
    • Lift module straight out of slot
    • Handle by edges only - avoid touching gold contacts
  3. Slot Preparation:
    • Inspect slots for dust or debris
    • Use compressed air to clean if necessary
    • Verify slot clips are in open position
    • Check for any physical damage to slots
  4. New DDR4 Memory Installation:
    • Align offset notch in module with key in slot
    • Insert module at 45-degree angle
    • Press firmly until module seats completely
    • Gently push down until side clips lock into place
    • Listen for audible "click" indicating proper installation
  5. Dual-Channel Configuration:
    • Install identical modules in both slots for best performance
    • Match capacity, speed, and timing specifications
    • If using different sizes, install larger module in primary slot
    • Verify both modules are securely installed

⚡ DDR4 Performance Advantages

  • Architectural Improvements:
    • Higher data transfer rates
    • Lower power consumption (1.2V vs 1.5V DDR3)
    • Improved reliability
    • Better signal integrity
  • Real-World Benefits:
    • Web Browsing: More tabs without slowdown
    • Office Applications: Faster document processing
    • Multitasking: Smooth performance with multiple apps
    • System Responsiveness: Reduced lag and stuttering

📈 RAM Speed Performance Comparison

Memory Speed Application Performance Multitasking Improvement Price Difference
2400MHz Baseline Good 0%
2666MHz +2-4% +3-5% 5-10%
3200MHz +5-8% +6-10% 15-25%

✅ Post-Installation Verification

  1. Initial Boot Test:
    • Reconnect battery and power adapter
    • Power on laptop and listen for beep codes
    • Watch for Lenovo splash screen
    • Note any error messages or failure to boot
  2. BIOS Recognition:
    • Enter BIOS (F2 or Fn+F2 during boot)
    • Navigate to Memory Information section
    • Verify total memory capacity is recognized
    • Check memory speed and timing settings
  3. Operating System Verification:
    • Boot to Windows and open System Properties
    • Verify installed memory matches expected capacity
    • Run CPU-Z and check Memory and SPD tabs
    • Confirm dual-channel mode if applicable
  4. Stress Testing:
    • Run Windows Memory Diagnostic tool
    • Open multiple applications simultaneously
    • Monitor for crashes or application errors
    • Test with your typical workload

🔍 Troubleshooting Common RAM Issues

Issue Symptoms Immediate Solution Advanced Resolution
No Boot/Black Screen Laptop powers on but no display Reseat modules, try one module at a time Update BIOS, check compatibility list
Reduced Capacity Only partial memory recognized Check both slots, clean contacts Test modules individually, check for slot damage
System Instability Random crashes or blue screens Run memory diagnostics, check compatibility Adjust BIOS timings, test with different modules
Wrong Speed Detection Memory running at lower speed Update BIOS to latest version Check JEDEC compatibility

📊 Real-World Performance Impact

  • 4GB vs 8GB Comparison:
    • Web Browsing: 45% fewer page reloads
    • Application Switching: 60% faster
    • File Operations: 35% faster
    • System Responsiveness: 50% improvement
  • 8GB vs 16GB Comparison:
    • Multitasking: Run 2x more applications
    • Browser Tabs: 3x more tabs without slowdown
    • Photo Editing: 40% faster processing
    • Virtual Machines: Possible to run VMs

💡 RAM Capacity Recommendations

Usage Scenario Recommended RAM Typical Applications Future Proofing
Basic Computing 8GB Web browsing, email, office apps Good for 2-3 years
Student/Office 12GB-16GB Multiple apps, research, documents Excellent for 3-4 years
Content Creation 16GB-20GB Photo editing, light video work Good for 2-3 years
Power User 32GB Virtual machines, development, heavy multitasking Future proof for 4+ years

💰 RAM Upgrade Resale Value

RAM Configuration Upgrade Cost Value Added ROI Percentage Buyer Appeal
4GB (Stock) $0 $0 N/A Basic
8GB Upgrade $25-40 $35-55 130-150% Good
16GB Upgrade $45-70 $60-90 120-140% Excellent
32GB Upgrade $80-120 $100-150 110-130% Premium

🎯 Ready for Display Repairs?

Excellent! With your RAM upgrade complete, your Lenovo Ideapad Flex 5 now has enhanced multitasking capabilities and improved system performance. The next common repair is LCD Screen Replacement Guide for addressing display issues or upgrading your visual experience.

8. LCD Screen Replacement Guide for Lenovo Ideapad Flex 5

🖥️ Essential Display Repair for Everyday Use

The Lenovo Ideapad Flex 5 features various display options with straightforward replacement procedures. Whether you're fixing a cracked screen or upgrading to a better panel, this guide ensures successful DIY display replacement.

📊 Ideapad Flex 5 Display Specifications

Specification Common Models Upgrade Options Visual Impact
Screen Size 14.0" 14.0" Standard laptop size
Resolutions HD (1366x768), FHD (1920x1080) FHD IPS, Touch Options Sharper image, better clarity
Panel Technology TN, IPS IPS, Touchscreen Better colors and viewing angles
Refresh Rate 60Hz 60Hz Standard for everyday use
Touch Options Non-touch, Touch Touchscreen upgrade possible Convertible functionality

🔍 Display Compatibility Verification

  • Physical Requirements:
    • Size: 14.0" diagonal
    • Bezel Compatibility: Must match original bezel
    • Thickness: 2.5-3.0mm maximum
    • Mounting Points: Standard 14" pattern
  • Electrical Compatibility:
    • Interface: 30-pin or 40-pin eDP
    • Voltage: 3.3V logic, backlight specific
    • Connector Position: Bottom-center typically
    • Cable Length: Must reach motherboard
  • Verified Compatible Panels:
    • Innolux N140HCA-EAC (FHD IPS)
    • BOE NV140FHM-N61 (FHD IPS)
    • LG LP140WFA-SPD1 (FHD IPS)
    • AUO B140HAN (FHD IPS)

⚠️ When to Replace Your Display

  • Physical Damage:
    • Cracked or shattered glass
    • Deep scratches affecting visibility
    • Pressure marks or spots
    • Liquid damage to display
  • Display Issues:
    • Lines or patterns on screen
    • Flickering or intermittent display
    • Backlight failure
    • Color distortion or fading
  • Upgrade Opportunities:
    • HD to FHD resolution upgrade
    • TN to IPS panel for better viewing
    • Adding touchscreen capability
    • Brighter panel for outdoor use

🛠️ Pre-Installation Preparation

  • Required Tools:
    • Plastic spudgers or guitar picks
    • Phillips #00 screwdriver
    • Small suction cups (helpful but not essential)
    • Double-sided adhesive tape (1mm)
    • Isopropyl alcohol and lint-free wipes
  • Safety Equipment:
    • Clean, soft work surface
    • Good lighting
    • ESD precautions
    • Patience and careful handling
  • Testing Preparation:
    • Test new panel before installation
    • Have external monitor ready
    • Prepare workspace for delicate work
    • Clear ample working space

🔧 Step-by-Step LCD Replacement

  1. Bezel Removal:
    • Start from bottom edge near hinge area
    • Insert plastic spudger at 45-degree angle
    • Work around entire perimeter slowly
    • Listen for soft clicks as clips release
    • Be extremely careful near webcam and sensors
  2. Display Mounting Screw Removal:
    • Remove 4-6 Phillips #00 screws securing display
    • Note screw lengths and positions
    • Keep screws organized in labeled containers
    • Take photos of screw locations
  3. Display Cable Disconnection:
    • Identify eDP display cable connector
    • Gently lift locking mechanism using spudger
    • Slide cable straight out - never pull at angle
    • Disconnect webcam and microphone cables if present
  4. Old Panel Removal:
    • Support display with both hands
    • Lift straight out from hinge brackets
    • Check for any adhesive or additional connections
    • Set old panel aside safely
  5. New Panel Installation:
    • Clean frame with isopropyl alcohol
    • Apply new double-sided adhesive if needed
    • Connect display cable to new panel
    • Align panel with mounting points
    • Secure with mounting screws
  6. Bezel Reinstallation:
    • Start from top edge and work downward
    • Press clips into place with even pressure
    • Verify all clips are fully engaged
    • Check for gaps or misalignment

💡 Display Upgrade Options

Panel Type Resolution Features Approximate Cost Best For
HD TN 1366x768 Basic display $40-60 Budget replacement
FHD IPS 1920x1080 Better colors, viewing angles $60-90 General use, media consumption
FHD IPS Touch 1920x1080 Touchscreen, convertible use $100-150 Flex 5 convertible functionality

🌈 Display Technology Comparison

  • TN Panel Advantages:
    • Lower cost
    • Faster response times (theoretical)
    • Widely available
  • IPS Panel Advantages:
    • Superior color accuracy
    • Excellent viewing angles (178°/178°)
    • Better contrast ratios
    • More consistent image quality
  • Touchscreen Considerations:
    • Requires compatible digitizer cable
    • May need different display cables
    • Check motherboard touch controller support
    • Additional cost but adds functionality

🔌 Cable Connection Guide

  1. Display Cable Identification:
    • Locate eDP cable running from motherboard
    • Identify locking mechanism type
    • Note cable routing through hinges
    • Check for any cable damage
  2. Proper Connection:
    • Ensure cable is fully seated in connector
    • Locking mechanism must click into place
    • Cable should lie flat without tension
    • Route cable away from moving parts
  3. Cable Routing:
    • Follow original cable path exactly
    • Use existing cable retention clips
    • Ensure no pinching in hinge mechanism
    • Leave slight slack for hinge movement

✅ Post-Installation Testing

  1. Pre-Assembly Test:
    • Connect new panel before final assembly
    • Power on laptop to test functionality
    • Check for dead pixels or display issues
    • Verify touch functionality if applicable
  2. Display Quality Check:
    • Test at different brightness levels
    • Check for uniform backlight
    • Look for color consistency
    • Verify viewing angles
  3. Functional Testing:
    • Test hinge movement and stability
    • Verify webcam and microphone operation
    • Check auto-rotation if convertible
    • Test touch accuracy if touchscreen

🔍 Display Replacement Troubleshooting

Issue Symptoms Immediate Solution Advanced Resolution
No Display Black screen, backlight works Reseat eDP cable, check connections Test with external monitor, check GPU
Flickering Screen flickers or flashes Check cable seating, update drivers Replace eDP cable, check inverter
Color Issues Wrong colors or banding Update graphics drivers, check cable Replace panel, check color profile
Touch Not Working Touchscreen unresponsive Check digitizer cable connection Install touch drivers, check hardware

💰 Display Upgrade Resale Value

Display Configuration Upgrade Cost Value Added ROI Percentage Buyer Appeal
HD TN (Stock) $0 $0 N/A Basic
FHD IPS Replacement $60-90 $80-120 120-150% High
Touchscreen Upgrade $100-150 $130-180 120-140% Very High

🎯 Ready for Keyboard Repairs?

Excellent work! With your display replacement complete, your Lenovo Ideapad Flex 5 now has a crisp, clear screen for all your computing needs. The next common repair is Keyboard & Touchpad Repair to address input device issues.

9. Keyboard & Touchpad Repair for Lenovo Ideapad Flex 5

⌨️ Essential Input Device Maintenance

The Lenovo Ideapad Flex 5 features a spill-resistant keyboard and precision touchpad that are designed for easy replacement. Proper repair techniques ensure reliable input performance for everyday computing tasks.

📊 Keyboard & Touchpad Specifications

Component Specifications Features Replacement Complexity
Keyboard US QWERTY, 78-81 keys Spill-resistant, backlit options ⭐️⭐️⭐️ (Moderate)
Touchpad Precision touchpad, 105×65mm Multi-touch gestures, Windows precision ⭐️⭐️⭐️⭐️ (Intermediate)
Keyboard Connector 20-30 pin ribbon cable ZIF (Zero Insertion Force) connector ⭐️⭐️ (Easy with care)
Touchpad Connector 10-15 pin ribbon cable Standard laptop touchpad interface ⭐️⭐️ (Easy with care)

⚠️ When to Repair Input Devices

  • Keyboard Issues:
    • Non-responsive or stuck keys
    • Spill damage or liquid exposure
    • Missing or broken keycaps
    • Backlight failure (if equipped)
    • Intermittent typing response
  • Touchpad Problems:
    • Cursor jumping or erratic movement
    • Non-responsive touch surface
    • Button click failure
    • Gesture recognition issues
    • Physical damage to surface
  • Software vs Hardware:
    • Test with external keyboard/mouse first
    • Update drivers from Lenovo Support
    • Check Windows device manager
    • Test in BIOS to rule out software issues

🛠️ Pre-Repair Preparation

  • Required Tools:
    • Phillips #00 screwdriver
    • Plastic spudgers and opening tools
    • Tweezers (plastic preferred)
    • Small container for screws
    • Isopropyl alcohol and cotton swabs
  • Safety Procedures:
    • Power down completely and disconnect battery
    • Work on clean, static-free surface
    • Handle ribbon cables with extreme care
    • Take photos before disconnecting cables
  • Replacement Parts:
    • Genuine Lenovo keyboard assembly
    • Compatible touchpad module
    • Replacement ribbon cables if damaged
    • Double-sided adhesive if needed

🔧 Keyboard Replacement Procedure

  1. Access Keyboard Assembly:
    • Remove back cover (8-10 Phillips #00 screws)
    • Disconnect battery from motherboard
    • Locate keyboard ribbon cable connector
    • Identify ZIF connector locking mechanism
  2. Keyboard Removal:
    • Release ZIF connector by lifting locking flap
    • Gently slide keyboard cable out of connector
    • Remove keyboard mounting screws (if present)
    • Carefully lift keyboard from palm rest area
  3. New Keyboard Installation:
    • Position new keyboard in palm rest cutout
    • Align mounting points and screw holes
    • Connect ribbon cable to motherboard
    • Secure ZIF connector locking mechanism
    • Test keyboard function before final assembly

🔧 Touchpad Replacement Procedure

  1. Access Touchpad Assembly:
    • Remove back cover and disconnect battery
    • Locate touchpad ribbon cable on motherboard
    • Identify touchpad mounting points
    • Note cable routing through chassis
  2. Touchpad Removal:
    • Disconnect touchpad ribbon cable from motherboard
    • Remove touchpad mounting screws (2-4 typically)
    • Gently lift touchpad from palm rest
    • Check for adhesive or additional connections
  3. New Touchpad Installation:
    • Position new touchpad in mounting location
    • Secure with mounting screws
    • Connect ribbon cable to motherboard
    • Ensure proper grounding if applicable
    • Test touchpad function before reassembly

🔌 Ribbon Cable Connection Guide

Connection Type Procedure Critical Steps Common Mistakes
ZIF Connectors Lift locking flap, insert cable, lock flap Cable must be straight and fully inserted Forcing cable, damaging locking mechanism
Standard Ribbon Slide cable straight into connector Ensure even insertion, no bent pins Angled insertion, partial connection
Locking Types Identify lock type before disconnection Take photos before disassembly Pulling cables without unlocking first

🧹 Cleaning & Maintenance Tips

  • Keyboard Cleaning:
    • Use compressed air to remove debris
    • Isopropyl alcohol on cotton swabs for stains
    • Keycap removal tool for deep cleaning
    • Never use excessive liquid
  • Touchpad Maintenance:
    • Clean with isopropyl alcohol and soft cloth
    • Avoid abrasive cleaners
    • Check driver settings in Windows
    • Update precision touchpad drivers
  • Preventative Care:
    • Keep food and drinks away from laptop
    • Wash hands before use to reduce oil buildup
    • Use keyboard cover if desired
    • Regular compressed air cleaning

🔍 Input Device Troubleshooting

Issue Symptoms Immediate Solution Advanced Resolution
Non-responsive Keys Specific keys not working Clean under keycaps, check for debris Replace keyboard assembly
Spill Damage Sticky keys, erratic behavior Immediate power off, disassembly, cleaning Full keyboard replacement if damaged
Touchpad Jumping Cursor moves erratically Update drivers, clean surface Replace touchpad, check grounding
Backlight Failure Keyboard backlight not working Check Fn key combination, power settings Replace keyboard, check LED circuit

🔧 Replacement Parts Guide

  • Keyboard Assembly Sources:
    • Lenovo Genuine Parts
    • Authorized Lenovo parts distributors
    • Reputable third-party suppliers
    • Ensure correct part number for your model
  • Part Number Verification:
    • Check laptop serial number on bottom label
    • Verify model number compatibility
    • Match keyboard layout (US, UK, etc.)
    • Check backlight compatibility if applicable
  • Quality Considerations:
    • Genuine Lenovo: Best quality, perfect fit
    • OEM Equivalent: Good quality, lower cost
    • Third-party: Variable quality, check reviews
    • Avoid used or questionable sources

✅ Post-Repair Testing

  1. Pre-Assembly Testing:
    • Test keyboard before final assembly
    • Check all keys for proper response
    • Verify backlight functionality if equipped
    • Test touchpad movement and clicks
  2. Software Configuration:
    • Update keyboard and touchpad drivers
    • Configure touchpad settings in Windows
    • Set up backlight preferences if available
    • Test special function keys (Fn combinations)
  3. Final Verification:
    • Test during normal computer use
    • Check for any unusual behavior
    • Verify gesture support on touchpad
    • Ensure comfortable typing experience

⏱️ Repair Time Expectations

Repair Type First Time Experienced Success Rate
Keyboard Replacement 30-45 minutes 15-25 minutes 95%
Touchpad Replacement 25-35 minutes 12-20 minutes 90%
Both Components 45-60 minutes 25-35 minutes 92%
Cleaning Only 15-25 minutes 8-15 minutes 98%

💰 Repair Cost-Benefit Analysis

Repair Scenario DIY Cost Professional Cost Savings Value Added
Keyboard Replacement $40-70 $120-180 $80-110 $50-80
Touchpad Replacement $25-50 $80-120 $55-70 $30-50
Both Components $65-120 $200-300 $135-180 $80-120

🎯 Ready for Cooling Maintenance?

Excellent! With your keyboard and touchpad repairs complete, your Lenovo Ideapad Flex 5 now has reliable input devices for comfortable computing. The next important maintenance task is Fan Cleaning & Thermal Maintenance to ensure optimal system performance and longevity.

10. Where to Sell Your Upgraded Lenovo Ideapad Flex 5

💰 Maximize Your Return on Investment

After completing your DIY upgrades, your Lenovo Ideapad Flex 5 has significantly increased value. Choosing the right selling platform can mean the difference between a good return and a great one. Here's your comprehensive guide to selling your upgraded laptop effectively.

🎯 Pre-Sale Preparation Checklist

  • Data Security & Reset:
    • Backup all personal files and data
    • Perform factory reset using Lenovo Recovery Media
    • Remove all accounts (Microsoft, Google, etc.)
    • Clean install Windows for fresh start
  • Physical Presentation:
    • Thoroughly clean exterior and keyboard
    • Polish screen with appropriate cleaner
    • Take high-quality photos from multiple angles
    • Include photos of upgrade components
  • Documentation Package:
    • Create list of all upgrades performed
    • Include before/after performance metrics
    • Provide original purchase receipt if available
    • Document remaining warranty information

🎓 Premium Institutional Buyers

Platform Best For Payout Speed Commission/Fees Recommendation
SellBroke Quick, hassle-free sales 24-48 hours No fees, free shipping ⭐️⭐️⭐️⭐️⭐️ (Top Choice)
SellLaptopBack Environmentally conscious sales 3-5 business days No hidden fees ⭐️⭐️⭐️⭐️ (Excellent)
.gov/.edu Programs Institutional buyers 30-45 days Typically none ⭐️⭐️⭐️⭐️ (High Value)

🛒 Popular Online Marketplaces

Platform Audience Size Seller Protection Fees Best For
eBay Global massive audience Good protection policies 12.9% + $0.30 Auction-style competitive bidding
Facebook Marketplace Local community Minimal protection No listing fees Quick local cash sales
Mercari Growing user base Good buyer/seller protection 10% selling fee Easy mobile sales
Swappa Tech-savvy buyers Excellent protection 3% PayPal fee + $10-20 Premium tech sales

💵 Smart Pricing Strategy

  • Market Research:
    • Search completed eBay listings for similar models
    • Check local Facebook Marketplace prices
    • Research Swappa recent sales data
    • Compare with refurbished models from retailers
  • Value Calculation:
    • Base laptop value (check completed sales)
    • Add 80-100% of upgrade component costs
    • Factor in cosmetic condition (Excellent/Good/Fair)
    • Include remaining warranty value
  • Pricing Examples:
    • Base Model (8GB/256GB): $300-400
    • With RAM & SSD Upgrades: $380-520
    • Fully Refurbished + Upgrades: $450-600
    • Premium Touchscreen Model: $500-650

📈 Listing Optimization Tips

  • Title Optimization:
    • "Lenovo Ideapad Flex 5 - [RAM]GB RAM, [SSD]GB SSD - Upgraded"
    • Include key specs: "14" FHD Touch, i5, 16GB, 1TB SSD"
    • Add selling points: "Fresh Thermal Paste, New Battery"
    • Mention condition: "Like New, Professionally Upgraded"
  • Photo Best Practices:
    • Clean, well-lit photos against neutral background
    • Show laptop from all angles (open/closed)
    • Include photos of upgrade components/receipts
    • Demonstrate screen quality with test images
  • Description Essentials:
    • List all upgrades with component brands
    • Include performance improvements (boot time, etc.)
    • Mention recent maintenance (thermal paste, cleaning)
    • Be honest about any cosmetic imperfections

🏆 Premium Selling Platforms Deep Dive

Why Choose Specialized Buyers?

  • SellBroke Advantages:
    • Instant price quotes online
    • Free shipping labels provided
    • Payment within 24 hours of inspection
    • No fees or commissions
    • Excellent for upgraded devices
  • SellLaptopBack Benefits:
    • Environmentally responsible recycling
    • Competitive pricing for upgraded units
    • Simple three-step process
    • Data security guarantee
    • Good customer service reputation
  • Institutional Programs (.gov/.edu):
    • Higher prices for bulk purchases
    • Stable, reliable buyers
    • Often purchase upgraded units at premium
    • Check local government surplus programs
    • University IT department buyback programs

⏱️ Expected Selling Timeline

Platform Time to Sale Time to Payment Effort Level
SellBroke/SellLaptopBack 1-3 days 24-48 hours after receipt ⭐️⭐️ (Low)
Facebook Marketplace 1-7 days Immediate (cash) ⭐️⭐️⭐️⭐️ (High)
eBay Auction 3-10 days 2-3 days after sale ⭐️⭐️⭐️ (Medium)
Swappa 2-14 days 3-5 days after delivery ⭐️⭐️⭐️ (Medium)

🛡️ Safety & Security Considerations

  • Local Meetup Safety:
    • Meet in public places (police stations, banks)
    • Bring a friend or family member
    • Accept cash only for local sales
    • Test device with buyer present
  • Online Payment Security:
    • Use PayPal Goods & Services for protection
    • Avoid wire transfers or gift cards
    • Ship with tracking and insurance
    • Document device condition before shipping
  • Data Protection:
    • Triple-check all data is wiped
    • Remove from your Microsoft account
    • Deauthorize from any software licenses
    • Keep backup of your data separately

💎 Maximizing Your Sale Price

  • Bundle Value-Adds:
    • Include original charger and packaging
    • Add laptop bag or sleeve
    • Include USB mouse or other accessories
    • Provide printed upgrade documentation
  • Highlight Upgrade Benefits:
    • Emphasize performance improvements
    • Mention extended lifespan from upgrades
    • Highlight cost savings vs buying new
    • Show before/after benchmark results
  • Professional Presentation:
    • Clean, professional photos
    • Well-written, detailed description
    • Quick response to buyer inquiries
    • Positive seller reputation building

🧾 Tax & Legal Considerations

  • Record Keeping:
    • Keep records of original purchase price
    • Document all upgrade component costs
    • Save receipts from sale transaction
    • Maintain records for tax purposes
  • Tax Implications:
    • Personal property sales typically not taxable
    • Different rules for business sales
    • Platforms may issue 1099-K for high-volume sales
    • Consult tax professional for specific advice

📊 Final ROI Calculation Example

Investment Cost Sale Price Net Profit ROI
Base Laptop Purchase $250 - - -
RAM Upgrade (16GB) $45 +$60 +$15 33%
SSD Upgrade (1TB) $65 +$85 +$20 31%
Battery Replacement $55 +$70 +$15 27%
Total $415 $550 +$135 32.5%

🎉 Congratulations on Your Successful Upgrade & Sale!

You've not only extended the life of a quality laptop through smart DIY upgrades but also created significant value. Whether you choose the convenience of specialized buyers like SellBroke or the potentially higher returns of marketplace sales, your upgraded Lenovo Ideapad Flex 5 represents the perfect intersection of performance, value, and sustainability in the computing market.

Ready for your next project? Consider repeating this process with other quality laptops - your new repair skills can become a profitable hobby or side business!

Need to Sell Your Lenovo Laptop? Get Instant Cash!

If your Lenovo IdeaPad Flex 5 (or other IdeaPad model) has performance issues or you're upgrading to a newer laptop, we offer competitive cash payouts for your device. We buy broken, used, and refurbished IdeaPad laptops—including all Flex 5 configurations—with free insured shipping and hassle-free evaluations.

Sell Popular Lenovo Models Now:

Share this: