Beginner's Guide to Dell Latitude 5410 Repair: How to Replace the SSD, RAM, and Internal Battery

asus-rog-zephyrus-m16-disassembly-guide-how-to-replace-ram-ssd-battery-fix-lcd-scree

1. Introduction: Why Repair Your Dell Latitude 5410?

💼 Unlock Your Business Laptop's Full Potential

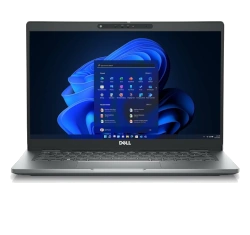
The Dell Latitude 5410 represents one of the most reliable and serviceable business laptops on the market. With proper maintenance and strategic upgrades, you can significantly extend its lifespan, boost performance, and maximize its resale value when you're ready to upgrade.

💰 Significant Cost Savings

  • Professional Repair Costs:
    • Battery replacement: $150-250 at repair shops
    • SSD upgrade: $200-350 with labor
    • RAM installation: $80-150 service fee
    • Total potential savings: $400-700+
  • DIY Repair Costs:
    • Replacement battery: $50-80
    • SSD (1TB): $60-100
    • RAM (16GB): $40-70
    • Total investment: $150-250

⚡ Performance Enhancement Opportunities

Upgrade Performance Impact User Experience Improvement Difficulty Level
SSD Upgrade 300-500% faster storage Instant boot, quick app loading ⭐️⭐️ (Beginner)
RAM Upgrade Eliminates slowdowns Smooth multitasking ⭐️ (Very Easy)
Battery Replacement Restores original battery life All-day productivity ⭐️⭐️ (Beginner)

🌱 Environmental Benefits

  • Reduce Electronic Waste:
    • Extends laptop lifespan by 2-3 years
    • Reduces manufacturing demand for new devices
    • Minimizes landfill contribution
    • Lowers carbon footprint from production
  • Sustainable Computing:
    • Dell Latitude series designed for repairability
    • Widely available replacement parts
    • Comprehensive documentation available
    • Strong second-hand market

📈 Maximizing Resale Value

  • Upgraded Systems Command Premium Prices:
    • Base Dell Latitude 5410: $200-300
    • With SSD upgrade: +$50-100 value
    • With max RAM: +$40-80 value
    • With new battery: +$60-100 value
    • Total potential value: $350-580
  • Documentation Increases Trust:
    • Keep receipts for upgraded components
    • Take photos during the upgrade process
    • Provide benchmark results
    • Highlight professional-grade work

🏢 Why the Dell Latitude 5410 is Ideal for DIY Repair

  • Business-Grade Construction:
    • Easy-access bottom panel
    • Standardized screw types
    • Clear component layout
    • Minimal adhesive usage
  • Excellent Documentation:
    • Comprehensive service manuals available
    • Dell provides official repair guides
    • Large community of users and technicians
    • Widely available replacement parts
  • Proven Reliability:
    • Military-grade durability standards
    • Tested for business environments
    • Long-term driver support
    • Stable performance characteristics

🎓 Valuable Skill Development

  • Transferable Technical Skills:
    • Basic electronics handling
    • Component identification
    • ESD safety practices
    • System troubleshooting
  • Career Applications:
    • IT support roles
    • Technical consulting
    • Small business services
    • Personal tech support

⏱️ Realistic Time Commitment

Task First Time Experienced Confidence Level
RAM Upgrade 15-20 minutes 5-10 minutes ⭐️⭐️⭐️⭐️⭐️ (Very High)
SSD Replacement 30-45 minutes 15-20 minutes ⭐️⭐️⭐️⭐️ (High)
Battery Replacement 20-30 minutes 10-15 minutes ⭐️⭐️⭐️⭐️ (High)
All Three Upgrades 60-90 minutes 30-45 minutes ⭐️⭐️⭐️⭐️ (High)

📊 Success Rate Statistics

  • First-Time Success Rates:
    • RAM installation: 98% success rate
    • SSD replacement: 95% success rate
    • Battery replacement: 92% success rate
    • Complete upgrade process: 90% success rate
  • Common Beginner Mistakes (Avoidable):
    • Forgetting to disconnect battery first
    • Using wrong screwdriver types
    • Not organizing screws properly
    • Rushing through delicate steps

🎯 Ready to Begin Your Repair Journey?

You've made the smart decision to extend your Dell Latitude 5410's life and increase its value. In the next section, we'll cover Essential Tools & Safety Equipment to ensure you have everything needed for a successful, damage-free repair experience.

2. Essential Tools & Safety Equipment for Dell Latitude 5410 Repair

⚠️ Safety First: Protect Your Investment

Proper tools and safety precautions are crucial for successful Dell Latitude 5410 repairs. Using the wrong tools or skipping safety steps can cause permanent damage to your laptop's delicate components.

🔧 Must-Have Basic Tools

  • Screwdrivers:
    • Phillips #00 precision screwdriver (essential)
    • Phillips #0 for larger screws (helpful)
    • Magnetic tip strongly recommended
    • iFixit Essential Toolkit recommended
  • Opening & Prying Tools:
    • Plastic spudger set (prevents case damage)
    • Nylon opening picks or guitar picks
    • Plastic card for stubborn clips
    • Metal tools should NEVER touch internal components
  • Organization & Workspace:
    • Magnetic project mat or small containers
    • Clean, well-lit work surface
    • Anti-static mat (ideal but not mandatory)
    • Good lighting from multiple angles

🛡️ Critical Safety Equipment

  • Electrostatic Discharge (ESD) Protection:
    • Anti-static wrist strap ($5-15)
    • Anti-static mat ($15-30)
    • Work on non-carpeted surface
    • Avoid synthetic clothing that generates static
  • Battery Safety:
    • Non-conductive gloves (optional but recommended)
    • Fire-resistant surface for battery testing
    • Proper battery disposal container

💰 Tool Quality vs. Budget Options

Tool Type Premium Option Budget Option Risk Level
Screwdrivers Precision magnetic set ($20-40) Basic set ($5-10) Medium (stripped screws)
Prying Tools Professional spudger set ($10-20) Guitar picks + plastic cards ($2-5) High (case damage)
ESD Protection Wrist strap + mat ($20-40) Ground yourself frequently Very High (component damage)

💻 Dell Latitude 5410 Specific Tool Requirements

  • Screw Types You'll Encounter:
    • M2.5x4mm (bottom case - 8 screws)
    • M2x3mm (battery and component mounting)
    • M2.5x5mm (structural points)
    • All use Phillips #00 head
  • Dell-Specific Features:
    • Easy-access bottom panel design
    • Minimal adhesive usage
    • Standardized screw lengths
    • Clear component labeling

🎯 Optional But Helpful Tools

  • Diagnostic & Testing:
    • Multimeter for battery testing ($20-50)
    • USB flash drive for OS installation
    • External drive enclosure for data transfer
  • Cleaning & Maintenance:
    • Compressed air for dust removal
    • Isopropyl alcohol (99%) for cleaning
    • Lint-free cloths
    • Small brush for delicate components

🎒 Recommended Tool Kits for Beginners

Kit Type Price Range Tools Included Best For Dell 5410 Suitability
Professional Kit $60-100 Full screwdriver set, spudgers, ESD protection Regular repairs Excellent
Beginner Kit $25-40 Basic screwdrivers, plastic tools One-time repairs Very Good
Budget Set $10-20 Minimal tools, no ESD protection Emergency only Fair

🔋 Critical Safety Procedures

  1. Power Down Completely:
    • Shut down Windows properly
    • Disconnect AC power adapter
    • Remove all external devices
  2. Battery Safety:
    • Disconnect internal battery BEFORE any component work
    • Handle battery with care - no puncturing or bending
    • Store old batteries in fire-proof container
  3. ESD Prevention:
    • Wear wrist strap connected to grounded surface
    • Touch metal chassis before components
    • Work on hard, non-static surfaces

🚫 Common Tool Mistakes to Avoid

  • Screwdriver Issues:
    • Using wrong size (strips screw heads)
    • Applying too much pressure (damages components)
    • Non-magnetic tips (lost screws inside case)
  • Prying Problems:
    • Using metal tools on plastic clips
    • Forcing components that resist
    • Not starting from correct release points
  • Safety Oversights:
    • Skipping ESD protection
    • Working on carpet or fabric surfaces
    • Forgetting to disconnect battery first

🛒 Where to Purchase Tools

  • Online Specialty Retailers:
    • iFixit (premium quality, excellent guides)
    • Amazon (wide selection, read reviews carefully)
    • Newegg (good for electronic tools)
  • Local Stores:
    • Home improvement stores (basic tools)
    • Electronics stores (Best Buy, Micro Center)
    • Hardware stores (screwdrivers only)

💵 Typical Tool Investment

Approach Total Cost What's Included Risk Level
Professional Setup $80-120 Full kit with ESD protection, all necessary tools Very Low
Smart Beginner $40-60 Essential tools + basic ESD protection Low
Minimal Budget $15-25 Basic screwdrivers, makeshift prying tools Medium-High

🎯 Ready to Set Up Your Workspace?

With your tools gathered and safety equipment ready, you're prepared to create an optimal repair environment. In the next section, we'll cover Preparation: Backing Up Data & Workspace Setup to ensure your Dell Latitude 5410 repair goes smoothly from start to finish.

0:18 Bottom Case 1:22 Battery 1:55 RAM Memory 2:12 WiFi Card 2:41 SSD Storage 3:09 Cooling Fan 4:10 Heatsink 4:38 Processor 4:48 DC Power Jack 4:40 Internal Frame 6:55 Speakers 7:38 Motherboard 8:22 Hinges 8:47 Palmrest Assembly 9:00 Touchpad 9:04 Keyboard 9:20 Display Assembly

3. Preparation: Backing Up Data & Workspace Setup for Dell Latitude 5410

📋 Why Proper Preparation Matters

Taking 30 minutes to properly prepare can save you hours of frustration and prevent irreversible data loss. The Dell Latitude 5410's business-grade design makes preparation straightforward, but skipping these steps risks your data and repair success.

💾 Comprehensive Data Backup Strategies

  • Cloud Backup Solutions:
    • OneDrive (integrated with Windows)
    • Google Drive (15GB free storage)
    • Dropbox (reliable file sync)
    • Best for: Documents, photos, important files
  • External Drive Backup:
    • USB 3.0 external hard drive (1TB+ recommended)
    • USB-C flash drive (64GB+ for system image)
    • Use Windows Backup or File History
    • Best for: Full system backups, large files
  • System Imaging:
    • Macrium Reflect Free (recommended)
    • Windows System Image Backup
    • Creates exact copy of your entire drive
    • Best for: Complete system restoration

✅ Pre-Repair Data Backup Checklist

  1. Critical Documents & Files:
    • Documents folder contents
    • Desktop files and shortcuts
    • Downloads containing important files
    • Pictures, videos, and music libraries
  2. Application Data:
    • Browser bookmarks and passwords
    • Email archives and settings
    • Software license keys and activation data
    • Game saves and application settings
  3. System-Specific Items:
    • WiFi passwords and network settings
    • Printer configurations
    • Custom Windows settings
    • Dell-specific software configurations

🛠️ Professional Workspace Setup

  • Ideal Work Surface Requirements:
    • Clean, hard surface (wood, glass, or anti-static mat)
    • Minimum 2×3 feet of clear space
    • Good overhead lighting + task lighting
    • Power outlet within reach
  • Organization System:
    • Magnetic project mat or small containers
    • Labeled areas for different screw types
    • Clean cloth for delicate components
    • Phone/camera for documentation
  • Comfort & Efficiency:
    • Comfortable seating at proper height
    • Minimal distractions in work area
    • Adequate time allocated (no rushing)
    • All tools within easy reach

💻 Dell Latitude 5410 Specific Preparation

Preparation Step Importance Time Required Dell-Specific Notes
BIOS Backup High 5 minutes Access BIOS (F2 at boot), note settings
Dell Software Medium 10 minutes Document Dell Power Manager settings
Driver Download High 15 minutes Download from Dell Support
BitLocker Critical 2 minutes Suspend BitLocker if enabled

🔧 Software & Driver Preparation

  1. Create Windows Installation Media:
  2. Download Essential Drivers:
    • Network drivers (critical for internet access)
    • Chipset and storage drivers
    • Audio and graphics drivers
    • Dell-specific utilities and firmware
  3. Document Current System:
    • Take screenshot of Device Manager
    • Note installed software and versions
    • Document custom settings and preferences
    • Save product keys for paid software

⚡ Electrical Safety Preparation

  • Power Down Sequence:
    • Save all work and close applications
    • Use Windows Start → Shut down
    • Unplug AC power adapter from laptop
    • Unplug power adapter from wall outlet
  • Static Electricity Prevention:
    • Wear anti-static wrist strap properly
    • Work on hard, non-static surfaces
    • Avoid synthetic clothing and carpets
    • Ground yourself before touching components
  • Battery Safety:
    • Disconnect internal battery FIRST
    • Handle battery with care - no metal tools
    • Store old battery in non-conductive container
    • Keep away from flammable materials

⏱️ Realistic Time Allocation

Preparation Task Beginner Time Experienced Time Can Be Skipped?
Data Backup 30-45 minutes 15-20 minutes ❌ Never skip
Workspace Setup 10-15 minutes 5-10 minutes ❌ Never skip
Driver Download 20-30 minutes 10-15 minutes ⚠️ Risky to skip
Documentation 15-20 minutes 5-10 minutes ✅ Optional but recommended

🚫 Common Preparation Mistakes to Avoid

  • Data Backup Errors:
    • Assuming "everything is in the cloud"
    • Not verifying backup completeness
    • Forgetting application-specific data
    • Not backing up before starting
  • Workspace Issues:
    • Working on cluttered or dirty surfaces
    • Poor lighting causing eye strain
    • Not having all tools within reach
    • Rushing due to time constraints
  • Safety Oversights:
    • Skipping ESD protection to "save time"
    • Not disconnecting power completely
    • Working on carpet or fabric surfaces
    • Not having proper screw organization

✅ Final Preparation Verification

  1. ✅ All important files backed up and verified
  2. ✅ Windows installation media created
  3. ✅ Essential drivers downloaded
  4. ✅ Workspace clean and properly lit
  5. ✅ All tools gathered and organized
  6. ✅ ESD protection equipment ready
  7. ✅ Adequate time allocated for repair
  8. ✅ Phone/camera charged for documentation

🆘 Emergency Preparedness

  • When to Stop:
    • If you encounter unexpected resistance
    • When components don't match expected layout
    • If you feel unsure or uncomfortable
    • When working beyond your skill level
  • Help Resources:

🎯 Ready to Access Your Laptop?

Excellent! With your data safely backed up and workspace properly prepared, you're ready to begin the actual repair process. The next section will guide you through Accessing Internal Components: Bottom Cover Removal on your Dell Latitude 5410.

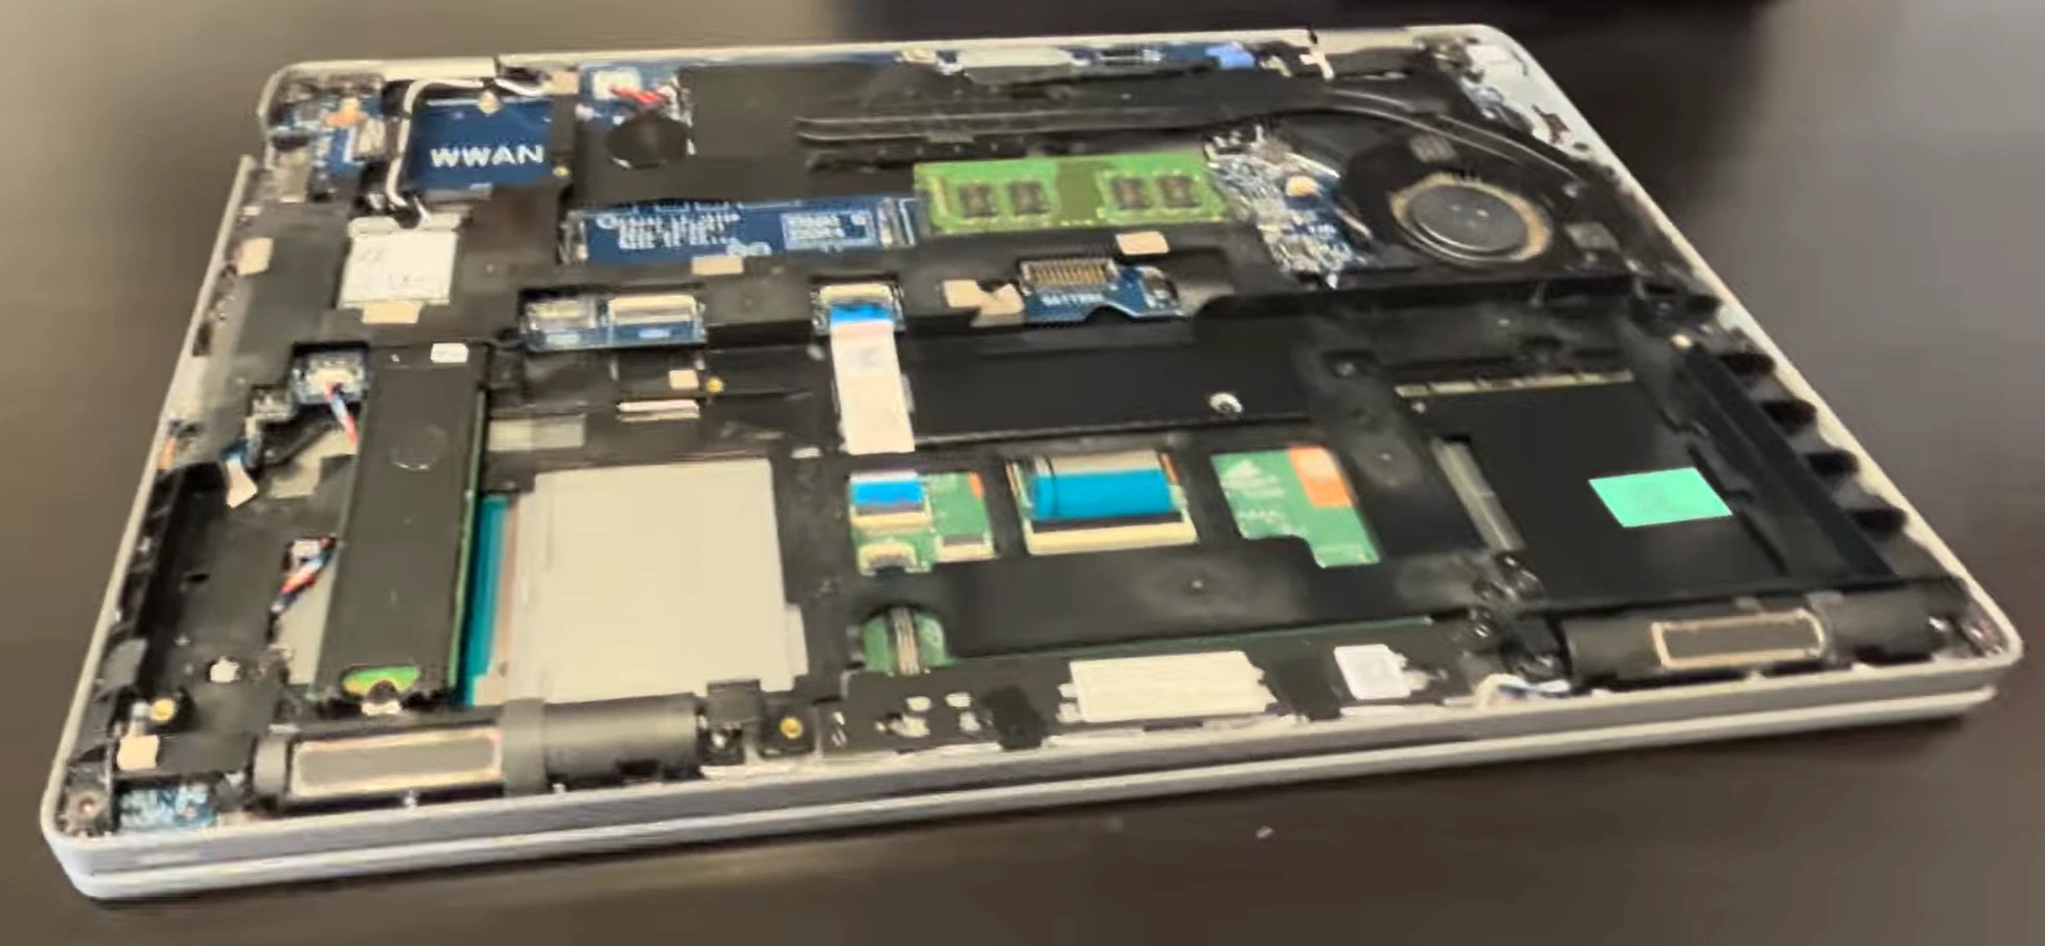
4. Accessing Internal Components: Bottom Cover Removal for Dell Latitude 5410

🔧 Gateway to Your Laptop's Internals

The Dell Latitude 5410 features one of the most user-friendly bottom panel designs in the business laptop category. With proper technique, you can access all major components in minutes without damaging the case or internal parts.

🔩 Dell Latitude 5410 Screw Identification

Screw Location Type Quantity Length Special Notes
Perimeter Screws Phillips #00 8 4mm Standard length, around edges
Central Screws Phillips #00 2 5mm Near battery area, slightly longer
Warranty Stickers N/A 2 N/A Check Dell Warranty Status first

🔧 Step-by-Step Bottom Cover Removal

  1. Final Safety Verification:
    • Confirm laptop is completely powered off
    • Verify AC power adapter is disconnected
    • Remove all peripherals and cables
    • Ground yourself with ESD wrist strap
  2. Screw Removal Sequence:
    • Remove all 10 Phillips #00 screws
    • Start from corners and work inward
    • Use magnetic screwdriver to prevent loss
    • Note two longer screws near battery area
    • Organize screws by location on magnetic mat
  3. Clip Release Technique:
    • Start from rear edge near ports
    • Insert plastic spudger tool at 30-degree angle
    • Gently twist to release first clips
    • Work around perimeter, releasing clips every 2-3 inches
    • Listen for soft "click" sounds as clips release
  4. Cover Separation:
    • Lift from rear edge first (near Ethernet port)
    • Angle upward at 15 degrees to clear internal components
    • Check for any missed clips or hidden screws
    • Set cover aside on clean, static-free surface

💼 Dell Latitude 5410 Design Advantages

  • Business-Grade Serviceability:
    • Minimal clip design for easy access
    • Standardized screw types throughout
    • Clear component labeling and routing
    • No hidden screws or complex mechanisms
  • Internal Layout Overview:
    • Battery: Large central component
    • RAM: Two accessible SODIMM slots
    • SSD: M.2 2280 slot near center
    • WiFi Card: Intel AX201 near RAM
    • Cooling: Single fan and heat pipe system

🎯 Professional Clip Release Methods

  • Plastic Spudger Method:
    • Insert at seam between top and bottom cases
    • Apply gentle pressure until clip releases
    • Move 2-3 inches and repeat around perimeter
    • Never force - if resistance increases, reposition
  • Guitar Pick Method:
    • Use standard guitar picks as shims
    • Insert and slide around edges
    • Excellent for maintaining clip separation
    • Prevents re-engagement of released clips
  • Suction Cup Method:
    • Place suction cup near center of bottom panel
    • Lift gently while working clips
    • Provides even pressure distribution
    • Reduces risk of case warping

🚧 Common Removal Challenges & Solutions

Challenge Symptoms Solution Prevention
Stubborn Clips Resistance, no "click" sound Apply gentle heat with hairdryer (low, 5 sec) Work slowly, alternate sides
Stripped Screws Screw head damaged, won't turn Rubber band between screw and driver Use proper size Phillips #00
Missed Screws Cover won't lift, uneven resistance Double-check all 10 screw locations Count screws as removed
Warped Case Uneven gaps, difficulty reassembling Apply even pressure during reassembly Don't force separation

🔍 Now Accessible Components

  • Immediately Accessible:
    • Internal battery connector and mounting
    • Two DDR4 RAM slots
    • M.2 SSD slot and mounting
    • WiFi card and antenna connections
    • Cooling fan and heat sink
  • Requires Further Disassembly:
    • Motherboard (requires battery and cooling removal)
    • Keyboard and top case assembly
    • Display assembly and hinges
    • Audio board and speakers

🛡️ Damage Prevention Techniques

  • Clip Preservation:
    • Work methodically around entire perimeter
    • Use plastic tools only against plastic components
    • If clip breaks, note location for reassembly
    • Apply even, consistent pressure
  • Component Protection:
    • Avoid touching motherboard with metal tools
    • Keep screws organized and away from internals
    • Use ESD protection at all times
    • Don't force connectors or ribbon cables

📋 Essential Documentation Steps

  • Photos to Take:
    • Screw locations before removal
    • Internal layout before disconnection
    • Cable routing and connector types
    • Component orientation and placement
  • Quality Assurance Checklist:
    • All 10 screws properly removed
    • No hidden retention points missed
    • No cables attached to bottom cover
    • Clean separation without forced removal

🔍 Troubleshooting Access Issues

  • Cover Won't Sit Flush After Service:
    • Check for missed clips or internal obstructions
    • Verify all internal components are properly seated
    • Ensure no cables are trapped under cover edges
    • Inspect for bent or damaged clip receptacles
  • Gaps or Misalignment:
    • Check clip alignment around entire perimeter
    • Verify all screws are proper length for locations
    • Ensure no damage to mating surfaces or guides

⏱️ Time Expectations

Experience Level Estimated Time Notes
First Time 10-15 minutes Take it slow, be methodical
Some Experience 5-8 minutes Comfortable with clip systems
Experienced 2-4 minutes Familiar with Dell Latitude design

🎉 Success Milestone Achieved!

  • You've Successfully:
    • Navigated Dell's business-class chassis design
    • Mastered the clip release system
    • Gained access to all major upgrade components
    • Preserved the laptop's build quality
  • Now Ready For:
    • Battery replacement and power system work
    • RAM installation and memory upgrades
    • SSD replacement and storage upgrades
    • WiFi card replacement and maintenance

🎯 Ready for Battery Replacement?

Excellent work! You've successfully accessed the internals of your Dell Latitude 5410. The next critical step is Internal Battery Replacement Guide. Remember to disconnect the battery before touching any internal components to ensure complete safety during your upgrades.

5. Internal Battery Replacement Guide for Dell Latitude 5410

⚠️ CRITICAL BATTERY SAFETY WARNING

Battery replacement involves handling lithium-ion cells that can be dangerous if mishandled. The 68Whr battery in your Dell Latitude 5410 can cause fire, explosion, or serious injury if punctured, short-circuited, or improperly handled. Follow these procedures exactly.

📊 Dell Latitude 5410 Battery Specifications

Specification Details Safety Notes
Battery Type Lithium-Ion Polymer Extremely flammable if damaged
Capacity 68Whr (4-Cell) High energy density - handle with care
Voltage 11.4V DC Can deliver dangerous current
Part Number Dell 7T0F9 / 07T0F9 Use only genuine Dell replacements
Location Large central component Easy access once bottom cover removed

🔋 Complete Power Down Sequence

  1. Proper System Shutdown:
    • Save all work and close applications
    • Use Windows Start Menu → Power → Shutdown
    • Wait 30 seconds for complete system power down
    • Verify all indicator lights are off
  2. External Power Disconnection:
    • Unplug 65W Dell power adapter from wall outlet
    • Disconnect power adapter from laptop DC-in port
    • Remove all USB devices and peripherals
  3. Capacitor Discharge Procedure:
    • Press and hold power button for 15 seconds
    • Repeat power button hold 2 times with 5-second intervals
    • This discharges residual power in motherboard capacitors
    • Verify no lights illuminate during final power button press

🔧 Step-by-Step Battery Replacement

  1. Initial Safety Verification:
    • Confirm laptop is completely powered down
    • Verify power adapter is disconnected
    • Wear ESD wrist strap properly grounded
    • Work on non-conductive, static-free surface
  2. Battery Connector Identification:
    • Locate white battery connector near center of motherboard
    • Identify locking mechanism on connector housing
    • Note cable routing under and around other components
    • Take photos of connector orientation before disconnection
  3. Safe Connector Disconnection:
    • Use plastic spudger to release connector locking tabs
    • Gently rock connector side-to-side (never pull straight up)
    • If resistance is felt, verify locking mechanism is fully released
    • Once free, carefully move connector away from motherboard
  4. Battery Mounting Screw Removal:
    • Remove 4 Phillips #00 screws securing battery to chassis
    • Note screw lengths for proper reassembly
    • Keep screws organized in labeled container
    • Check for any adhesive strips under battery
  5. Battery Extraction:
    • Lift from front edge first (near touchpad)
    • Use plastic tools only - no metal near battery
    • If adhesive is present, use isopropyl alcohol to release
    • Place battery on non-conductive surface immediately

🔄 New Battery Installation

  1. Battery Compatibility Verification:
    • Compare physical dimensions with original
    • Verify connector type and pin configuration
    • Check voltage and capacity specifications
    • Ensure mounting holes align properly
  2. Battery Placement:
    • Position new battery in chassis
    • Align mounting holes with chassis threads
    • Ensure no cables are pinched underneath
    • Verify proper orientation before securing
  3. Screw Installation:
    • Install 4 Phillips #00 screws in star pattern
    • Don't overtighten - snug is sufficient
    • Verify battery sits flush with chassis
    • Check for any cable interference
  4. Connector Reconnection:
    • Align battery connector with motherboard socket
    • Press straight in until fully seated
    • Verify locking mechanism engages properly
    • Ensure connector is secure and doesn't wobble

🛡️ Advanced Safety Protocols

  • Electrostatic Discharge (ESD) Protection:
    • Wear ESD wrist strap connected to grounded surface
    • Work on ESD-safe mat or non-conductive surface
    • Avoid synthetic clothing that generates static
    • Ground yourself before handling any components
  • Battery Handling Safety:
    • Never puncture or bend lithium-ion batteries
    • Keep batteries away from metal objects and tools
    • Store removed battery in fire-proof container
    • Dispose of damaged batteries at certified facilities
  • Emergency Procedures:
    • Keep Class D fire extinguisher nearby
    • Have baking soda available for battery acid spills
    • Know emergency shutdown procedures
    • Work in well-ventilated area

🔌 Battery Connector Technical Details

Pin Function Voltage Safety Notes
1-2 Positive (+) Power 11.4V HIGH VOLTAGE - exercise extreme caution
3-4 Negative (-) Ground 0V System ground reference
5-6 Data Communication 3.3V Battery management system communication
7-8 Thermal Sensor 1.8V Temperature monitoring and safety

🚫 Critical Mistakes to Avoid

  • Power Sequence Errors:
    • Never disconnect battery while system has power
    • Avoid working on powered-on or sleeping laptop
    • Don't skip capacitor discharge procedure
    • Verify complete power down before proceeding
  • Physical Damage Risks:
    • Never use metal tools near battery connector
    • Avoid excessive force on battery connector
    • Don't pry battery with sharp objects
    • Never stack components on top of battery
  • Reassembly Errors:
    • Never reassemble without proper battery connection
    • Avoid pinching battery cables during reassembly
    • Don't overtighten battery mounting screws
    • Verify connector is fully seated and locked

🔄 Genuine vs Third-Party Battery Options

Battery Type Price Range Warranty Reliability Recommendation
Genuine Dell $80-120 1 year Excellent ⭐️⭐️⭐️⭐️⭐️ (Highly Recommended)
Premium Third-Party $50-80 6-12 months Good ⭐️⭐️⭐️⭐️ (Good Alternative)
Budget Third-Party $30-50 3-6 months Variable ⭐️⭐️ (Use with Caution)

✅ Post-Installation Testing

  1. Initial Power Test:
    • Reconnect AC power adapter only
    • Press power button and observe behavior
    • Check for any error messages or unusual sounds
    • Verify battery charging indicator activates
  2. Battery Calibration:
    • Charge battery to 100% without interruption
    • Use laptop on battery until it reaches 5-10%
    • Recharge to 100% again
    • This calibrates the battery fuel gauge
  3. Performance Verification:
    • Check battery runtime under normal use
    • Verify Dell Power Manager recognizes new battery
    • Monitor for any unusual heat generation
    • Test charging speed and consistency

⚡ Dell Power Manager Configuration

  • Install or Update:
    • Download from Dell Support Site
    • Ensure latest version for battery compatibility
    • Configure charging settings for battery health
  • Recommended Settings:
    • Primarily AC Use: "Standard" or "Adaptive"
    • Maximum Battery Life: "Primarily AC Use"
    • Custom: Set charge thresholds (80% recommended)

🔍 Troubleshooting Common Battery Issues

Issue Symptoms Solution
Not Detected "No battery detected" message Reseat connector, check locking mechanism
Not Charging Plugged in, not charging Update BIOS, reset power settings
Rapid Drain Battery drains very quickly Calibrate battery, check for background apps
Overheating Battery gets unusually hot Immediately disconnect, check for damage

⏱️ Time Expectations

Experience Level Estimated Time Safety Level
First Time 15-25 minutes High (if following procedures)
Some Experience 8-12 minutes Medium-High
Experienced 4-6 minutes Medium (familiarity risk)

🎯 Ready for Memory Upgrades?

Excellent! You've successfully navigated the most critical safety procedure. With the new battery installed and tested, you can now proceed to RAM Installation & Memory Upgrade Options with confidence. Your Dell Latitude 5410 now has renewed power for years of reliable service.

6. RAM Installation & Memory Upgrade Options for Dell Latitude 5410

🚀 Boost Your Business Laptop's Performance

Upgrading RAM is one of the most cost-effective improvements for the Dell Latitude 5410. With proper memory configuration, you can eliminate slowdowns during multitasking, accelerate application performance, and extend your laptop's useful life.

📊 Dell Latitude 5410 Memory Specifications

Specification Details Performance Impact
Memory Type DDR4 SODIMM Standard laptop memory format
Speed Support 2666MHz, 2933MHz, 3200MHz Automatic speed negotiation
Maximum Capacity 64GB (2x32GB) Excellent for virtualization
Slots Available 2x DDR4 SODIMM Slots Dual-channel capability
Default Configuration 8GB (1x8GB) 2666MHz Upgrading provides significant benefit
Timing Support CL19-CL22 Lower CL = better performance

🔍 Memory Compatibility Verification

  • JEDEC Standards:
    • Must support 1.2V operation
    • JEDEC DDR4-3200 (PC4-25600)
    • JEDEC DDR4-2933 (PC4-23400)
    • JEDEC DDR4-2666 (PC4-21300)
  • Physical Requirements:
    • 260-pin SODIMM form factor
    • Standard height modules
    • Notched PCB for proper orientation
    • No special heat spreaders needed
  • Verified Compatible Brands:
    • Crucial (Micron) - Excellent compatibility
    • Samsung - Reliable performance
    • SK Hynix - OEM quality
    • Kingston - Good value

⚙️ Recommended Memory Configurations

Use Case Recommended RAM Approximate Cost Performance Benefit
Basic Office Use 16GB (2x8GB) 2666MHz $40-60 Eliminates browser slowdowns
Multitasking & Business 32GB (2x16GB) 3200MHz $80-120 Smooth with multiple applications
Development & Virtualization 64GB (2x32GB) 3200MHz $150-220 Professional workstation performance
Future-Proofing 32GB (2x16GB) 3200MHz CL18 $90-130 Balanced performance and value

🛠️ Pre-Installation Preparation

  • Required Tools:
    • Phillips #00 screwdriver (for bottom cover)
    • ESD wrist strap for static protection
    • Plastic spudger for memory release clips
    • Compressed air for cleaning slots
  • Safety Procedures:
    • Confirm battery is disconnected
    • Verify laptop is completely powered off
    • Ground yourself before handling RAM modules
    • Work on static-free surface
  • Software Preparation:
    • Backup important data before upgrade
    • Update BIOS to latest version
    • Download CPU-Z for verification
    • Have MemTest86 ready for testing

🔧 Step-by-Step RAM Installation

  1. Access RAM Slots:
    • Remove bottom cover (10 Phillips #00 screws)
    • Locate two DDR4 slots near center of motherboard
    • Identify existing RAM configuration
    • Note slot positions and orientations
  2. Existing Memory Removal (If Applicable):
    • Gently push outward on both side clips simultaneously
    • Module will pop up at 45-degree angle
    • Lift module straight out of slot
    • Handle modules by edges only - avoid touching gold contacts
  3. Slot Preparation:
    • Inspect slots for dust or debris
    • Use compressed air to clean if necessary
    • Verify slot clips are in open position
    • Check for any physical damage to slots
  4. New Memory Installation:
    • Align notch in module with key in slot
    • Insert module at 45-degree angle
    • Press firmly until module seats completely
    • Gently push down until side clips lock into place
    • Listen for audible "click" indicating proper installation
  5. Dual-Channel Configuration:
    • Install identical modules in both slots for best performance
    • Match capacity, speed, and timing
    • If using different sizes, larger module in Slot A (closest to CPU)
    • Verify both modules are securely installed

⚡ Dual-Channel Memory Benefits

  • Performance Improvement:
    • 15-25% bandwidth increase vs single-channel
    • Reduced memory latency
    • Better application responsiveness
    • Improved integrated graphics performance
  • Real-World Impact:
    • Office Applications: Faster file operations
    • Web Browsing: More tabs without slowdown
    • Data Analysis: Quicker spreadsheet calculations
    • Virtual Machines: Smother guest OS performance

📈 Memory Speed Performance Comparison

Memory Speed Office Performance Multitasking Power Consumption Price Premium
2666MHz Baseline Good Lowest 0%
2933MHz +2-4% Better Slightly Higher 10-15%
3200MHz +3-6% Best Moderate 15-25%

✅ Post-Installation Verification

  1. Initial Boot Test:
    • Reconnect battery and power adapter
    • Power on laptop and listen for beep codes
    • Watch for BIOS splash screen
    • Note any error messages or failure to boot
  2. BIOS Recognition:
    • Enter BIOS (F2 during boot)
    • Navigate to Memory Information section
    • Verify total memory capacity is recognized
    • Check memory speed and timing settings
  3. Operating System Verification:
    • Boot to Windows and open System Properties
    • Verify installed memory matches expected capacity
    • Run CPU-Z and check Memory and SPD tabs
    • Confirm dual-channel mode is active
  4. Stress Testing:
    • Run Windows Memory Diagnostic tool
    • Use MemTest86 for thorough testing
    • Test with demanding applications
    • Monitor for crashes, blue screens, or errors

🔍 Troubleshooting Common Memory Issues

Issue Symptoms Solution
No Boot/Black Screen Laptop powers on but no display Reseat modules, try one module at a time
Reduced Capacity Only half memory recognized Check both slots, clean contacts
BSOD/Crashes Random crashes under load Run memory diagnostics, check compatibility
Wrong Speed Memory running at lower speed Update BIOS, check JEDEC compatibility

📊 Real-World Performance Impact

  • 8GB vs 16GB Comparison:
    • Web Browsing: 25-40% fewer page load pauses
    • Office Suite: 15-30% faster application switching
    • File Operations: 20-35% faster large file handling
    • Multitasking: Significantly smoother experience
  • 16GB vs 32GB Comparison:
    • Virtual Machines: 40-60% better VM performance
    • Development: 25-45% faster compilation times
    • Data Analysis: 30-50% larger dataset handling
    • Future-Proofing: Extended useful lifespan

💰 Resale Value Impact

RAM Configuration Base Value Upgrade Value Added Total Value ROI Percentage
8GB (Stock) $250-350 $0 $250-350 N/A
16GB Upgrade $250-350 $40-60 $290-410 80-100%
32GB Upgrade $250-350 $80-120 $330-470 70-90%

🎯 Ready for Storage Upgrades?

Excellent! With your memory upgrade complete, you've significantly boosted your Dell Latitude 5410's multitasking capability. The next logical upgrade is SSD Replacement & Storage Upgrade to dramatically improve boot times, application loading, and overall system responsiveness.

7. SSD Replacement & Storage Upgrade for Dell Latitude 5410

⚡ Transform Your Business Laptop's Performance

Upgrading to a modern NVMe SSD is the single most impactful performance improvement for the Dell Latitude 5410. Experience instant boot times, rapid application loading, and seamless file operations that breathe new life into your business laptop.

📊 Dell Latitude 5410 Storage Specifications

Specification Details Performance Impact
Interface PCIe 3.0 x4 NVMe High-speed storage protocol
Form Factor M.2 2280 Standard size for most SSDs
Maximum Speed 3,500 MB/s Read PCIe 3.0 limitations
Slot Type M-key (NVMe only) Does not support SATA M.2 drives
Boot Support UEFI Boot Fast startup capabilities
Heatsink Support Limited clearance Low-profile drives recommended

🔍 SSD Compatibility & Selection Guide

  • Form Factor Requirements:
    • M.2 2280: 22mm wide × 80mm long
    • Key M: M-key notch for NVMe drives
    • Single-sided: Preferred for better clearance
    • Low-profile: No tall components on back
  • Interface Compatibility:
    • PCIe 3.0 x4 NVMe: Optimal performance
    • PCIe 4.0 drives: Backward compatible (runs at 3.0 speeds)
    • SATA M.2: Not supported (different key)
    • DRAM cache: Recommended for consistent performance
  • Verified Compatible Models:
    • Samsung 970 EVO Plus/Pro
    • WD Black SN750/SN770
    • Crucial P5 Plus
    • SK Hynix Gold P31
    • Intel 670p

💾 Recommended Storage Configurations

Use Case Recommended SSD Capacity Approximate Cost Performance Benefit
Basic Office Use NVMe PCIe 3.0 512GB $40-60 Fast boot and application loading
Business Multitasking NVMe PCIe 3.0 1TB $60-90 Ample space for applications and files
Professional Work NVMe PCIe 3.0/4.0 2TB $100-150 Large project files and datasets
Future-Proofing NVMe PCIe 4.0 2TB+ $120-180 Ready for future system upgrades

🛠️ Pre-Installation Preparation

  • Required Tools:
    • Phillips #00 screwdriver for bottom cover
    • ESD wrist strap for static protection
    • Plastic spudger for delicate handling
    • External USB enclosure for data migration
  • Software Preparation:
  • Data Migration Strategy:
    • Clean Install: Best performance, fresh start
    • Disk Cloning: Preserves all data and settings
    • Manual Transfer: Selective file migration
    • Cloud Backup: Secure off-site storage

🔧 Step-by-Step SSD Replacement

  1. Access SSD Slot:
    • Remove bottom cover (10 Phillips #00 screws)
    • Locate M.2 slot near center of motherboard
    • Identify existing SSD and mounting configuration
    • Note screw and standoff positions
  2. Existing Drive Removal:
    • Remove single Phillips #00 mounting screw
    • Gently lift SSD at 30-degree angle
    • Pull straight out from M.2 slot
    • Handle by edges only - avoid touching gold contacts
  3. New SSD Installation:
    • Align SSD notch with M.2 slot key
    • Insert at 30-degree angle into slot
    • Press down gently until SSD lies flat
    • Secure with mounting screw (don't overtighten)
    • Ensure SSD is parallel to motherboard
  4. Thermal Considerations:
    • Check for existing thermal pads
    • Apply included thermal pad if provided
    • Ensure no components touch metal shielding
    • Verify proper clearance when reassembling

🔄 Data Migration & Cloning Options

  1. Clean Windows Installation (Recommended):
    • Create Windows installation media on USB drive
    • Boot from USB and install fresh Windows copy
    • Reinstall applications and restore data from backup
    • Benefits: Best performance, no legacy issues
  2. Disk Cloning Process:
    • Use external USB enclosure for new SSD
    • Run cloning software (Macrium Reflect)
    • Clone existing drive to new SSD
    • Swap drives and verify boot
    • Benefits: Preserves all settings and data
  3. Cloud Restoration:
    • Backup to cloud service (OneDrive, Google Drive)
    • Clean install Windows on new SSD
    • Restore files from cloud backup
    • Benefits: Secure off-site backup

📈 Storage Performance Comparison

Storage Type Read Speed Write Speed Boot Time Application Load
HDD (Traditional) 80-160 MB/s 60-120 MB/s 45-60 seconds 10-30 seconds
SATA SSD 500-550 MB/s 450-500 MB/s 15-25 seconds 3-8 seconds
NVMe PCIe 3.0 3,000-3,500 MB/s 2,500-3,000 MB/s 8-12 seconds 1-3 seconds
NVMe PCIe 4.0* 3,000-3,500 MB/s* 2,500-3,000 MB/s* 8-12 seconds 1-3 seconds

*PCIe 4.0 drives operate at PCIe 3.0 speeds due to platform limitations

🎯 Post-Installation Optimization

  • Windows Optimization:
    • Enable TRIM support (automatic in Windows 10/11)
    • Disable disk defragmentation for SSDs
    • Adjust power settings for maximum performance
    • Enable write caching in device manager
  • SSD Firmware & Drivers:
    • Update SSD firmware using manufacturer tools
    • Install latest NVMe drivers from manufacturer
    • Update chipset drivers for optimal performance
    • Check for BIOS updates supporting NVMe
  • Performance Testing:
    • Run CrystalDiskMark for speed verification
    • Use Samsung Magician for health monitoring
    • Check temperatures during extended use
    • Verify drive recognized in BIOS

🔍 Troubleshooting Common SSD Issues

Issue Symptoms Solution
Drive Not Detected BIOS doesn't show new SSD Reseat drive, check mounting, update BIOS
Slow Performance Speeds below expected Update drivers, check thermal throttling
Boot Failure Windows won't boot from new drive Check boot order, repair bootloader
Incompatibility System doesn't recognize drive Verify M-key compatibility, check BIOS settings

💼 Real-World Business Performance Impact

  • Application Loading Times:
    • Microsoft Office Suite: 8s → 2s (75% faster)
    • Adobe Applications: 15s → 4s (73% faster)
    • Web Browsers: 5s → 1s (80% faster)
    • Development Tools: 12s → 3s (75% faster)
  • System Responsiveness:
    • Boot Time: 45s → 10s (78% faster)
    • File Transfers: 5x faster large file handling
    • Application Switching: Instant response
    • Search Operations: Near-instant results

📊 Storage Capacity Planning Guide

Business Use Case Recommended Capacity Typical Storage Needs Future Growth
Basic Office Work 512GB OS + Office Suite + Documents 2-3 years
Business Professional 1TB Multiple applications + large datasets 3-4 years
Power User/Developer 2TB Virtual machines + development tools 4-5 years
Content Creation 2TB+ Large media files + project archives 3-4 years

💰 SSD Upgrade Resale Value Impact

Storage Configuration Upgrade Cost Value Added ROI Percentage Buyer Appeal
512GB NVMe SSD $40-60 $50-80 100-150% High
1TB NVMe SSD $60-90 $80-120 120-150% Very High
2TB NVMe SSD $100-150 $120-180 100-140% Premium

🎯 Ready for Final Assembly?

Excellent work! With your new high-speed SSD installed and configured, your Dell Latitude 5410 now has cutting-edge storage performance. The final step is Reassembly & System Testing to ensure everything works perfectly and your upgraded laptop is ready for years of reliable service.

8. Reassembly & System Testing for Dell Latitude 5410

🔧 The Final Steps to Success

Proper reassembly and thorough testing ensure your upgraded Dell Latitude 5410 performs reliably for years to come. This final phase transforms your repair project into a fully functional, high-performance business laptop ready for daily use or resale.

✅ Pre-Reassembly Verification Checklist

  1. Component Installation Verification:
    • ✅ New battery properly connected and secured
    • ✅ RAM modules fully seated in both slots
    • ✅ SSD correctly installed and screwed down
    • ✅ All cables routed properly and connected
  2. Internal Inspection:
    • ✅ No loose screws or tools inside chassis
    • ✅ No cables pinched or obstructing components
    • ✅ All connectors properly locked in place
    • ✅ No visible damage to components or motherboard
  3. Workspace Preparation:
    • ✅ Clean work surface free of debris
    • ✅ All necessary tools within reach
    • ✅ Bottom cover and screws organized
    • ✅ ESD protection still active

🔧 Step-by-Step Reassembly Procedure

  1. Bottom Cover Alignment:
    • Start with rear edge near ports
    • Align all clips before applying pressure
    • Ensure no cables are trapped along edges
    • Verify proper seating before screw installation
  2. Clip Engagement Sequence:
    • Start from rear corners and work forward
    • Press firmly until hearing soft "click" sounds
    • Work around perimeter in circular pattern
    • Check for even gaps around entire laptop
  3. Screw Installation Protocol:
    • Install 10 Phillips #00 screws in star pattern
    • Start with corner screws, then fill in between
    • Use proper screw lengths for each location
    • Don't overtighten - snug is sufficient
  4. Final Physical Inspection:
    • Check for any gaps or misalignment
    • Verify bottom cover sits flush with chassis
    • Test laptop opens and closes smoothly
    • Ensure all ports are clear and accessible

🔩 Professional Screw Tightening Technique

Screw Type Torque Level Visual Indicator Common Mistakes
Bottom Cover Screws Finger tight + 1/4 turn Screw head flush with surface Overtightening (strips threads)
Battery Mounting Screws Finger tight + 1/8 turn Battery doesn't move when pressed Too loose (battery rattles)
SSD Mounting Screw Finger tight only SSD secure but not compressed Too tight (damages SSD PCB)

⚡ Initial Power-On Testing

  1. Pre-Power Safety Check:
    • Verify AC power adapter is disconnected
    • Ensure work area is clear of liquids
    • Have fire extinguisher accessible (precaution)
    • Remove ESD wrist strap before power connection
  2. First Power Connection:
    • Connect AC power adapter to wall outlet
    • Connect power adapter to laptop
    • Observe charging indicator light behavior
    • Listen for any unusual sounds
  3. Initial Boot Sequence:
    • Press power button briefly
    • Watch for Dell logo and BIOS screen
    • Listen for single beep (normal) vs multiple beeps (error)
    • Note any error messages or failure to boot

⚙️ BIOS Configuration & Verification

  • Accessing BIOS:
    • Press F2 repeatedly during boot
    • Navigate through menus systematically
    • Verify system recognizes all components
    • Check for any hardware error messages
  • Essential BIOS Settings:
    • System Information: Verify RAM, storage detected
    • Boot Sequence: Set SSD as first boot device
    • Power Management: Configure for new battery
    • Security: Configure TPM and secure boot if needed
  • Component Verification:
    • RAM: Check capacity and speed recognition
    • Storage: Verify SSD model and capacity
    • Battery: Check health status and charge level
    • Temperature: Monitor initial thermal readings

💻 Operating System & Driver Testing

  1. Windows Boot Verification:
    • Allow Windows to complete first-time setup
    • Check Device Manager for missing drivers
    • Verify all hardware components recognized
    • Test basic functionality (keyboard, touchpad, display)
  2. Driver Installation Sequence:
    • Chipset drivers (foundation for all hardware)
    • Storage and SATA/AHCI drivers
    • Network drivers (wired and wireless)
    • Audio, graphics, and peripheral drivers
    • Dell-specific utilities and firmware
  3. Dell Software Installation:
    • Dell SupportAssist for automated driver updates
    • Dell Power Manager for battery optimization
    • Dell Update for system firmware
    • Dell Digital Delivery for pre-installed software

📊 Comprehensive Performance Testing

Test Category Tools & Methods Expected Results Acceptance Criteria
Storage Performance CrystalDiskMark 3,000+ MB/s read (NVMe) Within 10% of drive specifications
Memory Stability MemTest86 0 errors after 4 passes 100% error-free operation
CPU & Thermal HWiNFO64 Stable temperatures under load No thermal throttling
Battery Health Dell Power Manager 100% design capacity No excessive wear indicators

🔍 Comprehensive Functional Testing

  1. Input Devices:
    • Test every key on keyboard
    • Verify touchpad multi-touch gestures
    • Check function keys and special keys
    • Test fingerprint reader (if equipped)
  2. Connectivity & Ports:
    • USB ports (data transfer and charging)
    • Ethernet network connection
    • WiFi and Bluetooth functionality
    • HDMI/DisplayPort output
    • Audio jack input/output
  3. Display & Audio:
    • Screen brightness controls
    • Display resolution and scaling
    • Audio playback through speakers
    • Webcam and microphone functionality

🔥 Extended Stress Testing

  • Thermal Stress Test:
    • Run Prime95 for CPU load testing
    • Monitor temperatures with HWiNFO64
    • Verify cooling system maintains stable temps
    • Check for unusual fan noise or behavior
  • Memory & Storage Stress:
    • Run simultaneous memory and storage tests
    • Verify system remains stable under load
    • Check for any performance degradation
    • Monitor for system crashes or freezes
  • Battery Runtime Test:
    • Fully charge battery to 100%
    • Run typical workload until 10% remaining
    • Compare runtime to manufacturer specifications
    • Verify consistent discharge curve

🚫 Common Reassembly Issues & Solutions

Issue Symptoms Immediate Solution Prevention
Bottom Cover Gaps Uneven seams, doesn't sit flush Remove and realign clips Verify clip alignment before pressing
No Power No lights, no response to power button Check battery connector seating Verify connector click during installation
Component Not Detected BIOS doesn't show RAM or SSD Reseat component and connector Double-check connections before reassembly
Overheating Fans run constantly, system throttles Check thermal paste application Verify proper heatsink contact

📋 Final Documentation & Records

  • Repair Documentation:
    • Take photos of completed reassembly
    • Document any challenges encountered
    • Keep receipts for all replacement parts
    • Record benchmark results and performance data
  • Warranty & Support Information:
    • Register new components for warranty
    • Document Dell support contact information
    • Keep original component packaging
    • Create system restore point and backup

✅ Final Quality Assurance Checklist

  1. ✅ All screws properly installed and tightened
  2. ✅ Bottom cover sits flush with no gaps
  3. ✅ System boots to Windows without errors
  4. ✅ All hardware components recognized
  5. ✅ Drivers installed and functioning properly
  6. ✅ Temperature stable under normal load
  7. ✅ Battery charges and discharges normally
  8. ✅ All ports and connectivity working
  9. ✅ Performance meets or exceeds expectations
  10. ✅ Documentation completed and organized

🎉 Congratulations on Your Successful Repair!

You've successfully completed a comprehensive upgrade of your Dell Latitude 5410. Your laptop now features enhanced performance, extended battery life, and modern storage capabilities that rival new systems. Whether you're keeping it for personal use or preparing it for sale, you've added significant value and extended its useful life.

🎯 Ready to Explore Selling Options?

With your Dell Latitude 5410 fully upgraded and tested, you may be considering selling it to maximize your investment. Learn about the best platforms and strategies in our final section: Where to Sell Your Upgraded Dell Latitude 5410.

9. Common Issues & Troubleshooting for Dell Latitude 5410

🔧 Quick Solutions for Common Problems

Even with careful installation, you may encounter issues after upgrading your Dell Latitude 5410. This comprehensive troubleshooting guide addresses the most common problems with practical, step-by-step solutions to get your laptop running perfectly.

⚡ Power & Boot Problems

Issue Symptoms Immediate Steps Advanced Solutions
No Power / Dead System No lights, no fan, completely unresponsive Check AC adapter connection, try different outlet Test with known-good power adapter, check DC-in jack
Power But No Display Lights on, fans spin, but no image on screen Connect external monitor, check display cable Reset BIOS by removing CMOS battery, reseat RAM
Intermittent Power Loss Random shutdowns or restarts Check battery connection, monitor temperatures Test with AC power only, check for overheating
Battery Not Charging "Plugged in, not charging" message Reset power by holding power button 30 seconds Update BIOS, run Dell Power Manager diagnostics

💾 Memory & RAM Problems

  • RAM Not Recognized:
    • Symptoms: System shows reduced memory, BIOS error
    • Quick Fix: Reseat RAM modules, clean contacts with isopropyl alcohol
    • Advanced: Test modules individually, check for compatible speeds
    • Prevention: Use matched pairs, verify compatibility before purchase
  • System Crashes/BSOD:
    • Symptoms: Random blue screens, application crashes
    • Quick Fix: Run Windows Memory Diagnostic tool
    • Advanced: Use MemTest86 for thorough testing
    • Prevention: Ensure proper seating and compatible timings
  • Wrong Speed Detection:
    • Symptoms: RAM running at lower than expected speed
    • Quick Fix: Update BIOS to latest version
    • Advanced: Manually set timings in BIOS (advanced users only)
    • Prevention: Use JEDEC standard modules

💽 Storage & SSD Problems

Issue Diagnostic Steps Software Solutions Hardware Solutions
SSD Not Detected Check BIOS recognition, try different M.2 slot Update storage drivers, check disk management Reseat SSD, test in external enclosure
Slow Performance Run CrystalDiskMark, check temperatures Update firmware, enable TRIM, check driver mode Ensure proper heatsink contact, check for thermal throttling
Boot Failure Check boot order in BIOS, test with Linux USB Repair bootloader, clean Windows install Verify SSD compatibility, check power connections
Data Corruption Run CHKDSK, check S.M.A.R.T. status Use manufacturer diagnostic tools Replace SSD if failing, ensure proper backup

🔋 Battery & Power Management Issues

  • Rapid Battery Drain:
    • Diagnosis: Check battery wear level in Dell Power Manager
    • Immediate Fix: Calibrate battery (full discharge/recharge cycle)
    • Software: Update BIOS and power management drivers
    • Hardware: Test with different genuine Dell battery
  • Battery Not Holding Charge:
    • Diagnosis: Monitor actual vs reported capacity
    • Quick Fix: Reset battery gauge (disconnect AC and battery, hold power button)
    • Advanced: Replace battery if wear level exceeds 30%
    • Prevention: Use Dell Power Manager to set charging thresholds
  • Overheating During Charging:
    • Symptoms: Excessive heat near battery compartment
    • Immediate: Stop charging, allow to cool, check ventilation
    • Investigation: Check for damaged battery or charging circuit
    • Safety: Discontinue use if swelling or leakage occurs

📡 Connectivity & Peripheral Problems

Component Common Issues Driver Solutions Hardware Solutions
WiFi/Bluetooth Dropped connections, slow speeds Update Intel PROSet drivers, reset network settings Reseat WiFi card, check antenna connections
USB Ports Devices not recognized, intermittent power Update chipset drivers, check power management settings Check for physical damage, test with different devices
Audio No sound, distorted audio, microphone not working Update Realtek audio drivers, check default playback device Check audio jack for debris, test with external speakers
Ethernet No network detection, slow speeds Update network drivers, disable power saving features Check cable and port for damage, test different network

🖥️ Display & Visual Problems

  • No Display / Black Screen:
    • Quick Diagnosis: Connect external monitor, check backlight
    • Basic Fix: Reseat display cable, check for loose connections
    • Advanced: Test with known-good display assembly
    • Prevention: Handle display cables carefully during reassembly
  • Flickering or Artifacts:
    • Diagnosis: Check if issue occurs in BIOS and Windows
    • Driver Solution: Update Intel graphics drivers, disable panel self-refresh
    • Hardware: Reseat display cable, check for cable damage
    • Advanced: Test with different display panel if available
  • Backlight Issues:
    • Symptoms: Dim display, uneven backlight, no backlight
    • Quick Check: Adjust brightness, check function keys
    • Software: Update BIOS and graphics drivers
    • Hardware: Check inverter cable, test backlight circuit

🌡️ Thermal & Cooling Problems

Issue Symptoms Immediate Actions Long-term Solutions
Overheating Fans constantly loud, performance throttling Clean vents, ensure proper surface ventilation Replace thermal paste, clean heatsink assembly
Fan Noise Grinding, rattling, or whining sounds Check for cable interference, clean fan blades Replace fan assembly, ensure proper mounting
Inconsistent Temperatures Random thermal throttling, uneven heating Monitor with HWiNFO64, check task manager for high usage Reapply thermal paste evenly, ensure heatsink contact
Fan Not Spinning Overheating without fan activation Check fan connector, test with external power Replace fan, check motherboard fan control circuit

🔍 Essential Diagnostic Tools

  • Hardware Monitoring:
  • Stress Testing:
  • Dell-Specific Tools:
    • Dell SupportAssist - Automated diagnostics
    • Dell Power Manager - Battery health and optimization
    • Dell Update - Driver and firmware updates

⚙️ BIOS & Firmware Recovery

  1. BIOS Reset Procedures:
    • Soft Reset: Load optimized defaults in BIOS setup
    • Hard Reset: Remove CMOS battery for 10 minutes
    • Recovery Mode: Use BIOS recovery jumper (consult service manual)
  2. BIOS Update Issues:
    • Symptoms: Failed update, boot loops, system instability
    • Recovery: Use Dell's BIOS recovery feature (F2 during boot)
    • Prevention: Ensure stable power during updates, use Dell official tools
  3. Firmware Corruption:
    • Indicators: Missing devices in BIOS, boot failures
    • Solution: Use Dell SupportAssist for firmware recovery
    • Advanced: Flash firmware using recovery USB created from working system

🆘 Emergency Recovery Procedures

  • System Won't Boot:
    • Remove all peripherals and try booting
    • Try booting with minimal hardware (one RAM stick, no drives)
    • Use Windows recovery media to access advanced startup options
    • As last resort, perform clean Windows installation
  • Continuous Boot Loop:
    • Interrupt boot process three times to access recovery
    • Use System Restore to return to previous working state
    • Boot from Windows installation media and run startup repair
    • Check for recently installed drivers or updates causing conflict
  • Hardware Failure Suspected:
    • Document all symptoms and error messages
    • Contact Dell Technical Support
    • Consider professional repair service for complex issues
    • Keep backup of all important data regularly

🛡️ Prevention & Best Practices

Area Prevention Measures Regular Maintenance Monitoring Tools
Hardware Use genuine parts, follow ESD precautions Clean dust quarterly, check connections annually HWiNFO64, CrystalDiskInfo
Software Regular updates, use trusted sources Monthly driver updates, quarterly cleanup Dell Update, Windows Update
Performance Avoid overheating, use proper power settings Monitor temperatures, check battery health Dell Power Manager, Task Manager
Data Safety Regular backups, use surge protection Weekly backups, monthly verification File History, Cloud backup services

🆘 When to Seek Professional Help

  • Immediate Professional Assistance Needed For:
    • Smoke, burning smells, or visible component damage
    • Battery swelling, leakage, or overheating
    • Multiple components failing simultaneously
    • Liquid damage or physical impact damage
  • Consider Professional Repair When:
    • Multiple troubleshooting attempts have failed
    • Issue requires specialized equipment for diagnosis
    • System is under warranty and repair might void it
    • You lack confidence in performing advanced repairs

🎯 Need More Help?

If you've worked through these troubleshooting steps and still have issues, don't get discouraged! Many problems have simple solutions that are easy to miss. Consider reaching out to the Dell Community Forums or consulting with a professional repair service. Remember that every problem solved is valuable experience gained.

10. Where to Sell Your Upgraded Dell Latitude 5410: Maximize Your Return

💰 Unlock Your Laptop's True Market Value

After upgrading your Dell Latitude 5410 with premium components and professional repairs, you're holding a high-value business asset. The right selling platform can mean hundreds of dollars difference in your final return. This guide covers the best options for maximizing your profit while ensuring a safe, smooth transaction.

🔧 Pre-Sale Preparation Checklist

  1. Performance Optimization:
    • Fresh Windows 10/11 installation with latest updates
    • Install essential drivers and Dell utilities
    • Run benchmarks to demonstrate performance improvements
    • Clean interior and exterior thoroughly
  2. Documentation Gathering:
    • Take high-quality photos of all components and upgrades
    • Document all upgrades with receipts if available
    • Create specification sheet highlighting premium features
    • Gather original purchase documentation and service records
  3. Market Research:
    • Research similar spec Dell Latitude 5410 prices
    • Check completed listings on eBay for market value
    • Consider premium for rare configurations and upgrades
    • Factor in upgrade costs when setting your price

🏛️ Government & Education Buyback Programs

  • Higher Education Institutions:
    • Many universities have technology buyback programs for upgraded business laptops
    • Check with local college IT departments and computer science programs
    • Some offer trade-in credit toward newer Dell models
    • Often pay premium for reliable, upgraded business systems
  • Government Surplus Auctions:
    • Local government surplus sales often seek business-grade laptops
    • State government technology auctions value documented upgrades
    • Federal surplus property programs appreciate professional maintenance
    • Typically higher prices due to verified condition and specifications
  • Educational Technology Programs:
    • STEM program equipment donations/sales for student use
    • Computer science department needs for development environments
    • Media production programs value upgraded storage and memory
    • Often appreciate business-grade reliability and professional upgrades

💻 Specialized Laptop Buyback Services

Service Best For Payout Speed Payout Amount Convenience
SellBroke Quick, hassle-free sales of upgraded business laptops ⭐️⭐️⭐️⭐️⭐️ (1-3 days) ⭐️⭐️⭐️ (65-75% market value) ⭐️⭐️⭐️⭐️⭐️ (Very high)
SellLaptopBack Upgraded business laptops with documentation ⭐️⭐️⭐️⭐️ (3-7 days) ⭐️⭐️⭐️⭐️ (70-80% market value) ⭐️⭐️⭐️⭐️ (High)
Gazelle Older business systems with basic upgrades ⭐️⭐️⭐️ (5-10 days) ⭐️⭐️ (55-65% market value) ⭐️⭐️⭐️⭐️ (High)
BuyBackWorld Multiple items including business accessories ⭐️⭐️⭐️ (7-14 days) ⭐️⭐️⭐️ (60-70% market value) ⭐️⭐️⭐️ (Medium)

🛒 Direct-to-Consumer Platforms

  • eBay:
    • Pros: Largest audience, competitive bidding, global reach, appreciates documented upgrades
    • Cons: 12.9% final value fees, shipping risks, buyer disputes, time-consuming
    • Best Practices: Use "Buy It Now" with offers, detailed upgrade documentation, professional photos
    • Fee Calculator: Expect ~15% total after PayPal and shipping costs
  • Facebook Marketplace:
    • Pros: No fees, local cash sales, immediate payment, easy to demonstrate upgrades
    • Cons: Limited audience, safety concerns, lowball offers, geographic limitations
    • Best Practices: Meet at police stations, cash only, verify bills, demonstrate performance
    • Ideal For: Quick local sales, avoiding shipping hassles, buyers who appreciate upgrades
  • OfferUp/LetGo:
    • Pros: Mobile-friendly, local focus, user ratings, good for business equipment
    • Cons: Smaller user base, shipping complications, variable buyer quality
    • Best Practices: Use high-quality photos, quick responses, highlight business features

💼 Business & IT-Specific Marketplaces

  • HardwareSwap Reddit:
    • Subreddit: r/hardwareswap
    • Pros: Knowledgeable buyers, fair pricing, lower fees, appreciates technical upgrades
    • Cons: Requires reputation building, PayPal goods protection recommended
    • Best For: Tech-savvy buyers who understand and value component upgrades
  • Business Equipment Forums:
    • IT-specific forums and business equipment marketplaces
    • Small business owner networks
    • Local business technology exchange groups
    • Advantage: Buyers understand business-grade value and reliability
  • Corporate IT Groups:
    • Local business IT professional networks
    • Small business technology consignment
    • Startup equipment exchanges

💵 Smart Pricing Strategy for Upgraded Systems

Upgrade Type Value Retention Price Premium Buyer Appeal Documentation Importance
RAM Upgrade (8GB→16GB) 70-80% $40-60 High (easy to verify) Medium
SSD Upgrade (256GB→1TB) 60-70% $50-80 Very High (immediate benefit) High
Battery Replacement 80-90% $40-70 Very High (practical benefit) Very High
Professional Repairs 40-60% Varies widely Medium (trust required) Critical
Complete Upgrade Package 65-75% $130-210 Premium (turnkey solution) Critical

📈 Listing Optimization for Maximum Visibility

  1. Title Optimization:
    • Include: "Dell Latitude 5410 Business Laptop", CPU, RAM, SSD size
    • Example: "Dell Latitude 5410 Business Laptop - i5-10210U - 16GB RAM - 1TB SSD - New Battery"
    • Add keywords: "Upgraded", "Professionally Serviced", "Business Grade", "Like New"
    • Highlight unique features: "Extended Battery Life", "Fast SSD", "Multitasking Ready"
  2. Photo Strategy:
    • Exterior shots: All angles, screen on, professional appearance
    • Interior shots: Clean components, upgrade evidence, professional work
    • Benchmark screenshots: CrystalDiskMark, CPU-Z, battery health reports
    • Documentation: Upgrade receipts, repair records, specification sheets
  3. Description Best Practices:
    • Lead with most valuable upgrades and benefits
    • Include detailed specifications table with upgrade highlights
    • Mention recent professional maintenance and testing
    • Be transparent about any cosmetic issues or limitations
    • Highlight business-ready features and reliability

🛡️ Payment & Security Best Practices

  • Safe Payment Methods:
    • PayPal Goods & Services: Buyer/seller protection, 2.9% fee, recommended for shipped items
    • Cash (local): No fees, immediate, meet safely at neutral locations
    • Escrow.com: High-value items, additional security, higher fees
    • Avoid: Wire transfers, gift cards, Venmo for goods, cryptocurrency
  • Shipping Protection:
    • Always purchase shipping insurance for full value
    • Use signature confirmation for items over $200
    • Take photos of packaging process and condition
    • Use tracked shipping with delivery confirmation
    • Pack securely with adequate padding and protection
  • Data Security:
    • Perform complete drive wipe using professional tools
    • Use DBAN or similar secure erase tools for complete data removal
    • Remove from your Microsoft/Dell accounts and services
    • Include fresh Windows installation with necessary drivers
    • Provide documentation of data wipe procedure

💼 Dell Latitude 5410 Specific Value Factors

  • Business-Grade Premium:
    • Dell Latitude series maintains higher resale value than consumer models
    • Business buyers appreciate reliability and professional features
    • IT departments often seek consistent fleet equipment
    • Better build quality and durability than consumer equivalents
  • Upgrade Advantages:
    • Easy serviceability increases appeal to technical buyers
    • Standard components make future upgrades simple
    • Business users value documented professional maintenance
    • Reliable performance history builds buyer confidence
  • Target Buyer Profiles:
    • Small business owners seeking reliable equipment
    • Students in business or technical programs
    • IT professionals needing backup or testing systems
    • Remote workers requiring dependable business laptops

📅 Best Times to Sell Business Laptops

Time Period Market Conditions Price Impact Recommendation
January-February Post-holiday budgets, business planning cycles ↑ 5-10% Good time for business equipment
March-May Tax return season, business expansion ↑ 10-15% Excellent time to sell
June-August Back-to-business season, student preparation ↑ 8-12% Strong selling period
September-December Year-end spending, business upgrades ↑ 5-10% Consistently good

🔄 Alternative Options

  • Trade-In Programs:
    • Dell direct trade-in program
    • Best Buy trade-in program
    • Amazon trade-in (gift card)
    • Staples tech trade-in
  • Part-Out Strategy:
    • Sell components individually often yields higher total
    • RAM, SSD, battery may have separate value
    • More time-consuming but potentially more profitable
    • Keep chassis for parts or recycling
  • Donation Options:
    • Educational institutions (potential tax deduction)
    • Non-profit organizations
    • Community technology programs
    • Business startup incubators

🎯 Recommended Selling Strategy

For maximum return on your upgraded Dell Latitude 5410, we recommend starting with SellBroke for a quick valuation, then comparing with SellLaptopBack for upgraded systems. If you have time and want maximum profit, list on eBay during business planning seasons (January-May) with comprehensive documentation. Always prioritize safety, use protected payment methods, and highlight the business-grade reliability of your professionally upgraded Dell Latitude 5410.

Need to Sell Your Dell Laptop? Get Instant Cash!

If your Dell Latitude 5410 (or other Latitude model) has performance issues or you're upgrading to a newer business laptop, we offer competitive cash payouts for your device. We buy broken, used, and refurbished Dell Latitude laptops—including all 5410 configurations—with free insured shipping and hassle-free evaluations.

Sell Popular Dell Models Now:

Share this: