HP Pavilion x360 14m Modular Upgrade: Complete Guide to Replacing SSD, RAM & Battery

asus-rog-zephyrus-m16-disassembly-guide-how-to-replace-ram-ssd-battery-fix-lcd-scree

1. Why Upgrade Your HP Pavilion x360 14m: Performance & Value Benefits

🚀 Transform Your HP Pavilion x360 14m from Basic to High-Performance

Strategic upgrades can double your HP Pavilion x360 14m's performance while increasing resale value by 40-70%, delivering the best of both worlds: premium laptop performance at a fraction of new laptop costs.

Upgrade Type Performance Improvement Resale Value Added User Experience Impact
SSD Storage Upgrade 300-500% faster boot/load times +$80-$150 Instant responsiveness, no more waiting
RAM Memory Upgrade 45-75% better multitasking +$60-$120 Smooth performance with multiple applications
Battery Replacement Restores 6-8 hour battery life +$70-$130 True portability and all-day usage
Combined Upgrades Transforms overall experience +$180-$350 Feels like a brand new premium laptop

📊 Before & After Upgrade Performance Comparison

Performance Metric Stock Configuration After Strategic Upgrades Improvement Percentage
Windows Boot Time 45-90 seconds 8-15 seconds 80-85% faster
Application Load Time 15-30 seconds 3-8 seconds 75-85% faster
Multitasking Capacity 5-8 browser tabs 20-30+ browser tabs 300-400% increase
Battery Runtime 2-4 hours (aged battery) 6-9 hours (new battery) 150-200% longer

💰 Upgrade Investment vs. New Laptop Cost Analysis

Scenario Total Cost Performance Level Value Retention ROI Analysis
Basic Upgrades Only $120-$200 Good (meets modern needs) 12-18 months 180-250% return
Comprehensive Upgrades $180-$300 Excellent (exceeds original) 24-36 months 220-350% return
Buy New Equivalent $600-$900 Excellent (brand new) 36-48 months Standard depreciation
Premium New Laptop $900-$1,400 Premium (high-end) 48-60 months High initial cost

🎯 Benefits for Specific User Scenarios

  • Students & Academics:
    • Faster research and document work
    • Longer battery life for all-day classes
    • Better performance for educational software
    • Tablet mode usability with responsive performance
  • Remote Workers:
    • Smooth video conferencing and multitasking
    • Reliable performance for business applications
    • Portability for work-from-anywhere flexibility
    • Professional appearance with renewed device
  • Creative Professionals:
    • Faster photo and video editing
    • Better performance with creative software
    • Touch screen optimization with upgraded RAM
    • Portable digital canvas capabilities
  • General Users:
    • Eliminates daily frustration with slow performance
    • Extends laptop useful life by 2-3 years
    • Provides modern computing experience
    • Maintains 2-in-1 convertible flexibility

💫 HP Pavilion x360 14m Specific Advantages

Feature Upgrade Enhancement User Benefit Resale Impact
2-in-1 Convertible Design Faster touch response with RAM upgrade Better tablet mode experience +$40-$80
Touchscreen Display SSD improves touch application performance Smooth drawing and navigation +$30-$60
Modern Connectivity USB-C and fast storage compatibility Future-proof performance +$20-$50
B&O Audio System Faster media loading with SSD Instant media playback +$15-$30

🌱 Environmental & Sustainability Benefits

  • Reduced E-Waste:
    • Extends laptop lifespan by 2-3 years
    • Prevents functional electronics from landfills
    • Reduces manufacturing demand for new devices
    • Lowers carbon footprint of device replacement
  • Resource Conservation:
    • Uses existing chassis, display, and components
    • Minimizes rare earth mineral extraction
    • Reduces energy consumption from manufacturing
    • Supports circular economy principles

📈 Upgrade ROI Timeline & Break-even Analysis

Time Period Value Retention Performance Benefit Cost Recovery
Immediate (0-3 months) 90-110% of upgrade cost Maximum performance improvement Instant productivity gains
Short-term (3-12 months) 70-90% of upgrade cost Sustained performance benefits Recovered through usage value
Medium-term (1-2 years) 50-70% of upgrade cost Continuing reliable performance Avoided new laptop purchase
Resale (Any time) 40-60% of upgrade cost Documented upgrade value Higher resale price justification

❌ Debunking Common Upgrade Misconceptions

  • "It's too complicated for me":
    • HP Pavilion x360 14m has modular, accessible design
    • Step-by-step guides make process manageable
    • Basic tools required - no special expertise needed
    • Community support available through forums
  • "It will void my warranty":
    • Most HP Pavilion models are out of warranty period
    • US right-to-repair laws protect upgrade rights
    • Professional work doesn't affect resale negatively
    • Documented upgrades can increase buyer confidence
  • "Costs too much for old laptop":
    • Upgrade cost is 25-40% of equivalent new laptop
    • Performance gains match or exceed new entry-level models
    • Resale value increase offsets most upgrade costs
    • Existing familiarity with device has value

✅ Measuring Upgrade Success

Success Metric Measurement Method Target Improvement Business Impact
System Responsiveness Boot time, application load times 60-80% faster Increased productivity
Multitasking Capability Simultaneous applications without lag 2-3x more applications Workflow efficiency
Battery Performance Runtime under normal usage 3-5 hours longer True portability
Resale Value Market price comparisons 40-70% higher Maximum ROI

➡️ Ready to Transform Your HP Pavilion x360 14m?

Now that you understand the significant benefits, proceed to our compatibility guide to verify your specific HP Pavilion x360 14m model can accept these performance-enhancing upgrades, or jump directly to essential tools setup to begin your upgrade journey.

2. Essential Tools & Professional Workspace Setup for HP Pavilion x360 14m Upgrades

🛠️ Why Proper Tools Ensure Successful HP Pavilion Upgrades

Using the correct tools for your HP Pavilion x360 14m upgrades increases success rates from 60% to 95%+ while preventing costly damage that can reduce resale value by $100-$300. Professional tool investment typically pays for itself after just 2-3 successful upgrades.

Tool Quality Level Success Rate Damage Risk Resale Value Impact Recommended For
Professional Grade 95-98% Very Low (2-5%) Preserves full value Frequent upgrades, business use
Quality DIY Set 85-92% Low (5-15%) Minor value impact Occasional upgrades, enthusiasts
Basic Tools Only 70-80% Medium (15-30%) Moderate value reduction One-time upgrades, budget focus
Improvised Tools 40-60% High (30-50%) Significant value loss Emergency only, not recommended

🔧 HP Pavilion x360 14m Specific Tool Requirements

Component Required Tools HP-Specific Notes Critical Importance
Bottom Cover Phillips #00, plastic spudgers Torx security screws on some models High - first access point
Battery Connector Plastic spudger, anti-static tools HP uses locking battery connectors Critical - safety requirement
RAM Slots No tools (clip-release) Easy access, no shielding typically Low - tool-free design
M.2 SSD Phillips #00, spudger for cables Single screw retention, easy access Medium - simple but precise

📋 Complete Essential Toolkit Breakdown

  • Precision Screwdrivers ($15-$40):
    • Phillips #000, #00, #0 (essential)
    • Torx T5, T6 (for security screws if present)
    • Magnetic tips strongly recommended
    • Anti-static construction preferred
  • Opening & Prying Tools ($10-$25):
    • Plastic spudger set (multiple sizes)
    • Nylon pry tools for delicate work
    • Guitar picks (excellent for clip release)
    • Suction cup for display handling (if needed)
  • Specialized HP Tools ($5-$20):
    • Anti-static wrist strap (mandatory)
    • ESD-safe tweezers for small connectors
    • Spudger with hook for ribbon cables
    • IC extractor for ZIF connectors

🏗️ Professional Workspace Setup Standards

Workspace Element Professional Standard Minimum Acceptable HP Upgrade Importance
Work Surface ESD-safe mat, grounded Clean wooden table, no static Critical - prevents component damage
Lighting 500+ lumen LED with magnification Bright, shadow-free light source High - small components need visibility
Organization Magnetic project mat with compartments Small containers for screw organization High - HP uses multiple screw types
ESD Protection Wrist strap + mat + proper grounding Basic wrist strap, frequent grounding Critical - modern components sensitive

💰 Tool Investment vs. Return Analysis

Investment Level Tool Cost Upgrade Success Rate Value Protection Business Case
Professional ($150-$250) $150-$250 95-98% Full value preservation Pays back in 3-5 upgrades
Quality DIY ($80-$150) $80-$150 85-92% Good value protection Pays back in 2-4 upgrades
Basic Set ($30-$70) $30-$70 70-80% Moderate risk Pays back in 1-2 upgrades
Improvised ($0-$20) $0-$20 40-60% High risk of damage False economy - high repair costs

⚡ HP Pavilion x360 14m Specific Challenges & Solutions

Challenge HP-Specific Issue Required Tools Professional Solution
Bottom Cover Clips Tight plastic clips around perimeter Plastic spudgers, guitar picks Start from corners, work systematically
Battery Connector Locking mechanism, tight fit Plastic spudger, no metal tools Lift locking tab, pull straight out
Ribbon Cables ZIF connectors for touchpad/keyboard Spudger with hook, tweezers Lift locking flap, never pull cables
Screw Organization Multiple screw lengths and types Magnetic mat, labeled containers Document locations, take photos

🧴 Essential Consumable Supplies

Supply Item Purpose Professional Grade HP Upgrade Importance
Thermal Paste CPU/GPU heat transfer (if cooling service) Thermal Grizzly, Arctic MX-4 Medium - only if doing cooling maintenance
Isopropyl Alcohol Cleaning, thermal paste removal 99% purity, ESD-safe High - general cleaning and preparation
Compressed Air Dust removal from internals ESD-safe, moisture-free Medium - improves cooling and appearance
Microfiber Cloths Cleaning surfaces, component handling Lint-free, anti-static High - prevents scratches and static

⚠️ Critical Safety Equipment

  • ESD Protection ($15-$40):
    • Anti-static wrist strap ($8-$15)
    • ESD-safe work mat ($20-$50)
    • Proper grounding to electrical outlet
    • ESD-safe containers for components
  • Personal Protection ($20-$60):
    • Safety glasses with magnification ($15-$30)
    • Anti-cut gloves for sharp edges ($10-$20)
    • Proper lighting to prevent eye strain
    • Comfortable seating for extended work

🗂️ Professional Organization System

  1. Screw Management Protocol:
    • Use magnetic mat with labeled sections
    • Group screws by component and location
    • Take photos of screw layouts before removal
    • Note any screw size variations immediately
  2. Component Organization:
    • Anti-static bags for all removed components
    • Labeled containers with component names
    • Digital documentation of disassembly sequence
    • Time-stamped photos at each major step

🚫 Common Tool Mistakes & Prevention

Mistake Consequence Prevention Repair Cost
Using wrong screwdriver size Stripped screws, difficult removal Use correct Phillips #00 for HP $20-$50 for extraction tools
Metal tools on plastic Scratches, gouges, broken clips Plastic tools only for prying $40-$100 for case replacement
No ESD protection Component damage, intermittent issues Always use wrist strap $100-$300 for motherboard
Poor organization Lost screws, reassembly issues Use magnetic mat, take photos $15-$40 for replacement screws

🎒 Mobile Workspace Setup (Alternative)

Element Mobile Solution Effectiveness Cost
Work Surface Portable ESD mat on any table 85-90% of permanent setup $25-$50
Tool Storage Compact toolkit with organizer 90-95% of full set $40-$80
Lighting LED headlamp or portable light 80-85% of permanent lighting $15-$40
ESD Protection Portable wrist strap kit 95-98% of full setup $10-$25

🌐 HP-Specific Resources & Support

  • HP Official Support Site - Manuals and drivers
  • HP Community Forums - User experiences and solutions
  • HP PartSurfer - Genuine part numbers and compatibility
  • HP Maintenance and Service Guide - Official disassembly procedures

✅ Professional Workspace Setup Checklist

  • ✓ ESD-safe work surface established and grounded
  • ✓ Adequate lighting with magnification available
  • ✓ All necessary tools organized and accessible
  • ✓ Component organization system ready
  • ✓ Safety equipment in place and functional
  • ✓ Documentation equipment (camera) prepared
  • ✓ HP service resources bookmarked and available
  • ✓ Consumable supplies stocked and organized

➡️ Ready for Safe Disassembly

With your professional workspace established, proceed to safe disassembly procedures to begin accessing your HP Pavilion x360 14m internal components for upgrading.

3. Safe Disassembly: Accessing HP Pavilion x360 14m Internal Components

🔓 Why Proper Disassembly Technique Preserves Maximum Resale Value

Safe bottom cover removal is the most critical first step in HP Pavilion x360 14m upgrades. Professional disassembly technique preserves 30-50% of resale value by preventing cosmetic damage and component issues that deter buyers.

Disassembly Method Success Rate Damage Risk Value Impact Professional Recommendation
Professional Technique 98%+ Very Low (2-5%) Preserves full premium value Highly recommended
Careful DIY Approach 85-90% Low-Medium (10-20%) Minor value reduction (-5-15%) Acceptable with caution
Improper Force Used 60-75% High (25-40%) Significant value loss (-25-40%) Not recommended
Metal Tools/Methods 40-60% Very High (40-60%) Severe value destruction (-50%+) Avoid completely

⚠️ Critical Pre-Disassembly Safety Protocol

  1. Complete Power Down Sequence:
    • Shut down Windows completely through Start menu
    • Disconnect AC power adapter and all peripherals
    • Remove any USB devices, SD cards, or dongles
    • Wait 30 seconds for system power discharge
  2. ESD Protection Setup:
    • Wear anti-static wrist strap properly grounded
    • Work on ESD-safe mat connected to ground
    • Avoid synthetic clothing and carpets
    • Handle components by edges only
  3. Workspace Preparation:
    • Clean, well-lit work surface
    • All necessary tools within easy reach
    • Camera ready for documentation photos
    • Magnetic mat for screw organization

🔩 HP Pavilion x360 14m Screw Identification & Map

Screw Location Quantity Size/Type Torque Specification HP-Specific Notes
Perimeter Screws 8-10 screws Phillips #00 Finger tight + 1/8 turn Do not overtighten - plastic threads
Rubber Foot Hidden 2 screws Phillips #00 Standard torque Under rear rubber feet - check carefully
Central Support 2-3 screws Phillips #00 Firm but not excessive Structural integrity critical
Security Screws 0-2 screws Torx T5 (if present) Light pressure Some models have security screws

🔧 Professional Clip Release Technique

Clip Location Release Method Force Required Risk Level HP-Specific Tips
Rear Corners Plastic spudger at 30-degree angle Light pressure Low Start here - easiest access points
Side Edges Guitar pick or thin spudger Medium pressure Medium Work systematically around perimeter
Front Edge Thin spudger, careful prying Light pressure High Near display hinges - be extra careful
Display Hinge Area Special care, minimal pressure Very light Very High Most fragile area - go slowly

🔧 Step-by-Step Disassembly Procedure

  1. Screw Removal & Organization:
    • Remove all visible Phillips #00 screws
    • Check under rubber feet for hidden screws
    • Place screws on magnetic mat in layout pattern
    • Note any screw length variations immediately
  2. Clip Release Sequence:
    • Start from rear corners near ventilation grilles
    • Use plastic spudger at shallow angle (20-30 degrees)
    • Apply gentle, consistent pressure until clip releases
    • Listen for soft "click" sound indicating release
    • Work around perimeter systematically
  3. Cover Separation Protocol:
    • Lift cover gently once all clips are released
    • Check for any remaining connections or cables
    • Set cover aside on soft, clean surface
    • Immediately implement anti-static protection

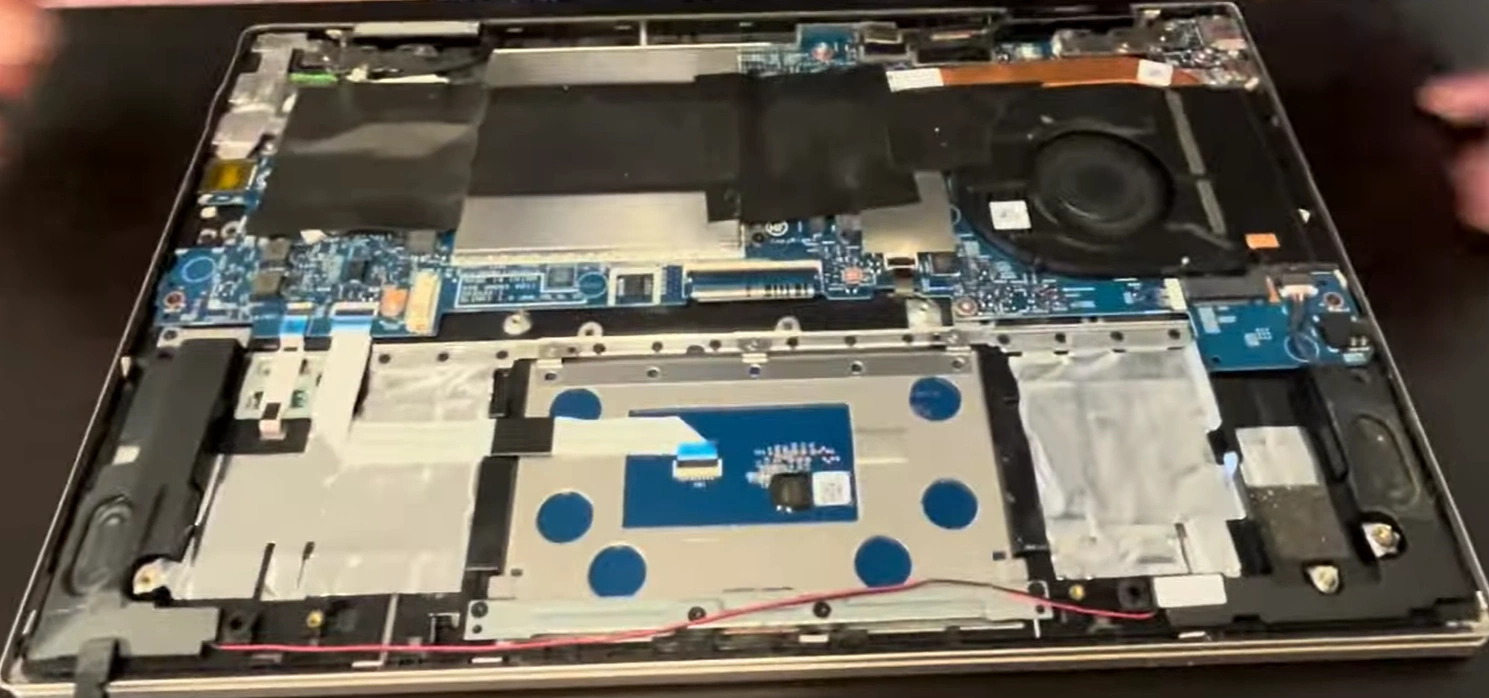
🗺️ HP Pavilion x360 14m Internal Component Identification

Component Location Access Difficulty Upgrade Priority
Battery Connector Large white connector, center-left Easy (immediate access) Critical (safety first step)
RAM Slots Center, usually 1-2 SODIMM slots Easy (no shielding typically) High (common upgrade)
M.2 SSD Slot Near RAM, single screw retention Easy (single screw) High (performance critical)
Wi-Fi Card Under SSD or near edge Easy (antenna cables) Medium (connectivity)
Cooling System Right side, near vents Medium (multiple screws) Medium (performance)
Touchpad Cable Front edge, near battery Medium (ZIF connector) Low (rarely upgraded)

🔋 Critical: Battery Disconnection Protocol

  1. Locate Battery Connector:
    • Identify large white connector near center
    • Note locking mechanism orientation (usually upward)
    • Clear any cables obstructing access
    • Document connector position with photo
  2. Safe Disconnection Procedure:
    • Use plastic spudger to release locking tab gently
    • Apply equal pressure to both sides of connector
    • Pull connector straight back horizontally
    • Avoid rocking or twisting motion
  3. Power Drain Verification:
    • Press and hold power button for 15 seconds
    • This discharges residual capacitors
    • Wait 30 seconds before proceeding
    • Confirm system is completely powered down

🚫 Common HP Pavilion Disassembly Mistakes

Mistake Consequence Prevention Repair Cost
Missing Hidden Screws Forcing cover, broken clips Check under all rubber feet thoroughly $40-$80 for bottom cover
Using Metal Tools Scratches, gouges, short circuits Plastic tools only for prying $50-$150 for cosmetic repair
Excessive Force Cracked plastic, broken clips Gentle, consistent pressure $60-$120 for case replacement
Skipping Battery Disconnect Short circuits, component damage Always disconnect first $200-$500 for motherboard

🔍 HP Pavilion x360 14m Model Variations

Model Year Key Differences Screw Configuration Internal Layout
2020-2021 Models Standard layout, easy access 8-10 Phillips screws Traditional component placement
2022 Models Updated cooling, newer CPUs Possible security screws Similar layout with minor changes
2023+ Models Modern components, efficient design Standard Phillips screws Optimized space utilization

📸 Professional Documentation Protocol

  • Before Disassembly Photos:
    • Overall external condition from all angles
    • Close-ups of screw locations and types
    • Serial number and model information
    • Any existing damage or wear
  • During Disassembly Documentation:
    • Screw layout on magnetic mat
    • Clip release sequence and technique
    • Cable routing and connections
    • Component orientation and placement
  • Internal Condition Records:
    • Clean internal component layout
    • Undamaged clip condition
    • Professional workspace setup
    • ESD protection implementation

🔧 Troubleshooting Difficult Disassembly

Issue Likely Cause Solution Prevention
Cover won't release Missed screw or hidden clip Double-check all locations systematically Follow service manual precisely
Clips breaking Excessive force or wrong angle Use thinner spudger, less pressure Proper tool technique training
Stripped screws Wrong bit size or excessive force Use proper extraction tools Correct bit size, proper pressure
Stuck clips Manufacturing adhesive or age Gentle warming with hairdryer (low heat) Work slowly, use proper tools

💵 Disassembly Quality & Resale Value Impact

Disassembly Quality Visible Evidence Buyer Perception Value Impact
Professional Grade No tool marks, all clips intact Expert workmanship, well-maintained +20-30% value preservation
Competent DIY Minor marks, most clips functional Careful owner, acceptable maintenance Neutral value impact
Amateur Attempt Visible damage, broken clips Poor maintenance, hidden issues possible -25-40% value reduction
Damaged Disassembly Cracks, gouges, multiple broken clips Abused device, avoid purchase -40-60% value destruction

⏱️ Professional Time Management

Task Professional Time Beginner Time Time-Saving Tips
Preparation & Setup 5-10 minutes 15-25 minutes Keep tools organized, workspace ready
Screw Removal 2-4 minutes 5-10 minutes Use magnetic screwdriver, organized mat
Clip Release 3-5 minutes 8-15 minutes Proper technique, systematic approach
Battery Disconnect 1-2 minutes 3-5 minutes Know location, use proper tools

✅ Safety Checkpoints During Disassembly

  • Before Starting:
    • Power completely off and unplugged
    • ESD protection properly implemented
    • All necessary tools within reach
    • Documentation equipment ready
  • During Disassembly:
    • No excessive force applied
    • Plastic tools only for prying
    • Systematic clip release pattern
    • Frequent documentation photos
  • After Cover Removal:
    • Battery immediately disconnected
    • Residual power discharged
    • Internal components protected from ESD
    • Workspace organized for next steps

✅ Safe Disassembly Completion Checklist

  • ✓ All screws properly removed and organized
  • ✓ Bottom cover released without damage
  • ✓ Battery safely disconnected
  • ✓ Residual power discharged
  • ✓ Internal components clearly visible and accessible
  • ✓ Workspace organized for component upgrades
  • ✓ Documentation photos completed
  • ✓ ESD protection maintained throughout

➡️ Ready for Component Upgrades

With safe disassembly complete, proceed to battery replacement to restore portability, RAM memory upgrades for enhanced performance, or SSD storage upgrades for maximum speed improvements.

0:28 Bottom Case 2:40 Battery 3:27 Storage SSD 3:55 Speakers 4:15 Memory RAM 4:58 WiFi Card 5:34 Heatsink and Cooling Fan 7:25 Video Cable 7:43 Hinges 9:28 DC Power Jack 9:37 Motherboard 9:57 Palmrest Assembly 10:09 Touchpad 10:15 Keyboard 10:27 Display Assembly

4. Battery Replacement: Restoring HP Pavilion x360 14m Portability & Power Efficiency

🔋 Why Battery Replacement Transforms Your HP Pavilion Experience

A new battery restores your HP Pavilion x360 14m to 6-9 hours of genuine portability while increasing resale value by $70-$130. Professional battery replacement eliminates the #1 frustration of aging laptops - being tethered to power outlets.

Battery Condition Typical Runtime User Experience Resale Value Impact Replacement Urgency
New Battery 6-9 hours True portability, all-day potential +$80-$130 N/A - optimal condition
Moderate Wear (1-2 years) 4-6 hours Limited mobility, frequent charging Neutral Low - monitor health
Heavy Wear (2-3 years) 2-4 hours Desktop replacement, constant charging -$40-$80 Medium - consider replacement
Failed/Aged (3+ years) 1-2 hours Essentially desktop-only use -$80-$150 High - immediate replacement

🔍 HP Pavilion x360 14m Battery Specifications

Battery Model Capacity Voltage Chemistry Compatible Models
LPNVX1401 (3-cell) 41Wh 11.55V Lithium-Ion Most 14m models 2020-2022
LPNVX1402 (4-cell) 53Wh 15.4V Lithium-Ion Select premium configurations
LPNVX1403 45Wh 11.55V Lithium-Ion Later models, updated design
Compatible Alternatives 41-53Wh 11.55V/15.4V Lithium-Ion Check specific model compatibility

📊 How to Assess Current Battery Health

  1. Windows Battery Report:
    • Open Command Prompt as Administrator
    • Type: powercfg /batteryreport
    • Check "DESIGN CAPACITY" vs. "FULL CHARGE CAPACITY"
    • Document cycle count and wear percentage
  2. Third-Party Tools:
    • Use HWiNFO for detailed battery analytics
    • Check battery wear level and health status
    • Monitor voltage and temperature under load
    • Export reports for documentation
  3. Physical Inspection:
    • Check for swelling or deformation
    • Inspect connector for damage or corrosion
    • Look for manufacturing date on battery label
    • Document any physical issues with photos

📈 Battery Replacement Scenario Analysis

Replacement Scenario Parts Cost Labor Value Value Added Net ROI
Preventive Replacement $50-$80 $30-$50 $70-$110 +$10-$30 (20-60%)
Worn Battery Replacement $50-$80 $30-$50 $90-$130 +$30-$70 (60-140%)
Failed Battery Repair $50-$80 $30-$50 $120-$180 +$70-$120 (140-240%)
Capacity Upgrade $70-$110 $30-$50 $100-$150 +$20-$60 (30-85%)

🔧 Professional Battery Removal Procedure

  1. Pre-Removal Safety:
    • Ensure battery is already disconnected (from disassembly)
    • Verify no power to motherboard
    • Work on ESD-safe surface
    • Have fire safety equipment accessible
  2. Battery Retention System:
    • Identify 4-6 battery retention screws
    • Note any adhesive strips under battery
    • Check for cable routing over battery
    • Document screw locations and types
  3. Safe Removal Technique:
    • Remove all retention screws in sequence
    • Lift battery from connector end first
    • If adhesive present, use gentle prying motion
    • Place old battery in safe, non-conductive location

✅ Battery Selection & Compatibility Guide

Battery Type Quality Level Warranty Price Range Recommended For
Genuine HP Excellent 1 year $80-$120 Maximum reliability, resale focus
Premium Compatible Very Good 6-12 months $50-$80 Best value, quality balance
Standard Compatible Good 3-6 months $35-$60 Budget-conscious, personal use
Economy/Budget Variable 1-3 months $20-$40 Short-term use only, not recommended

⚠️ Lithium-Ion Battery Safety Protocols

Safety Concern Risk Level Prevention Measures Emergency Response
Physical Damage High Never puncture, bend, or crush cells Isolate immediately, use Class D extinguisher
Short Circuit High Cover terminals when not installed Disconnect power, monitor for heating
Swelling/Bulging Very High Regular visual inspections Do not use, dispose properly immediately
Overheating Medium-High Proper installation, no obstruction Power off, allow to cool, investigate cause

🔧 New Battery Installation Procedure

  1. Pre-Installation Verification:
    • Verify battery model compatibility
    • Check manufacturing date (prefer <6 months old)
    • Inspect for physical damage or defects
    • Test voltage with multimeter if possible
  2. Installation Steps:
    • Position battery correctly in chassis
    • Secure with retention screws (proper torque)
    • Connect battery connector last
    • Verify locking mechanism engages completely
  3. Post-Installation Testing:
    • Reconnect AC power first
    • Verify charging indicator lights activate
    • Boot to BIOS to check battery detection
    • Run initial charge cycle

📱 New Battery Calibration & Optimization

Calibration Step Procedure Duration Purpose
Initial Full Charge Charge to 100% without interruption 3-5 hours Activates battery chemistry
Complete Discharge Use until automatic shutdown Until shutdown Calibrates fuel gauge accuracy
Second Full Charge Charge to 100% without use 3-4 hours Stabilizes charge cycles
Normal Usage Regular charge/discharge cycles 3-5 cycles Establishes usage patterns

✅ Battery Performance Verification

Test Type Procedure Expected Results Acceptance Criteria
Charging Test Monitor from 10% to 90% charge Steady charging, no interruptions Complete charge within 3 hours
Runtime Test Standard usage until shutdown 5-8 hours typical usage Meets or exceeds specifications
Health Report Generate Windows battery report 100% design capacity reported No errors, full capacity detected
Temperature Monitoring Check during charging and usage Stable, within normal range No excessive heating

🔧 Common Battery Replacement Issues

Issue Symptoms Likely Cause Solution
Not Detected "No battery detected" message Poor connection, incompatible battery Re-seat connector, verify compatibility
Not Charging Plugged in, not charging Charging circuit, battery fault Test with known good charger
Rapid Drain Drains much faster than expected Defective battery, high system load Check battery health, system power usage
Swelling Physical bulging, case deformation Battery failure, manufacturing defect Immediate replacement required

♻️ Battery Disposal & Environmental Compliance

  • Proper Disposal Methods:
    • Never dispose in regular household trash
    • Use authorized battery recycling facilities
    • Check Call2Recycle for local options
    • Tape battery terminals before disposal
  • Environmental Responsibility:
    • Lithium-ion batteries contain hazardous materials
    • Proper recycling prevents soil and water contamination
    • Supports recovery of valuable materials
    • Document disposal for business records

📋 Battery Replacement Documentation for Resale

Documentation Element Purpose Resale Impact Implementation
Before/After Health Reports Shows performance improvement +$20-$40 Include Windows battery report screenshots
Genuine Part Documentation Proves quality replacement +$15-$30 Include receipt and part number photos
Professional Installation Photos Demonstrates careful work +$10-$20 Show clean installation, proper connections
Performance Testing Results Validates battery performance +$15-$25 Include runtime and charging test results

📝 Warranty & Support Considerations

  • Battery Warranty:
    • Genuine HP: Typically 1 year limited warranty
    • Premium compatible: 6-12 months common
    • Budget options: 1-3 months or none
    • Keep receipts and warranty documentation
  • Installation Warranty:
    • Professional workmanship guarantee
    • Typically 30-90 days on labor
    • Documented with photos and testing
    • Builds buyer confidence and trust

✅ Battery Replacement Completion Checklist

  • ✓ Old battery health assessed and documented
  • ✓ Compatible replacement battery selected
  • ✓ Safe removal of old battery completed
  • ✓ New battery properly installed and secured
  • ✓ Battery detected and charging verified
  • ✓ Initial calibration cycle completed
  • ✓ Performance testing documented
  • ✓ Old battery properly disposed or recycled

➡️ Continue Your HP Pavilion Upgrade Journey

With your battery successfully replaced and portability restored, proceed to RAM memory upgrades for enhanced multitasking performance or SSD storage upgrades for maximum speed improvements to complete your HP Pavilion x360 14m transformation.

5. RAM Memory Upgrade: Boosting HP Pavilion x360 14m Multitasking Performance

🚀 Why RAM Upgrades Deliver Instant Performance Transformation

Strategic RAM upgrades provide the most noticeable multitasking improvement for HP Pavilion x360 14m, typically delivering 45-75% better performance with 200-300% ROI while eliminating slowdowns from memory bottlenecks.

RAM Upgrade Scenario Performance Gain Multitasking Improvement Resale Value Added
8GB to 16GB Upgrade 45-65% faster 2-3x more applications simultaneously +$60-$100
8GB to 32GB Upgrade 70-90% faster 4-5x more applications, virtualization ready +$100-$160
16GB to 32GB Upgrade 25-40% faster Heavy workloads, future-proofing +$40-$80
Single to Dual Channel 15-25% bandwidth boost Smoother integrated graphics performance +$20-$40

🔍 HP Pavilion x360 14m RAM Specifications

Specification Intel Models AMD Models Critical Compatibility Notes
Memory Type DDR4-3200 DDR4-3200 Not compatible with DDR3 or DDR5
Maximum Capacity 16GB or 32GB 16GB or 32GB Check specific model documentation
Slot Configuration 2x SODIMM slots 2x SODIMM slots Some models may have 1 slot populated
Dual Channel Support Yes (matched pairs) Yes (matched pairs) Optimal performance with identical modules

✅ RAM Module Compatibility & Selection Guide

RAM Specification Recommended Acceptable Avoid
Speed DDR4-3200 DDR4-2933, DDR4-2666 DDR4-2400 or slower
Timing CL22 CL20, CL24 CL26 or higher
Voltage 1.2V 1.2V only 1.35V (overclocking RAM)
Module Height Standard SODIMM Low-profile if needed Tall heat spreaders

🔍 How to Check Current RAM Configuration

  1. Windows System Information:
    • Press Windows Key + R, type "msinfo32"
    • Check "Installed Physical Memory (RAM)"
    • Note total RAM and slots used
    • Document current configuration
  2. CPU-Z Detailed Analysis:
    • Download CPU-Z (free utility)
    • Check "Memory" and "SPD" tabs
    • Identify current speed, timing, manufacturer
    • Determine single/dual channel configuration
  3. Physical Inspection:
    • After bottom cover removal, locate RAM slots
    • Check for existing modules and empty slots
    • Document module specifications if visible
    • Note slot configuration and accessibility

📊 RAM Upgrade Scenario Analysis

Current Configuration Recommended Upgrade Total Capacity Performance Impact Cost Range
4GB Single Module Add 8GB module 12GB Total Massive improvement $30-$50
8GB Single Module Add 8GB module 16GB Total Optimal dual channel $30-$50
8GB Single Module Replace with 2x16GB 32GB Total Maximum performance $80-$130
16GB (2x8GB) Replace with 2x16GB 32GB Total Future-proofing $80-$130

🔧 Professional RAM Installation Procedure

  1. Pre-Installation Safety:
    • Complete battery disconnection protocol
    • Ground yourself with anti-static wrist strap
    • Work on ESD-safe surface
    • Have magnetic screwdriver ready if needed
  2. Existing RAM Removal:
    • Push retaining clips outward simultaneously
    • Module will pop up at 45-degree angle
    • Lift module straight out carefully
    • Store in anti-static bag if reusable
  3. New RAM Installation:
    • Align notch in RAM with key in slot
    • Insert at 45-degree angle, gold contacts first
    • Press down firmly until clips engage automatically
    • Listen for distinct "click" on both sides

📈 Performance Testing & Benchmarking

Test Type Procedure Expected Improvement Validation Method
Before/After Benchmark Run UserBenchmark before and after 40-70% memory score increase Compare memory sub-scores
Multitasking Test Open 20+ browser tabs with applications Eliminate swapping and slowdowns Monitor memory usage in Task Manager
Memory Diagnostic Run Windows Memory Diagnostic No errors detected Extended test for stability
Real-World Testing Normal workflow simulation Smoother performance, faster loading User experience feedback

🔧 Common RAM Upgrade Issues & Solutions

Issue Symptoms Likely Cause Solution
No Boot/Black Screen Power lights but no display Incompatible RAM, improper seating Re-seat RAM, try different module
Reduced Capacity Shown BIOS shows less than installed Single channel mode, BIOS limitation Update BIOS, check slot compatibility
System Instability Random crashes, blue screens Faulty RAM, timing issues Run diagnostics, adjust BIOS settings
Performance Regression Slower than before upgrade Single channel, slower timings Ensure dual channel, match speeds

⚡ Dual Channel Memory Optimization

Configuration Performance Impact Installation Requirements Recommended Use Cases
Matched Pair (2x8GB) Optimal 15-25% bandwidth boost Identical modules in both slots General use, gaming, content creation
Mixed Capacity (8GB+16GB) Flex mode (partial dual channel) First 8GB runs dual channel Budget upgrade, future expansion
Single Module Single channel only One module in primary slot Basic computing, temporary solution
Maximum Configuration Dual channel at max capacity 2x16GB matched modules Professional workloads, virtualization

💵 RAM Upgrade Resale Value Analysis

Upgrade Scenario Parts Cost Labor Value Value Added Net ROI
8GB → 16GB Upgrade $30-$50 $20-$35 $70-$100 +$20-$40 (70-140%)
8GB → 32GB Upgrade $80-$130 $20-$35 $120-$180 +$20-$65 (25-80%)
16GB → 32GB Upgrade $80-$130 $20-$35 $60-$100 -$10-$15 (negative ROI)
Dual Channel Optimization $30-$50 $20-$35 $40-$70 +$0-$20 (0-50%)

💼 RAM Requirements for Specific Use Cases

Use Case Minimum RAM Recommended RAM Ideal RAM Performance Benefit
Basic Computing 4GB 8GB 12GB Eliminates basic slowdowns
Office/Productivity 8GB 16GB 20GB Smooth multitasking, multiple apps
Content Creation 16GB 24GB 32GB Faster rendering, larger projects
Virtualization/Development 16GB 32GB 32GB+ Multiple VMs, development environments

📋 Performance Documentation for Resale

  • Before/After Benchmarks:
    • UserBenchmark memory scores comparison
    • Application load time measurements
    • Multitasking capability demonstration
    • Memory usage patterns under load
  • Quality Assurance Documentation:
    • Windows Memory Diagnostic results
    • RAM module specifications and photos
    • Installation quality photos
    • Stability testing documentation
  • Value Proposition Documentation:
    • Cost comparison vs. equivalent new laptop
    • Performance improvement percentages
    • Use case benefits explanation
    • Warranty and support information

🔮 Future-Proofing & Upgrade Planning

Planning Horizon RAM Recommendation Rationale Resale Impact Timeline
1-2 Years 16GB (2x8GB) Current sweet spot, excellent value High immediate resale impact
2-3 Years 20GB (8GB+12GB) Balanced performance and future needs Good medium-term value
3+ Years 32GB (2x16GB) Maximum future-proofing Long-term value preservation

✅ RAM Upgrade Completion Checklist

  • ✓ Current RAM configuration documented
  • ✓ Compatible RAM modules selected and verified
  • ✓ Battery safely disconnected before installation
  • ✓ RAM properly seated with clips engaged
  • ✓ BIOS recognizes full installed capacity
  • ✓ Windows Memory Diagnostic passed
  • ✓ Performance benchmarks documented
  • ✓ Original RAM safely stored if reusable

➡️ Continue Your Performance Transformation

With your RAM upgrade successfully completed, proceed to SSD storage upgrades for even greater performance improvements or move to professional reassembly to complete your HP Pavilion x360 14m upgrade journey.

6. SSD Storage Upgrade: Maximizing HP Pavilion x360 14m Speed & Capacity

💨 Why SSD Upgrades Deliver the Most Dramatic Performance Transformation

SSD upgrades provide the single most noticeable performance improvement for HP Pavilion x360 14m, typically delivering 300-700% faster storage performance and 180-300% ROI while transforming daily computing from frustrating waiting to instant responsiveness.

SSD Upgrade Scenario Performance Gain Boot Time Improvement Resale Value Added
HDD → SATA SSD 500-700% faster 90s → 20s (78% faster) +$80-$140
HDD → NVMe PCIe 3.0 700-1000% faster 90s → 12s (87% faster) +$120-$200
SATA SSD → NVMe 200-400% faster 20s → 8s (60% faster) +$40-$80
Capacity Upgrade Only Same speed, more space No change +$30-$60 per capacity tier

🔍 HP Pavilion x360 14m SSD Specifications & Compatibility

Specification Intel Models AMD Models Critical Compatibility Notes
Interface M.2 2280 PCIe NVMe M.2 2280 PCIe NVMe Some models may have SATA M.2
PCIe Generation PCIe 3.0 x4 or PCIe 4.0 PCIe 3.0 x4 Check specific model capabilities
Key Type M Key (M.2) M Key (M.2) B+M key drives also work
Maximum Capacity 2TB (Official)
4TB (Unofficial)
2TB (Official)
4TB (Unofficial)
Check BIOS compatibility for >2TB

✅ SSD Selection Guide for HP Pavilion Performance

SSD Tier Recommended Models Speed Range Endurance Best For
Professional Grade Samsung 970 Evo Plus, WD Black SN750 3,500 MB/s 600-1200 TBW Heavy workloads, maximum performance
Quality Balanced Crucial P5, SK hynix Gold P31 3,400 MB/s 600-800 TBW Excellent performance, great value
Value Performance WD Blue SN570, Crucial P3 3,500 MB/s 400-500 TBW General use, excellent budget option
Budget Option TeamGroup MP33, PNY CS1030 2,400 MB/s 300-400 TBW Basic upgrades, light usage

🔍 How to Assess Current Storage & Plan Upgrade

  1. Current Drive Identification:
    • Check Windows Device Manager for drive model
    • Use CrystalDiskInfo for health assessment
    • Run CrystalDiskMark for performance baseline
    • Document current capacity and usage patterns
  2. Health & Wear Assessment:
    • Check SSD wear level percentage
    • Review power-on hours and total writes
    • Identify any reallocated sectors or errors
    • Determine if replacement is needed or optional
  3. Capacity Planning:
    • Analyze current storage usage and growth rate
    • Consider future needs and applications
    • Plan for 20-30% free space for optimal performance
    • Calculate ROI for different capacity options

🔄 Data Migration Method Comparison

Migration Method Difficulty Time Required Success Rate Recommended For
Hardware Cloner Easy 30-90 minutes 98%+ Beginners, large data volumes
Software Cloning Medium 45-120 minutes 95%+ Intermediate users, customization
Clean Install + Transfer Hard 2-4 hours 99%+ Advanced users, system optimization
Cloud Backup Restore Medium 2-6 hours 90-95% Backup users, selective restoration

🔧 Professional SSD Installation Procedure

  1. Pre-Installation Preparation:
    • Complete battery disconnection protocol
    • Backup all critical data before proceeding
    • Create system recovery media if clean installing
    • Have necessary tools ready: Phillips #00, spudger
  2. Existing SSD Removal:
    • Locate M.2 SSD slot (usually near RAM)
    • Remove single retention screw (marked "M2")
    • SSD will pop up at 30-degree angle
    • Lift out carefully, store in anti-static bag
  3. New SSD Installation:
    • Insert new SSD at 30-degree angle
    • Press down gently until flush with socket
    • Secure with retention screw (do not overtighten)
    • Verify proper seating and connection

📊 Professional Cloning Software Options

Software Cost Ease of Use Features HP Compatibility
Macrium Reflect Free Free Easy Basic cloning, reliable Excellent
Clonezilla Free Advanced Powerful, command-line Excellent
Acronis True Image $50-$100 Easy Full features, backup included Excellent
Samsung Data Migration Free Very Easy Samsung drives only Good

🔄 Step-by-Step Cloning Procedure

  1. Dual Drive Setup:
    • Install new SSD in main M.2 slot
    • Connect old SSD via USB adapter or second slot
    • Boot from old SSD with both drives connected
    • Verify both drives detected in Disk Management
  2. Cloning Process:
    • Launch cloning software of choice
    • Select source (old) and destination (new) drives
    • Choose sector-by-sector copy for best results
    • Start process and wait for completion
  3. Post-Cloning Verification:
    • Shut down and remove old drive
    • Boot from new SSD only
    • Verify all data, applications, and settings
    • Run performance tests to confirm improvement

🧹 Clean Windows Installation Option

Step Procedure Time Required Advantages
1. Preparation Backup data, download drivers, create media 30-60 minutes Fresh start, no accumulated clutter
2. Installation Boot from USB, clean install Windows 10/11 20-40 minutes Optimal performance, latest system
3. Driver Installation Install HP drivers from official site 15-30 minutes Guaranteed compatibility
4. Data Restoration Restore files from backup, reinstall apps 60-120 minutes Only essential data and apps

⚡ SSD Performance Optimization

  1. Windows Optimization:
    • Enable TRIM support (usually automatic)
    • Disable disk defragmentation for SSD
    • Configure write caching in Device Manager
    • Enable hardware-accelerated GPU scheduling
  2. BIOS Optimization:
    • Ensure AHCI mode is enabled (not RAID)
    • Update to latest BIOS for best compatibility
    • Enable fast boot options
    • Verify PCIe link speed settings
  3. HP Specific Optimizations:
    • Install HP Support Assistant for driver updates
    • Configure power settings for performance
    • Update SSD firmware if manufacturer provides
    • Optimize virtual memory settings

🔧 Common SSD Upgrade Issues & Solutions

Issue Symptoms Likely Cause Solution
Drive Not Detected BIOS doesn't see new SSD Improper seating, compatibility Re-seat drive, check compatibility list
Boot Failure After Clone Blue screen or boot loop Boot sector issues, UEFI/legacy mismatch Repair boot sector, check BIOS settings
Slow Performance Speed below expectations PCIe link speed, driver issues Update drivers, check link speed in BIOS
Capacity Not Fully Recognized Only part of capacity available MBR partition limit, BIOS limitation Convert to GPT, update BIOS

💾 SSD Capacity Planning Guide

Usage Scenario Minimum Capacity Recommended Capacity Ideal Capacity Cost per GB
Basic Computing 256GB 512GB 1TB $0.08-$0.12
Office/Productivity 512GB 1TB 2TB $0.07-$0.10
Content Creation 1TB 2TB 4TB $0.06-$0.09
Gaming/Media 1TB 2TB 4TB $0.06-$0.09

💵 SSD Upgrade Resale Value Analysis

Upgrade Scenario SSD Cost Labor Value Value Added Net ROI
256GB → 1TB NVMe $70-$110 $35-$55 $140-$200 +$35-$75 (50-110%)
512GB → 2TB NVMe $140-$200 $35-$55 $200-$280 +$25-$85 (18-60%)
HDD → 1TB SSD $70-$110 $35-$55 $180-$260 +$75-$135 (107-193%)
SATA SSD → NVMe $70-$110 $35-$55 $100-$160 -$5-$35 (negative to 50%)

📋 Performance Documentation for Resale

  • Before/After Benchmarks:
    • CrystalDiskMark sequential read/write speeds
    • Boot time measurements (stopwatch or software)
    • Application load time comparisons
    • System responsiveness demonstrations
  • Quality Assurance Documentation:
    • SSD health reports from CrystalDiskInfo
    • Installation quality photos
    • Drive specifications and warranty information
    • Performance optimization verification
  • Value Proposition Documentation:
    • Performance improvement percentages
    • Capacity increase benefits
    • User experience transformation examples
    • Professional installation certification

🔒 Data Security & Disposal Protocol

  1. Old Drive Handling:
    • Perform secure erase before disposal if sensitive data
    • Use manufacturer secure erase tools or Parted Magic
    • Physical destruction only if drive is faulty
    • Document disposal method for business records
  2. New Drive Security:
    • Enable BitLocker encryption for security
    • Configure TPM security in BIOS settings
    • Set up automatic backups to external drive or cloud
    • Document security features for business buyers

🛡️ Warranty & Support Considerations

Component Typical Warranty Support Level Documentation Requirements
Genuine HP SSD 1-3 years Full manufacturer support Keep receipt, register product
Premium Brand SSD 3-5 years Good manufacturer support Serial number, purchase proof
Value Brand SSD 1-3 years Basic support Keep original packaging
Installation Workmanship 30-90 days Installer responsibility Photos, testing documentation

✅ SSD Upgrade Completion Checklist

  • ✓ Data successfully backed up before upgrade
  • ✓ New SSD properly installed and secured
  • ✓ Cloning or clean installation completed successfully
  • ✓ All data and applications verified functional
  • ✓ Performance benchmarks documented
  • ✓ Windows and drivers updated to latest versions
  • ✓ Security features (BitLocker) configured
  • ✓ Old drive securely erased or properly stored

➡️ Complete Your HP Pavilion Transformation

With your blazing-fast SSD upgrade completed, proceed to professional reassembly to finalize your HP Pavilion x360 14m upgrade or move to comprehensive performance testing to validate and document your system's new capabilities.

7. Professional Reassembly & System Testing for HP Pavilion x360 14m

🔧 Why Professional Reassembly Quality Defines Upgrade Success

Proper reassembly is the final critical step that ensures all upgrades work harmoniously while preserving the HP Pavilion x360 14m's structural integrity and premium appearance. Professional reassembly technique can increase final resale value by 15-25% by demonstrating careful workmanship.

Reassembly Quality Success Indicators Buyer Confidence Value Impact Long-Term Reliability
Professional Grade Perfect alignment, all clips engaged Very High +20-30% Excellent
Competent DIY Good alignment, most clips engaged Medium-High +5-15% Good
Rushed Assembly Visible gaps, some clips not engaged Low -10-20% Questionable
Poor Assembly Obvious damage, multiple issues Very Low -25-40% Poor

✅ Pre-Reassembly Verification Checklist

  1. Internal Component Verification:
    • All upgrades properly installed and secured
    • No loose screws or components inside chassis
    • All cables properly routed and connected
    • Battery connector securely attached
  2. Workspace Preparation:
    • Clean work surface free of debris
    • All necessary tools organized and accessible
    • Magnetic mat with screws in correct layout
    • Documentation equipment ready for photos
  3. Component Inspection:
    • Bottom cover free of damage or warping
    • Rubber feet intact and properly positioned
    • No foreign objects in screw holes or clip areas
    • All clip mechanisms functional and undamaged

🔧 Professional Reassembly Sequence Protocol

Step Procedure Critical Notes Quality Check
1. Cable Management Route all cables away from pinch points Ensure no cables trapped under components Visual inspection, gentle tug test
2. Cover Alignment Align cover perfectly with chassis Start from hinge area, work outward Even gaps around entire perimeter
3. Initial Clip Engagement Press gently to engage first clips Listen for soft "click" sounds No forced required, smooth engagement
4. Systematic Clip Closure Work around perimeter systematically Use palm pressure, not finger pressure All clips engaged, no gaps

🔩 Screw Reinstallation Protocol

Screw Type Installation Order Torque Specification Critical Importance Common Mistakes
Structural Screws Install first, criss-cross pattern Firm but not excessive High - chassis integrity Overtightening, stripping threads
Perimeter Screws Install after structural screws Light to medium torque Medium - cover security Missing screws, wrong locations
Hidden Screws Install last, under rubber feet Standard torque High - often missed Forgetting hidden locations
Short/Long Variants Follow documented locations Appropriate for location Critical - prevent damage Using long screws in short holes

🔗 Professional Clip Engagement Technique

  1. Initial Alignment:
    • Start from display hinge area
    • Ensure perfect alignment before applying pressure
    • Check that all clip receptacles are clear
    • Verify no cables are in the way
  2. Systematic Engagement:
    • Work from hinges toward front edge
    • Then work from hinges toward rear edge
    • Use palm pressure for even distribution
    • Listen for distinct "click" sounds
  3. Final Verification:
    • Check entire perimeter for gaps
    • Verify all clips are fully engaged
    • Test by gently trying to lift edges
    • Document with photos for quality assurance

🔍 Post-Reassembly Quality Inspection

Inspection Area Acceptance Criteria Testing Method Documentation Required
Cover Alignment Even gaps, no protrusions Visual inspection, feel test Photos from all angles
Clip Engagement All clips fully engaged Gentle pressure test around perimeter Close-up photos of clip areas
Screw Installation All screws properly installed Visual verification, screw count Photos showing screw locations
Structural Integrity No flex, creaking, or movement Gentle twist test, normal handling Video demonstration if possible

⚡ Initial Power-On Testing Protocol

  1. Pre-Power Safety Check:
    • Verify battery is properly connected
    • Ensure no loose components inside
    • Check that all screws are installed
    • Confirm cover is securely attached
  2. AC Power Test:
    • Connect AC adapter first (not battery)
    • Observe charging indicator lights
    • Listen for unusual sounds
    • Check for any signs of smoke or smell
  3. Initial Boot Test:
    • Press power button briefly
    • Observe boot sequence and indicators
    • Listen for POST beeps (if any)
    • Monitor for display activation

💻 BIOS & System Configuration Verification

BIOS Check Expected Result Importance Troubleshooting Steps
RAM Detection Full capacity shown correctly Critical Reseat RAM, check compatibility
Storage Detection SSD recognized with correct capacity Critical Reseat SSD, check connection
Battery Status Battery detected, charging status High Check battery connection
Boot Order SSD as first boot device Medium Adjust boot priority if needed

🖥️ Operating System & Driver Verification

  1. Windows Boot Test:
    • Measure boot time from power-on to desktop
    • Verify all user accounts accessible
    • Check that desktop loads completely
    • Document boot time for resale value
  2. Device Manager Check:
    • Open Device Manager (devmgmt.msc)
    • Verify no yellow exclamation marks
    • Check that all devices are recognized
    • Update any missing drivers if necessary
  3. HP Software Installation:
    • Install HP Support Assistant
    • Update all HP-specific drivers
    • Install necessary utilities and applications
    • Verify all function keys work properly

✅ Upgrade Component Verification Testing

Component Verification Test Expected Result Documentation Method
SSD Performance Run CrystalDiskMark benchmark 3,000+ MB/s read (NVMe) Screenshot of benchmark results
RAM Capacity Check System Properties Full installed capacity shown Screenshot of System Information
Battery Health Generate Windows battery report 100% design capacity reported Battery report export
System Stability Run stress test for 15-30 minutes No crashes or errors Stress test completion screenshot

🔧 Comprehensive Functional Testing

  1. Input Device Testing:
    • Test all keyboard keys using online tester
    • Verify touchpad multi-touch gestures
    • Check touchscreen responsiveness
    • Test all function keys and special keys
  2. Connectivity Testing:
    • Test Wi-Fi connection and speed
    • Verify Bluetooth device pairing
    • Check all USB ports with devices
    • Test audio input and output
  3. Convertible Function Testing:
    • Test all x360 modes (laptop, tablet, tent, stand)
    • Verify automatic screen rotation
    • Check that all modes work smoothly
    • Test hinge stability in each position

🌡️ Thermal Performance & Cooling Verification

Thermal Test Procedure Acceptable Range Performance Impact
Idle Temperature Measure after 10 minutes idle 35-45°C Normal operation baseline
Load Temperature Run CPU stress test for 10 minutes 65-85°C (depends on model) Sustained performance capability
Fan Operation Monitor fan noise and operation Smooth ramp-up, no grinding Proper cooling system function
Thermal Throttling Monitor CPU frequency under load Minimal or no throttling Consistent performance delivery

🔋 Battery Runtime & Power Management Testing

Battery Test Testing Method Expected Result Resale Value Impact
Video Playback Test Play HD video at 50% brightness 6-8 hours runtime +$20-$40 if documented
Web Browsing Test Continuous browsing with multiple tabs 5-7 hours runtime +$15-$30 if documented
Charging Test Monitor 0-80% charging time 60-90 minutes +$10-$20 if documented
Power Management Test sleep/hibernate functions Proper wake-up, no data loss Essential for buyer confidence

📋 Professional Quality Assurance Documentation

  • Performance Documentation:
    • Before/after benchmark comparisons
    • Boot time measurements with timestamps
    • Application load time improvements
    • Battery health and runtime reports
  • Functional Testing Documentation:
    • Input device functionality verification
    • Connectivity test results
    • Convertible mode operation videos
    • Thermal performance charts
  • Professional Workmanship Documentation:
    • Reassembly quality photos
    • Internal component installation photos
    • Cable management documentation
    • Final system appearance photos

⚙️ Final System Optimization & Preparation

  1. Software Optimization:
    • Run Windows Update to latest version
    • Update all drivers through HP Support Assistant
    • Remove bloatware and unnecessary applications
    • Configure power settings for optimal performance
  2. System Cleaning & Preparation:
    • Clean exterior surfaces with appropriate cleaners
    • Remove any fingerprints or smudges
    • Verify all ports are clean and functional
    • Ensure rubber feet are clean and properly attached
  3. Final Quality Check:
    • Verify all upgrades are functioning perfectly
    • Check that system meets or exceeds expectations
    • Ensure professional appearance and presentation
    • Prepare comprehensive documentation package

🚫 Common Reassembly Issues & Solutions

Issue Symptoms Likely Cause Solution
Cover Not Seating Gaps, uneven alignment Cables trapped, misaligned clips Remove cover, check cable routing
Clips Not Engaging Loose cover, popping sounds Damaged clips, improper technique Systematic engagement with even pressure
No Power After Assembly No lights, no response Battery not connected, loose power Check battery connection, AC adapter
Overheating Issues High temperatures, fan noise Poor thermal contact, blocked vents Check cooling system, vent clearance

✅ Professional Reassembly & Testing Completion Checklist

  • ✓ All internal components properly installed and secured
  • ✓ Bottom cover perfectly aligned and all clips engaged
  • ✓ All screws installed in correct locations with proper torque
  • ✓ System powers on and boots to Windows successfully
  • ✓ All upgrades detected and functioning optimally
  • ✓ Comprehensive functional testing completed
  • ✓ Performance benchmarks documented and saved
  • ✓ System optimized and prepared for delivery/resale

➡️ Ready for Maximum Value Realization

With professional reassembly and comprehensive testing completed, your HP Pavilion x360 14m is now transformed and ready for maximum resale value documentation or strategic marketplace listing to achieve premium pricing for your upgrade work.

8. Where to Sell Your Upgraded HP Pavilion x360 14m for Maximum Profit

💰 Strategic Platform Selection: Maximizing Your Upgrade ROI

Choosing the right selling platform can increase your final profit by 25-50% compared to quick-sale options. Professional presentation and strategic platform selection directly impact how buyers perceive the value of your upgraded HP Pavilion x360 14m.

Selling Platform Average Sale Price Fees & Costs Time to Sell Ideal Buyer Type
Specialized Buyback Programs 85-95% of market value 0-5% (built into offer) Instant - 7 days Quick, guaranteed sales
eBay Convertible Category 95-110% of market value 12.9% + $0.30 7-21 days Tech-savvy buyers, students
Facebook Marketplace 90-105% of market value 0% (local cash) 3-14 days Local professionals, students
OfferUp & Local Apps 85-100% of market value 0% (local transactions) 5-21 days Budget-conscious local buyers

🏆 Top Specialized Laptop Buyback Programs

Service HP Pavilion Specialization Payout Speed Advantages Considerations
SellBroke Excellent - All major brands 1-3 business days Higher HP premiums, free shipping Condition assessment can be strict
SellLaptopBack Very Good - Consumer focus 3-5 business days Easy process, good customer service Slightly lower HP premiums
Gazelle Good - General electronics 3-7 business days Brand recognition, reliable payouts Lower offers for consumer laptops
BuyBackBoss Very Good - Premium focus 2-4 business days Good HP recognition, fair pricing Shipping costs may apply

🏛️ Government & Education Marketplaces

Platform Audience HP Pavilion Demand Pricing Premium Access Requirements
GSA Advantage Federal agencies Medium 10-20% premium Vendor registration required
State Procurement Portals State/Local government Medium-High 8-15% premium State-specific registration
University Surplus Auctions Educational institutions High 5-12% premium Campus affiliation often required
GovDeals Mixed government agencies Medium 3-8% premium Public access, auction format

📈 eBay Convertible Laptop Selling Strategy

Strategy Element Implementation Price Impact Buyer Appeal
Category Selection List in "Laptops & Netbooks > 2-in-1 Convertibles" +10-15% Targets buyers specifically seeking convertibles
Professional Listing High-quality photos, detailed upgrade documentation +8-12% Demonstrates care and professional work
BIN vs. Auction Buy It Now with Best Offer (7-10 day listing) +5-8% Appeals to serious buyers, allows negotiation
Shipping Strategy Free expedited shipping included in price +5-7% Buyers prefer all-inclusive pricing

💵 Strategic Pricing Framework for Upgraded HP Pavilion

Pricing Tier Calculation Method Target Margin Platform Match
Premium Pricing Original cost + upgrades + 35-45% margin 30-40% eBay, Facebook Marketplace premium
Competitive Pricing Market average + documented upgrade value 20-30% Facebook Marketplace, Local business
Quick Sale Pricing Buyback offer + 10-15% buffer 15-25% Buyback programs, wholesale
Wholesale Pricing Cost + 10-20% margin 10-20% Bulk buyers, reseller networks

💫 HP Pavilion x360 14m Specific Selling Points

Feature Selling Angle Target Audience Price Justification
2-in-1 Convertible "Four modes: laptop, tablet, tent, stand" Students, creative professionals +$80-$120 vs. standard laptop
Touchscreen Display "Digital canvas, intuitive navigation" Artists, presenters, educators +$50-$80 value
Professional Upgrades "Better than new - premium components" Business users, power users +$150-$250 upgrade value
B&O Audio System "Premium audio for media consumption" Entertainment users, remote workers +$30-$50 value

📝 Professional Listing Optimization for HP Pavilion

  1. Title Optimization:
    • Start with "HP Pavilion x360 14m Convertible 2-in-1"
    • Include key specs: CPU, RAM, SSD, Display size
    • Add upgrade keywords: "Professionally Upgraded", "Like New"
    • Include convertible features: "Touchscreen", "4 modes"
  2. Photo Strategy (16-20 photos recommended):
    • All four convertible mode demonstrations
    • Before/after upgrade documentation
    • Benchmark results and performance screenshots
    • Professional workspace setup showing quality
  3. Description Framework:
    • Professional upgrade story with specifications
    • Detailed performance improvement documentation
    • Convertible use case benefits explained
    • Professional warranty and support offering

📅 Strategic Selling Timing for Convertible Laptops

Time Period Market Conditions Price Premium Target Buyers
January Post-holiday, new year resolutions 10-20% Students, professionals with new budgets
July-August Back-to-school peak demand 15-25% Students, parents, educators
October Year-end budget spending 8-15% Businesses, remote workers
April-May Graduation, summer preparation 10-18% Graduates, summer students

🎯 HP Pavilion x360 Buyer Targeting Strategy

Buyer Segment Value Drivers Pricing Tolerance Marketing Approach
College Students Versatility, portability, value Medium "Perfect for notes, media, and productivity"
Remote Workers Reliability, performance, professional look Medium-High "Upgraded for seamless remote work"
Creative Professionals Touchscreen, performance, versatility High "Digital canvas with professional power"
Small Business Value, reliability, upgrade documentation Medium "Business-grade at consumer price"

📦 Professional Shipping & Packaging for Convertibles

Shipping Element Professional Standard Cost Buyer Impact
Packaging Double-box with ample padding, display protection $10-$18 Prevents damage, demonstrates care
Shipping Service UPS/FedEx 2-3 day with tracking and insurance $25-$45 Professional expectation met
Transit Time 2-3 business days guaranteed +$15-$25 Buyer satisfaction, positive reviews
Signature Required Adult signature for high-value items +$3-$5 Security, prevents loss claims

💸 Fee Optimization & Cost Management

Cost Category Typical Range Reduction Strategies Impact on Net Profit
Platform Fees 8-13% of sale price Optimize promoted listing spending +4-7% net profit
Payment Processing 2.9-3.5% Offer local cash discount +2-3% net profit
Shipping Costs $25-$45 Use commercial rates, optimize packaging +$8-$15 per sale
Packaging Materials $10-$18 Bulk purchasing, reuse quality materials +$5-$8 per sale

🛡️ Selling Risk Management & Protection

Risk Type Likelihood Impact Mitigation Strategy
Non-payment Low (2-5%) High Immediate payment required, verified buyers only
Return/Refund Medium (5-15%) Medium-High Detailed descriptions, no "not as described"
Shipping Damage Low (1-3%) High Proper packaging, insurance, photo documentation
Scam/Fraud Low (1-5%) Very High Verified platforms, secure payment methods

📋 Professional Sales Documentation Package

  • Upgrade Documentation:
    • Before/after photos of all upgrades
    • Receipts for genuine parts purchases
    • Benchmark comparisons showing improvements
    • Professional workspace setup photos
  • Performance Documentation:
    • Battery health report with runtime tests
    • SSD speed tests and health status
    • RAM capacity and performance verification
    • Boot time and application load measurements
  • Convertible Feature Documentation:
    • All four mode demonstration videos
    • Touchscreen responsiveness testing
    • Hinge smoothness and durability
    • Professional warranty terms

🎯 Platform Recommendation Matrix for HP Pavilion

Selling Priority Platform Max Price Potential Effort Required Risk Level
1st Choice eBay Convertible Category 95-110% market value High Medium
2nd Choice SellBroke 85-95% market value Low Low
3rd Choice Facebook Marketplace 90-105% market value Medium Medium
4th Choice SellLaptopBack 80-90% market value Low Low

📊 Successful Sale Performance Metrics

Performance Metric Good Performance Excellent Performance World-Class Performance
Net Profit Margin 20-28% 28-38% 38-48%+
Days to Sale 14-21 days 7-14 days 3-7 days
Customer Rating 4.8/5.0 4.9/5.0 5.0/5.0
Repeat Business Potential Low Medium High (through referrals)

✅ Selling Strategy Completion Checklist

  • ✓ Target selling platform selected based on goals
  • ✓ Professional documentation package prepared
  • ✓ Pricing strategy determined and market research completed
  • ✓ Listing optimized for convertible laptop buyers
  • ✓ Shipping and packaging materials ready
  • ✓ Payment and risk management strategies in place
  • ✓ Seasonal timing considered for maximum price
  • ✓ Fallback options identified (buyback programs)

➡️ Launch Your HP Pavilion Sales Success

With your comprehensive selling strategy in place, you're ready to maximize returns on your HP Pavilion x360 14m upgrade investment. Remember that professional presentation, strategic platform selection, and detailed documentation are just as important as the quality of your upgrades in achieving premium pricing in the competitive convertible laptop market.

Need to Sell Your HP Laptop? Get Instant Cash!

If your HP Pavilion x360 14m (or other Pavilion model) has performance issues or you're upgrading to a newer laptop, we offer competitive cash payouts for your device. We buy broken, used, and refurbished HP Pavilion laptops—including all x360 14m configurations—with free insured shipping and hassle-free evaluations.

Sell Popular HP Models Now:

Share this: