MSI Stealth 15M Laptop - Complete Disassembly & Upgrade Guide: RAM, SSD, Motherboard, LCD, Battery Replacement & Repairs
May 05, 2025
1. MSI Stealth 15M Pre-Disassembly Checklist
⚠️ Critical Safety Precautions
- Power down and unplug all cables
- Ground yourself with an anti-static wrist strap
- Work on a clean, well-lit non-conductive surface
Essential Tools
-
Basic Toolkit:
- Phillips #00 screwdriver (magnetic tip preferred)
- Plastic spudger/pry tools (0.6mm thickness)
- Tweezers (for ribbon cable connectors)
-
Optional but Recommended:
- Magnifying lamp or headlamp
- Screw organizer mat with compartments
- Thermal paste (for reassembly)
Pre-Work Preparation Steps
-
Backup Your Data:
- Use cloud storage or external drive
- Create a system image backup if keeping OS
-
Document Original State:
- Photograph screw locations and cable routing
- Note any existing damage for disclosure
-
Performance Baseline:
- Run UserBenchmark for comparison later
- Record temperatures with HWMonitor
MSI Stealth 15M Specific Notes
-
Unique Components:
- 11 bottom case screws (4 long, 7 short)
- Hidden clips near front edge
- Battery connector under motherboard shield
-
Common Pitfalls:
- Avoid prying near hinge mechanisms
- Display cables are extra fragile
- Some screws may be under warranty stickers
Time & Difficulty Estimate
- First-timers: 45-60 minutes
- Experienced: 20-30 minutes
- Risk Level: Moderate (3/5)
2. MSI Stealth 15M Complete Disassembly Guide
Disassembly Overview
- Difficulty Level: Intermediate (4/10)
- Time Required: 35-50 minutes
- Critical Tools: Phillips #00, plastic spudger, anti-static mat
Step-by-Step Teardown Process
-
Bottom Case Removal:
- Remove 11 screws (4 long, 7 short)
- Start prying from rear vents with plastic tool
- Work around perimeter clockwise
-
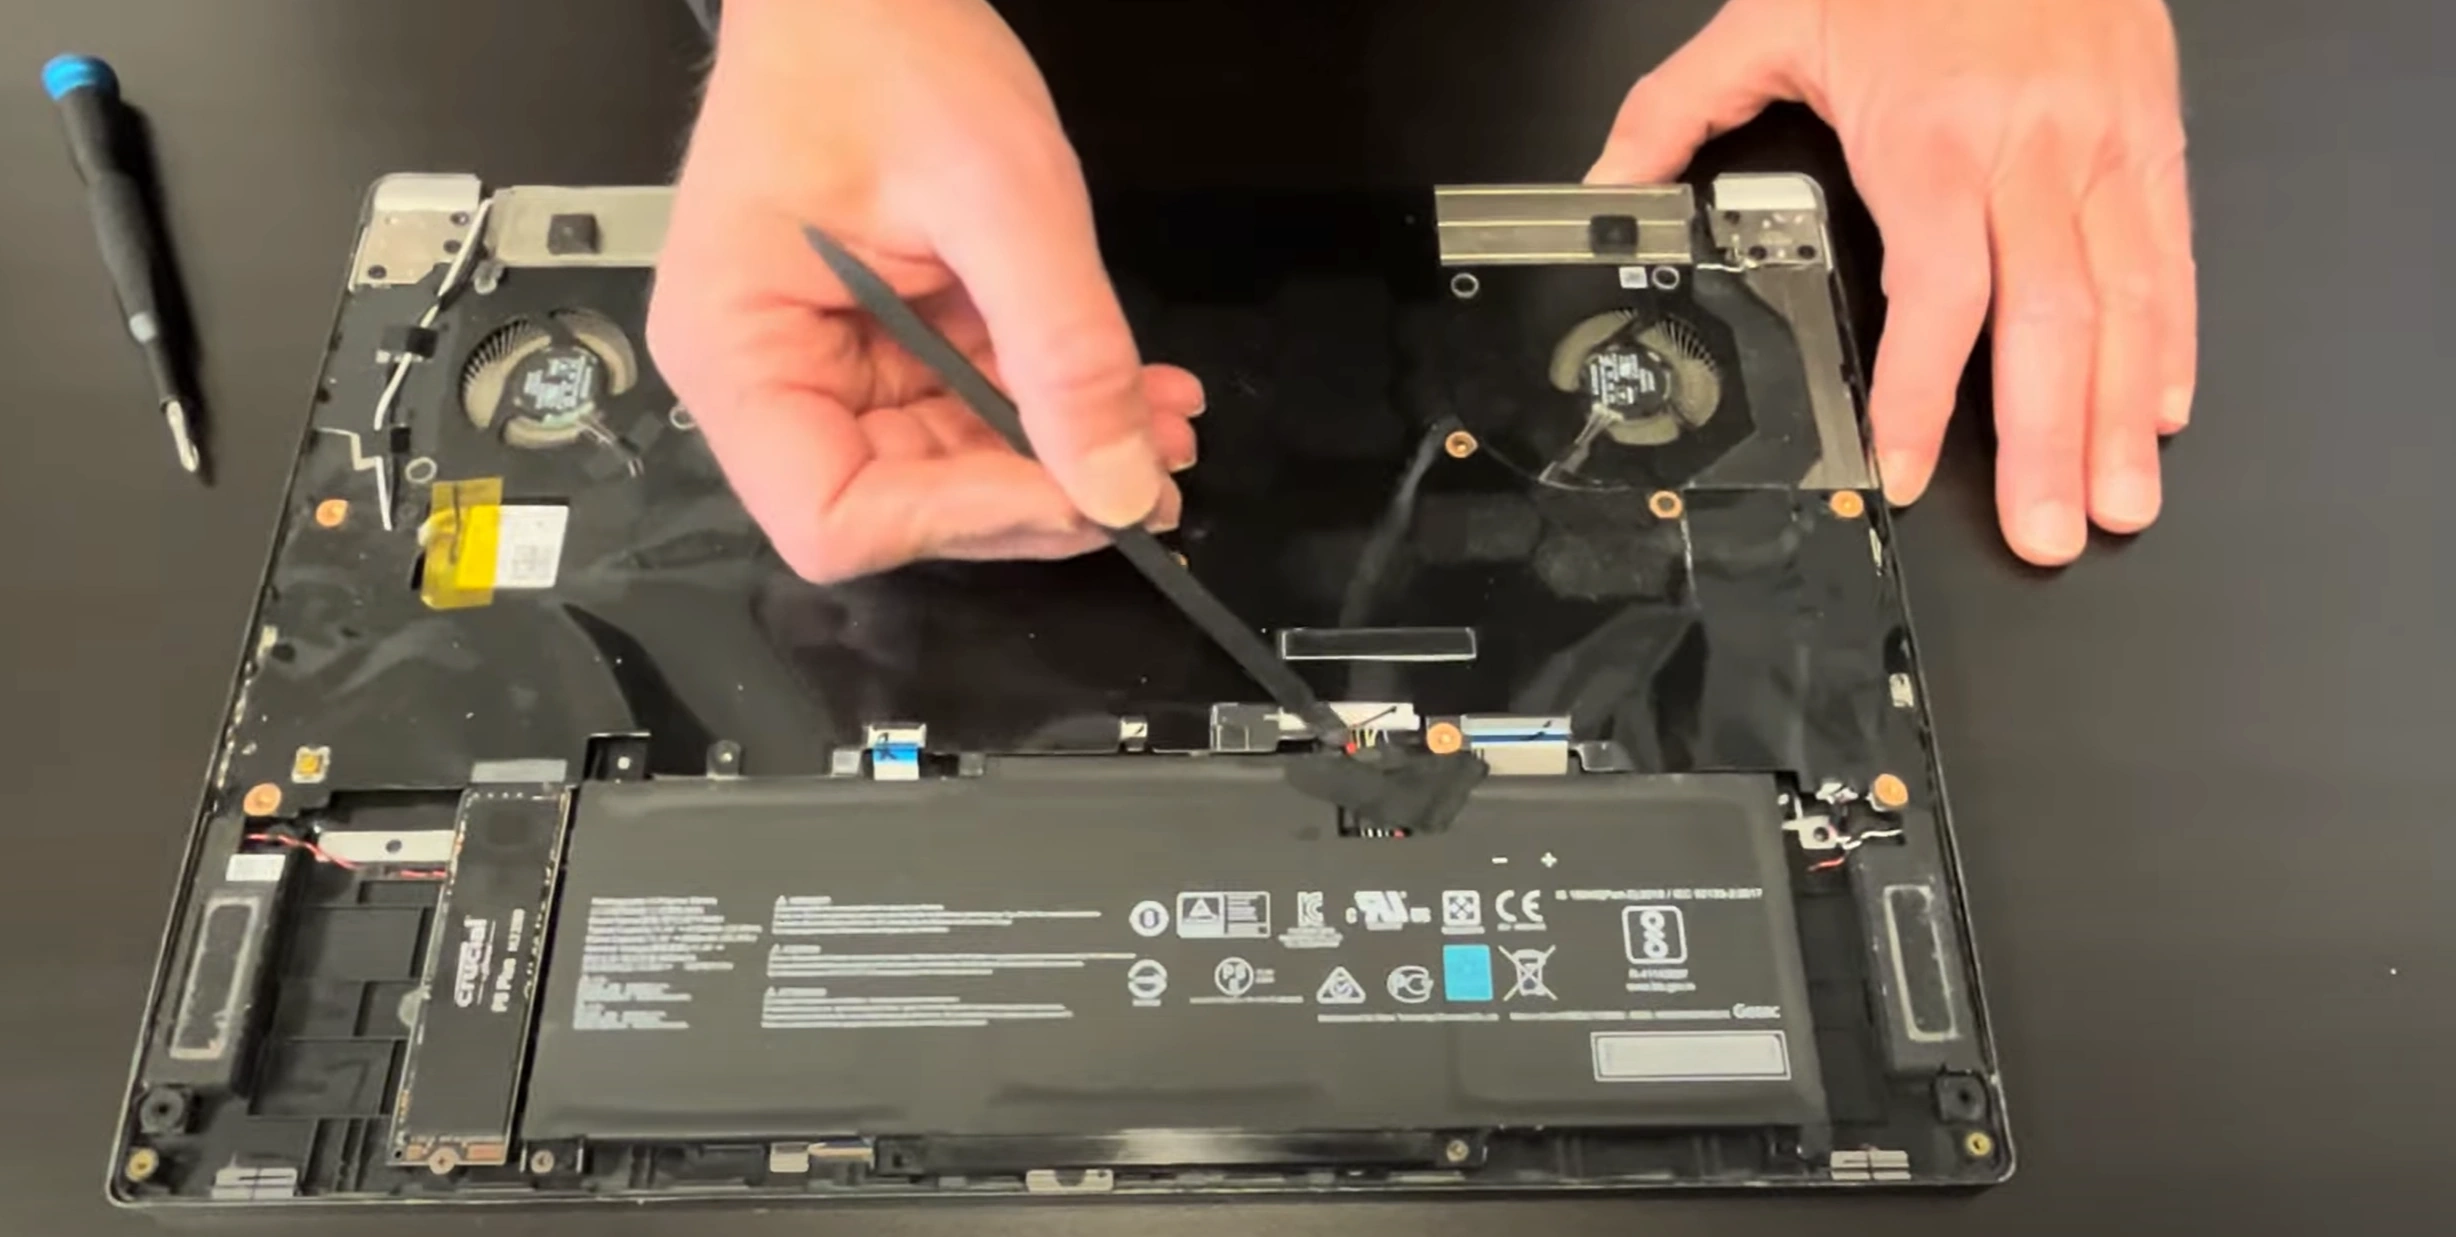
Battery Disconnection:
- Locate battery connector near center
- Use plastic spudger to lift connector straight up
- Press power button for 15 seconds to discharge
-
Cooling System Removal:
- Unscrew 8 heatsink screws in reverse numbered order
- Disconnect both fan cables
- Lift heatsink straight up to avoid bending heatpipes
-
Motherboard Access:
- Disconnect all ribbon cables (note orientations)
- Remove 6 motherboard screws (varying lengths)
- Lift motherboard at 30° angle from I/O side first
Special Component Handling
-
Keyboard/Touchpad Ribbon:
- Use tweezers for ZIF connectors
- Lift black latch before removing
-
Display Assembly:
- Support panel when disconnecting eDP cable
- Note hinge screw locations (left/right differ)
Cable Management Notes
| Cable | Connection Type | Tool Required |
|---|---|---|
| Battery | Vertical pull connector | Plastic spudger |
| Touchpad | ZIF latch | Tweezers |
Common Disassembly Challenges
-
Stuck Bottom Panel:
- Check for hidden screws under rubber feet
- Apply heat to adhesive strips with hair dryer
-
Stripped Screws:
- Use rubber band for extra grip
- Consider screw extraction kit for severe cases
0:29 Bottom Case 2:08 Battery 3:00 SSD Drive 3:20 Disconnect Cables from Motherboard 3:48 WiFi Card 4:58 Video Cable 5:10 Motherboard 5:20 RAM Memory 5:38 Heatsink and Cooling Fans 8:00 Speakers 8:32 Hinges 9:15 Palmrest Keyboard and Trackpad Assembly 9:40 Display Assembly
3. MSI Stealth 15M RAM Upgrade Guide
RAM Compatibility Specifications
-
Supported Standards:
- DDR4-3200 SO-DIMM (non-ECC)
- Dual-channel architecture
- Max 64GB (2×32GB) capacity
-
Performance Considerations:
- CL22 latency recommended
- 1.2V operating voltage
- XMP profiles not supported
Performance Benefits
| Upgrade Path | Performance Gain | Best For |
|---|---|---|
| 16GB → 32GB | +25% multitasking | Content creators |
| 16GB → 64GB | +40% VM performance | Developers |
Step-by-Step Installation
-
Preparation:
- Power down and disconnect all cables
- Ground yourself to prevent static damage
-
Access RAM Slots:
- Remove bottom case (11 screws)
- Locate RAM slots near center
-
Module Replacement:
- Push outward on retention clips
- Insert new RAM at 30° angle
- Press down until clips engage
Post-Installation Verification
- Boot to BIOS (press DEL during startup)
- Check detected capacity and speed
- Run
Windows Memory Diagnostic
Common Issues & Solutions
-
RAM Not Detected:
- Reseat modules firmly
- Test sticks individually
-
System Crashes:
- Reset BIOS to default settings
- Verify compatible JEDEC timings
Professional Tips
- Install matching capacity sticks for dual-channel
- Keep old RAM as backup/test kit
- Document serial numbers for warranty
4. MSI Stealth 15M SSD Upgrade Guide
SSD Compatibility
-
Supported Formats:
- Primary Slot: PCIe Gen4×4 NVMe (up to 2TB)
- Secondary Slot: PCIe Gen3×4 NVMe (up to 2TB)
- M.2 2280 form factor required
-
Recommended SSDs:
- Samsung 980 Pro (Gen4)
- WD Black SN750 (Gen3)
- Single-sided designs preferred
Performance Comparison
| SSD Type | Sequential Read | Sequential Write |
|---|---|---|
| Gen3 (Secondary) | 3,500 MB/s | 3,000 MB/s |
| Gen4 (Primary) | 7,000 MB/s | 5,000 MB/s |
Installation Steps
-
Preparation:
- Backup existing data
- Disconnect battery
-
Access M.2 Slots:
- Remove bottom case (11 screws)
- Locate slots near center
-
SSD Installation:
- Insert at 30° angle into slot
- Secure with M.2 screw (0.5Nm torque)
- Reattach thermal pad/cover
Data Migration
Post-Install Optimization
- Enable Write Caching in Device Manager
- Update SSD firmware
- Run TRIM command weekly
Common Issues
-
Drive Not Detected:
- Check BIOS for NVMe support
- Reseat SSD firmly
-
Slow Speeds:
- Verify proper PCIe generation
- Update chipset drivers
5. MSI Stealth 15M Motherboard Access Guide
⚠️ Critical Safety Precautions
- Disconnect both power adapter and battery
- Use anti-static wrist strap connected to chassis
- Handle motherboard by edges only
Step-by-Step Access Procedure
-
Remove All Connections:
- Disconnect 8 ribbon cables (note orientations)
- Label each connector with masking tape
- Detach antenna wires carefully
-
Cooling System Removal:
- Unscrew heatsink in reverse numbered order
- Lift straight up to avoid bending heatpipes
- Set aside with thermal paste facing up
-
Motherboard Screws:
- Remove 6 Phillips #00 screws (varying lengths)
- Note screw locations - MSI's diagram
- Magnetic tray recommended
-
Lift Motherboard:
- Start from I/O side at 30° angle
- Watch for hidden clips near touchpad
- Support underside during removal
Key Components Identification
| Component | Location | Handling Notes |
|---|---|---|
| BIOS Battery | Near RAM slots | Disconnect for full reset |
| EC Controller | Below touchpad | Extremely sensitive |
Common Challenges
-
Stuck I/O Shield:
- Check for hidden screws under stickers
- Use plastic spudger to gently pry
-
Ribbon Cable Damage:
- Replacement parts on MSI Parts
- Never pull by wires
Professional Tips
- Take smartphone photos at each stage
- Place screws in labeled containers
- Inspect for liquid damage while exposed
6. MSI Stealth 15M LCD Screen Replacement Guide
Compatible Display Panels
⚠️ Critical Precautions
- Disconnect battery before handling display cables
- Work on clean, soft surface to prevent scratches
- Use plastic tools only - metal can damage LCD layers
Step-by-Step Replacement
-
Bezel Removal:
- Heat edges with 60°C heat gun for 2 minutes
- Insert plastic card between bezel and display
- Work slowly around perimeter
-
Display Assembly:
- Remove 8 display bracket screws (T5 Torx)
- Support panel while disconnecting eDP cable
- Note camera/mic ribbon cable routing
-
New Panel Installation:
- Align new panel with hinge mounts
- Secure display brackets in crisscross pattern
- Test before applying new adhesive
eDP Cable Handling
- Route cable away from hinge mechanisms
- Ensure 2mm clearance from metal edges
- Use Kapton tape for strain relief
Post-Installation Calibration
- Verify refresh rate in Windows Display Settings
- Check for dead pixels with JScreenFix
- Adjust color profile via MSI True Color
Common Issues & Solutions
-
Flickering Display:
- Reseat eDP cable firmly
- Check for pin damage under magnification
-
Touchpad Not Working:
- Verify ribbon cable reconnection
- Check MSI support for touchpad drivers
7. MSI Stealth 15M Battery Replacement Guide
OEM Battery Specifications
-
Model Numbers:
- BTY-M6R (80Wh) - Original Part
- BTY-M6S (99.9Wh) - Extended capacity
-
Technical Details:
- Lithium-ion polymer
- 11.4V nominal voltage
- 7000mAh capacity (80Wh)
⚠️ Critical Safety Precautions
- Power down and unplug before starting
- Never puncture or bend battery cells
- Inspect for swelling - Battery University safety guide
Battery Removal Process
-
Access Battery:
- Remove 11 bottom case screws (4 long, 7 short)
- Use plastic tool to release clips
-
Disconnect Battery:
- Locate white connector near center
- Pull straight up with even pressure
-
Remove Old Battery:
- Unscrew 6 mounting screws (T5 Torx)
- Lift at 30° angle to avoid bending
- Note adhesive strip locations
New Battery Installation
-
Prepare New Battery:
- Inspect for shipping damage
- Remove protective films
-
Secure Battery:
- Align screw holes precisely
- Tighten screws in star pattern
- Apply new adhesive if needed
-
Final Connection:
- Reconnect battery cable until click
- Verify secure connection
Battery Calibration
- Charge to 100% uninterrupted
- Discharge completely (until shutdown)
- Recharge to 100% again
- Check health in MSI Dragon Center
Common Issues & Solutions
-
Not Charging:
- Reset EC controller (hold power button 60s)
- Check charger compatibility
-
Incorrect Capacity Reading:
- Complete 3 full charge cycles
- Update BIOS from MSI website
8. MSI Stealth 15M: Maximizing Resale Value
Professional Valuation Methods
-
Compare Prices On:
- SellBroke (gaming hardware specialists)
- SellLaptopBack (instant cash offers)
- eBay sold listings (filter by "Completed Sales")
- Official Resources:
SEO-Optimized Listing Strategies
-
Title Structure:
- "MSI Stealth 15M [Year] | [GPU] | [RAM]GB | [Storage]GB | [Condition]"
- Example: "MSI Stealth 15M 2023 | RTX 3060 | 32GB RAM | 1TB SSD | Excellent Condition"
-
Description Essentials:
- Lead with gaming benchmarks (3DMark/Time Spy scores)
- Mention recent upgrades (SSD/RAM/battery)
- Include remaining warranty status
Photography & Media Tips
-
Must-Have Shots:
- Screen displaying specs (CPU-Z/HWINFO)
- Close-up of ports and I/O
- Original charger/accessories
-
Lighting Advice:
- Use natural light or softbox lighting
- Show reflective surfaces at angles
Pricing Research
Best Selling Platforms
| Platform | Best For | Fees |
|---|---|---|
| SellBroke | Premium gaming hardware | 10-12% |
| SellLaptopBack | Quick guaranteed sale | 15-20% |
| Facebook Marketplace | Local cash sales | 0% |
Safe Selling Practices
-
Data Protection:
- Perform MSI Secure Erase
- Remove all accounts (Windows/MSI)
-
Transaction Safety:
- Use platform payment systems only
- Meet buyers at police station lobbies
Need to Sell Your MSI laptop? Get Instant Cash!
If your MSI gaming laptop (or any MSI device) has unfixable issues or you're upgrading, sell it to us for quick, high-value payment. We buy broken, used, and refurbished MSI laptops—including Stealth, Raider, Katana, and Creator series—with free shipping and hassle-free quotes.
Sell Popular MSI Models Now: