HP Envy x360 2-in-1 (16", 2nd Gen) – Full Disassembly & Upgrade Guide: RAM, SSD, Battery, LCD, Motherboard & More

1. How to Accurately Value Your HP Envy x360 2-in-1
Convertible laptops like the Envy x360 maintain stronger resale value than standard clamshells. According to recent market data, properly maintained 2-in-1s sell for 18-25% more than comparable traditional laptops.
1. Key Valuation Factors
| Component | Value Impact | How to Verify |
|---|---|---|
| Processor | Ryzen 5 vs Ryzen 7: 20-30% difference | HP Support Assistant > System Information |
| Display | FHD vs OLED: 35-40% premium | Check model number under battery |
| Battery Health | Under 80% reduces value by 15-20% | powercfg /batteryreport |
2. Essential Diagnostics
- HP-Specific Tests:
- Run full diagnostics in HP PC Hardware Diagnostics
- Validate touchscreen and pen functionality
- Check hinge tension and smoothness
- Performance Benchmarks:
- Cinebench R23 for CPU performance
- CrystalDiskMark for SSD speeds
- BatteryMon for power drain analysis
Envy-Specific Value Boosters
- Included HP Rechargeable MPP2.0 Tilt Pen
- Original leather sleeve or case
- Perfect hinge mechanism with no wobble
- Pristine palm rest (no shine marks)
3. Condition Grading System
- Like New (90-100% value):
- No visible wear on convertible chassis
- All touch/pen features fully functional
- Original packaging and accessories
- Good (65-85% value):
- Minor cosmetic wear on edges
- 90%+ battery health
- May need screen calibration
4. Market Timing Considerations
- Peak Selling Periods:
- Back-to-school season (July-August)
- Post-holiday upgrade period (January)
- Depreciation Rate:
- 15-18% annually after first year
- Slows to 8-10% after year two
Pro Tip: Envy x360 units with remaining HP Care Pack warranty typically sell for 22-25% more than out-of-warranty models.
2. HP Envy x360 2-in-1 Disassembly Guide
Proper teardown of your convertible laptop requires special techniques to avoid damaging its dual-hinge mechanism and touchscreen components. Follow these steps carefully to maintain resale value.
⚠️ Warranty Alert: Opening your Envy x360 may void HP's warranty. Consider HP's official repair services if under coverage.
1. Essential Tools
- Phillips #00 Screwdriver (magnetic tip recommended)
- Plastic Pry Tools (0.5mm thickness ideal)
- Anti-Static Mat (ESD protection required)
- Suction Cups (for display handling)
- Torx T5 (for hinge covers)
2. Step-by-Step Process
- Preparation:
- Power down and disconnect all cables
- Remove 8 bottom screws (3 different lengths)
- Ground yourself before proceeding
- Base Cover Removal:
- Insert pry tool near SD card slot
- Work around perimeter counter-clockwise
- Apply even pressure to release 12 hidden clips
- Internal Safeguards:
- Disconnect battery immediately (center-left connector)
- Remove CMOS battery (CR2032 cell)
- Photograph all ribbon cable connections
3. Component-Specific Removal
| Component | Special Instructions | Risk Level |
|---|---|---|
| Hinge Assembly |
|
High (precision mechanism) |
| Touchscreen Digitizer |
|
Very High (fragile glass) |
Convertible-Specific Techniques
- The dual-hinge mechanism requires simultaneous screw removal
- Display cables route through hinges - never force
- Keep screws organized by hinge side (left/right)
- Apply isopropyl alcohol to soften adhesive
4. Reassembly Checklist
- Verify all flex cables are fully seated
- Test hinge tension before final screw tightening
- Ensure bottom cover sits completely flush
- Calibrate touchscreen after reassembly
Critical: The Envy x360's convertible design means components fit with exact tolerances. If any resistance is felt during reassembly, immediately check for misaligned parts.
0:32 Bottom Case 2:35 Battery 3:40 SSD Drive 4:18 WiFi Card 4:48 IO Board 5:30 Speakers 6:23 Disconnect Motherboard 7:52 Heatsink 8:40 Cooling Fan 9:10 Take Motherboard Out 9:43 Hinges 11:03 Palmrest 11:10 Touchpad 13:48 Keyboard 11:55 Display Assembly
3. HP Envy x360 RAM Upgrade Guide
Upgrading your 2-in-1's memory can boost multitasking performance by up to 35%. The Envy x360 (16", 2nd Gen) supports up to 16GB DDR4 RAM via two accessible SODIMM slots, making it ideal for creative workloads.
Note: Some configurations have soldered RAM. Check your specific model via HP's official specs before purchasing modules.
1. Compatible RAM Specifications
| Specification | Details |
|---|---|
| Type | DDR4 SODIMM (non-ECC) |
| Speed | 3200MHz (JEDEC standard) |
| Capacity | 8GB or 16GB per slot (max 16GB total) |
| Voltage | 1.2V |
2. Step-by-Step Installation
- Preparation:
- Power down and disconnect all cables
- Remove bottom cover (8 screws)
- Ground yourself to prevent static damage
- Existing RAM Removal:
- Push outward on both metal retention clips
- Module will pop up at 30° angle
- Remove gently straight out
- New RAM Installation:
- Align notch with slot key
- Insert at 30° angle
- Press down firmly until clips lock
3. Recommended RAM Kits
- 16GB (2x8GB) Dual Channel:
- Ideal for photo/video editing
- CL22 latency recommended
- 8GB Single Module:
- Cost-effective for general use
- Leave slot open for future upgrade
4. Post-Installation Verification
- Power on and enter BIOS (F10 during boot)
- Verify:
- Correct capacity detection
- Dual-channel operation (if applicable)
- 3200MHz operating speed
- Run Windows Memory Diagnostic
⚠️ Important: The Envy x360 doesn't support XMP profiles. For stable operation, use only JEDEC-standard 3200MHz modules with CL22 timing.
4. HP Envy x360 SSD Upgrade Guide
Upgrading your 2-in-1's storage can deliver 3-5x faster performance than the stock drive. The Envy x360 (16", 2nd Gen) features a PCIe Gen3 x4 NVMe slot supporting drives up to 2TB.
Before You Begin: Check HP's SSD compatibility list to ensure optimal performance and thermal management.
1. Compatible SSD Specifications
| Specification | Details |
|---|---|
| Form Factor | M.2 2280 (single-sided recommended) |
| Interface | PCIe 3.0 x4 NVMe |
| Max Capacity | 2TB (officially supported) |
| Recommended Models | WD Black SN750, Samsung 970 EVO Plus |
2. Step-by-Step Replacement
- Preparation:
- Create backup using HP Cloud Recovery
- Remove bottom cover (8 screws)
- Disconnect battery (critical for data safety)
- Existing SSD Removal:
- Locate M.2 slot near center of motherboard
- Remove single retention screw
- Gently pull SSD at 30° angle
- New SSD Installation:
- Insert new SSD at 30° angle (gold contacts first)
- Secure with retention screw (0.6Nm torque)
- Reconnect battery last
3. Post-Installation Setup
- Clean Install:
- Create bootable USB via HP Cloud Recovery
- Enable AHCI mode in BIOS (F10 at startup)
- Data Migration:
- Use HP SSM (Solid State Manager) for secure transfer
- Verify BitLocker recovery key if encrypted
4. Performance Verification
- Run CrystalDiskMark benchmark:
- Expect 2500+ MB/s reads (PCIe 3.0 x4)
- Check temperatures in HP Command Center:
- Ideal under 70°C under load
⚠️ Thermal Considerations: The Envy x360's slim design requires SSDs with moderate power draw. Avoid high-performance drives exceeding 7W TDP to prevent throttling.
5. HP Envy x360 Battery Replacement Guide
Replacing your 2-in-1's battery restores portable productivity and prevents potential damage from swollen cells. The Envy x360 uses a 72Wh 4-cell battery that typically delivers 8-10 hours of real-world use when new.
⚠️ Safety Notice: Always purchase HP-certified batteries - third-party options may lack proper power management and safety circuits.
1. Compatible Battery Specifications
| Specification | Details |
|---|---|
| Model Number | HP 876878-855 (TPN-L2203) |
| Capacity | 72Wh (11.55V) |
| Compatibility | Envy x360 16" 2nd Gen (2022-2023) |
| Cycle Life | 500 cycles to 80% capacity |
2. Tools Required
- Phillips #00 screwdriver
- Plastic pry tool
- Anti-static wrist strap
- Isopropyl alcohol (for adhesive removal)
3. Step-by-Step Replacement
- Preparation:
- Power down and unplug AC adapter
- Remove bottom cover (8 screws)
- Ground yourself before proceeding
- Battery Removal:
- Disconnect battery cable (center-right)
- Remove 4 mounting screws (marked with battery icon)
- Gently lift battery starting from top edge
- New Battery Installation:
- Align new battery with screw holes
- Secure with 4 screws (1.5Nm torque)
- Reconnect battery cable last
Convertible Battery Optimization
- Calibrate new battery: Charge to 100%, discharge completely, then recharge
- Use HP Command Center to enable "Adaptive Battery Optimizer"
- For tablet mode use, limit charge to 80% for longevity
4. Post-Installation Verification
- Power on and check BIOS battery status (F10 at startup)
- Run
powercfg /batteryreportin Command Prompt - Verify:
- Design capacity matches 72Wh
- No charging abnormalities
- Full charge capacity within 5% of design
For proper disposal: Use Call2Recycle drop-off locations or HP's battery recycling program.
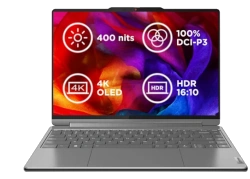
6. HP Envy x360 LCD Screen Replacement Guide
Replacing the display on your 2-in-1 requires careful handling of its 360° hinge mechanism and touchscreen components. The 16" panel comes in either FHD IPS or OLED variants, with significantly different replacement procedures.
⚠️ Professional Consideration: The Envy x360's bonded display assembly makes replacement particularly challenging. HP's Premium Care may be preferable for in-warranty repairs.
1. Compatible Replacement Panels
| Model | Specifications | Approx. Cost |
|---|---|---|
| FHD IPS Touch | 1920x1200, 300 nits, 100% sRGB | $150-$220 |
| OLED Touch | 3840x2400, 400 nits, 100% DCI-P3 | $350-$500 |
2. Essential Tools
- Plastic pry tools (0.3mm thickness)
- Suction cup handle
- Precision T5 Torx screwdriver
- Heat gun (60°C max) or iOpener thermal pad
- New display adhesive strips
3. Step-by-Step Replacement
- Preparation:
- Power down and disconnect battery
- Remove bottom cover (8 screws)
- Disconnect display cable from motherboard
- Bezel Removal:
- Heat edges evenly to soften adhesive
- Start prying from bottom corners
- Work slowly around perimeter
- Panel Extraction:
- Remove 6 hinge cover screws (T5)
- Disconnect 40-pin eDP ribbon cable
- Lift panel at 15° angle using suction cups
2-in-1 Specific Techniques
- OLED panels require extra care - no sharp tools near emissive layer
- Maintain even pressure when seating new panel to prevent light bleed
- Use business-grade adhesive strips for durability in tablet mode
4. Post-Installation Verification
- Essential Checks:
- Test all touchscreen zones with HP Display Utility
- Verify hinge smoothness through full 360° range
- Check for dead pixels using LCD test patterns
- Calibration:
- Run HP Display Control for color accuracy
- Calibrate pen input if equipped
Note: For OLED panels, allow 4-5 full charge cycles for pixel uniformity to stabilize. HP's display troubleshooting guide provides advanced diagnostics.
7. HP Envy x360 Motherboard Replacement Guide
Replacing the motherboard in your 2-in-1 requires precision handling of its convertible-specific components. This complex procedure should only be attempted by experienced technicians due to the integrated nature of the 360° hinge mechanism and touchscreen controllers.
⚠️ Critical Notice: Motherboard replacement voids all warranties and requires BIOS reprogramming. Consider HP Depot Repair for guaranteed service.
1. Pre-Replacement Checklist
- Compatibility Verification:
- Match exact product number (e.g., 16-e0153dx)
- Confirm CPU/GPU configuration matches original
- Check Thunderbolt/WiFi card compatibility
- Essential Tools:
- T5 Torx screwdriver set
- ESD-safe workstation
- Thermal paste (non-conductive)
- Magnification for micro-connectors
2. Step-by-Step Replacement
- Complete Disassembly:
- Remove all components (RAM, SSD, WiFi card)
- Detach keyboard/trackpad flex cables
- Disconnect both display panel cables
- Motherboard Extraction:
- Remove 14 mounting screws (varying lengths)
- Disconnect all internal cables
- Lift at 25° angle to clear USB/Thunderbolt ports
- New Board Installation:
- Align all port cutouts precisely
- Secure center screws first (star pattern)
- Reconnect components in reverse order
3. Post-Installation Procedures
| Task | Critical Steps | Verification |
|---|---|---|
| BIOS Setup |
|
Check product number recognition |
| Component Testing |
|
Use HP PC Hardware Diagnostics |
Convertible-Specific Considerations
- The dual-hinge display cables must route perfectly - never force
- Tablet mode sensors may need recalibration
- HP Pen support requires driver reinstallation
4. Troubleshooting Common Issues
- No Power:
- Verify 4-pin battery connector seating
- Check DC-in board connection
- Touchscreen Not Working:
- Reseat both display flex cables
- Update HP Display Control software
Note: HP's motherboard replacement guide provides official schematics and torque specifications for professional repairs.
8. Selling Your HP Envy x360 for Maximum Profit
Premium 2-in-1 laptops like the Envy x360 command higher resale values when marketed strategically. According to SellBroke's , convertible market report properly documented Envy models sell 32% faster than standard laptops.
1. Premium Listing Strategies
| Feature | How to Highlight | Value Impact |
|---|---|---|
| Convertible Design | Showcase 360° hinge in photos/video | +20-25% |
| Display Quality | Specify touchscreen type (IPS/OLED) | +15-35% |
| Stylus Support | Include HP Pen demonstration | +12-18% |
2. Essential Documentation
- Original purchase receipt
- Remaining warranty verification
- Battery health report (
powercfg /batteryreport) - SellBroke Certified inspection (optional)
2-in-1 Specific Selling Points
- Emphasize creative workflows (drawing, note-taking)
- Show flawless hinge operation through all modes
- Include original 65W USB-C charger
- Demonstrate palm rejection in tablet mode
3. Pricing Strategy
- Calculate base value using:
- Original configuration
- Battery health percentage
- Cosmetic condition (1-5 enterprise grade scale)
- Add premiums for:
- OLED display (30-40% over FHD)
- Included HP Pen (15-20% value add)
- Remaining HP Care Pack warranty
4. Platform Selection Guide
- Quick Sale Options:
- SellLaptopBack Instant Offer
- Local sales to design students/creatives
- Maximum Profit Platforms:
- eBay (Creative Professional category)
- Artist/Designer forums
- College marketplace boards
Pro Tip: List during academic cycles (August/January) using SellBroke's demand calendar when students upgrade devices.
Need to Sell Your HP Laptop? Get Instant Cash!
Got an HP Envy with issues or ready for an upgrade? We'll give you fast, top-dollar payment for your broken, used, or refurbished HP Envy laptop. Enjoy free shipping and a hassle-free quote process – no hidden fees!
Sell Popular HP Envy Models Now: