Dell Latitude 3140 Laptop – Step-by-Step Disassembly, Repair & Upgrade Guide: RAM, SSD, Motherboard, LCD, and Battery Replacement
1. How to Accurately Value Your Dell Latitude 3140 Laptop
Business-class Latitudes retain strong resale value when properly maintained. According to SellBroke's 2023 market report, documented Dell Latitudes sell 22% faster than comparable business laptops.
1. Key Valuation Factors
| Component | Value Impact | Verification Method |
|---|---|---|
| Processor | N200 vs i3: 35-40% difference | Dell Service Tag lookup |
| RAM | 4GB vs 8GB: 20-25% premium | Task Manager > Performance |
| SSD | 128GB vs 256GB: 15-18% increase | CrystalDiskInfo |
2. Professional Diagnostics
- Dell-Specific Tests:
- Run full diagnostics in Dell SupportAssist
- Check battery health (
powercfg /batteryreport) - Validate USB-C port functionality
- Quick Value Estimate:
- Use SellLaptopBack's calculator
- Compare to recent eBay sold listings
Latitude-Specific Value Boosters
- Dell ProSupport warranty remaining
- Original docking station included
- Enterprise security features (TPM 2.0, SmartCard)
- Excellent keyboard condition
3. Condition Grading System
- Enterprise Ready (90-100% value):
- No cosmetic wear
- 90%+ battery health
- All ports functional
- Education Grade (60-75% value):
- Minor scuffs but fully functional
- 80%+ battery health
- May need keyboard cleaning
4. Market Timing Considerations
- Peak Selling Periods:
- Corporate fiscal year-end (June/December)
- Back-to-school season (July-August)
- Depreciation Rate:
- 10-12% annually after first year
- Slows after year 3 (5-7% annually)
Pro Tip: Latitudes with SellBroke Certified inspection reports sell for 15-18% more than undocumented units.
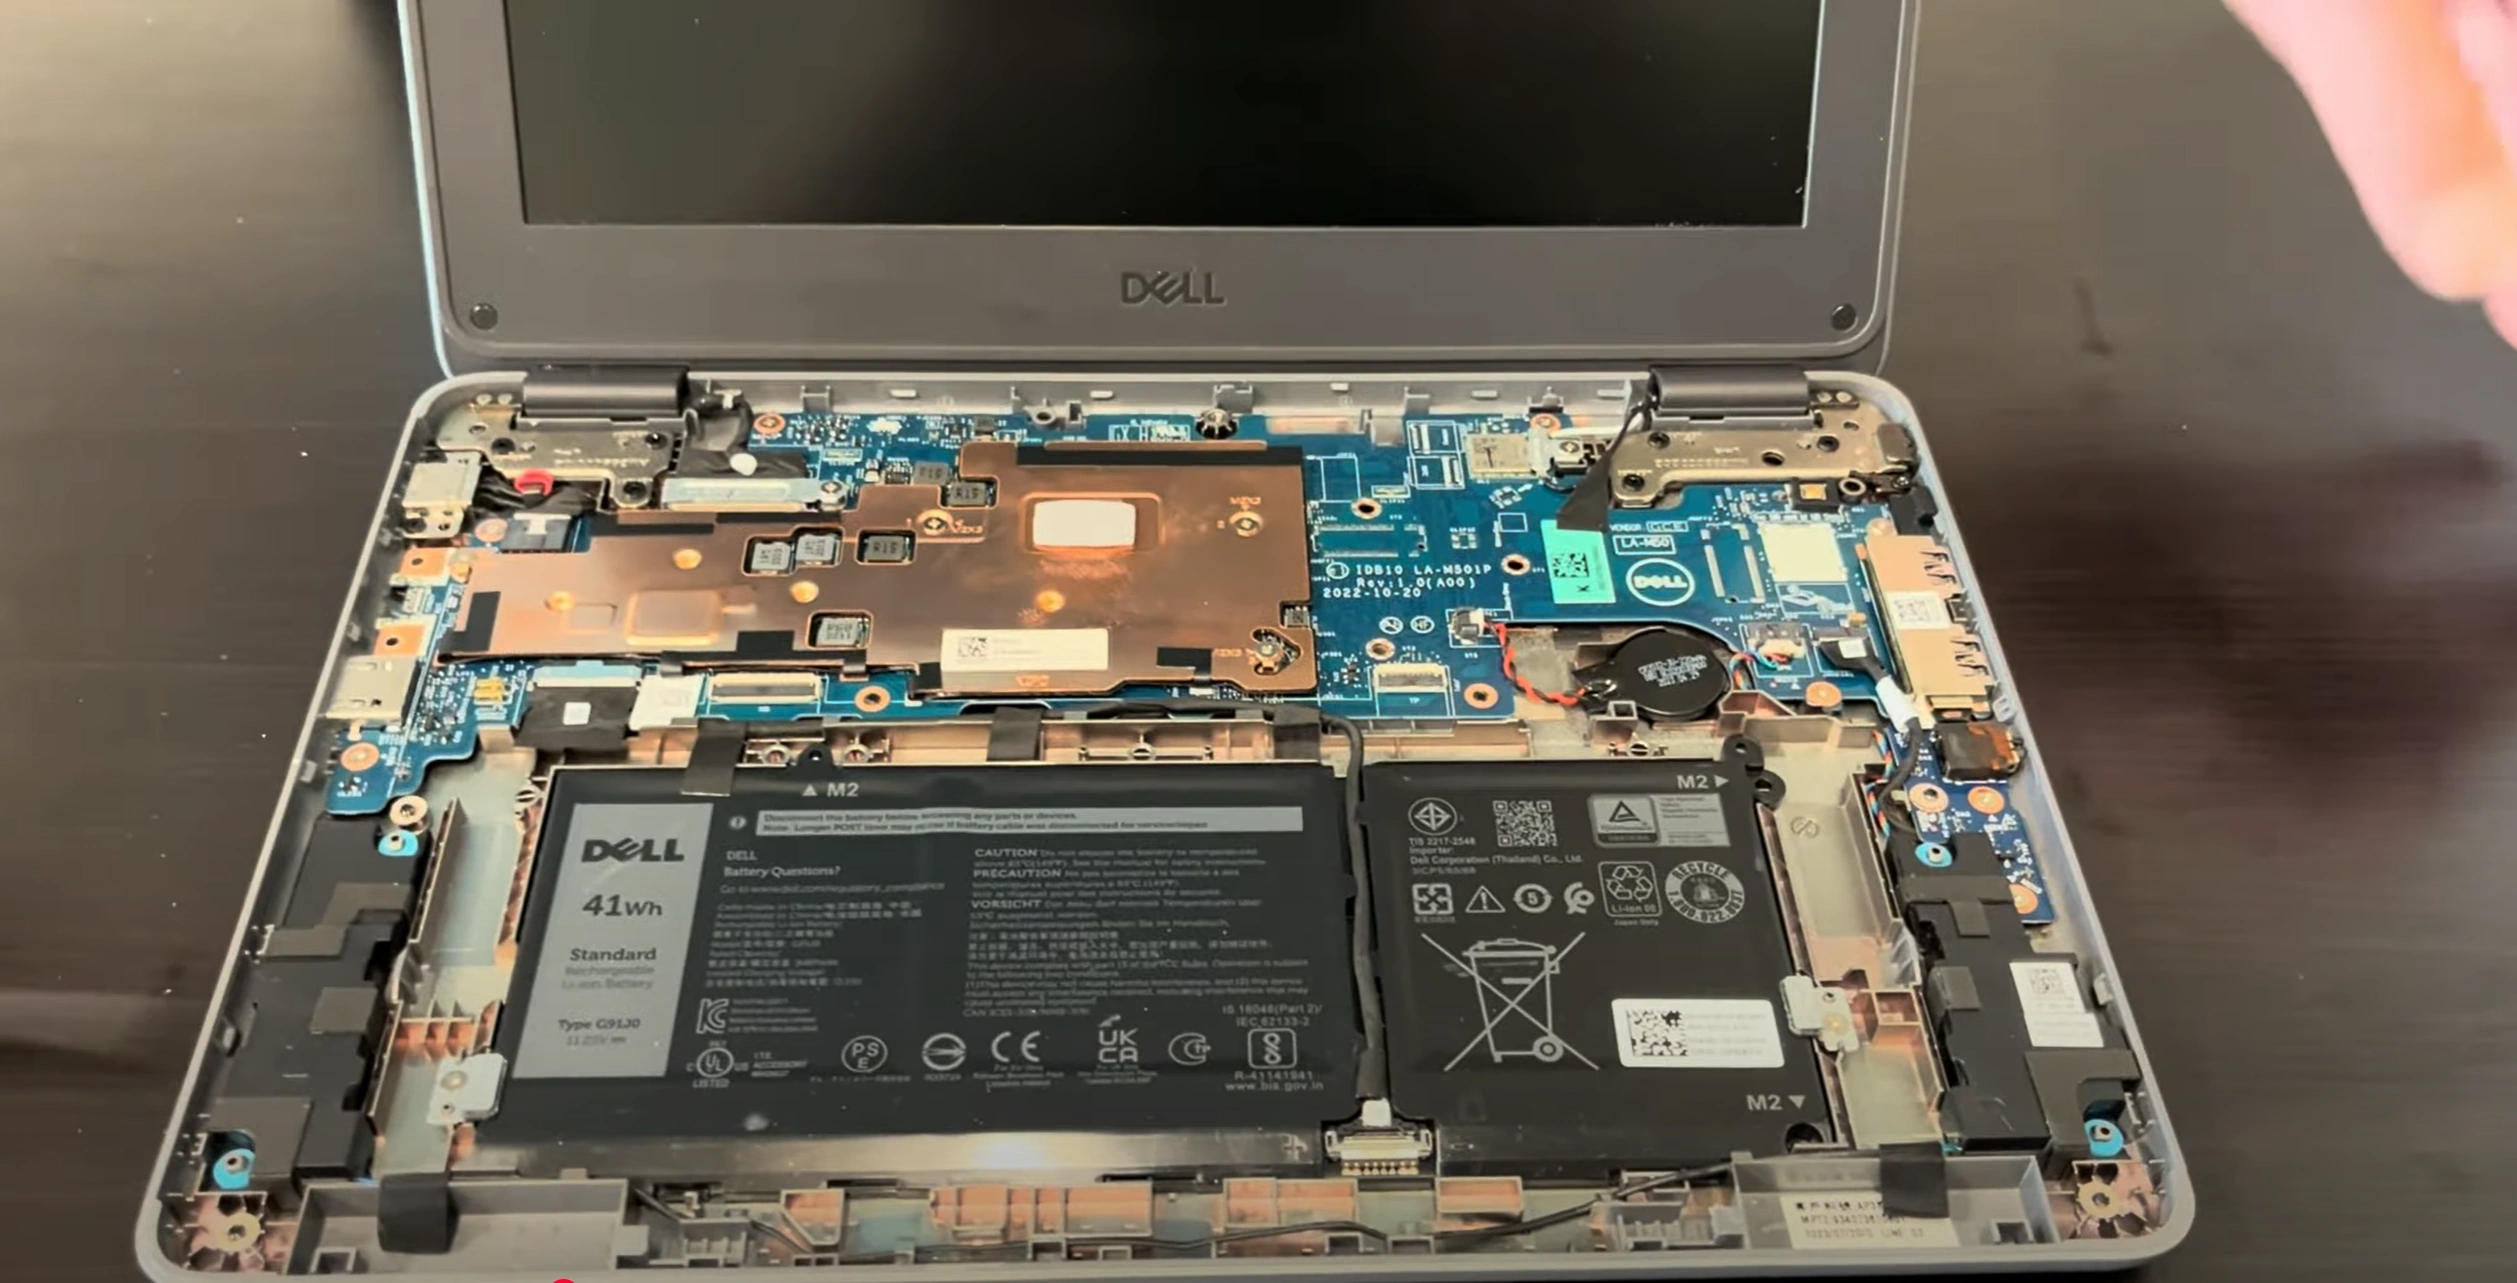
2. Dell Latitude 3140 Professional Disassembly Guide
Proper teardown of your business laptop requires careful handling to maintain its resale value. Follow these steps to safely access internal components while preserving the chassis integrity.
⚠️ Warranty Notice: Opening your Latitude may void Dell's warranty. Consider Dell's Premium Support for in-warranty repairs.
1. Essential Tools
- Phillips #00 Screwdriver (magnetic tip recommended)
- Plastic Spudger Set (0.6mm thickness ideal)
- Anti-Static Mat (ESD protection required)
- Organizational Tray (for 7 different screw lengths)
2. Step-by-Step Disassembly
- Preparation:
- Power down and disconnect all peripherals
- Remove 7 bottom screws (3 long, 4 short)
- Ground yourself before proceeding
- Base Cover Removal:
- Insert pry tool near hinge area
- Work clockwise around perimeter
- Apply even pressure to release 6 hidden clips
- Internal Safeguards:
- Disconnect battery immediately (center-right connector)
- Remove CMOS battery (CR2032 cell)
- Document all ribbon cable orientations with photos
3. Component-Specific Removal
| Component | Special Instructions | Risk Level |
|---|---|---|
| Keyboard |
|
Medium (fragile membrane) |
| Motherboard |
|
High (ESD sensitive) |
Latitude-Specific Techniques
- The magnesium-reinforced chassis requires firm but controlled prying
- Ribbon cables have white locking mechanisms (slide to release)
- Screw lengths vary by location - organize by component
4. Reassembly Checklist
- Verify all ribbon cables are fully seated
- Ensure bottom cover sits flush with no gaps
- Test all functions before final screw installation
- Check keyboard/touchpad responsiveness
Critical: The Latitude 3140's thin-profile design means components fit precisely. Never force connections - if resistance is met, check for missed screws or clips.
0:20 Bottom Screws 1:48 Palmrest 2:04 Trackpad 2:12 Keyboard 8:40 Battery 3:38 Speakers 4:25 Audio Board 5:00 WiFi Card 5:25 Motherboard 6:22 Video Cable 6:52 Power 7:35 Jack Hinges 8:20 Bottom Case Base Cover 8:27 Display Assembly
3. Dell Latitude 3140 RAM Upgrade Guide
Upgrading your Latitude's memory can improve multitasking performance by up to 40% for business applications. The 3140 supports up to 16GB DDR4 RAM via a single accessible SODIMM slot.
1. Compatible RAM Specifications
| Specification | Details |
|---|---|
| Type | DDR4 SODIMM (non-ECC) |
| Speed | 3200MHz (JEDEC standard) |
| Capacity | 8GB or 16GB module |
| Voltage | 1.2V |
| Timings | CL22 recommended |
Latitude-Specific Notes
- Single-channel architecture only
- XMP profiles are not supported
- Dell-certified RAM ensures best compatibility
2. Step-by-Step Installation
- Preparation:
- Power down and disconnect AC adapter
- Remove bottom cover (7 screws)
- Ground yourself to prevent static discharge
- Existing RAM Removal:
- Push outward on both metal retention clips
- Module will pop up at 30° angle
- Remove gently straight out
- New RAM Installation:
- Align notch with slot key
- Insert at 30° angle
- Press down firmly until clips lock
3. Recommended Configurations
- Basic Office Use:
- 8GB DDR4-3200
- Sufficient for Office 365, web browsing
- Business Multitasking:
- 16GB DDR4-3200
- Ideal for Teams, Zoom, multiple Chrome tabs
4. Post-Installation Verification
- Reconnect battery and power on
- Enter BIOS (F2 during boot)
- Verify:
- Correct capacity detection
- 3200MHz operating speed
- Run Windows Memory Diagnostic
Note: The Latitude 3140's RAM slot is located near the center of the motherboard, beneath a small metal shield in some configurations.
4. Dell Latitude 3140 SSD Replacement Guide
Upgrading your Latitude's storage can dramatically improve system responsiveness and productivity. The 3140 supports PCIe NVMe SSDs with capacities up to 1TB, offering 3-5x faster performance than standard SATA drives.
1. Compatible SSD Specifications
| Specification | Details |
|---|---|
| Form Factor | M.2 2280 (single-sided recommended) |
| Interface | PCIe 3.0 x4 NVMe |
| Max Capacity | 1TB (officially supported) |
| Recommended Models | WD SN570, Samsung PM991a, SK hynix BC711 |
Business-Grade SSD Selection
- Choose drives with power-loss protection for data security
- Single-sided SSDs ensure proper fit in the compact chassis
- Dell-certified drives prevent compatibility issues
2. Step-by-Step Replacement
- Preparation:
- Create backup of existing data
- Remove bottom cover (7 screws)
- Disconnect battery cable
- Existing SSD Removal:
- Locate M.2 slot near center of motherboard
- Remove single retention screw
- Gently pull SSD at 30° angle
- New SSD Installation:
- Insert new SSD at 30° angle
- Secure with retention screw (0.5Nm torque)
- Reconnect battery last
3. Post-Installation Setup
- Fresh Windows Install:
- Create bootable USB using Dell OS Recovery Tool
- Enable AHCI mode in BIOS
- Data Migration:
- Use Dell Migration Software for existing installations
- Verify all encryption keys transfer properly
4. Performance Verification
- Run CrystalDiskMark benchmark:
- Expect 2000+ MB/s reads (PCIe 3.0 x4)
- Check drive health in Dell SupportAssist
- Verify TRIM is enabled (command:
fsutil behavior query DisableDeleteNotify)
Note: For maximum reliability in business environments, schedule quarterly SSD health checks using Dell's built-in diagnostics.
5. Dell Latitude 3140 Motherboard Replacement Guide
Replacing the motherboard in your Latitude 3140 requires precision handling of this mission-critical business component. This complex procedure should only be attempted by experienced technicians due to the integrated nature of modern laptop architectures.
⚠️ Critical Notice: Motherboard replacement voids all warranties and requires BIOS reprogramming for proper component recognition. Consider Dell's Depot Service for guaranteed repairs.
1. Pre-Replacement Checklist
- Compatibility Verification:
- Match exact service tag (ST) prefix
- Confirm CPU generation (N-series vs Core)
- Check wireless card compatibility
- Essential Tools:
- T5 Torx screwdriver
- ESD-safe workstation
- Thermal paste (non-conductive)
- Magnification for small connectors
2. Step-by-Step Replacement
- Complete Disassembly:
- Remove all components (RAM, SSD, WiFi card)
- Detach keyboard/trackpad flex cables
- Disconnect display panel cables
- Motherboard Extraction:
- Remove 11 mounting screws (varying lengths)
- Disconnect all internal cables
- Lift at 25° angle to clear I/O ports
- New Board Installation:
- Align all port cutouts precisely
- Secure center screws first (cross pattern)
- Reconnect components in reverse order
3. Post-Installation Procedures
| Task | Critical Steps | Verification |
|---|---|---|
| BIOS Setup |
|
Check service tag recognition |
| Component Testing |
|
Use Dell Diagnostics |
Enterprise Considerations
- TPM 2.0 may require re-initialization
- Dell Client Command Suite can restore enterprise settings
- BitLocker recovery key will be needed
4. Troubleshooting Common Issues
- No Power:
- Verify 4-pin battery connector seating
- Check DC-in board connection
- Component Not Recognized:
- Reseat affected flex cables
- Update BIOS/drivers
Note: Dell's service tag system helps verify authentic replacement boards. Counterfeit motherboards may cause permanent damage.
6. Dell Latitude 3140 LCD Screen Replacement Guide
Replacing the display on your Latitude 3140 requires careful handling of its business-grade 11.6" panel. This guide covers both standard HD and touchscreen variants, with important notes for maintaining the unit's professional appearance.
⚠️ Professional Consideration: The 3140's thin bezel design makes display replacement particularly challenging. Consider Dell's Next Business Day Service for in-warranty repairs.
1. Compatible Replacement Panels
| Model | Specifications | Approx. Cost |
|---|---|---|
| HD Non-Touch | 1366x768, 220 nits, 45% NTSC | $80-$120 |
| HD Touchscreen | 1366x768, 250 nits, 10-point touch | $150-$200 |
2. Essential Tools
- Plastic pry tools (0.3mm thickness)
- T5 Torx screwdriver
- Suction cup for panel handling
- New display adhesive strips
- Anti-static gloves
3. Step-by-Step Replacement
- Preparation:
- Power down and disconnect battery
- Remove bottom cover (7 screws)
- Disconnect display cable from motherboard
- Bezel Removal:
- Heat edges with hair dryer (60°C max)
- Start prying from bottom corners
- Work slowly around perimeter
- Panel Extraction:
- Remove 4 corner screws (T5)
- Disconnect 30-pin eDP ribbon cable
- Lift panel at 20° angle
Business-Laptop Specific Tips
- Touchscreen versions require recalibration in Dell Optimizer
- Apply even pressure when seating new panel to avoid light bleed
- Use business-grade adhesive strips for durability
4. Post-Installation Verification
- Check for:
- Dead/stuck pixels (use LCD test patterns)
- Touchscreen responsiveness (if applicable)
- Hinge alignment and smooth operation
- Run Dell Display Manager tests
Note: For corporate deployments, Dell's display troubleshooting guide provides enterprise-level diagnostics.
7. Dell Latitude 3140 Battery Replacement Guide
Restoring your Latitude's battery life is essential for business productivity. The 3140 uses a 42Wh 3-cell battery that typically lasts 300-500 cycles before needing replacement.
⚠️ Safety First: Always purchase Dell-certified batteries - third-party options may lack proper power management and safety features.
1. Compatible Battery Specifications
| Specification | Details |
|---|---|
| Model Number | Dell 0GYF20 (G5H7W) |
| Capacity | 42Wh (11.4V) |
| Compatibility | Latitude 3140 all configurations |
| Cycle Life | 500 cycles to 80% capacity |
2. Tools Required
- Phillips #00 screwdriver
- Plastic spudger
- Anti-static wrist strap
- Isopropyl alcohol (for adhesive removal)
3. Step-by-Step Replacement
- Preparation:
- Power down and unplug AC adapter
- Remove bottom cover (7 screws)
- Ground yourself before proceeding
- Battery Removal:
- Disconnect battery cable (center-right)
- Remove 3 mounting screws
- Gently lift battery starting from top edge
- New Battery Installation:
- Align new battery with screw holes
- Secure with 3 screws (1Nm torque)
- Reconnect battery cable last
Business Battery Maintenance
- Calibrate new battery: Charge to 100%, discharge completely, then recharge
- Use Dell Power Manager to enable "Primarily AC Use" mode
- Avoid deep discharges below 20%
4. Post-Installation Verification
- Power on and check BIOS battery status
- Run
powercfg /batteryreportin Command Prompt - Verify:
- Design capacity matches specs
- No charging abnormalities
- Full charge capacity within 5% of design
For proper disposal of old batteries, use Call2Recycle locations or Dell's battery recycling program.
8. Selling Your Dell Latitude 3140 for Maximum Value
Business laptops like the Latitude 3140 maintain strong resale value when marketed correctly. According to SellBroke's enterprise hardware report, documented Dell Latitudes sell 28% faster than comparable business laptops.
1. Premium Listing Strategies
| Feature | How to Highlight | Value Impact |
|---|---|---|
| Durability | Show MIL-STD-810G test results | +12-15% |
| Upgrades | Document SSD/RAM improvements | +18-25% |
| Security | Highlight TPM 2.0 & SmartCard reader | +10-12% |
2. Essential Documentation
- Original purchase receipt
- Remaining warranty verification
- Battery health report (
powercfg /batteryreport) - SellBroke Certified inspection (optional)
Latitude-Specific Selling Points
- Emphasize Dell's 3-year enterprise reliability
- Show keyboard backlight functionality
- Include original 65W power adapter
- Mention docking station compatibility
3. Pricing Strategy
- Calculate base value using:
- Original configuration
- Battery health percentage
- Cosmetic condition (1-5 scale)
- Add premiums for:
- Upgrades (50-70% of component cost)
- Remaining ProSupport warranty
- Original packaging ($50 value)
4. Platform Selection Guide
- Quick Sale Options:
- SellLaptopBack Instant Offer
- Local IT asset buyers
- Maximum Profit Platforms:
- Business-focused eBay categories
- Corporate equipment marketplaces
Pro Tip: List during corporate refresh cycles (typically Q1 and Q4) using SellBroke's demand calendar to maximize offers.
Need to Sell Your Dell Laptop? Get Instant Cash!
Is your Dell Latitude giving you trouble or ready for retirement? Sell it to us for fast cash and hassle-free service! We specialize in buying broken, used, and refurbished Dell Latitude laptops with free shipping and no-obligation quotes.
Sell Popular Dell Latitude Models Now: