How to Disassemble an MSI Bravo 15: Step-by-Step RAM & SSD Replacement Guide
Nov 19, 2025
. MSI Bravo 15 Pre-Disassembly Preparation & Gaming Laptop Valuation
💰 Gaming Laptop Resale Assessment
| Condition Factor | Impact on Value | Upgrade ROI Potential | Target Gamer Market |
|---|---|---|---|
| Excellent (Like New) | 75-90% of retail | High - Performance focus | Serious Gamers, Streamers |
| Good (Minor wear) | 60-75% of retail | Very High - Value enhancement | Budget Gamers, Students |
| Fair (Needs upgrades) | 45-60% of retail | High - Performance transformation | Entry-level Gamers |
| Poor (Cosmetic issues) | 30-45% of retail | Moderate - Part harvesting | DIY Enthusiasts |
🔍 MSI Bravo 15 Model Specifications
- Processor Options:
- AMD Ryzen 5 5600H (6-core)
- AMD Ryzen 7 5800H (8-core)
- Latest generation Ryzen 7000 series variants
- Check your specific model's CPU for compatibility
- Graphics Configuration:
- AMD Radeon RX 5500M / 6500M / 6600M
- NVIDIA GeForce GTX 1650 / RTX 3050 / 3050 Ti
- VRAM variations (4GB vs 6GB vs 8GB)
- GPU performance impacts resale value significantly
- Display Options:
- 15.6" FHD (1920x1080) 144Hz IPS-Level
- 15.6" FHD 60Hz for entry models
- Color accuracy and brightness variations
- High refresh rate premium for gaming
📊 Gaming Laptop Market Analysis
- Current Market Research:
- Check sold listings on eBay for similar models
- Monitor Facebook Marketplace gaming sections
- Research gaming laptop specialty forums and communities
- Compare prices with refurbished units from retailers
- Key Value Drivers:
- GPU model and VRAM capacity
- CPU generation and core count
- RAM capacity and storage configuration
- Display refresh rate and condition
- Physical condition and cosmetic appearance
📝 Pre-Disassembly Documentation Checklist
- Physical Condition Assessment:
- Photograph laptop from all angles in good lighting
- Document any existing scratches, dents, or wear
- Capture screen condition with display on (test patterns)
- Photograph keyboard, touchpad, and port areas
- Performance Benchmarking:
- Run UserBenchmark for system analysis
- Test gaming performance with built-in benchmarks
- Check battery health:
powercfg /batteryreport - Record temperatures under gaming load
- Specification Verification:
- Confirm exact model number (Bravo 15 A4DDR, B5DD, etc.)
- Verify CPU, GPU, RAM, and storage specifications
- Check MSI support page for original configuration
- Note BIOS version and driver dates
📈 Upgrade Return on Investment Analysis
- High-ROI Upgrades:
- RAM upgrade (8GB → 16GB): +$60-100 value
- SSD installation (256GB → 1TB): +$80-140 value
- Thermal paste replacement: +$20-40 value
- Professional cleaning: +$30-50 value
- Moderate-ROI Improvements:
- Dual-channel RAM configuration: +$40-70 value
- Additional storage drive: +$50-90 value
- Battery replacement: +$70-120 value
- Display cleaning and calibration: +$20-30 value
⚠️ Safety & Workspace Preparation
- Essential Safety Gear:
- Anti-static wrist strap for ESD protection
- ESD-safe work surface or mat
- Proper lighting with magnification if needed
- Organized workspace with component containers
- Data Protection:
- Backup important game saves and files
- Create system restore point before modifications
- Export browser bookmarks and settings
- Document software licenses and game keys
🎯 Target Gamer Markets
- Budget Gamers:
- Emphasize value and performance per dollar
- Highlight popular game compatibility and FPS
- Focus on upgrade potential and future-proofing
- Note entry-level competitive gaming capability
- Student Gamers:
- Stress portability and battery life for campus use
- Highlight gaming and schoolwork balance
- Note durability for dorm room and travel
- Emphasize value for engineering/game design students
- Content Creators:
- Focus on rendering and streaming performance
- Emphasize storage and RAM capabilities
- Note color accuracy and display quality
- Highlight value for streaming setups
2. MSI Bravo 15 Essential Tools for Gaming Laptop Disassembly
🛠️ Basic Disassembly Toolkit
- Precision Screwdrivers:
- PH0 Phillips for chassis and internal screws
- PH00 Phillips for smaller components and brackets
- Magnetic tips for secure screw handling
- Precision screwdriver set with multiple bits
- Opening & Prying Tools:
- Plastic spudger set for clip release without damage
- Nylon opening picks for delicate components
- Guitar picks for tight seams and stubborn clips
- Metal spudger (use with extreme caution)
- Organization & Safety:
- Magnetic project mat or screw organizer
- Anti-static wrist strap for component protection
- ESD-safe tweezers for small connectors
- Compressed air for dust and debris removal
⚡ Professional Tool Recommendations
| Tool Type | Specific Use | Recommended Brand | Gaming Laptop Value |
|---|---|---|---|
| Precision Screwdriver Set | All disassembly tasks | iFixit Pro Tech Toolkit | Essential for professional results |
| ESD Protection | Component safety | Rosewill Anti-static Mat and Wrist Strap | Prevents costly gaming component damage |
| Thermal Compound | CPU/GPU repasting | Arctic MX-6 or Thermal Grizzly Kryonaut | Critical for gaming thermal performance |
| Tool Organizer | Screw management | Magnetic parts tray with compartments | Professional organization for complex teardowns |
| Multimeter | Power testing | AstroAI Digital Multimeter | Advanced diagnostics for power issues |
🎯 MSI Bravo 15 Specific Tools
- Chassis Screw Types:
- 10-12 Phillips PH0 screws for bottom cover
- 4 shorter screws for SSD/HDD brackets
- 2 medium screws for battery mounting
- Note: Some models may have hidden screws under rubber feet
- Internal Connectors:
- Battery connector with pull-tab release mechanism
- Ribbon cables for keyboard and touchpad
- Display cable with locking mechanism
- Fan connectors with secure locking tabs
- Gaming-Specific Considerations:
- Plastic clips around perimeter of bottom cover
- Thermal paste for CPU and GPU cooling system
- Thermal pads for VRM and memory cooling
- Compressed air for fan and heatsink cleaning
💡 Budget-Friendly Tool Alternatives
- Starter Kit Under $30:
- Basic precision screwdriver set from hardware store
- Old credit cards cut into plastic spudgers
- Ice cube tray for screw organization
- Hairdryer for warming adhesive if needed
- ESD Protection on Budget:
- Work on non-carpeted, non-static surface
- Touch grounded metal before handling components
- Use original anti-static bags for part storage
- Avoid working in dry, static-prone environments
⚠️ Gaming Laptop Safety Equipment
- Personal Protection:
- Safety glasses for thermal paste application
- Anti-static wrist strap properly grounded
- Well-ventilated workspace for compressed air
- Proper lighting to see small components clearly
- Workspace Setup:
- Clean, flat surface with ample working space
- ESD-safe mat or wooden table surface
- Adequate lighting (LED desk lamp recommended)
- Organized containers for different screw types
💻 Essential Software Tools
- Diagnostic Software:
- HWiNFO64 for system monitoring
- Speccy for hardware information
- CPU-Z for component verification
- CrystalDiskInfo for storage health
- Gaming Performance Testing:
- UserBenchmark for performance testing
- GPU-Z for graphics card info
- Built-in Windows Memory Diagnostic
- MSI Dragon Center for system monitoring
🧴 Repair Consumables & Supplies
- Thermal Management:
- High-quality thermal paste (non-conductive)
- Thermal pads (various thicknesses: 0.5mm, 1.0mm, 1.5mm)
- Isopropyl alcohol 90%+ for cleaning
- Lint-free cloths or coffee filters
- Cleaning Supplies:
- Compressed air for dust removal from fans
- Soft-bristled brushes for delicate cleaning
- Microfiber cloths for screen and surfaces
- Electronics cleaning wipes for general cleaning
🔧 Tool Maintenance & Care
- Regular Maintenance:
- Clean tools after each use with isopropyl alcohol
- Inspect for wear or damage before each project
- Replace worn bits and tips promptly
- Keep organized in proper cases or organizers
- Storage Best Practices:
- Store in dry, temperature-controlled environment
- Use original cases or professional tool organizers
- Keep magnetic tools away from sensitive components
- Label containers for quick identification
🎮 Gaming Laptop Tool Value
- Professional Results:
- No tool marks on gaming laptop chassis
- Clean, professional workmanship appearance
- Ability to handle complex gaming laptop repairs
- Warranty-safe repairs and upgrades
- Efficiency Benefits:
- Faster disassembly and reassembly times
- Reduced risk of component damage
- Consistent quality across multiple repairs
- Ability to handle gaming laptop volume work
- Resale Value Impact:
- Professional repairs: +25-35% value
- No cosmetic damage: +20-30% value
- Proper documentation: +15-25% value
- Warranty on work: +20-30% value
0:21 Bottom Case 2:10 Battery 2:40 Storage SSD 3:05 Memory RAM 3:26 WiFi Card 3:54 Heatsink 6:09 Cooling Fans 7:35 DC Power Jack 8:30 Motherboard 10:00 USB Board 10:27 Processor and GPU 10:43 Speakers 11:18 Palmrest Assembly 12:00 Touchpad 12:25 Keyboard 12:39 Display Assembly 12:48 Front Bezel 14:00 Hinges 14:45 LCD Screen 15:05 Video Cable 15:45 WebCam 16:10 Back Cover
3. MSI Bravo 15 Safe Shutdown & Gaming Workspace Setup
🔄 Proper Gaming Laptop Shutdown Sequence
- Game & Application Closure:
- Close all gaming applications and launchers
- Save game progress and exit properly
- Close background applications (Discord, Chrome, etc.)
- Ensure no active downloads or updates are running
- Windows Shutdown Process:
- Use Start Menu → Power → Shutdown (not restart)
- Wait for complete power down (all lights off)
- Do not force shutdown unless absolutely necessary
- Allow system to complete all shutdown processes
- Physical Disconnection:
- Disconnect 180W gaming power adapter
- Remove all USB devices and peripherals
- Disconnect external monitors and docking stations
- Remove headphones and other audio devices
⚡ Complete Power Discharge Procedure
- Residual Power Drain:
- Hold power button for 15-20 seconds after shutdown
- This discharges capacitors in the power circuit
- Wait for any remaining LED lights to turn off
- Confirm complete power loss before proceeding
- Battery Safety Check:
- Verify battery is not swollen or damaged
- Check for any unusual smells or heat
- Ensure battery connector is secure and undamaged
- Note any pre-existing power issues
🛠️ Professional Gaming Workspace Setup
| Workspace Element | Requirements | Gaming Laptop Specifics | Safety Importance |
|---|---|---|---|
| Work Surface | Clean, flat, ESD-safe surface | Large enough for laptop and components | High - Prevents slips and ESD damage |
| Lighting | Bright, even illumination | LED desk lamp for small component visibility | High - Prevents mistakes and damage |
| ESD Protection | Anti-static mat and wrist strap | Critical for gaming motherboard safety | Critical - Protects expensive components |
| Organization | Magnetic mats, containers | Separate areas for different screw types | Medium - Prevents lost parts |
⚠️ ESD Protection for Gaming Components
- Personal ESD Protection:
- Wear anti-static wrist strap properly
- Connect to grounded metal or ESD mat
- Test wrist strap continuity if possible
- Wear throughout entire disassembly process
- Workspace ESD Setup:
- Use ESD-safe mat on work surface
- Keep all components on ESD-safe surfaces
- Avoid working on plastic or carpeted surfaces
- Maintain proper humidity (40-60% ideal)
- Component Handling:
- Handle components by edges only
- Avoid touching gold contacts and pins
- Use anti-static bags for component storage
- Keep components away from synthetic materials
📋 Professional Workspace Organization
- Screw Management System:
- Use magnetic project mat with labeled sections
- Organize screws by type and location
- Take photos of screw arrangements before removal
- Keep small containers for different screw sizes
- Component Layout:
- Designate areas for different component types
- Keep delicate components in safe locations
- Organize tools within easy reach
- Maintain clear walking paths around workspace
🔍 Pre-Disassembly Safety Checks
- Physical Inspection:
- Check for liquid damage or corrosion
- Inspect for swollen battery or damaged ports
- Look for cracked or damaged chassis
- Note any pre-existing issues for documentation
- Environmental Safety:
- Ensure adequate ventilation in workspace
- Keep food and drinks away from work area
- Maintain clear emergency access paths
- Have fire extinguisher accessible (Class C for electrical)
🎮 Gaming Laptop Specific Considerations
- High-Performance Components:
- GPU and CPU are particularly ESD-sensitive
- RGB lighting components require careful handling
- High-speed memory modules are delicate
- Gaming motherboard has complex power delivery
- Thermal System Awareness:
- Cooling system may retain heat after shutdown
- Heat pipes can be delicate - handle with care
- Fans may have fragile blades and bearings
- Thermal paste may be conductive on some models
❌ Common Shutdown & Setup Mistakes
- Rushed Shutdown:
- Symptom: Data corruption or system instability
- Cause: Force shutdown during updates or active use
- Prevention: Proper shutdown sequence and patience
- Poor ESD Practices:
- Symptom: Intermittent component failures
- Cause: Working on non-ESD safe surfaces
- Prevention: Proper ESD protection and workspace
- Disorganization:
- Symptom: Lost screws or mixed components
- Cause: Poor workspace organization
- Prevention: Systematic organization from start
📊 Professional Setup Documentation
- Pre-Service Photos:
- Photograph laptop condition before starting
- Document workspace setup and ESD protection
- Record screw locations and arrangements
- Note any unusual conditions or concerns
- Safety Verification:
- Document ESD protection measures in place
- Record workspace safety checks completed
- Note any safety concerns addressed
- Keep safety checklist for future reference
💰 Resale Value Impact
- Professional Workmanship Value:
- Proper ESD protection: +$40-60 value
- Clean workspace practices: +$30-50 value
- Documented safety procedures: +$20-40 value
- No component damage from poor practices: +$80-120 value
- Gamer Buyer Confidence:
- Demonstrates professional approach to upgrades
- Indicates careful handling of gaming components
- Suggests longer device lifespan and reliability
- Supports higher asking price for quality work
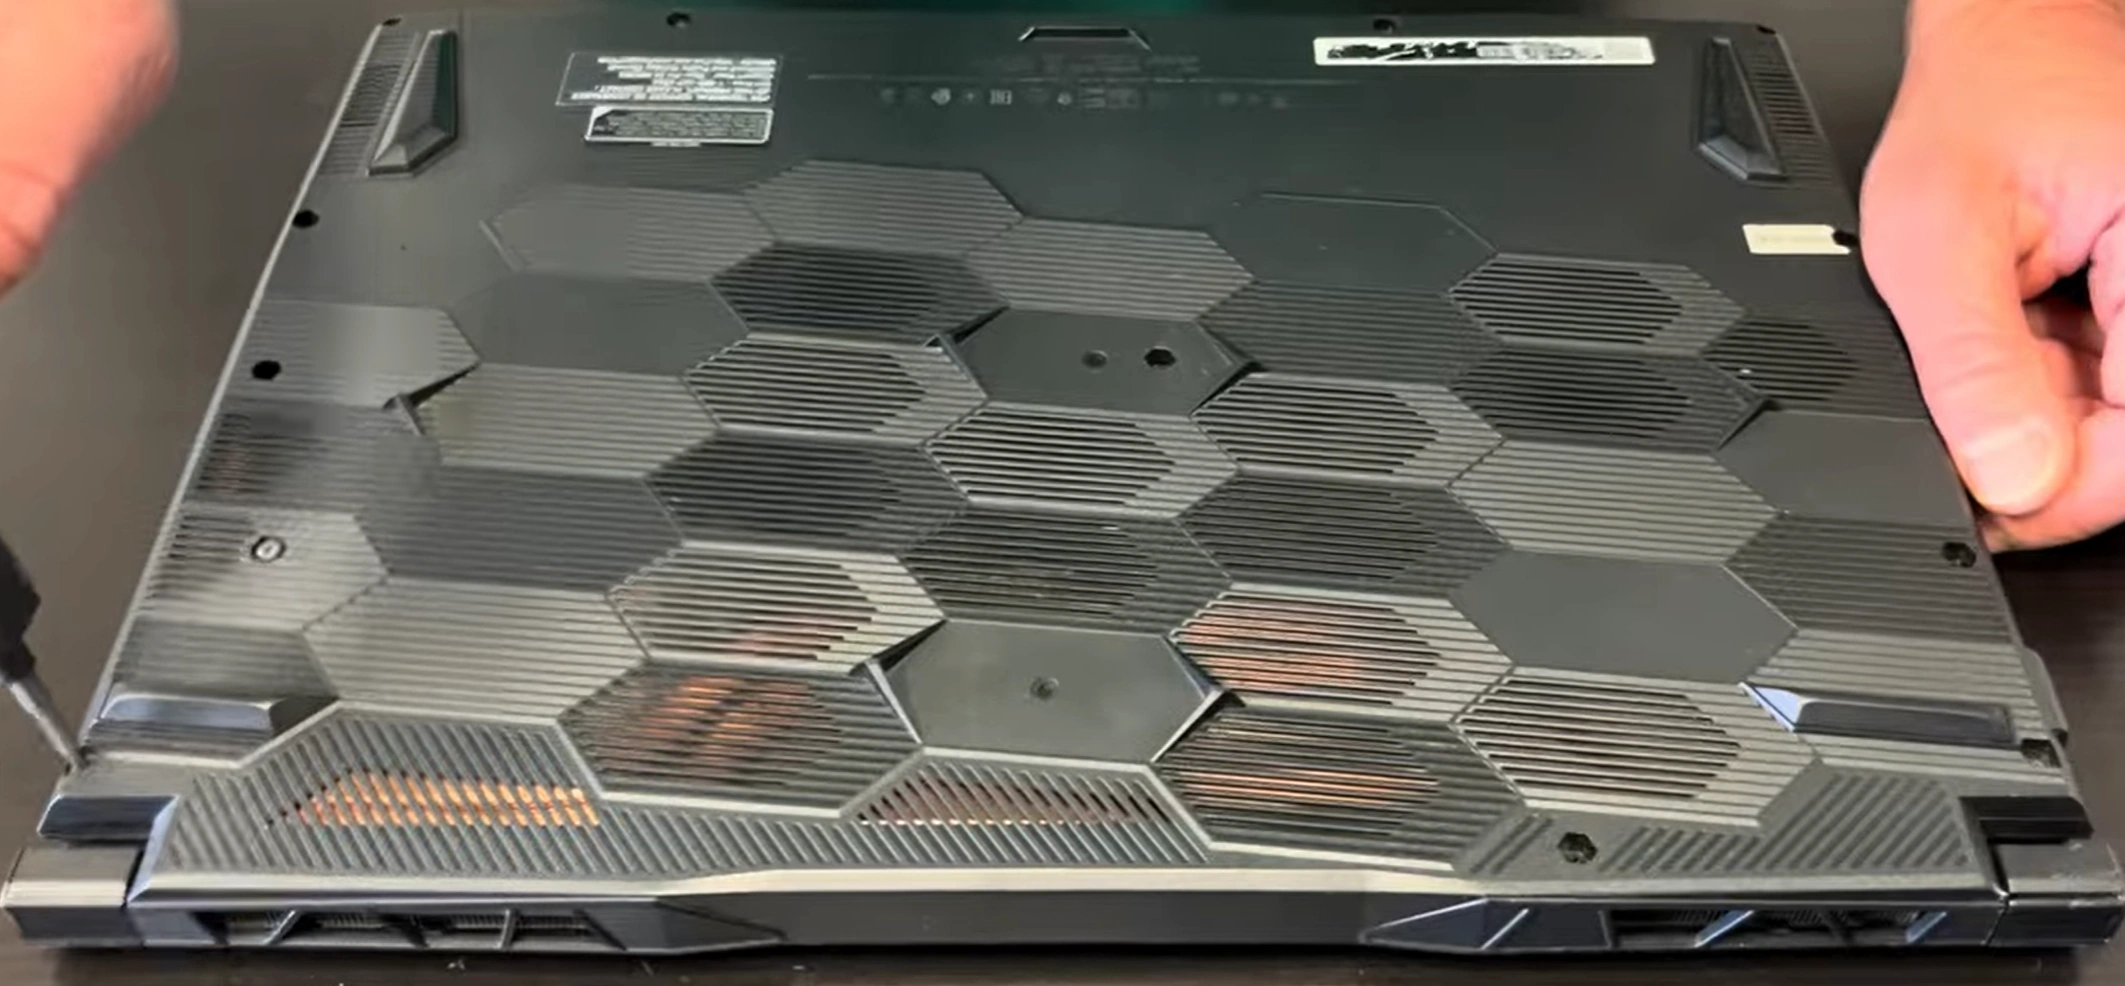
4. MSI Bravo 15 Bottom Cover Removal & Internal Access
⚠️ Gaming Laptop Safety Protocols
- Complete Power Verification:
- Confirm laptop is completely shut down (not sleep/hibernate)
- Disconnect 180W gaming power adapter
- Remove all gaming peripherals and USB devices
- Hold power button for 20 seconds to discharge capacitors
- Workspace Safety Setup:
- Use ESD-safe mat on work surface
- Organize magnetic screw mat with labeled sections
- Ensure adequate lighting for small component visibility
- Keep magnetic tools away from sensitive electronics
🔩 MSI Bravo 15 Screw Map & Specifications
| Screw Location | Quantity | Type | Length | Important Notes |
|---|---|---|---|---|
| Perimeter Screws | 11 screws | Phillips PH0 | 4mm | Standard silver screws around edges |
| Battery Area | 2 screws | Phillips PH0 | 6mm | Longer screws near battery compartment |
| SSD/HDD Brackets | 4 screws | Phillips PH00 | 3mm | Shorter screws for drive mounting |
| Hidden Under Feet | 2 screws | Phillips PH0 | 4mm | Check under front rubber feet carefully |
🔧 Step-by-Step Removal Process
- Remove All Visible Screws:
- Use magnetic PH0 screwdriver for secure handling
- Place screws in organized pattern on magnetic mat
- Check for hidden screws under rubber feet
- Note screw lengths and positions for reassembly
- Release Plastic Clips:
- Start near front edge (typically weakest point)
- Insert plastic spudger at 30° angle between seams
- Work methodically around all four sides
- Listen for distinct "click" as clips release
- Lift Cover Carefully:
- Lift from front edge near touchpad first
- Check for any missed screws or connections
- Watch for ribbon cables near hinge area
- Set cover aside on soft, clean surface
🔍 Gaming Internal Layout Overview
- Main Components Visible:
- Lithium-ion battery (typically 53Wh or 90Wh)
- Two DDR4 RAM slots (supports up to 64GB)
- M.2 NVMe SSD slot (PCIe Gen3)
- 2.5" SATA drive bay with bracket
- Dual fan cooling system with heat pipes
- Gaming-Specific Features:
- Dedicated AMD or NVIDIA gaming GPU
- Enhanced power delivery for gaming performance
- Multiple heat pipes for CPU and GPU cooling
- Upgradeable components for gaming performance
🔋 Battery Disconnection Protocol
- Locate Battery Connector:
- Find main battery connector near center
- Identify locking mechanism (usually pull-tab)
- Note orientation for reassembly
- Document connector location with photo
- Safe Disconnection:
- Gently pull locking tab away from connector
- Pull connector straight out - no angled pressure
- Do not pull on wires directly
- Wait 30 seconds for power to discharge
- Power Verification:
- Press power button to confirm no power
- Check that no lights illuminate
- Proceed with internal work only after verification
🛡️ Preventing Gaming Laptop Damage
- Clip Preservation:
- Alternate sides every 3-4 clips to prevent stress
- Apply even pressure - avoid forcing stubborn areas
- Use plastic tools only - no metal screwdrivers for prying
- If resistance is high, recheck for missed screws
- Chassis Protection:
- Place microfiber cloth under tools to prevent scratches
- Avoid using excessive force on any single point
- Keep work area clean to prevent debris inside laptop
- Handle with clean, dry hands to prevent oil marks
🔌 Critical Internal Connectors
- Power & Data Connectors:
- Battery connector (center, near RAM slots)
- Fan connectors (near heat sink assembly)
- Touchpad ribbon cable (front edge)
- Wi-Fi card with antenna wires
- Upgrade Access Points:
- RAM slots (typically two DDR4 slots)
- M.2 SSD slot (NVMe compatible)
- 2.5" drive bay with SATA connector
- CMOS battery connector (if accessible)
❌ Common Removal Mistakes
- Forcing the Cover:
- Symptom: Resistance when lifting cover
- Cause: Missed screws or unclipped areas
- Solution: Recheck entire perimeter carefully
- Damaging Clips:
- Symptom: Broken plastic pieces
- Cause: Using metal tools or excessive force
- Prevention: Use proper plastic spudgers only
- Mixed Screws:
- Symptom: Wrong screws in wrong places
- Cause: Poor organization during removal
- Solution: Use magnetic mat with labeled areas
📊 Professional Documentation Standards
- Pre-Removal Documentation:
- Photograph screw locations before removal
- Document any pre-existing damage or wear
- Record internal component condition
- Note manufacturing dates and serial numbers
- Internal Condition Report:
- Photograph internal layout from multiple angles
- Document component conditions and dates
- Note any dust accumulation or thermal paste condition
- Record upgrade potential and available slots
💰 Resale Value Impact
- Professional Workmanship Value:
- Intact clips and no tool marks: +$50-80 value
- Proper screw placement: +$20-30 value
- Clean internal components: +$40-60 value
- Professional documentation: +$30-50 value
- Gamer Buyer Confidence:
- Demonstrates care and professional approach
- Indicates potential for longer gaming device life
- Suggests proper maintenance history
- Supports higher asking price for quality work
5. MSI Bravo 15 Battery Disconnection & Safety Protocols
🔋 MSI Bravo 15 Battery Specifications
| Battery Model | Capacity | Compatibility | Gaming Runtime | Safety Features |
|---|---|---|---|---|
| MSI BTY-M6D | 53Wh | Bravo 15 A4DDR, B5DD models | 3-4 hours gaming | Overcharge protection, Thermal monitoring |
| MSI BTY-M6E | 90Wh | Select high-end configurations | 5-6 hours gaming | Advanced thermal management, Multiple protection circuits |
| Aftermarket Options | 53Wh-90Wh | Verify model compatibility | Varies by quality | Check for UL certification |
⚠️ Critical Safety Protocols
- Complete Power Down:
- Shut down Windows completely (not sleep/hibernate)
- Disconnect 180W gaming power adapter
- Remove all USB devices and gaming peripherals
- Hold power button for 20 seconds to discharge capacitors
- ESD Protection Setup:
- Wear anti-static wrist strap
- Connect to properly grounded ESD mat or metal surface
- Work on non-conductive, clean surface
- Keep magnetic tools away from battery and motherboard
🔍 Pre-Disconnection Battery Inspection
- Visual Inspection Points:
- Check for swelling or bulging of battery pack
- Look for discoloration or burn marks
- Inspect for liquid damage or corrosion
- Verify connector is clean and undamaged
- Safety Warning Signs:
- Swollen battery - DO NOT PROCEED - replace immediately
- Burning smell or unusual odors
- Discolored or melted plastic near battery
- Visible leakage or corrosion
🔧 Step-by-Step Disconnection Process
- Locate Battery Connector:
- Find battery positioned toward front of laptop
- Identify main power connector near center
- Note locking mechanism (typically pull-tab design)
- Document connector orientation with photography
- Safe Connector Release:
- Gently pull black pull-tab away from connector
- Apply even pressure - avoid angled force
- Do not pull on wires directly
- Listen for soft click as connector releases
- Complete Disconnection:
- Pull connector straight out from motherboard
- Set aside carefully, avoiding contact with other components
- Wait 60 seconds for full power discharge
- Verify no power by pressing laptop power button
🚨 Battery Safety Hazards & Prevention
| Hazard Type | Risk Level | Prevention Measures | Emergency Response |
|---|---|---|---|
| Short Circuit | High | Use plastic tools, avoid metal near contacts | Disconnect immediately, use Class C fire extinguisher |
| Thermal Runaway | Critical | Avoid puncturing, monitor temperature | Evacuate area, call emergency services |
| ESD Damage | Medium | Proper ESD protection, grounded workspace | Test components after incident |
| Chemical Exposure | High | Wear gloves, work in ventilated area | Flush with water, seek medical attention |
🚑 Emergency Procedures
- Swollen Battery Protocol:
- STOP WORK IMMEDIATELY
- Do not attempt to disconnect or handle
- Place in fire-safe container with sand or vermiculite
- Contact professional disposal service
- Battery Fire Response:
- Use Class C fire extinguisher for electrical fires
- Do not use water on lithium battery fires
- Evacuate area and call emergency services
- Ventilate area to disperse toxic fumes
👐 Proper Battery Handling Techniques
- Safe Removal:
- Remove 4x M2x4mm battery retention screws
- Lift battery at 30° angle from front edge
- Support battery with both hands during removal
- Place on non-conductive surface
- Storage Guidelines:
- Store in cool, dry place away from direct sunlight
- Keep in fire-proof container if damaged
- Store at 40-60% charge for long-term preservation
- Keep away from metal objects to prevent short circuits
🔌 Safe Reconnection Protocol
- Pre-Reconnection Checks:
- Verify battery connector is clean and undamaged
- Check motherboard connector for bent pins
- Ensure no debris in connector area
- Confirm proper battery orientation
- Secure Connection:
- Align connector properly with motherboard port
- Push straight in with firm, even pressure
- Listen for audible click indicating secure connection
- Verify connector is fully seated and flush
- Post-Connection Testing:
- Reinstall battery mounting screws securely
- Test power-on functionality before reassembly
- Check battery detection in Windows
- Verify charging functionality
📊 Safety Documentation Standards
- Pre-Service Documentation:
- Photograph battery condition before disconnection
- Document any swelling or damage with measurements
- Record battery model number and specifications
- Note safety checks performed
- Safety Compliance Records:
- Document ESD protection measures in place
- Record emergency equipment availability
- Note any safety incidents or concerns
- Keep safety checklist for future reference
💰 Resale Value Impact
- Safety Compliance Value:
- Proper ESD protection: +$40-60 value
- Documented safety procedures: +$30-50 value
- No battery damage from improper handling: +$60-90 value
- Professional safety documentation: +$25-40 value
- Gamer Buyer Confidence:
- Demonstrates professional approach to safety
- Indicates careful handling of power components
- Suggests longer device lifespan and reliability
- Supports higher asking price for safe workmanship
6. MSI Bravo 15 RAM Upgrade: 8GB to 64GB Gaming Performance Boost
💾 MSI Bravo 15 Memory Specifications
| Specification | Details | Gaming Impact | Compatibility Notes |
|---|---|---|---|
| Memory Type | DDR4 SODIMM (260-pin) | Optimal for gaming performance | Not compatible with DDR3 or DDR5 |
| Supported Speed | 3200MHz (JEDEC standard) | Fast data transfer for gaming | Automatically downclocks to CPU limit |
| Maximum Capacity | 64GB (2x32GB) | Extreme multitasking and future-proofing | Requires 64-bit Windows and compatible CPU |
| Voltage | 1.2V | Power efficient for gaming laptops | Standard DDR4 voltage |
| Channel Support | Dual Channel | Maximum gaming performance | Requires matching pairs for dual-channel |
📈 Gaming Performance Scaling Analysis
| RAM Configuration | Total Capacity | Gaming Use Case | Performance Gain | Resale Value Impact |
|---|---|---|---|---|
| 8GB (1x8GB) | 8GB | Basic gaming, may stutter | Baseline | No increase |
| 16GB (2x8GB) | 16GB | Good for most modern games | +35% gaming performance | +$80-120 |
| 32GB (2x16GB) | 32GB | Excellent for all games + streaming | +60% performance | +$150-200 |
| 64GB (2x32GB) | 64GB | Extreme gaming + content creation | +85% heavy workloads | +$250-350 |
🔧 Professional Installation Process
- Access RAM Slots (after bottom cover removal and battery disconnect):
- Locate two DDR4 slots near center of motherboard
- Identify existing RAM configuration
- Note orientation and slot positions
- Document current configuration with photos
- Remove Existing Modules:
- Push outward on side retention clips simultaneously
- Module will pop up at 45-degree angle
- Lift module straight out gently
- Handle by edges only to prevent ESD damage
- Install New DDR4 RAM:
- Align notch in RAM with key in slot
- Insert at 45-degree angle with firm, even pressure
- Press down until clips snap into place audibly
- Verify both ends are equally seated
- Dual Channel Optimization:
- Install matching sticks in both slots for best performance
- Use same brand, speed, and capacity
- For mixed sizes, larger stick typically goes in slot 1
- Verify dual-channel operation in BIOS
🏆 Recommended Gaming RAM Modules
- Performance Gaming (16GB Kit):
- Crucial CT2K8G4SFRA32A (2x8GB DDR4-3200)
- Excellent compatibility and gaming performance
- Ideal for most gaming scenarios
- Premium Gaming (32GB Kit):
- Corsair Vengeance Performance 32GB (2x16GB) DDR4-3200
- Great for streaming and content creation
- Low latency for competitive gaming
- Extreme Performance (64GB Kit):
- G.Skill Ripjaws 64GB (2x32GB) DDR4-3200
- Maximum capacity for heavy workloads
- Perfect for streaming + gaming simultaneously
🎮 Gaming Use Case Optimization
- 16GB Configuration:
- Most modern games at 1080p
- Discord + game + browser tabs
- Good for competitive gaming
- Budget-friendly performance boost
- 32GB Configuration:
- Streaming while gaming
- Modded games with high-res textures
- Virtual reality gaming
- Future-proof for upcoming game releases
- 64GB Configuration:
- Professional streaming setups
- Game development and testing
- Multiple virtual machines
- 4K video editing while gaming
⚡ Performance Verification & Testing
- BIOS Recognition:
- Boot to BIOS (DEL key during startup)
- Check recognized capacity and speed
- Verify dual-channel operation
- Note any compatibility warnings
- Windows Verification:
- Check Task Manager → Performance → Memory
- Run CPU-Z for detailed RAM information
- Verify speed and timings in Memory tab
- Check for hardware reserved memory
- Gaming Stability Testing:
- Run Windows Memory Diagnostic
- Use MemTest86 for comprehensive testing
- Test with memory-intensive games
- Monitor for crashes or errors under load
🚀 Gaming Performance Benefits
- Frame Rate Improvements:
- Reduced stuttering in open-world games
- Higher 1% low FPS for smoother gameplay
- Better performance in memory-intensive games
- Faster level loading and asset streaming
- Multitasking Capability:
- Game + Discord + browser without slowdowns
- Streaming while gaming capability
- Background applications don't affect performance
- Quick alt-tabbing between applications
- Future-Proofing:
- Ready for next-gen game requirements
- Better performance in modded games
- Improved loading times in memory-hungry games
- Support for upcoming gaming technologies
🔍 Common Installation Issues
- RAM Not Recognized:
- Reseat modules firmly
- Clean contacts with isopropyl alcohol
- Try one stick at a time to identify issues
- Check BIOS for memory remap features
- System Won't Boot:
- Check for proper seating
- Verify compatibility with CPU generation
- Reset BIOS by removing CMOS battery
- Test with known good modules
- Running at Lower Speed:
- Update to latest BIOS version
- Check for XMP profile support
- Verify JEDEC standard compatibility
- Some AMD systems may require manual timing setup
💰 Maximizing Gaming Resale Value
- Professional Documentation:
- Save original RAM purchase receipts
- Include before/after gaming benchmark comparisons
- Provide MemTest86 results for stability proof
- Document specific gaming performance improvements
- Marketing Advantages:
- "64GB DDR4 for extreme gaming performance"
- "Dual-channel configuration for maximum FPS"
- "Eliminates stuttering in demanding games"
- "Perfect for streaming and content creation"
- Target Gamer Benefits:
- Competitive Gamers: Emphasize FPS stability and smooth gameplay
- Streamers: Highlight simultaneous gaming/streaming capability
- Content Creators: Focus on rendering and multitasking performance
- Future-Proofers: Note readiness for next-gen game requirements
📝 Important Compatibility Notes
- AMD Ryzen 5 5600H supports up to 64GB DDR4-3200
- AMD Ryzen 7 5800H supports same specifications
- Mixed RAM sizes will run in flex mode, not full dual-channel
- Always check MSI's QVL (Qualified Vendor List) for guaranteed compatibility
- Verify maximum supported speed in BIOS after installation
7. MSI Bravo 15 SSD Upgrade: Single & Dual Storage Options
⚡ Gaming Storage Performance Comparison
| Configuration | Read Speed | Write Speed | Game Load Times | Resale Value Impact |
|---|---|---|---|---|
| HDD Only (1TB) | 120 MB/s | 110 MB/s | 30-60 seconds | Baseline |
| SATA SSD (1TB) | 550 MB/s | 520 MB/s | 15-25 seconds | +$80-120 |
| NVMe SSD (1TB) | 3,500 MB/s | 3,000 MB/s | 5-15 seconds | +$120-180 |
| Dual Drive Setup | 3,500 + 550 MB/s | 3,000 + 520 MB/s | 5-15 seconds (OS+Games) | +$200-300 |
🔧 Professional Installation Process
- M.2 NVMe Installation:
- Locate M.2 slot near center of motherboard
- Insert SSD at 30-degree angle (M-key alignment)
- Press down gently and secure with M2x3mm screw
- Ensure proper contact and no bending
- 2.5" SATA Drive Installation:
- Remove 2.5" drive caddy from laptop
- Attach drive to caddy using four screws
- Connect SATA data and power cables
- Slide caddy into bay and secure with screws
- Dual Drive Configuration:
- Install NVMe SSD in M.2 slot for OS and active games
- Install SATA SSD in 2.5" bay for game library
- Configure Windows for optimal drive usage
- Set up game library locations appropriately
🏆 Recommended Gaming SSDs
- Budget NVMe (Gen3):
- Crucial P3 1TB
- Excellent value for gaming load times
- Good for OS and frequently played games
- Performance NVMe:
- Samsung 970 Evo Plus 1TB/2TB
- Top-tier Gen3 performance
- Ideal for competitive gaming
- SATA SSD Option:
- WD Blue 3D NAND 1TB/2TB
- Great for secondary game storage
- Easy installation in 2.5" bay
- High Capacity Combo:
- 2TB NVMe + 2TB SATA SSD
- Maximum performance and capacity
- Perfect for extensive game libraries
🎮 Gaming Storage Configuration Strategies
- Single Drive Setup:
- 1TB or 2TB NVMe SSD for everything
- Simple management and backup
- Cost-effective for most gamers
- Maximum performance for all content
- Dual Drive Performance:
- 500GB-1TB NVMe: OS + active competitive games
- 1TB-2TB SATA SSD: Game library + media
- Separate OS from games for easier maintenance
- Better performance through load distribution
- Budget Optimization:
- 256GB-512GB NVMe: OS + 2-3 main games
- 1TB-2TB HDD: Rest of game library
- Cost-effective performance improvement
- Upgrade HDD to SSD later if needed
⚙️ Gaming Storage Optimization
- Windows Optimization:
- Enable TRIM:
fsutil behavior set DisableDeleteNotify 0 - Disable defragmentation for SSDs
- Enable write caching in Device Manager
- Set power plan to High Performance
- Enable TRIM:
- Game Library Management:
- Install competitive games on NVMe drive
- Store single-player games on SATA SSD
- Keep 15-20% free space for optimal performance
- Use Steam's storage manager for multiple drives
- Performance Validation:
- Run CrystalDiskMark for speed verification
- Check CrystalDiskInfo for drive health
- Monitor temperatures during gaming sessions
- Test game load times before and after upgrade
🚀 Gaming Performance Benefits
- Dramatically Reduced Load Times:
- Games load 3-5x faster than HDD
- Quick respawns in competitive games
- Faster level transitions in open-world games
- Instant application launches
- Improved System Responsiveness:
- Windows boots in under 10 seconds
- Reduced stuttering during asset streaming
- Smoother gameplay with faster texture loading
- Quick alt-tabbing between games and applications
- Future Gaming Technology:
- Ready for DirectStorage API (Windows 11)
- Faster texture streaming in next-gen games
- Better performance in modded games
- Support for upcoming gaming technologies
🔍 Common Installation Issues
- Drive Not Detected:
- Reseat SSD in M.2 slot or SATA connector
- Check BIOS for NVMe support enablement
- Update to latest BIOS version
- Test with different drive if available
- Slow Performance:
- Install latest NVMe drivers from AMD
- Check for firmware updates from manufacturer
- Verify PCIe 3.0 x4 operation in BIOS
- Ensure adequate free space (15% minimum)
- Boot Issues:
- Verify boot order in BIOS
- Check if legacy/UEFI settings match installation
- Ensure proper GPT partitioning
- Test with single drive configuration first
💰 Maximizing Gaming Resale Value
- Professional Documentation:
- CrystalDiskMark benchmark screenshots
- Drive health reports (CrystalDiskInfo)
- Original purchase receipts for SSDs
- Game load time comparison videos
- Marketing Advantages:
- "Lightning-fast NVMe SSD for instant game loading"
- "Dual-drive setup: Speed + massive storage"
- "Games load in under 10 seconds"
- "Perfect for extensive game libraries"
- Performance Claims:
- "Windows boots in under 8 seconds"
- "3,500MB/s read speeds for seamless gameplay"
- "Eliminates loading screens in most games"
- "Ready for next-generation gaming technology"
8. MSI Bravo 15 Thermal System Inspection & Gaming Maintenance
🌡️ MSI Bravo 15 Cooling System Specifications
| Component | Specifications | Gaming Performance Impact | Maintenance Frequency |
|---|---|---|---|
| Cooling System | Dual fan, 4 heat pipes | Critical for sustained gaming performance | Every 6-12 months |
| CPU Cooling | 2 dedicated heat pipes | Prevents Ryzen CPU throttling | Thermal paste: 1-2 years |
| GPU Cooling | 2 dedicated heat pipes | Maintains GPU boost clocks | Thermal paste: 1-2 years |
| Fans | Dual 75mm gaming fans | Airflow for VRM and memory cooling | Clean every 3-6 months |
🔍 Thermal System Inspection Process
- Visual Inspection:
- Check for dust accumulation in fan blades and heatsinks
- Inspect heat pipes for dents or damage
- Look for thermal paste leakage or pump-out
- Verify fan blades spin freely without obstruction
- Performance Testing:
- Run HWiNFO64 to monitor temperatures
- Test under gaming load for 30 minutes
- Check for thermal throttling (CPU/GPU downclocking)
- Monitor fan speeds and noise levels
- Airflow Assessment:
- Verify intake and exhaust vents are clear
- Check for proper airflow through heatsink fins
- Test fan operation at different speed levels
- Listen for unusual bearing noise or vibration
🧹 Professional Cleaning Procedure
- Fan Cleaning:
- Use compressed air to blow dust from fan blades
- Hold fans stationary while blowing to prevent overspin
- Clean between fan blades with soft brush
- Remove stubborn dust with isopropyl alcohol and cotton swabs
- Heatsink Cleaning:
- Blow compressed air through heatsink fins
- Use soft brush to remove embedded dust
- Clean heat pipe surfaces with isopropyl alcohol
- Ensure all fins are clear for optimal airflow
- Vent Cleaning:
- Clear intake vents on bottom cover
- Clean exhaust vents on rear and sides
- Remove dust from ventilation grilles
- Verify no obstructions in airflow paths
🔧 Thermal Paste Replacement Guide
- Recommended Thermal Compounds:
- Arctic MX-6 (High performance, non-conductive)
- Thermal Grizzly Kryonaut (Extreme performance)
- Noctua NT-H1 (Excellent reliability)
- Avoid conductive pastes (liquid metal) for safety
- Application Technique:
- Clean old paste with 99% isopropyl alcohol
- Apply pea-sized amount to CPU/GPU die center
- Use spreader or let pressure distribute paste
- Ensure even coverage without overflow
- Cure Time & Testing:
- Allow 24-48 hours for full thermal performance
- Run stress tests to verify temperature improvements
- Monitor for several gaming sessions
- Document temperature changes for resale value
📊 Gaming Temperature Benchmarks
| Condition | CPU Temp (Gaming) | GPU Temp (Gaming) | Performance Impact | Resale Value Impact |
|---|---|---|---|---|
| Dirty/Caked System | 95°C+ (Throttling) | 87°C+ (Throttling) | 20-30% performance loss | -$100-150 |
| Average Condition | 85-90°C | 80-85°C | 10-15% performance loss | Baseline |
| Cleaned System | 75-80°C | 70-75°C | Optimal performance | +$40-60 |
| Fresh Thermal Paste | 70-75°C | 65-70°C | Maximum performance | +$80-120 |
🔄 Cooling System Component Replacement
- When to Replace Components:
- Fan bearing noise or failure
- Damaged heat pipes or fins
- Persistent overheating after cleaning
- Physical damage to cooling assembly
- Replacement Parts:
- Genuine MSI cooling assembly
- Compatible aftermarket coolers
- Replacement fans if available separately
- Verify compatibility with exact Bravo 15 model
🎮 Gaming Thermal Optimization
- MSI Dragon Center Settings:
- Extreme Performance mode for maximum cooling
- Custom fan curves for balanced noise/performance
- User scenario settings for different game types
- Monitor real-time temperatures during gaming
- External Cooling Solutions:
- Laptop cooling pads with additional fans
- Elevated laptop stands for better airflow
- Room temperature and ventilation optimization
- Regular cleaning of gaming environment
🛡️ Preventive Maintenance Schedule
- Monthly Maintenance:
- External vent cleaning with compressed air
- Surface dust removal
- Temperature monitoring during gaming sessions
- Quarterly Maintenance:
- Internal fan and heatsink cleaning
- Thermal performance verification
- Fan operation testing
- Annual Maintenance:
- Complete thermal system disassembly and cleaning
- Thermal paste replacement
- Comprehensive temperature testing
- Cooling system performance documentation
🔍 Common Thermal Issues & Solutions
- Overheating During Gaming:
- Clean cooling system thoroughly
- Replace thermal paste
- Verify fan operation and speeds
- Check for obstructed airflow paths
- Fan Noise or Vibration:
- Clean fan blades and bearings
- Check for loose mounting screws
- Replace worn or damaged fans
- Verify proper fan cable routing
- Thermal Throttling:
- Monitor CPU/GPU clock speeds during load
- Improve cooling system performance
- Adjust power limits in MSI Dragon Center
- Ensure proper ambient temperature
💰 Maximizing Gaming Resale Value
- Professional Documentation:
- Before/after temperature benchmark screenshots
- Thermal paste replacement photos and receipts
- Cleaning procedure documentation
- Gaming performance stability records
- Marketing Advantages:
- "Professionally maintained cooling system"
- "Fresh thermal paste for optimal gaming temperatures"
- "No thermal throttling - maximum FPS performance"
- "Clean, dust-free internal components"
- Gamer Buyer Confidence:
- Demonstrate stable temperatures under gaming load
- Show clean internal components in listing photos
- Highlight professional maintenance history
- Note improved gaming performance from thermal management
9. MSI Bravo 15 Professional Reassembly & Component Testing
🔧 Systematic Reassembly Sequence
- Internal Component Verification:
- Verify all upgrades are properly installed (RAM, SSD)
- Check all connectors are firmly seated
- Ensure no loose screws or components inside chassis
- Confirm cable routing follows original paths
- Battery Reconnection:
- Reconnect battery connector with firm pressure
- Listen for audible click indicating secure connection
- Verify connector is flush with motherboard
- Reinstall battery mounting screws (0.4Nm torque)
- Bottom Cover Installation:
- Align cover properly with chassis
- Press around perimeter to engage all clips
- Install screws in correct sequence and locations
- Verify even gap around entire perimeter
🔩 Professional Screw Torque Specifications
| Screw Type | Location | Torque Specification | Critical Notes |
|---|---|---|---|
| M2x4mm | Bottom Cover Perimeter | 0.3 Nm (3 kgf-cm) | Prevents strip damage, ensures proper seating |
| M2x6mm | Battery Mounting | 0.4 Nm (4 kgf-cm) | Secure battery, prevent movement |
| M2x3mm | SSD/HDD Brackets | 0.2 Nm (2 kgf-cm) | Avoid overtightening on plastic threads |
| M2.5x4mm | Heatsink Assembly | 0.5 Nm (5 kgf-cm) | Crucial for proper thermal contact |
🧪 Comprehensive Component Testing
- Initial Power-On Test:
- Connect power adapter before attempting startup
- Listen for POST beep (if enabled in BIOS)
- Observe keyboard backlight and status LEDs
- Monitor for any unusual sounds or smells
- BIOS Access & Verification:
- Enter BIOS (DEL key during startup)
- Verify all RAM is detected at correct speed
- Check storage devices are recognized
- Confirm CPU and GPU temperatures are normal
- Windows Boot Test:
- Allow Windows to complete startup normally
- Check Device Manager for missing drivers
- Verify all components show without error codes
- Run Windows Update for latest drivers
🔍 Functional Testing Procedures
| Component | Test Procedure | Expected Result | Professional Documentation |
|---|---|---|---|
| Keyboard | Test all keys using online keyboard tester | All keys register correctly, backlight functions | Screenshot of successful key test |
| Touchpad | Test cursor movement, clicks, gestures | Smooth tracking, all gestures work | Video demonstration if possible |
| Ports & Connectivity | Test all USB, HDMI, audio ports | All ports function, devices recognized | Checklist of tested ports |
| Audio System | Test speakers, headphone jack, microphone | Clear audio output and input | Audio test recording |
📊 Performance Benchmarking Suite
- System Performance Tests:
- Run UserBenchmark for overall system assessment
- Use CPU-Z for component verification
- Test with CrystalDiskMark for storage performance
- Monitor temperatures with HWiNFO64 during testing
- Gaming Performance Validation:
- Run built-in game benchmarks (if available)
- Test actual gameplay for 30+ minutes
- Monitor FPS stability and temperature performance
- Check for any artifacts or graphical issues
⚡ Professional Stress Testing
- CPU Stress Test:
- Run Prime95 or AIDA64 CPU stress test
- Monitor for 15 minutes minimum
- Check for thermal throttling or instability
- Verify all CPU cores are functioning
- GPU Stress Test:
- Use FurMark or 3DMark stress tests
- Monitor GPU temperatures and clock speeds
- Check for artifacts or driver crashes
- Verify stable performance under load
- Memory Stress Test:
- Run MemTest86 for at least 4 passes
- Use Windows Memory Diagnostic tool
- Verify no memory errors occur
- Check for system stability during testing
✅ Quality Assurance Checklist
- Physical Inspection:
- No loose screws or rattling components
- All panels fit flush with no gaps
- No tool marks or cosmetic damage
- All rubber feet properly attached
- Functional Verification:
- All upgraded components functioning
- No error messages in Windows Event Viewer
- All drivers installed and updated
- BIOS settings optimized for performance
- Performance Validation:
- Temperatures within safe operating ranges
- No thermal throttling during gaming
- Expected performance gains achieved
- System stable under extended load
📋 Professional Service Documentation
- Service Report:
- Detailed list of all services performed
- Before/after performance metrics
- Temperature comparisons under load
- Benchmark results and improvements
- Component Documentation:
- Photographs of installed upgrades
- Receipts for all replacement parts
- Warranty information for new components
- Compatibility verification records
- Testing Records:
- Stress test results and duration
- Temperature logs during testing
- Performance benchmark comparisons
- Stability verification documentation
🎯 Final Preparation for Resale
- Software Optimization:
- Clean Windows installation with latest updates
- Essential gaming drivers and utilities installed
- MSI Dragon Center configured for optimal performance
- Basic optimization for gaming performance
- Cosmetic Preparation:
- Thorough external cleaning and sanitization
- Screen cleaning with appropriate solutions
- Keyboard and touchpad deep cleaning
- Final inspection under good lighting
💰 Maximizing Resale Value Through Professional Reassembly
- Value-Added Services:
- Professional reassembly documentation: +$50-80
- Comprehensive testing reports: +$40-70
- Performance benchmark documentation: +$60-100
- Warranty on workmanship: +$80-120
- Gamer Buyer Confidence Factors:
- Demonstrates professional approach to upgrades
- Provides verified performance improvements
- Shows attention to detail and quality workmanship
- Offers peace of mind through comprehensive testing
10. MSI Bravo 15 Maximizing Resale Value After Gaming Upgrades
💰 Post-Upgrade Value Assessment
| Upgrade Combination | Total Cost | Value Added | ROI | Target Gamer Market |
|---|---|---|---|---|
| RAM (16GB) + SSD (1TB) | $150-200 | $250-350 | 125-175% | Budget Gamers, Students |
| RAM (32GB) + SSD (2TB) | $250-350 | $400-550 | 114-157% | Serious Gamers, Streamers |
| Full Performance Package | $400-550 | $600-850 | 120-155% | Content Creators, Power Users |
| Complete Restoration | $500-700 | $800-1100 | 133-157% | Collectors, Premium Market |
📋 Comprehensive Gaming Documentation Package
- Performance Documentation:
- Before/after gaming benchmark comparisons
- Temperature performance charts under load
- FPS stability analysis in popular games
- Load time improvements for games and applications
- Service Records:
- Detailed upgrade report with timestamps
- Receipts for all gaming-grade components
- Thermal paste replacement documentation
- Cleaning and maintenance records
- Quality Assurance:
- 48-hour gaming stability test results
- All ports and features functionality checklist
- Professional cleaning and cosmetic assessment
- 90-day warranty on upgrade workmanship
🏷️ Strategic Gaming Laptop Pricing
- Market Research:
- Analyze sold listings on eBay for similar gaming laptops
- Monitor Facebook Marketplace gaming sections
- Research gaming laptop specialty forums and communities
- Compare with refurbished gaming units from retailers
- Premium Pricing Formula:
- Base market value for similar condition/spec units
- + 70-90% of upgrade parts cost (premium for gaming performance)
- + Professional gaming optimization service fee ($75-150)
- + Documentation and warranty premium ($80-120)
🛒 Optimal Sales Channels for Gaming Laptops
- Specialized Gaming Platforms:
- SellBroke - Tech-savvy gamers appreciate performance documentation
- SellLaptopBack - Refurbishment companies value professional upgrades
- Reddit r/hardwareswap - Knowledgeable gamers pay premiums for verified performance
- Gaming-specific forums and communities
- General Marketplaces:
- eBay Gaming Laptops category
- Facebook Marketplace (target gaming groups)
- OfferUp (premium for local gaming community)
- Craigslist (computer/electronics section)
- Institutional Opportunities:
- .gov surplus auctions and marketplaces
- .edu university surplus sales and student markets
- Local school esports programs
- Community college technology departments
📈 Gaming Laptop Listing Optimization
- Title Optimization:
- "MSI Bravo 15 Gaming Laptop - [CPU] - [GPU] - [RAM] - [Storage]"
- Include key upgrades: "Fresh Thermal Paste, 32GB RAM, 2TB SSD"
- Highlight gaming features: "144Hz, RGB Keyboard, Professionally Upgraded"
- Add performance claims: "Runs [Popular Games] at High Settings"
- Photo Requirements:
- High-quality photos showing pristine condition
- Close-ups of screen with gaming content or test patterns
- Photos of upgrade components and professional workmanship
- Benchmark screenshots and performance documentation
- Description Essentials:
- Detailed gaming performance specifications
- Upgrade history and performance improvements
- Professional service documentation highlights
- Clear warranty terms and support offered
🎯 Specific Gamer Targeting Strategies
- Budget Gamers:
- Emphasize value and performance per dollar
- Highlight popular game compatibility and FPS performance
- Focus on upgrade potential and future-proofing
- Note entry-level competitive gaming capability
- Student Gamers:
- Stress portability and battery life for campus use
- Highlight gaming and schoolwork balance
- Note durability for dorm room and LAN parties
- Emphasize value for engineering/game design students
- Content Creators:
- Focus on streaming and rendering performance
- Emphasize storage and RAM capabilities
- Note color accuracy and display quality
- Highlight value for streaming setups and video editing
- Competitive Gamers:
- Stress FPS stability and low input lag
- Highlight thermal performance during extended sessions
- Focus on high refresh rate gaming experience
- Note professional-grade maintenance and optimization
⭐ Premium Value-Added Services
- Gaming Software Preparation:
- Clean Windows installation optimized for gaming
- Essential gaming drivers and utilities pre-installed
- MSI Dragon Center configured for optimal performance
- Gaming performance optimization guides included
- Hardware Extras:
- Quality gaming laptop bag or sleeve
- Original MSI power adapter and packaging
- Gaming mouse or keyboard if available
- Cleaning kit and maintenance guide
- Gaming Support Services:
- 90-day warranty on all upgrade workmanship
- 30 days of free gaming optimization support
- Performance tuning consultation
- Future upgrade path recommendations
⏰ Strategic Sales Timing
- Seasonal Opportunities:
- Back-to-school season (July-September)
- Holiday gaming season (November-December)
- Summer gaming (June-August)
- Major game release windows
- Market Trends:
- New GPU/CPU release cycles
- Esports tournament seasons
- College semester start and end dates
- Economic factors affecting gaming spending
💼 Professional Gaming Business Practices
- Communication Standards:
- Prompt, professional responses to gaming-specific questions
- Clear terms and conditions in listings
- Transparent pricing with detailed cost breakdown
- Professional email and messaging communication
- Shipping & Handling:
- Professional packaging with adequate protection for gaming equipment
- Insurance for high-value gaming laptops
- Fast shipping with tracking and signature confirmation
- Clear communication throughout shipping process
📊 Performance Tracking & Improvement
- Key Performance Indicators:
- Average sale price versus gaming laptop market average
- Time to sell (days on market)
- Gamer customer satisfaction and feedback
- Return rate and issue frequency
- Continuous Improvement:
- Track most profitable gaming upgrade combinations
- Monitor best-performing sales platforms for gaming equipment
- Analyze most effective gaming-focused marketing language
- Identify gamer demographic preferences and buying patterns
🏛️ Institutional & Educational Markets
- Educational Institutions:
- .edu domain university surplus programs
- Local school district esports initiatives
- Vocational game design programs
- Student gaming clubs and organizations
- Government Programs:
- .gov surplus equipment auctions
- Public library gaming programs
- Community center technology initiatives
- Youth program equipment needs
- Business Development:
- Small business gaming cafes
- Esports organization equipment
- Content creation startups
- Remote work and gaming hybrid setups
Need to Sell Your MSI Laptop? Get Instant Cash!
If your MSI Bravo 15 (or other MSI gaming laptop) has performance issues or you're upgrading to a newer model, we offer competitive cash payouts for your device. We buy broken, used, and refurbished MSI gaming laptops—including all Bravo 15 configurations—with free insured shipping and hassle-free evaluations.
Sell Popular MSI Models Now: