This beginner-friendly guide will walk you through upgrading your Dell XPS 9510 step by step. Even if you've never opened a laptop before, you'll find clear instructions and helpful tips to make your first repair successful and stress-free.
🛠️ Essential Tools for Beginners
Basic Screwdriver Set:
Phillips #00 screwdriver (most important for XPS 9510)
Now that you have your tools ready and understand the safety basics, you're prepared to move on to the next section: Pre-Repair Preparation & Data Backup. This crucial step will ensure your data is safe and your workspace is properly set up for success.
2. Pre-Repair Preparation & Data Backup for Dell XPS 9510
💾 Why Data Backup is Essential
Before touching any screws, protecting your data is the most important step. Even simple upgrades can sometimes lead to data loss, and being prepared ensures your photos, documents, and important files stay safe throughout the repair process.
Congratulations! You've completed the most important preparation steps. Your data is safe, your workspace is ready, and you're mentally prepared. Now you're ready to move on to the fun part: Easy Bottom Cover Removal. Remember to work slowly and methodically - you've got this!
Removing the bottom cover is the perfect starting point for beginners. It's designed to be accessible, and with these step-by-step instructions, you'll have it off in no time. This is where the real fun begins!
🛠️ Tools You'll Need
Essential Tools:
Phillips #00 screwdriver (most important tool)
Plastic pry tool or old credit card
Small container for screws
Magnetic mat (optional but helpful)
Beginner Alternatives:
If you don't have a plastic pry tool: guitar pick or thick plastic card
No magnetic mat? Use an ice cube tray or egg carton
Regular Phillips screwdriver if #00 isn't available (be careful)
🔩 Identifying the Screws
Screw Locations:
8 Phillips #00 screws total
4 shorter screws around the edges
4 longer screws near the center
All screws are the same type (Phillips #00)
Beginner Tip:
Take a photo of the bottom before removing screws
Note which screws came from which locations
The XPS 9510 uses standard screws - no special types!
🔧 Step-by-Step Removal Process
Position Your Laptop:
Place laptop upside down on soft cloth or towel
Ensure the surface is clean and scratch-free
Open display to about 45 degrees for stability
Make sure you have good lighting
Remove the Screws:
Start with any corner screw
Turn counterclockwise (lefty loosey!)
Use firm but gentle pressure
If a screw won't budge, don't force it - try a different one first
Place screws in your container immediately
Release the Clips (Easiest Method):
Insert plastic tool between case and body near a corner
Gently twist - you'll hear a soft "click"
Work your way around the edges
Move to opposite side and repeat
No need to rush - slow and steady wins here
Lift the Cover Off:
Once all clips are released, lift from the rear edge
Angle it up and toward you
Set it aside in a safe place
Congratulations! You've successfully opened your laptop
🚫 Common Beginner Mistakes to Avoid
Using Too Much Force:
If it doesn't want to come off, check for missed screws
Never use metal tools to pry - they can damage the case
Gentle pressure is almost always enough
Screw Organization:
Don't mix screws from different locations
Keep them in order if possible
Take a photo if you're unsure about placement
Rushing the Process:
This should take 10-15 minutes for first-timers
No prize for speed - accuracy matters more
If frustrated, take a 5-minute break
🔍 Troubleshooting Tips
Stuck Screws:
Ensure you're using the correct size screwdriver
Apply downward pressure while turning
If stripped, try a rubber band between screw and driver
Stubborn Clips:
Work from different angles
Use a thinner plastic tool
Check if you missed any screws
Uneven Release:
Release clips evenly around the perimeter
Don't force one area - work on opposite sides
If one side is stuck, check for hidden clips
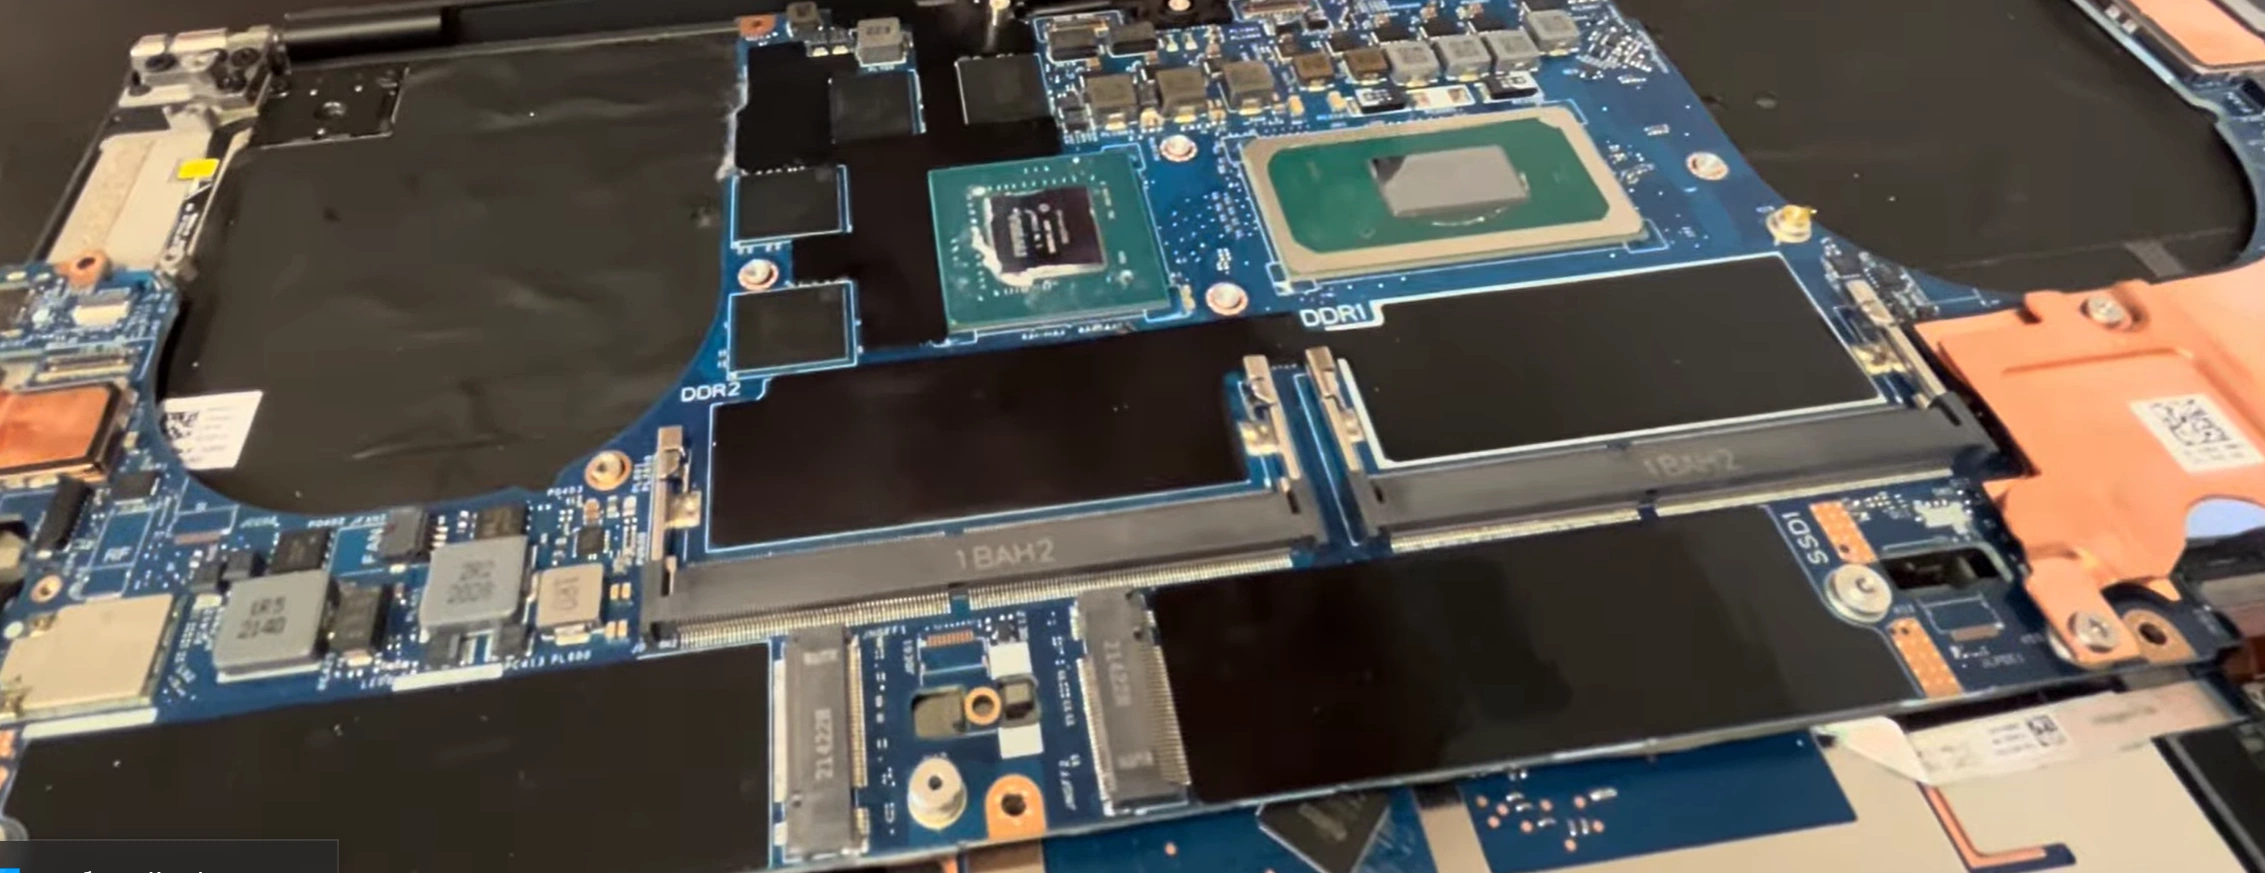
🔍 What You'll See Inside
Easy to Identify Components:
Large battery in the center
Two fans for cooling
RAM slots (usually two)
SSD storage slot
Wi-Fi card
Various cables and connectors
Beginner-Friendly Layout:
Components are clearly separated
Cables are color-coded or labeled
Plenty of working space
No cramped, complicated layouts
⚠️ Important Safety Reminders
Battery Disconnection:
Before touching ANY internal components, disconnect the battery
Locate the battery connector (usually white or gray)
Gently pull straight up or use plastic tool to lift connector
This is the most important safety step!
Static Precautions:
Touch metal surface before handling components
Work on hard surfaces, not carpets
Avoid wearing wool or synthetic clothing
⏱️ Realistic Time Expectations
Experience Level
Estimated Time
Notes
First Time Ever
15-25 minutes
Take your time, no rushing
Some Experience
8-12 minutes
Comfortable with basic tools
Experienced
3-5 minutes
Done this many times before
🎉 Celebrate Your Success!
You've Just Accomplished:
Successfully opened a premium laptop
Learned proper screw removal technique
Mastered clip release without damage
Gained confidence for future repairs
Next Steps Ready:
Now you can access RAM, SSD, and battery
All major upgrades are within reach
You're officially a laptop repair beginner!
📸 Photo Documentation Tips
Essential Photos to Take:
Overall internal layout
Close-up of battery connector
Cable routing patterns
Screw locations (for reassembly)
Why Photos Help:
Reference for reassembly
Troubleshooting if something goes wrong
Learning tool for future repairs
Peace of mind
🎯 Ready for Your First Upgrade?
Excellent work! You've successfully opened your Dell XPS 9510 and can now see all the upgradeable components. The next step is Battery Replacement Guide, where you'll learn to safely disconnect power and replace your battery. Remember to disconnect the battery before touching any other components!
4. Battery Replacement Guide for Dell XPS 9510
🔋 Your First Component Replacement!
Replacing the battery is one of the most common and rewarding upgrades. With these step-by-step instructions, you'll safely swap your old battery for a new one and extend your laptop's mobile life. This is perfect for beginners!
💡 Why Replace Your Battery?
Common Signs You Need a New Battery:
Laptop dies quickly when unplugged
Battery percentage jumps around erratically
Laptop doesn't recognize the battery
Battery is swollen or bulging (replace immediately!)
Computer is more than 2-3 years old
Benefits of Replacement:
Longer battery life for mobile use
Better performance when unplugged
Peace of mind and safety
Increased resale value
⚠️ Critical Safety Precautions
Power Down Completely:
Ensure laptop is completely shut down
Unplug AC adapter and all cables
Hold power button for 10 seconds to discharge
Verify no lights are on
Battery Safety Rules:
NEVER puncture or bend the battery
If battery is swollen, handle with extreme care
Work in well-ventilated area
Keep away from flammable materials
Static Protection:
Touch metal surface before handling
Use anti-static wrist strap if available
Work on hard, non-carpeted surfaces
🛠️ Tools You'll Need
Essential Tools:
Phillips #00 screwdriver
Plastic spudger or pry tool
Small container for screws
Anti-static wrist strap (recommended)
Optional Helpers:
Tweezers for small connectors
Isopropyl alcohol for cleaning
New thermal pads if replacing them
🔧 Step-by-Step Battery Replacement
Disconnect the Battery (MOST IMPORTANT STEP):
Locate the battery connector (white or gray, near battery center)
Use plastic spudger to gently lift connector straight up
Listen for a soft "click" when it releases
Never pull by the wires - always by the connector
Double-check it's disconnected before proceeding
Remove Battery Screws:
Identify 4-6 Phillips #00 screws securing the battery
Remove screws in criss-cross pattern (like tightening car tires)
Place screws in your container immediately
Note any screws of different lengths
Lift Out Old Battery:
Gently lift from the connector end first
If resistance is felt, check for adhesive strips
Use plastic card to release any adhesive
Lift at 20-degree angle to clear surrounding components
Prepare New Battery:
Inspect new battery for any damage
Remove protective films
Check connector matches old battery
Ensure it's the correct model for XPS 9510
Install New Battery:
Position new battery in the same orientation as old one
Lower into place without forcing
Ensure no cables are trapped underneath
Replace screws in same locations
Reconnect Battery:
Push connector straight down until it clicks
Give gentle tug test to ensure it's secure
Do not force if it doesn't connect easily
🛒 Choosing the Right Battery
Battery Type
Pros
Cons
Price Range
Best For
Genuine Dell
Perfect compatibility, full warranty
Most expensive
$80-120
Peace of mind, warranty concerns
High-Quality Third Party
Good performance, lower cost
Variable quality
$50-80
Budget-conscious, reliable brands
Budget Option
Lowest cost
Uncertain longevity
$30-50
Temporary fixes, very tight budgets
🔌 Battery Connector Tips
Identifying the Connector:
Usually white or gray plastic
Located near center of battery
Has 4-6 pins inside
May have a locking mechanism
Safe Disconnection:
Use plastic tool, not metal
Lift straight up, not at an angle
If stuck, gently wiggle side to side
Never pull by the wires
🔍 Troubleshooting Common Issues
Battery Not Detected:
Reseat connector firmly
Check for bent pins in connector
Update BIOS from Dell website
Test with old battery if possible
Not Charging:
Verify AC adapter is working
Check charging port for damage
Update power management drivers
Test with different power outlet
Poor Battery Life:
Calibrate new battery (full charge/discharge cycle)
Check power settings in Windows
Update Dell Power Manager software
Monitor for background app drain
⚡ New Battery Calibration
Charge to 100% without interruption
Use on battery until it shuts down (around 5%)
Charge to 100% again without using laptop
Check battery health in Dell Power Manager
Your battery is now calibrated!
♻️ Proper Old Battery Disposal
Safe Disposal Options:
Best Buy or Staples electronics recycling
Local hazardous waste facility
Battery manufacturer take-back programs
Never throw in regular trash
Storage Before Disposal:
Cover terminals with electrical tape
Store in cool, dry place
Keep away from metal objects
Dispose within 30 days
✅ Success Checklist
✅ Battery connector securely attached
✅ All screws properly tightened
✅ Laptop powers on with battery
✅ Battery charges normally
✅ Windows recognizes new battery
✅ No error messages in Device Manager
⏱️ Time Expectations
Experience Level
Estimated Time
Notes
First Time
20-30 minutes
Take it slow, double-check everything
Some Experience
10-15 minutes
Comfortable with basic disassembly
Experienced
5-8 minutes
Done many battery replacements
🎯 Ready for More Upgrades?
Excellent work! You've successfully replaced your battery - a major milestone for any beginner. With the battery safely disconnected (remember to keep it disconnected for safety), you're now ready to move on to RAM Installation & Memory Upgrade. This is even easier than the battery replacement and will give your laptop a noticeable performance boost!
5. RAM Installation & Memory Upgrade for Dell XPS 9510
💾 Easiest Performance Upgrade!
RAM (Random Access Memory) is one of the simplest and most effective upgrades you can make. It's like giving your laptop more workspace to think - and the best part is, it's incredibly easy for beginners!
🚀 Why Upgrade Your RAM?
Performance Benefits:
Faster multitasking with multiple programs open
Smoother performance with many browser tabs
Better performance in photo and video editing
Improved gaming and 3D application performance
Future-proofing for new software and updates
Signs You Need More RAM:
Computer feels slow when multiple programs are open
Frequent freezing or "not responding" messages
Slow program switching
High memory usage in Task Manager
🔍 RAM Basics for Beginners
What is RAM?:
Temporary workspace for running programs
Faster than your SSD but loses data when powered off
More RAM = more programs can run smoothly at once
Think of it as your computer's "desk space"
XPS 9510 RAM Specifications:
Type: DDR4 SODIMM
Speed: 3200MHz
Maximum: 64GB (2x32GB)
Slots: 2 (both usually accessible)
Easy upgrade - no special tools needed!
🛠️ Tools You'll Need
Essential Tools:
Phillips #00 screwdriver (same as before)
Plastic spudger (optional but helpful)
Anti-static wrist strap (recommended)
Your screw container
RAM-Specific Items:
New RAM modules (see selection guide below)
Anti-static bag for old RAM (if keeping)
Clean, static-free workspace
⚠️ Safety First - Always!
Power Down Completely:
Ensure laptop is shut down and unplugged
Battery should already be disconnected from previous step
Hold power button for 10 seconds to discharge
Static Protection:
Touch metal surface before handling RAM
Handle RAM by edges only - never touch gold contacts
Work on hard surfaces
Use anti-static wrist strap if available
🔧 Step-by-Step RAM Installation
Locate RAM Slots:
Find two RAM slots near center of motherboard
They're usually labeled or color-coded
Note how existing RAM is installed
Take a photo for reference
Remove Old RAM (if replacing):
Gently push outward on metal clips at both ends
RAM will pop up at 30-degree angle automatically
Lift straight out - no twisting needed
Place in anti-static bag if keeping
Install New RAM:
Align notch in RAM with notch in slot
Insert at 30-degree angle
Press down firmly until clips snap into place
You should hear a satisfying "click"
Verify Installation:
Both metal clips should be fully engaged
RAM should be perfectly parallel to motherboard
No gold contacts should be visible
Give gentle tug test to ensure it's secure
🛒 RAM Selection Guide
Configuration
Best For
Performance Gain
Cost Range
Beginner Friendly
16GB (2x8GB)
Basic computing, web browsing, office work
Good
$40-60
⭐️⭐️⭐️⭐️⭐️
32GB (2x16GB)
Multitasking, photo editing, moderate gaming
Excellent
$70-100
⭐️⭐️⭐️⭐️⭐️
64GB (2x32GB)
Video editing, 3D modeling, heavy multitasking
Outstanding
$130-180
⭐️⭐️⭐️⭐️⭐️
🏆 Recommended RAM Brands
Top Tier (Best Performance):
Crucial - Excellent compatibility with Dell systems
Very straightforward - you'll be surprised how easy!
Some Experience
5-8 minutes
Quick and simple upgrade
Experienced
2-3 minutes
One of the fastest upgrades possible
✅ Success Checklist
✅ Both RAM clips fully engaged
✅ RAM modules parallel to motherboard
✅ Full RAM amount detected in BIOS
✅ System boots normally
✅ No error messages
✅ Improved multitasking performance
🎯 Ready for Storage Upgrade?
Fantastic work! You've successfully upgraded your RAM and given your laptop more "thinking space." The next logical upgrade is SSD Replacement & Storage Upgrade, which will make your computer feel even faster by improving storage speed. This is another beginner-friendly upgrade that builds on the skills you've already learned!
6. SSD Replacement & Storage Upgrade for Dell XPS 9510
💨 The Speed Upgrade You'll Actually Feel!
Upgrading your SSD (Solid State Drive) is like giving your laptop a turbo boost. It's one of the few upgrades where you'll notice immediate, dramatic improvements in everyday use - and it's surprisingly easy for beginners!
⚡ Why Upgrade Your SSD?
Immediate Performance Benefits:
Faster boot times (Windows starts in seconds)
Quicker application loading
Speedier file transfers and saves
Snappier overall system responsiveness
Better gaming load times
Capacity Benefits:
More space for photos, videos, and games
Room for large projects and files
Better organization without constant cleanup
Future-proofing for larger applications
🔍 SSD Basics for Beginners
What is an SSD?:
Solid State Drive - no moving parts
Much faster than traditional hard drives
Stores your operating system, programs, and files
Think of it as your computer's "filing cabinet"
XPS 9510 SSD Specifications:
Type: M.2 NVMe PCIe 3.0
Form Factor: 2280 (22mm wide, 80mm long)
Interface: PCIe 3.0 x4
Speeds: Up to 3500MB/s read, 3000MB/s write
Easy "plug and play" installation
🛠️ Tools You'll Need
Essential Tools:
Phillips #00 screwdriver
Plastic spudger (for cable management)
Anti-static wrist strap
Your trusty screw container
SSD-Specific Items:
New M.2 NVMe SSD
USB drive (for Windows installation, if needed)
External drive (for data transfer)
⚠️ Safety First - Remember!
Power Down Completely:
Laptop should be off and unplugged
Battery should still be disconnected
Hold power button to discharge any residual power
Static Protection:
Handle SSD by edges only
Don't touch the gold contacts
Use anti-static wrist strap
Work on static-safe surfaces
🔧 Step-by-Step SSD Installation
Locate SSD Slot:
Find M.2 slot on motherboard
It's usually near the center or RAM slots
Look for a small screw and standoff
Note how existing SSD is installed
Remove Old SSD:
Unscrew the single retention screw
SSD will pop up at 30-degree angle
Lift straight out gently
Place in anti-static bag if keeping
Install New SSD:
Insert new SSD at 30-degree angle
Align the notch with the slot key
Press down gently until it lies flat
Secure with retention screw
Verify Installation:
SSD should be parallel to motherboard
Screw should be snug but not overtightened
No bending or stress on the SSD
Label should be facing up for better heat dissipation
🛒 SSD Selection Guide
Capacity
Best For
Speed Improvement
Cost Range
Beginner Friendly
512GB
Basic computing, office work, light gaming
Good
$40-60
⭐️⭐️⭐️⭐️⭐️
1TB
Most users, gaming, photo editing, moderate files
Excellent
$70-100
⭐️⭐️⭐️⭐️⭐️
2TB
Power users, video editing, large game libraries
Outstanding
$120-160
⭐️⭐️⭐️⭐️⭐️
4TB
Professionals, content creators, massive storage
Exceptional
$200-300
⭐️⭐️⭐️⭐️⭐️
🏆 Recommended SSD Brands
Top Performance:
Samsung 970 EVO Plus - Excellent speed and reliability
Western Digital SN750 - Great performance and value
✅ Windows boots normally (or installs successfully)
✅ All data successfully transferred
✅ Performance improvement noticeable
✅ All programs functioning correctly
🎯 Ready for Screen Upgrade?
Amazing work! You've successfully upgraded your storage and given your laptop incredible speed. The final major upgrade is LCD Screen Replacement Guide. This is the most visually rewarding upgrade and, while it requires more care, is still very achievable for beginners following our step-by-step guide!
7. Thermal Paste & Cooling System Care for Dell XPS 9510
❄️ Keep Your Cool - Literally!
Thermal maintenance is like giving your laptop a fresh set of lungs. It's not the flashiest upgrade, but it's one of the most important for long-term health and performance. Best of all, it's surprisingly easy and inexpensive!
🔥 Why Thermal Maintenance Matters
Performance Benefits:
Prevents overheating and thermal throttling
Maintains consistent performance during heavy use
Extends component lifespan
Reduces fan noise (quieter operation)
Better gaming and rendering performance
Signs You Need Thermal Maintenance:
Laptop feels unusually hot to touch
Fans run loudly during normal use
Performance drops during extended use
Unexpected shutdowns during heavy tasks
Laptop is more than 2 years old
🔍 Thermal Basics for Beginners
What is Thermal Paste?:
Special compound that transfers heat from CPU/GPU to heatsink
Fills microscopic gaps between metal surfaces
Dries out over time (typically 2-3 years)
Fresh paste = better heat transfer = cooler laptop
Excellent work! You've given your laptop's cooling system a new lease on life. The next maintenance task is Keyboard & Touchpad Maintenance, which focuses on keeping your input devices clean and functional. It's much simpler than thermal work and perfect for completing your comprehensive laptop care knowledge!
8. Keyboard & Touchpad Maintenance for Dell XPS 9510
⌨️ Keep Your Inputs Clean & Responsive!
Your keyboard and touchpad are what you touch every time you use your laptop. Proper maintenance keeps them feeling fresh, responsive, and professional-looking. These simple cleaning routines can prevent costly replacements down the road!
🧼 Why Regular Maintenance Matters
Performance Benefits:
Prevents sticky or unresponsive keys
Maintains smooth touchpad operation
Reduces wear on mechanical components
Prevents debris buildup under keys
Extends overall lifespan of input devices
Hygiene Benefits:
Reduces bacteria and germ buildup
Prevents skin oil accumulation
Eliminates food crumbs and dust
Creates more pleasant user experience
📅 Recommended Cleaning Schedule
Cleaning Type
Frequency
Time Required
Tools Needed
Quick Surface Clean
Weekly
2-3 minutes
Microfiber cloth
Deep Key Clean
Monthly
10-15 minutes
Compressed air, brush
Complete Maintenance
Every 6 months
20-30 minutes
Full cleaning kit
Spill Response
Immediately!
30-60 minutes
Emergency kit
🛠️ Cleaning Tools & Supplies
Basic Cleaning Kit:
Microfiber cloths (lint-free)
Isopropyl alcohol 70% or higher
Cotton swabs
Compressed air can
Soft-bristle brush
Advanced Tools (Optional):
Keycap puller (for deep cleaning)
Plastic spudger for stubborn debris
Keyboard cleaning putty or gel
Small vacuum with brush attachment
🔧 Step-by-Step Cleaning Process
Power Down & Prepare:
Shut down laptop completely
Unplug from power source
Turn upside down to dislodge loose debris
Gently tap to remove large particles
Compressed Air Cleaning:
Hold can upright to prevent moisture spray
Use short bursts at 45-degree angle
Work from top to bottom of keyboard
Clean between keys thoroughly
Don't spin fan if laptop is on
Surface Wiping:
Dampen microfiber cloth with isopropyl alcohol
Wipe keys and touchpad surface
Use cotton swabs for tight spaces
Clean around key edges and touchpad border
Deep Cleaning (Monthly):
Use soft brush to dislodge stubborn debris
Clean between keys with brush or putty
Wipe down entire palm rest area
Inspect for worn or damaged keys
👆 Touchpad Special Care
Regular Maintenance:
Clean with isopropyl alcohol and microfiber cloth
Remove oil and fingerprint buildup
Ensure smooth, consistent surface
Check for scratches or wear spots
Performance Optimization:
Update touchpad drivers from Dell website
Adjust sensitivity in Windows settings
Enable/disable gestures as preferred
Calibrate if experiencing accuracy issues
🚰 Emergency Spill Response Guide
Immediate Action:
UNPLUG power immediately
Hold power button to force shutdown
Turn laptop upside down
Remove any external devices
Liquid Removal:
Wipe excess liquid with absorbent cloth
Use compressed air to blow out liquid
Place in dry, warm area for 48-72 hours
DO NOT use heat sources like hair dryers
Testing & Recovery:
Wait at least 48 hours before testing
Check each key individually
Test touchpad functionality
Backup data immediately if it works
🔍 Common Problems & Solutions
Sticky Keys:
Clean around key with isopropyl alcohol
Use compressed air to dislodge debris
Gently rock key back and forth
If persistent, may need keycap removal
Unresponsive Keys:
Check for physical obstructions
Update keyboard drivers
Test with external keyboard
May require professional repair
Touchpad Issues:
Clean surface thoroughly
Update touchpad drivers
Check Windows touchpad settings
Reset to default settings
🛡️ Preventive Measures
Daily Habits:
Wash hands before using laptop
Avoid eating over keyboard
Keep drinks away from laptop
Close laptop when not in use
Protective Accessories:
Keyboard covers (check compatibility)
Laptop skins or decals
Protective laptop bags
Screen protectors
🧽 Advanced Deep Cleaning Techniques
Keycap Removal (Advanced):
Use keycap puller tool
Start with less frequently used keys
Clean keycaps in soapy water
Ensure completely dry before reinstalling
Take photos for reassembly reference
Membrane Cleaning:
Only if comfortable with disassembly
Clean rubber domes with alcohol swabs
Check for wear or damage
Ensure proper alignment during reassembly
🏆 Recommended Cleaning Products
Product Type
Recommended Brands
Price Range
Effectiveness
Compressed Air
Dust-Off, Falcon
$5-10
Excellent
Cleaning Putty
Cyber Clean, Mr. Clean
$8-12
Very Good
Microfiber Cloths
Any brand, multiple pack
$5-8
Essential
Cleaning Kits
iFixit, Jelly Comb
$15-25
Complete Solution
🔧 Troubleshooting Common Issues
Multiple Keys Not Working:
Check ribbon cable connection
Update keyboard drivers
Test in BIOS to isolate software issues
May require keyboard replacement
Touchpad Jumpy or Inaccurate:
Clean surface thoroughly
Update touchpad drivers
Calibrate in Windows settings
Check for electromagnetic interference
Backlight Issues:
Check function key combinations (Fn + F10)
Update BIOS and keyboard drivers
Test in Dell Power Manager
May be ribbon cable or LED issue
⏱️ Time Expectations
Cleaning Type
Estimated Time
Frequency
Quick Wipe Down
2-5 minutes
Weekly
Standard Cleaning
10-15 minutes
Monthly
Deep Clean
20-30 minutes
Every 6 months
Spill Recovery
60+ minutes + drying time
As needed
✅ Success Checklist
✅ All keys responsive and not sticky
✅ Touchpad smooth and accurate
✅ No visible debris between keys
✅ Surface free of oils and fingerprints
✅ Backlight functioning properly
✅ Pleasant typing experience restored
🎯 Ready for Screen Replacement?
Great job maintaining your input devices! Now you're ready for the final major upgrade: LCD Screen Replacement Guide. This is the most visually transformative upgrade and, while it requires careful handling, is very achievable with our step-by-step guidance. Your laptop is about to get a brand new view on the world!
9. LCD Screen Replacement Guide for Dell XPS 9510
🖥️ Your Most Rewarding Upgrade!
Replacing your laptop screen is the ultimate DIY achievement. It transforms your entire computing experience and, while it requires careful handling, is completely achievable for beginners following these detailed steps. Get ready to give your XPS 9510 a brand new view!
✨ Why Replace Your Screen?
Common Reasons for Replacement:
Cracked or broken glass
Dead pixels or screen discoloration
Flickering or backlight issues
Upgrade to higher resolution or better panel
Touch screen not responding
Benefits of Replacement:
Restores perfect visual experience
Can upgrade to better display technology
Significant cost savings vs professional repair
Learn valuable repair skills
Increased resale value with perfect screen
🔍 XPS 9510 Screen Specifications
Standard Configurations:
15.6" FHD+ (1920x1200) IPS Non-Touch
15.6" UHD+ (3840x2400) IPS Touch
15.6" OLED (3456x2160) Touch
All use 30-pin eDP connectors
Compatibility Notes:
Must match your original screen type
Touch and non-touch are not interchangeable
Check connector type and cable length
Verify mounting hole positions
🛠️ Specialized Tools Needed
Essential Tools:
Phillips #00 screwdriver
Plastic pry tools and spudgers
Guitar picks or plastic cards
Suction cups (highly recommended)
Anti-static wrist strap
Screen-Specific Items:
Replacement LCD panel
Double-sided tape (if needed)
Clean microfiber cloths
Soft, clean workspace
⚠️ Critical Safety Precautions
LCD Glass Safety:
LCD panels are FRAGILE - handle with extreme care
Never press on the screen surface
Use suction cups for safe handling
Work on soft, padded surface
Power Safety:
Laptop must be completely powered off
Battery must be disconnected
Discharge any static electricity
Work in static-safe environment
Cable Safety:
Handle ribbon cables gently
Never pull cables by the wires
Note cable routing for reassembly
Check for locking mechanisms
🛒 Screen Selection Guide
Screen Type
Best For
Cost Range
Installation Difficulty
FHD+ IPS Non-Touch
General use, budget replacement
$80-120
⭐️⭐️⭐️
UHD+ IPS Touch
Creative work, premium experience
$150-220
⭐️⭐️⭐️⭐️
OLED Touch
Best image quality, professional use
$250-350
⭐️⭐️⭐️⭐️
🔧 Step-by-Step Screen Replacement
Prepare Your Workspace:
Clear large, clean area with soft padding
Have all tools organized and within reach
Remove any jewelry that could scratch surfaces
Ensure good lighting for detailed work
Remove Bottom Cover & Disconnect Battery:
Follow previous steps to access interior
Disconnect battery completely
This is CRITICAL for safety
Remove Display Bezel:
Use plastic pry tool at bottom edge
Work around perimeter, releasing clips
Listen for soft clicks as clips release
Be gentle - bezel plastic can break easily
Remove Old Screen:
Remove 4 corner screws securing LCD
Use suction cups to lift screen carefully
Lift at 30-degree angle to access cables
Disconnect eDP cable and backlight cable
Install New Screen:
Connect cables to new screen first
Lower screen into position carefully
Replace mounting screws
Ensure all cables are properly routed
Reattach Bezel:
Align bezel clips with corresponding slots
Press gently around perimeter until all clips engage
Work systematically from one side to the other
Ensure even, flush fit all around
🔌 Cable Connection Details
eDP Cable (Main Video):
30-pin connector for high-resolution displays
Usually has flip-up locking mechanism
Lift lock, insert cable, press lock down
Ensure straight, even insertion
Backlight Cable:
Smaller connector near eDP cable
May have sliding lock or simple friction fit
Check for proper orientation
Test backlight before final assembly
Touch Screen Cable (if applicable):
Additional cable for touch functionality
Similar connection to eDP but smaller
Route carefully to avoid pinching
🚫 Common Beginner Mistakes
Rushing the Process:
Screen replacement requires patience
Don't force anything that resists
Double-check each step before proceeding
Improper Handling:
Never press on the LCD surface
Use edges or suction cups for handling
Keep screen face down on soft surface
Cable Damage:
Always disconnect locking mechanisms first
Pull straight out, not at angles
Check for bent pins before reconnecting
🔍 Troubleshooting Screen Issues
No Display:
Check eDP cable connection
Verify locking mechanism is engaged
Test with external monitor
Reseat cable and try again
No Backlight:
Check backlight cable connection
Test brightness settings
Verify backlight functionality in BIOS
May be inverter or cable issue
Touch Not Working:
Check touch cable connection
Update touch screen drivers
Calibrate in Windows settings
Test in Device Manager
📊 Testing Your New Screen
Partial Assembly Test:
Reconnect battery and power
Test screen before final bezel installation
Check for dead pixels and backlight uniformity
Verify touch functionality if applicable
Visual Quality Check:
Display solid colors to check for uniformity
Test different brightness levels
Check viewing angles
Verify color accuracy
Functional Testing:
Test all touch points if touch screen
Check for flickering at different refresh rates
Verify automatic brightness if supported
Test with different applications
⏱️ Time Expectations
Experience Level
Estimated Time
Notes
First Time
60-90 minutes
Take it slow, be methodical
Some Experience
30-45 minutes
Comfortable with delicate components
Experienced
15-25 minutes
Done multiple screen replacements
✅ Success Checklist
✅ New screen displays image clearly
✅ Backlight works at all brightness levels
✅ No dead pixels or discoloration
✅ Bezel fits flush and even
✅ Touch functionality works (if applicable)
✅ All cables properly routed and secured
💰 Cost Savings vs Professional Repair
Repair Type
Professional Cost
DIY Cost
Your Savings
FHD+ Screen Replacement
$300-400
$80-120
$220-280
UHD+ Touch Replacement
$500-600
$150-220
$350-380
OLED Replacement
$700-800
$250-350
$450-450
🎯 Ready for Final Assembly?
Congratulations! You've successfully completed the most visually dramatic upgrade. Your XPS 9510 now has a beautiful new screen. The final step is Step-by-Step Reassembly Instructions, where we'll put everything back together and ensure your upgraded laptop works perfectly. You're almost at the finish line!
10. Where to Sell Your Upgraded Dell XPS 9510: Maximize Your Return
💰 Turn Your DIY Skills Into Cash!
Congratulations on successfully upgrading your XPS 9510! Now it's time to turn your hard work into maximum profit. This guide will show you exactly where and how to sell your upgraded laptop for the best possible price.
Use relevant keywords: "Upgraded, Maintained, Like New"
Description Best Practices:
Lead with your professional upgrades
Detail all maintenance performed
Include high-quality photos of upgrades
Mention remaining warranty if applicable
Be honest about any cosmetic wear
📸 Photography That Sells
Essential Photos:
Front view with screen on (desktop visible)
Close-ups of keyboard and touchpad
Photos showing screen quality (color test)
Internal photos showing clean components
Upgrade documentation and receipts
Any cosmetic imperfections (be transparent)
Professional Presentation:
Clean, neutral background
Good lighting to show true condition
Show laptop in professional setting
Include proof of upgrades
📄 Professional Documentation Package
What to Include:
Before/after photos of upgrades
Receipts for new components
Performance benchmark results
Battery health report
Thermal performance data
Clean bill of health from diagnostics
Building Buyer Confidence:
Documented maintenance history
Component testing results
Professional presentation
Clear upgrade timeline
📦 Professional Shipping & Packaging
Packaging Best Practices:
Use original Dell box if available (+$30-50 value)
Double-box with ample padding
Include all original accessories
Pack documentation professionally
Use anti-static protection
Shipping Protection:
Always require signature confirmation
Purchase full-value shipping insurance
Use tracked shipping methods
Take photos of packaging process
📅 Optimal Selling Times
Time Period
Market Conditions
Best Platforms
Pricing Strategy
January-February
Post-holiday, corporate budget refresh
SellBroke, corporate channels
Premium pricing
August-September
Back-to-school, college preparation
.edu channels, general marketplaces
Competitive pricing
November-December
Holiday shopping, year-end spending
All platforms
Market pricing
🛡️ Selling Safely & Smartly
Fraud Prevention:
Use platform payment protection
Verify buyer profiles and history
Be cautious of overpayment scams
Use tracked shipping with confirmation
Dispute Prevention:
Document everything with photos
Be honest about condition
Provide clear return policy
Communicate professionally
✅ Pre-Sale Checklist
✅ Laptop thoroughly cleaned inside and out
✅ All upgrades tested and functioning
✅ Professional photos taken
✅ Documentation package prepared
✅ Research completed on pricing
✅ Best platform selected for your needs
✅ Packaging materials gathered
🎉 You're Ready to Sell!
You've not only successfully upgraded a premium laptop but also gained valuable skills that can save you (or make you) money for years to come. Your professionally upgraded Dell XPS 9510 is now ready to find its next happy owner at a price that reflects your hard work and expertise. Happy selling!
Need to Sell Your Dell Laptop? Get Instant Cash!
If your Dell XPS 9510 (or other XPS model) has performance issues or you're upgrading to a newer laptop, we offer premium cash payouts for your device. We buy broken, used, and refurbished Dell XPS laptops—including all 9510 configurations—with free insured shipping and hassle-free evaluations.