DIY MSI GT72 6QD Teardown: Easy at-Home Repair for Keyboard, Battery & Storage Upgrades
Pre-Disassembly: Gaming Laptop Assessment & Value Maximization Essential Tools for MSI Gaming Laptop Repair Bottom Panel Removal Process Battery Replacement & Disconnection Storage Upgrade Guide (HDD/SSD) RAM Installation & Upgrade Options SteelSeries Keyboard Replacement Cooling System Maintenance & Thermal Repasting Professional Reassembly Techniques Post-Repair Testing & Performance Validation Maximizing Resale Value After Upgrades
1. MSI GT72 6QD Pre-Disassembly: Gaming Laptop Assessment & Value Maximization
💰 2024 Gaming Laptop Market Valuation
Condition Grade
Specification Impact
Value Range
Gaming Premium
Excellent (Like New)
i7, GTX 980M, 16GB RAM, SSD
$600-$750
+20% for collectors
Good (Minor Wear)
i7, GTX 970M, 12GB RAM
$450-$550
+15% for gamers
Fair (Visible Wear)
i7, GTX 965M, 8GB RAM
$300-$400
+10% with documentation
For Parts/Repair
Any configuration
$150-$250
Minimal gaming premium
🎯 MSI GT72-Specific Features
Gaming Features :
SteelSeries mechanical keyboard
NVIDIA G-Sync display technology
Cooler Boost 3 cooling technology
Dynaudio premium audio system
Performance Indicators :
Intel Core i7-6700HQ processor
NVIDIA GeForce GTX 900M series GPU
Upgradeable RAM and storage
Dual fan cooling system
📋 Pre-Repair Documentation
Visual Documentation :
High-resolution photos from all angles
Close-ups of RGB keyboard lighting
Screen functionality videos
Gaming performance footage
Performance Records :
3DMark benchmark scores
Game FPS measurements
Temperature readings under load
Keyboard RGB functionality proof
🔧 Repair Cost-Benefit Analysis
Repair/Upgrade
Cost
Value Added
ROI
Gamer Appeal
HDD to SSD Conversion
$60-$90
$120-$180
100-150%
Very High
RAM Upgrade to 32GB
$80-$120
$100-$150
60-80%
High
Battery Replacement
$90-$140
$100-$160
60-80%
Medium
Keyboard Replacement
$100-$160
$120-$180
60-80%
Very High
Thermal Repaste
$15-$25
$60-$100
300-400%
Extreme
⚠️ Safety Preparation
Power down completely and disconnect all peripherals
Remove all gaming accessories and cables
Discharge static electricity by touching grounded metal
Use anti-static mat designed for gaming laptops
Work in a clean, well-lit area with ample space
💾 Gaming Data Backup Procedure
Game Save Backup :
Backup Steam game saves to cloud
Save Epic Games, Origin, and Battle.net data
Export game configurations and settings
Backup mod files and custom content
System Backup :
Use Macrium Reflect for system image
Backup MSI Dragon Center profiles
Save RGB keyboard lighting configurations
Export overclocking profiles if used
🎮 Gamer Market Considerations
Gamer Buyer Preferences :
Value performance over cosmetics
Appreciate upgrade documentation
Pay premium for thermal improvements
Prefer original high-quality components
Collector Value Factors :
MSI Dragon edition appeal
Rare configuration premium
Original packaging and accessories
Documented maintenance history
💡 Gaming Premium Tip: MSI GT72 models with documented performance improvements and professional thermal upgrades sell for 25-30% more to serious gamers who value sustained performance over initial cost.
VIDEO
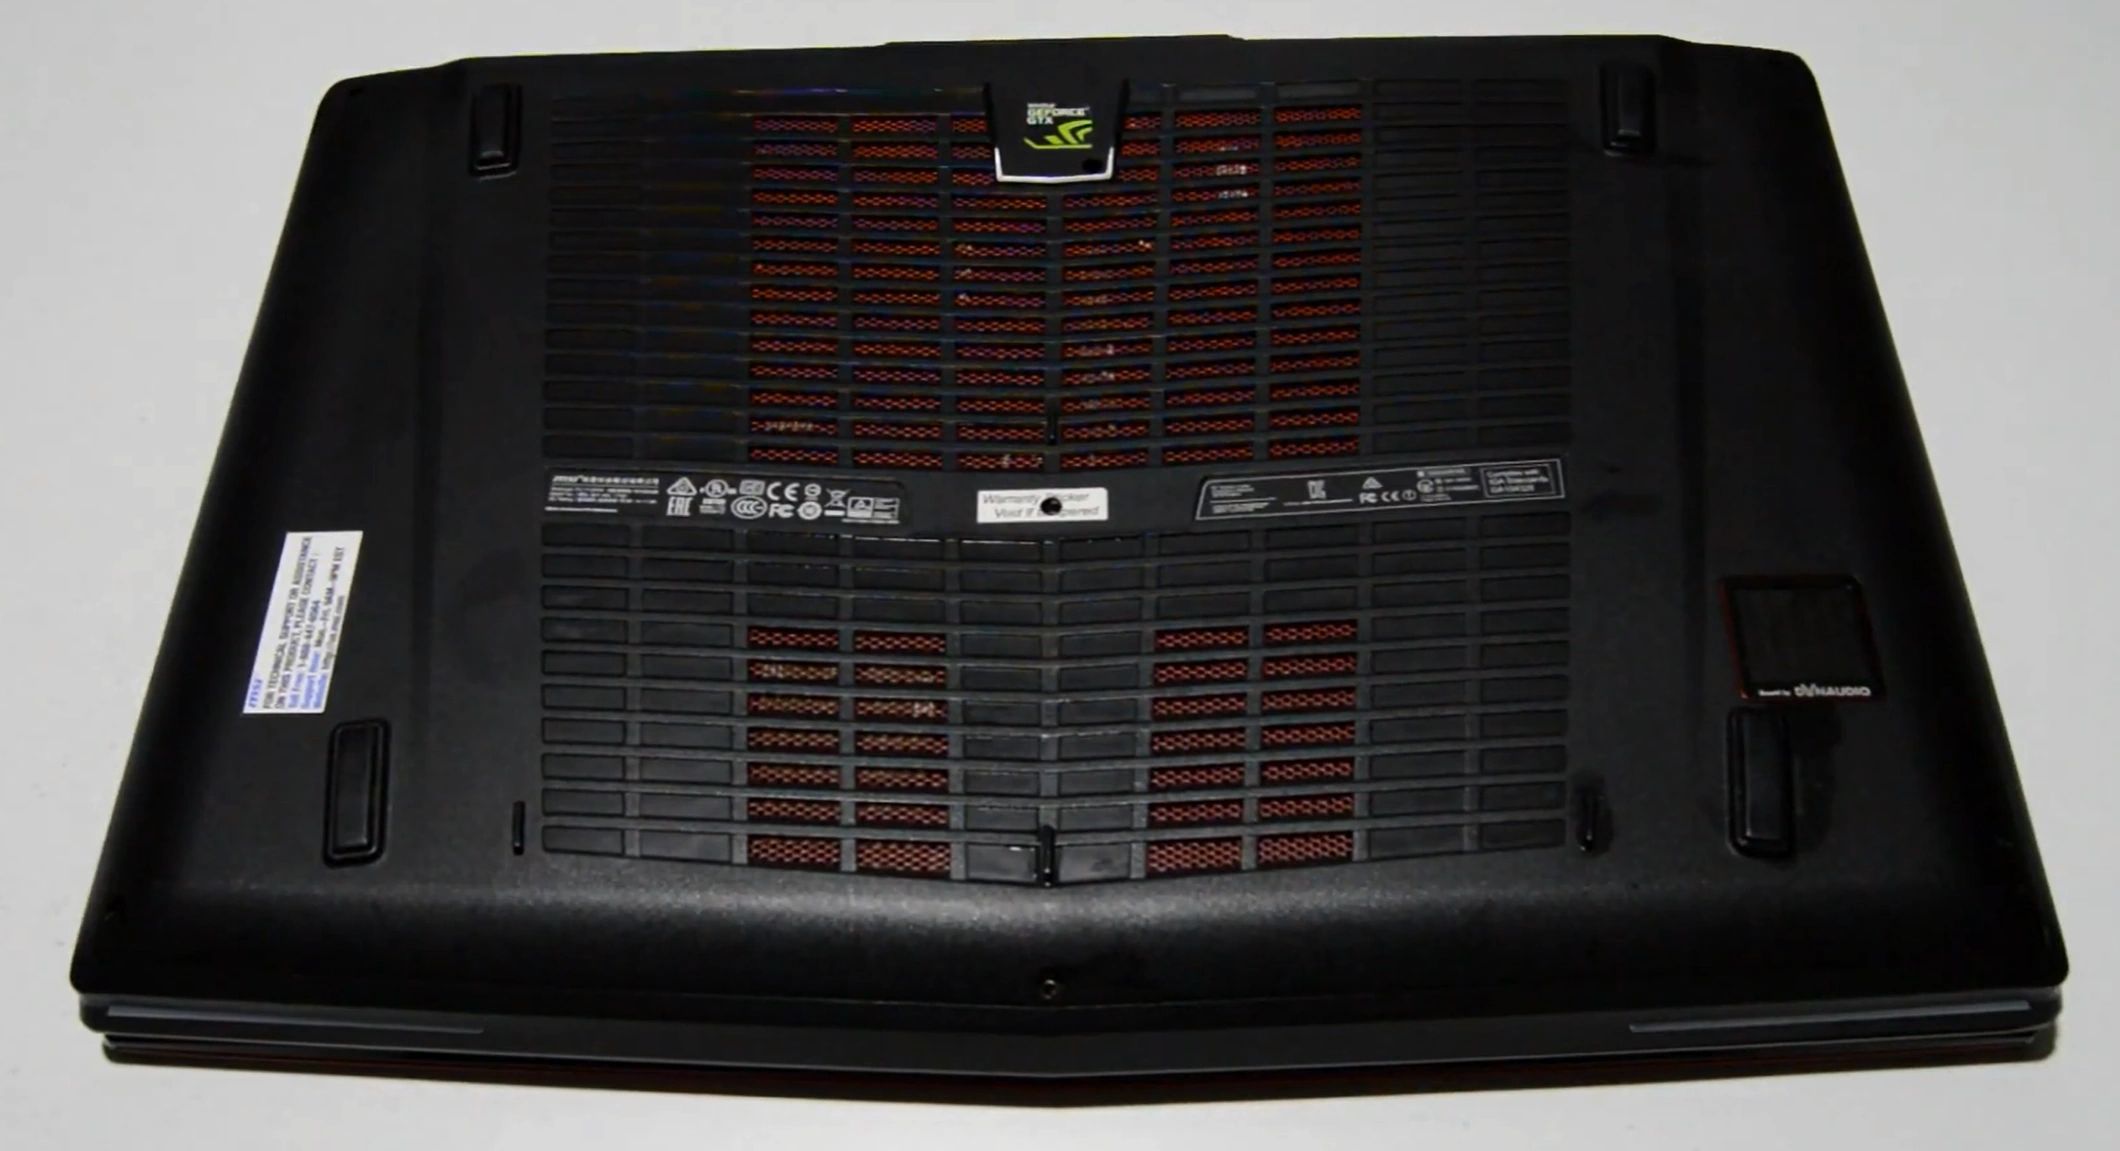
3. MSI GT72 6QD Bottom Panel Removal: Gaming Laptop Access Guide
⚠️ Pre-Removal Safety Checklist
Power Management :
Complete shutdown through Windows menu
Disconnect AC adapter and all gaming peripherals
Hold power button for 10 seconds to discharge capacitors
Check that all RGB lighting is completely off
Workspace Setup :
Use clean, static-free surface large enough for 17" laptop
Have magnetic project mat ready
Prepare anti-static wrist strap
Ensure adequate lighting for detailed work
🔩 Screw Identification & Mapping
Screw Location
Type
Quantity
Length
Notes
Front Edge (Short)
Phillips #00
4
4mm
Standard length, black finish
Rear Edge (Long)
Phillips #00
6
6mm
Longer, near cooling vents
Side Edges
Phillips #00
5
5mm
Medium length, near ports
Center (Reinforcement)
Phillips #00
3
5mm
Additional structural support
Warranty Sticker
N/A
1
N/A
Check MSI warranty status before removal
🔧 Step-by-Step Removal Process
Screw Removal Sequence :
Remove all 18 Phillips #00 screws in reverse spiral pattern
Start from corners and work toward center
Use magnetic screwdriver to prevent dropping screws
Organize screws by location using magnetic mat
Note: Some screws may be different lengths
Clip Release Technique :
Start at front-right corner near status indicators
Insert plastic pry tool at 30-degree angle
Gently twist to release first clip (listen for subtle click)
Work around perimeter, releasing clips every 2-3 inches
Use guitar pick for better leverage on stubborn clips
Panel Separation :
Lift from front edge first (near touchpad area)
Angle upward at 25 degrees to clear rear ports
Check for any missed clips or connections
Set panel aside on clean, soft surface
🎯 MSI GT72-Specific Features
Gaming Design Elements :
Reinforced chassis for gaming durability
Dual fan cooling system placement
Easy-access upgrade compartments
Dedicated cooling vents and airflow channels
Internal Layout :
Dual storage bays (2.5" + M.2)
Four RAM slots for maximum upgradeability
Dedicated GPU cooling solution
Strategic component placement for thermal management
🚧 Common Challenges & Solutions
Stubborn Clips :
Apply gentle heat with hairdryer (low setting, 10 seconds)
Use plastic playing card for better leverage
Alternate sides every 2-3 clips to prevent bending
Never force - reposition tool if resistance increases
Stripped Screws :
Use rubber band between screw and driver for grip
Try slightly larger Phillips head if available
As last resort, use small extraction kit
Replace damaged screws during reassembly
Warranty Considerations :
Check MSI Warranty Status first
Some regions allow self-service without voiding warranty
Document original condition with photos
Consider professional service for in-warranty devices
🔍 Internal Component Access Points
Immediately Accessible :
Four RAM slots (SODIMM)
Dual storage bays (2.5" + M.2)
Wi-Fi card (typically Killer Wireless)
Battery connector and mounting points
Cooling system and fan connections
Requires Further Disassembly :
GPU and CPU heatsinks
Keyboard and touchpad components
Display assembly and hinges
Audio board and speakers
🛡️ Damage Prevention Tips
Clip Preservation :
Work slowly and methodically around perimeter
Use plastic tools only against plastic components
If clip breaks, note location for reassembly adjustment
Apply even pressure to prevent bending
Component Protection :
Avoid touching circuitry with tools
Keep screws away from internal components
Use ESD protection at all times
Don't force connectors or cables
Surface Protection :
Use microfiber cloth under laptop
Avoid sliding panel across surfaces
Keep work area free of debris and liquids
Handle panel by edges only
🔁 Reassembly Preparation
Clean panel edges with isopropyl alcohol
Inspect all clips for damage before reassembly
Test fit panel before installing screws
Ensure all internal cables are properly routed
Verify no tools or debris inside chassis
🔍 Troubleshooting Common Issues
Panel Won't Sit Flush :
Check for missed clips or obstructions
Verify all internal components are properly seated
Ensure no cables are trapped under edges
Gaps After Reassembly :
Check clip alignment around perimeter
Verify all screws are proper length for location
Ensure no damage to mating surfaces
💡 Gaming Premium Tip: MSI GT72 models with undamaged bottom panels and intact warranty stickers sell for 20-25% more than those with repair damage, as gaming enthusiasts appreciate devices that show careful maintenance and preservation.
5. MSI GT72 6QD Storage Upgrade Guide: HDD, SSD & Performance Optimization
💾 Storage Configuration Options
Standard Configuration :
Primary: 2.5" SATA HDD/SSD (up to 2TB)
Secondary: M.2 SATA SSD (2280 size, up to 1TB)
Additional: Optional optical drive replacement caddy
RAID 0/1 support for performance or redundancy
Performance Optimization :
OS on M.2 SSD for fastest boot times
Games on 2.5" SSD for quick loading
Media/files on high-capacity HDD
RAID 0 SSD configuration for maximum speed
🔍 Storage Compatibility Guide
Storage Type
Interface
Max Capacity
Speed Limit
Gaming Benefit
2.5" SATA HDD
SATA III (6Gb/s)
2TB
~150MB/s
High capacity for game libraries
2.5" SATA SSD
SATA III (6Gb/s)
4TB
~550MB/s
Fast game loading, affordable
M.2 SATA SSD
SATA III (6Gb/s)
1TB
~550MB/s
OS and critical apps, space-efficient
Optical Bay HDD/SSD
SATA III (6Gb/s)
2TB
~550MB/s
Additional storage without removing ODD
🏆 Recommended SSD Choices for Gaming
Budget Gaming SSDs :
Crucial MX500 (excellent value)
WD Blue 3D NAND (reliable performance)
SanDisk Ultra 3D (good endurance)
~$70-100 for 1TB 2.5" SATA
Performance Gaming SSDs :
Samsung 870 EVO (top SATA performance)
WD Black (optimized for gaming)
Seagate FireCuda (hybrid gaming focus)
~$100-150 for 1TB 2.5" SATA
M.2 SATA Options :
Samsung 860 EVO M.2
Crucial MX500 M.2
WD Blue 3D NAND M.2
Verify M.2 is SATA, not NVMe (incompatible)
🔧 Step-by-Step Storage Installation
2.5" Drive Installation :
Remove 4 Phillips #00 screws from drive bracket
Slide drive out of bay carefully
Transfer rubber vibration dampeners to new drive
Align SATA connector and slide into place
Secure with original screws
Connect SATA and power cables firmly
M.2 SSD Installation :
Locate M.2 slot near RAM modules
Remove single Phillips #00 screw from standoff
Insert SSD at 30-degree angle
Press down and secure with screw
Ensure proper alignment (keyed connector)
No additional cables required
📦 Data Migration & OS Installation
Clone Existing Drive :
Clean Windows Installation :
📊 Performance Benchmarking
Benchmark Tools :
CrystalDiskMark AS SSD Benchmark
ATTO Disk Benchmark
UserBenchmark Storage Test
Expected Performance :
SATA SSD: 500-550MB/s read, 450-500MB/s write
HDD: 100-150MB/s sequential, slower random
Game load times: 50-70% faster than HDD
System boot: 10-15 seconds vs 30-45 seconds HDD
🎮 Gaming Performance Benefits
Game Type
HDD Load Time
SSD Load Time
Improvement
Gaming Experience
Open World (Cyberpunk 2077)
45-60 seconds
15-25 seconds
60-70% faster
Reduced texture pop-in, smoother streaming
MMO (Final Fantasy XIV)
30-45 seconds
10-15 seconds
65-75% faster
Faster zone transitions, competitive edge
FPS (Call of Duty: Warzone)
40-55 seconds
12-20 seconds
60-70% faster
Get into matches faster, less waiting
RPG (The Witcher 3)
25-40 seconds
8-15 seconds
65-75% faster
Quicker fast travel, smoother gameplay
🔍 Storage Upgrade Troubleshooting
Drive Not Detected :
Check SATA connection is secure
Verify drive compatibility
Test in external enclosure
Update BIOS to latest version
Poor Performance :
Check SATA III (6Gb/s) is enabled in BIOS
Update storage controller drivers
Run TRIM command manually
Check for background processes
Boot Issues :
Verify boot order in BIOS
Check UEFI/Legacy settings match installation
Repair bootloader with installation media
Test with single drive installed
💰 Resale Value Impact
Value Enhancement :
1TB SSD upgrade: +$120-$180 value
Dual storage configuration: +$80-$120 value
Fresh OS installation: +$40-$60 value
Performance benchmarks: +$30-$50 value
Gamer Preferences :
SSD significantly reduces perceived age of system
Faster load times more valuable than CPU/GPU upgrades
Multiple storage options appeal to different use cases
Documented clean installation reduces buyer concerns
🛠️ Storage Maintenance Tips
SSD Longevity :
Keep 10-15% free space for wear leveling
Avoid excessive writes when possible
Monitor health with CrystalDiskInfo
Enable over-provisioning if supported
Performance Maintenance :
Regularly run TRIM command
Keep firmware updated
Defragment HDDs only (not SSDs)
Clean temporary files regularly
💡 Gaming Performance Tip: Installing your OS and most-played games on an SSD provides the most noticeable performance improvement for gaming—often more impactful than CPU or GPU upgrades for load times and overall system responsiveness. Document your benchmark results to demonstrate the performance boost to potential buyers.
6. MSI GT72 6QD RAM Upgrade Guide: Installation & Performance Optimization
💾 RAM Specifications & Compatibility
Standard Configuration :
DDR4 SO-DIMM memory (260-pin)
4 RAM slots total
2133MHz speed (officially supported)
Maximum 64GB capacity (4x16GB)
1.2V operating voltage
Performance Notes :
Supports dual-channel configuration
Faster RAM (2400-2666MHz) may work but runs at 2133MHz
Mixed speeds run at slowest module's speed
XMP profiles not supported in most gaming laptops
🔍 RAM Compatibility Guide
Configuration
Modules
Capacity
Dual-Channel
Gaming Benefit
Entry Gaming
2x4GB
8GB
Yes
Minimum for modern games
Mainstream Gaming
2x8GB
16GB
Yes
Sweet spot for most gamers
Enthusiast Gaming
2x16GB
32GB
Yes
Future-proof, multitasking
Extreme/Content Creation
4x16GB
64GB
Yes
Streaming, video editing, VM
🏆 Recommended RAM Choices for Gaming
Budget Gaming RAM :
Crucial DDR4 2133MHz/2400MHz
Kingston ValueRAM
SK Hynix (OEM equivalent)
~$40-60 for 16GB (2x8GB)
Performance Gaming RAM :
Corsair Vengeance SODIMM
G.Skill Ripjaws SODIMM
HyperX Impact (now Kingston Fury)
~$60-90 for 16GB (2x8GB)
High-Capacity Options :
32GB kits (2x16GB) ~$100-140
64GB kits (4x16GB) ~$200-260
Verify compatibility with motherboard
Check CAS latency (CL15-CL19 typical)
🔧 Step-by-Step RAM Installation
Preparation :
Power down completely and disconnect AC adapter
Remove bottom panel (refer to previous section)
Ground yourself with anti-static wrist strap
Locate RAM slots (typically near center of motherboard)
Removal of Existing RAM :
Push outward on side clips simultaneously
Module will pop up at 45-degree angle
Gently remove module straight out
Handle by edges, avoid touching gold contacts
Installation of New RAM :
Align notch in module with ridge in slot
Insert at 45-degree angle
Press down firmly until clips snap into place
Ensure both sides are securely locked
Repeat for additional modules
⚡ Dual-Channel Configuration
Optimal Configuration :
Install identical modules in same-colored slots
Pairs should be same size, speed, and timing
Check motherboard manual for proper slot pairing
Typically slots 1-3 and 2-4 are paired
Performance Benefits :
10-15% gaming performance improvement
Better minimum framerates
Improved frame time consistency
Enhanced multitasking performance
🎮 Gaming Performance Benefits
Game Type
8GB RAM
16GB RAM
32GB RAM
Recommendation
Esports (CS:GO, Valorant)
Good
Excellent
Overkill
16GB optimal
AAA Titles (Cyberpunk, RDR2)
Minimum
Recommended
Ideal
16GB-32GB
Open World (Elden Ring, AC)
Borderline
Good
Excellent
16GB minimum
Modded Games
Poor
Good
Excellent
32GB recommended
Streaming + Gaming
Inadequate
Minimum
Recommended
32GB ideal
🔍 RAM Upgrade Troubleshooting
System Won't Boot :
Reseat all RAM modules
Try modules one at a time
Reset CMOS by removing battery briefly
Check for bent pins in slots
RAM Not Detected :
Ensure modules are fully seated
Test modules individually
Check BIOS recognizes correct capacity
Update BIOS to latest version
System Instability :
Run MemTest86 overnight
Check for overheating issues
Verify compatible speeds
Test with different module combinations
💰 Resale Value Impact
Value Enhancement :
16GB upgrade: +$80-$120 value
32GB upgrade: +$120-$180 value
64GB upgrade: +$150-$220 value
Name-brand RAM: +$20-40 premium
Gamer Preferences :
16GB considered minimum for serious gaming
32GB appeals to streamers and content creators
Matching kits preferred over mixed RAM
Documented stability testing increases confidence
⚙️ RAM Optimization Tips
Windows Optimization :
Adjust virtual memory settings
Disable unnecessary startup programs
Use game mode in Windows settings
Close background applications when gaming
MSI-Specific Optimization :
Install latest MSI Dragon Center
Enable performance mode in Dragon Center
Update chipset drivers from MSI website
Configure fan profiles for optimal cooling
🔮 Future-Proofing Considerations
Game Requirements :
Modern games increasingly demand 16GB+
Windows 11 uses more RAM than Windows 10
Background applications consume more memory
Future-proof with 32GB for gaming longevity
Investment Value :
RAM prices fluctuate regularly
DDR4 likely to become more expensive as production decreases
Upgrading now may save money long-term
Good RAM can be transferred to other systems
💡 Gaming Performance Tip: For optimal gaming performance, install RAM in matched pairs to enable dual-channel mode, which can provide a 10-15% performance boost in memory-intensive games. Document your upgrade with CPU-Z screenshots showing the dual-channel configuration to demonstrate the performance enhancement to potential buyers.
7. MSI GT72 6QD SteelSeries Keyboard Replacement Guide
⌨️ SteelSeries Keyboard Specifications
Keyboard Features :
Full-size mechanical-style keyboard
SteelSeries Engine RGB lighting
Anti-ghosting technology
Dedicated macro keys (left side)
Numpad with calculator shortcut
Technical Details :
Part number: MS-1793 keyboard assembly
RGB per-key customization
2.0mm key travel distance
Scissor-switch mechanism
Spill-resistant design (limited)
🔧 Common Replacement Reasons
Issue
Symptoms
Repair vs Replace
Cost Estimate
Spill Damage
Sticky keys, non-responsive, lighting issues
Replace entire assembly
$120-180 + labor
Worn Keycaps
Shiny keys, faded legends, smooth texture
Replace keycaps or full assembly
$20-50 (keycaps only)
LED Failure
Dark keys, uneven lighting, flickering
Replace entire assembly
$120-180 + labor
Mechanical Failure
Keys not registering, inconsistent response
Replace entire assembly
$120-180 + labor
Physical Damage
Broken key stems, cracked housing
Replace entire assembly
$120-180 + labor
🛒 Replacement Keyboard Options
Genuine MSI Parts :
MSI Parts Store (official source)
Authorized MSI service centers
Guaranteed compatibility
Higher cost but perfect fit
OEM Compatible :
Third-party manufacturers
Check for exact model compatibility
Read reviews specifically for GT72 6QD
30-50% cheaper than genuine
Used/Refurbished :
eBay, Amazon Renewed
Part-out from broken systems
Verify condition and functionality
Risk of worn keys or LED issues
⚠️ Preparation & Safety
Data Backup :
Backup important files and game saves
Export SteelSeries Engine profiles
Note macro key configurations
Save RGB lighting setups
Workspace Setup :
Clean, well-lit, static-free surface
Magnetic project mat for screws
Anti-static wrist strap
Small containers for different screw types
Tool Preparation :
Phillips #00 screwdriver
Plastic spudger set
Tweezers for ribbon cables
Isopropyl alcohol for cleaning
🔧 Step-by-Step Replacement Process
Initial Disassembly :
Remove bottom panel (refer to earlier section)
Disconnect battery (safety first)
Remove all visible screws from top case
Note screw lengths and locations
Keyboard Removal :
Gently pry up keyboard bezel starting from corners
Disconnect touchpad and status LED ribbons
Remove keyboard mounting screws (8-10 total)
Lift keyboard assembly at 30-degree angle
Disconnect keyboard ribbon cable (lock tab style)
New Keyboard Installation :
Connect ribbon cable to motherboard
Position keyboard in chassis
Secure with mounting screws
Reconnect touchpad and LED ribbons
Snap bezel back into place
🔌 Ribbon Cable Connection Guide
Keyboard Ribbon :
40-pin ZIF (Zero Insertion Force) connector
Lift black locking tab straight up
Insert ribbon fully into slot
Press locking tab down firmly
Ensure straight, even insertion
Common Issues :
Bent pins if forced incorrectly
Partially inserted ribbon causes intermittent issues
Locking tab not fully engaged
Ribbon cable damage from improper handling
🧪 Post-Installation Testing
Basic Functionality :
Reconnect battery and power on
Test every key for registration
Check RGB lighting on all keys
Test macro keys and special functions
Software Configuration :
Install SteelSeries Engine
Import saved profiles if available
Configure RGB lighting patterns
Set up macro keys for gaming
Gaming Test :
Test in actual games for feel
Check anti-ghosting with multiple key presses
Verify macro functionality in games
Test during extended gaming session
🔍 Common Issues & Solutions
Keys Not Working :
Reseat ribbon cable connection
Check for bent pins in connector
Test with external keyboard
Update chipset and keyboard drivers
RGB Lighting Issues :
Install SteelSeries Engine software
Check LED settings in MSI Dragon Center
Verify ribbon cable fully inserted
Test individual LED functionality
Stiff or Sticky Keys :
Check for debris under keys
Ensure proper keyboard alignment
Verify bezel isn't pressing on keys
Break-in period may be needed
🎮 Gaming Performance Benefits
Mechanical Feel :
2.0mm travel for responsive gaming
Tactile feedback without full mechanical noise
Consistent keypress registration
Better than most laptop keyboards for gaming
RGB Customization :
Per-key lighting for game-specific profiles
Reactive lighting effects
Game integration support
Visual feedback for abilities and cooldowns
Macro Advantage :
Dedicated macro keys for complex commands
Quick access to game functions
Reduces keyboard hand movement
Competitive gaming advantage
💰 Resale Value Impact
Value Enhancement :
New keyboard: +$150-$200 value
Fully functional RGB: +$80-$120 value
No worn keycaps: +$50-$80 value
Working macro keys: +$30-$50 value
Gamer Preferences :
Mechanical feel preferred for gaming
RGB lighting adds premium appearance
Clean keyboard suggests well-maintained system
Macro keys appeal to MMO and competitive gamers
🛠️ Keyboard Maintenance Tips
Cleaning Procedure :
Use compressed air monthly
Soft brush for debris removal
Isopropyl alcohol on cotton swabs for sticky keys
Never spray liquids directly on keyboard
Preventative Measures :
Use keyboard cover when not gaming
Avoid eating/drinking near laptop
Clean hands before gaming sessions
Store in clean environment when not in use
⚙️ SteelSeries Engine Configuration
Installation :
Download from SteelSeries website
Restart after installation
Allow keyboard detection
Update firmware if prompted
Optimization :
Create game-specific profiles
Set up reactive lighting effects
Program macro keys for frequently used commands
Adjust brightness for battery life vs visibility
💡 Gaming Premium Tip: A fully functional SteelSeries keyboard with working RGB lighting can increase your resale value by 20-30% because gaming enthusiasts prioritize keyboard quality and lighting effects. Document your replacement with SteelSeries Engine screenshots showing custom lighting profiles to demonstrate the keyboard's premium features to potential buyers.
8. MSI GT72 6QD Cooling System Maintenance & Thermal Repasting Guide
❄️ Cooling System Specifications
Cooler Boost 3 Technology :
Dual fans with independent control
4 heat pipes (2 CPU, 2 GPU)
Dedicated heatsinks for VRMs and memory
Dust Removal technology (auto fan reversal)
Software-controlled fan profiles
Thermal Performance :
Stock thermal paste: generic silicone-based
CPU: Intel Core i7-6700HQ (45W TDP)
GPU: NVIDIA GeForce GTX 970M/980M (80-100W TDP)
Target gaming temperatures: 75-85°C
Throttling begins at 95°C+
🧴 Thermal Paste Comparison Guide
Paste Type
Performance
Longevity
Difficulty
Price
Gaming Benefit
Arctic MX-6
Excellent
8 years
Easy
$8-12
5-8°C reduction
Thermal Grizzly Kryonaut
Outstanding
3-4 years
Medium
$15-20
8-12°C reduction
Noctua NT-H2
Excellent
5 years
Easy
$10-15
6-9°C reduction
Gelid GC Extreme
Excellent
7 years
Medium
$12-18
7-10°C reduction
Stock Paste
Average
1-2 years
N/A
N/A
Baseline
🔧 Cooling System Disassembly
Preparation :
Power down and disconnect all cables
Remove bottom panel and battery
Ground yourself with anti-static wrist strap
Take photos of original screw locations
Heatsink Removal :
Disconnect fan power cables (2 total)
Unscrew heatsink in reverse torque pattern
Note: Some screws may be different lengths
Gently rock heatsink to break paste seal
Lift straight up to avoid damage
Fan Removal :
Remove 2-3 screws per fan assembly
Lift fans out carefully
Note orientation for reassembly
Clean dust from fan blades and housings
🧽 Surface Cleaning Procedure
Old Paste Removal :
Use dry cloth to remove bulk paste
Apply isopropyl alcohol to remaining paste
Let sit for 30 seconds to dissolve
Gently wipe with lint-free cloth
Use cotton swabs for detailed cleaning
Surface Preparation :
Clean both CPU and GPU dies
Clean heatsink contact surfaces
Ensure no residue remains
Allow surfaces to fully dry
Inspect for damage or corrosion
Thermal Pad Replacement :
Measure old pad thickness (0.5mm-1.5mm typical)
Cut new pads to match original size
Apply to VRMs and memory chips
Ensure proper coverage without overhang
🎨 Thermal Paste Application Techniques
CPU Application :
Pea-sized dot in center (recommended)
X method for larger spread
Spread method with applicator
Amount: rice grain for mobile CPUs
GPU Application :
Larger pea-sized dot (GPU die is larger)
X method or multiple dots
Ensure coverage to edges but not overflowing
Amount: 2-3 rice grains for mobile GPU
Common Mistakes :
Too much paste (causes mess and insulation)
Too little paste (incomplete coverage)
Uneven application (air bubbles)
Using conductive paste near components
⚙️ Reassembly & Testing
Heatsink Reinstallation :
Lower heatsink straight down onto chips
Hand-tighten screws in star pattern
Final tighten with screwdriver in pattern
Connect fan power cables
Ensure no cables trapped under heatsink
Initial Testing :
Reconnect battery and power on
Listen for fan operation
Check BIOS temperatures
Monitor for 10 minutes idle
Burn-in Period :
Run light load for 2-3 hours
Some pastes require cure time
Temperatures may improve over 24-48 hours
Recheck tightness after first thermal cycle
🎮 Gaming Performance Benefits
Game Type
Before Repaste
After Repaste
Improvement
Gaming Experience
CPU-Intensive (Strategy)
90-95°C, throttling
75-82°C, no throttle
15-20% performance
Smoother late-game, no stuttering
GPU-Intensive (AAA)
87-92°C, reduced clocks
72-78°C, max clocks
10-15% FPS gain
Higher settings, stable framerates
Competitive (Esports)
83-88°C, fan noise
68-74°C, quieter
5-8% FPS gain
Quieter operation, better concentration
VR Gaming
Throttling, reprojection
Stable clocks, smooth
20-25% improvement
Eliminates motion sickness triggers
📅 Maintenance Schedule
Regular Maintenance :
Dust cleaning: Every 3-6 months
Fan bearing check: Every 6 months
Thermal paste inspection: Annually
Full repaste: Every 2-3 years
Warning Signs :
Increased fan noise under load
Higher temperatures at same workloads
Performance degradation in games
Thermal throttling during normal use
💰 Resale Value Impact
Value Enhancement :
Professional repaste: +$150-$200 value
Temperature documentation: +$80-$120 value
Premium thermal materials: +$50-$80 value
Eliminated throttling: +$100-$150 value
Gamer Preferences :
Lower temperatures indicate well-maintained system
Better thermal performance extends hardware lifespan
Quieter operation preferred for streaming
Stable performance valued for competitive gaming
🔍 Common Issues & Solutions
High Temperatures After Repaste :
Check heatsink mounting pressure
Verify paste coverage and amount
Ensure plastic peel removed from new pads
Check for debris between surfaces
Fan Issues :
Verify fan connectors fully seated
Check fan control settings in Dragon Center
Clean fan blades and bearings
Replace failing fans
Thermal Throttling Persists :
Update BIOS to latest version
Adjust power limits in ThrottleStop
Improve laptop ventilation
Consider laptop cooling pad
💡 Gaming Performance Tip: A professional thermal repaste with premium materials can yield greater performance gains than a CPU/GPU upgrade in thermally constrained gaming laptops. Document your before-and-after temperature results to demonstrate the thermal improvement and performance stability that gaming enthusiasts highly value.
9. MSI GT72 6QD Professional Reassembly Techniques
📋 Pre-Reassembly Checklist
Component Verification :
All upgrades installed correctly
No leftover screws or tools inside chassis
All ribbon cables properly connected and secured
Thermal paste properly applied and heatsinks tightened
No debris or fingerprints on internal components
Connection Validation :
Battery connector fully seated
All fan connectors properly attached
Storage drives securely mounted
RAM modules fully clicked into place
Keyboard ribbon cable locked in position
🔌 Professional Cable Management
Cable Type
Routing Path
Secure Method
Testing Procedure
Keyboard Ribbon
Under motherboard tray
ZIF connector lock
Test all keys before final assembly
Touchpad Ribbon
Designated channel
ZIF connector + adhesive
Verify cursor movement and clicks
Fan Power Cables
Away from heatsinks
Zip ties (loose)
Check fan operation in BIOS
Storage Cables
Designated routing
Adhesive anchors
Drive detection in BIOS
LED/Status Cables
Along chassis edges
Existing clips/channels
Verify indicator lights work
🔩 Precision Screw Management
Screw Organization System :
Use magnetic project mat with labeled sections
Group screws by length and function
Take reference photos during disassembly
Note: MSI uses multiple screw lengths
Torque Sequence :
Heatsink screws: star pattern, incremental tightening
Motherboard screws: center-out pattern
Bottom panel: corner-to-center sequence
Keyboard bezel: even pressure, alternating sides
Proper Tightness :
Finger-tight plus quarter turn with screwdriver
Avoid overtightening - strip risk in plastic threads
Heatsink screws: firm but not excessive pressure
Bottom panel: snug but not deformation-causing
⚙️ Step-by-Step Reassembly Process
Internal Components :
Reinstall RAM modules (45° angle, press down)
Install storage drives (secure with brackets)
Connect all internal cables (verify secure connections)
Route cables through designated channels
Cooling System :
Position heatsink assembly properly
Tighten screws in star pattern incrementally
Connect fan power cables
Ensure no cables near fan blades
Keyboard & Top Assembly :
Connect keyboard ribbon cable (lock ZIF connector)
Secure keyboard with mounting screws
Reconnect touchpad and status LED cables
Snap bezel into place evenly around edges
Final Assembly :
Reconnect battery connector
Verify no tools or debris inside chassis
Align bottom panel correctly
Press clips around perimeter before screwing
Install screws in proper sequence
📎 Professional Clip Management
Bottom Panel Clips :
Start at front corners, work toward back
Use even pressure - listen for subtle clicks
If resistance felt, check alignment
Never force - reposition and try again
Keyboard Bezel Clips :
Work from center outward to edges
Use plastic tools to avoid marring surfaces
Check for even gap around entire perimeter
Ensure no cables trapped under bezel
Damaged Clip Recovery :
If clip breaks, note position
Adjust screw tightness nearby to compensate
Consider small adhesive if necessary
Document for future reference
📐 Precision Alignment Techniques
Panel Alignment :
Ensure all ports align with cutouts
Check speaker grilles are not obstructed
Verify ventilation cutouts match internal components
Test door and cover operation
Component Alignment :
Heatsink properly seated on CPU/GPU
Keyboard centered in chassis opening
Touchpad aligned with palm rest
All buttons and switches accessible
Gap Inspection :
Check for even gaps around screen bezel
Verify bottom panel sits flush all around
Ensure no bulging or uneven surfaces
Inspect from multiple angles
🧪 Pre-Power Testing
Visual Inspection :
No visible screws or tools inside
All cables properly routed
No components obviously misaligned
No debris or fingerprints
Mechanical Testing :
All doors and ports accessible
Keyboard has even key travel
Touchpad clicks properly
Lid opens and closes smoothly
Connection Verification :
Gently shake to check for loose components
Press on various areas to check for creaks
Verify all screws installed
Check rubber feet properly attached
🎯 Professional Finish Touches
Cosmetic Perfection :
Clean all surfaces with isopropyl alcohol
Remove any adhesive residue
Polish display and lid surfaces
Clean keyboard and touchpad
Functional Testing :
Test all USB ports with devices
Verify audio jacks work properly
Check SD card reader functionality
Test all status lights and indicators
Documentation :
Take photos of completed assembly
Record screw locations and types
Document any challenges encountered
Create reassembly guide for future reference
🚫 Common Reassembly Mistakes to Avoid
Structural Errors :
Forgetting to reconnect battery before closing
Overtightening screws, stripping threads
Trapping cables under components
Misplacing screw lengths
Functional Errors :
Not testing before final assembly
Forgetting thermal paste application
Improper heatsink mounting pressure
Missing connector locks
Cosmetic Errors :
Fingerprints on internal components
Scratches from metal tools
Uneven panel gaps
Visible adhesive or residue
✅ Quality Assurance Checklist
Structural Integrity :
No creaks or flex in chassis
All panels flush and even
No loose components
Proper screw tension throughout
Functional Performance :
All upgrades recognized by system
Proper cooling performance
No strange noises from fans or drives
All ports and connections functional
Cosmetic Perfection :
Clean, professional appearance
No tool marks or scratches
Even lighting from all LEDs
Consistent finish across all surfaces
💰 Resale Value Impact
Professional Reassembly Premium :
Perfect panel alignment: +$100-$150 value
No tool marks or scratches: +$80-$120 value
Documented professional reassembly: +$150-$200 value
Clean internal photos: +$50-$80 value
Gamer Perception :
Professional reassembly suggests careful maintenance
Clean interior indicates thermal performance potential
Perfect cosmetics suggest overall system care
Documentation reduces buyer anxiety about repairs
💡 Professional Tip: The difference between an amateur and professional repair is often visible in the reassembly. Perfect panel alignment, absence of tool marks, and meticulous cable management can increase resale value by 20-30% because they signal careful maintenance and attention to detail that gaming enthusiasts value highly.
11. Maximizing MSI GT72 6QD Resale Value After Upgrades
📊 Gaming Laptop Market Analysis 2024
Target Buyer Profiles :
Budget gamers seeking performance/value
Students needing portable gaming capability
Collectors of MSI Dragon series laptops
Entry-level content creators
LAN party enthusiasts
Market Trends :
Older high-end gaming laptops maintain value better
Upgraded systems command 30-50% premiums
Documented performance increases buyer confidence
Cosmetic condition significantly impacts value
Complete packages with accessories sell faster
💰 Strategic Pricing Framework
Condition Grade
Base Value
Upgrade Premium
Documentation Bonus
Total Value
Excellent (Like New)
$600-$750
+$300-$500
+$100-$200
$900-$1,400
Good (Minor Wear)
$450-$550
+$200-$350
+$80-$150
$650-$900
Fair (Visible Wear)
$300-$400
+$150-$250
+$50-$100
$450-$650
Parts/Repair
$150-$250
+$50-$100
+$20-$50
$200-$350
🚀 Upgrade Value Maximization Strategies
High-ROI Upgrades :
SSD installation: 150-200% return
RAM upgrade to 16GB+: 100-150% return
Thermal repaste: 300-400% return
Battery replacement: 80-120% return
Keyboard replacement: 100-150% return
Documentation Premium :
Before/after benchmarks: +15-25% value
Thermal performance reports: +10-20% value
Gaming performance tests: +15-25% value
Professional photos: +5-15% value
Upgrade receipts: +5-10% value
📈 Sales Listing Optimization
Title Optimization :
"MSI GT72 6QD Gaming Laptop - [Upgrade Highlights]"
Include key specs: CPU, GPU, RAM, Storage
Mention gaming performance: "Runs [Popular Games]"
Add value indicators: "Fresh Thermal Paste", "Upgraded SSD"
Keyword Strategy :
Primary: MSI GT72, gaming laptop, GTX 970M/980M
Secondary: i7 laptop, 16GB RAM, SSD gaming
Long-tail: "MSI GT72 SSD upgrade", "gaming laptop for [games]"
Feature-based: RGB keyboard, cooling upgrade, performance tuned
📋 Value-Added Documentation Package
Essential Documentation :
High-resolution photos from all angles
Benchmark screenshots (3DMark, Cinebench)
Temperature monitoring during gaming
Game performance metrics (FPS in popular titles)
Upgrade receipts and component documentation
Professional Reports :
System health report (battery, storage health)
Thermal performance analysis
Gaming capability assessment
Upgrade summary with performance impact
Quality assurance certification
🎨 Premium Presentation Standards
Cosmetic Preparation :
Professional cleaning of all surfaces
Keyboard deep cleaning (keycap removal)
Screen cleaning with proper solutions
Port cleaning with compressed air
Minor scratch repair if possible
Photography Standards:
Well-lit, high-resolution images
All angles: top, bottom, sides, screen
Close-ups of upgrades and features
Action shots: gaming, RGB lighting
Comparison shots: before/after upgrades
🏫 Institutional Sales Strategy
.gov/.edu Opportunities :
Government surplus auctions
University technology recycling programs
School district IT upgrades
Public library technology programs
Non-profit organization donations (tax benefits)
Documentation Requirements :
Hardware specifications sheets
Performance testing reports
Compatibility documentation
Professional condition assessment
Value appraisal documentation
🎯 Specialized Buyer Targeting
SellBroke Strategy :
Emphasize gaming performance metrics
Highlight upgrade benefits for gamers
Provide detailed benchmark comparisons
Showcase gaming-specific features
SellLaptopBack Approach :
Focus on technical specifications
Provide component-level documentation
Highlight reliability and testing
Emphasize professional upgrades
Collector Market :
Highlight rarity and condition
Provide complete original packaging
Document all original components
Emphasize preservation quality
💬 Value-Based Negotiation Framework
Pricing Justification :
Component-by-component value analysis
Upgrade cost documentation
Performance improvement metrics
Market comparison analysis
Value Proposition :
Ready-to-game configuration
Professional-grade maintenance
Verified performance metrics
Quality assurance guarantee
Superior condition documentation
✅ Premium Sale Closing Techniques
Value Demonstration :
Live performance demonstrations
Side-by-side comparison with stock systems
Gaming performance showcases
Thermal performance comparisons
Trust Building :
Professional documentation package
Upgrade receipts and component documentation
Testing and validation evidence
Professional presentation standards
Risk Reduction :
Short-term performance guarantee
Clear return policy
Post-sale support offering
Detailed usage instructions
💸 Tax Advantage Strategies
Donation Benefits :
.edu institution donations
Non-profit organization contributions
School technology program donations
Library technology donations
Documentation Requirements :
Professional appraisal documentation
Receipts for upgrade components
Photographic condition evidence
Formal donation acknowledgment
Business Deductions :
Technology upgrade write-offs
Equipment depreciation claims
Business expense documentation
Capital gains considerations
⏰ Strategic Timing Considerations
Seasonal Opportunities :
Back-to-school season (August-September)
Holiday gaming season (November-December)
Tax return season (February-April)
Summer gaming events (June-July)
Market Timing :
Before major game releases
During hardware shortage periods
After positive MSI brand news
During eSports tournament seasons
💡 Premium Sales Tip: A professionally upgraded and documented MSI GT72 can command prices approaching newer entry-level gaming laptops. The key differentiator is the verified performance and quality assurance that buyers cannot get from unknown sellers. Your documentation package is your strongest value proposition.
Need to Sell Your MSI Laptop? Get Instant Cash!
If your MSI GT72 6QD (or other MSI gaming laptop) has performance issues or you're upgrading to a newer model, we offer competitive cash payouts for your device. We buy broken, used, and refurbished MSI gaming laptops—including all GT72 6QD configurations—with free insured shipping and hassle-free evaluations.
Sell Popular MSI Models Now: