How to Disassemble ThinkPad X1 Carbon Gen 8: DIY Repair & RAM/SSD Upgrade at Home
Pre-Disassembly: ThinkPad Assessment & Value Maximization Essential Tools for ThinkPad Repair Bottom Case Removal Process Battery Replacement & Disconnection NVMe SSD Upgrade Guide Thermal System Maintenance & Repasting Keyboard & Top Case Access Professional Reassembly Techniques Post-Repair Testing & Diagnostics Maximizing Resale Value After Upgrade
1. ThinkPad X1 Carbon Gen 8 ThinkPad X1 Carbon Gen 8 Pre-Disassembly: Assessment & Value Maximization
💰 2024 ThinkPad Market Valuation
Condition Grade
Specification Impact
Value Range
Business Premium
Excellent (Like New)
i7, 16GB, 1TB SSD
$800-$1000
+20% for corporate buyers
Good (Minor Wear)
i5, 16GB, 512GB SSD
$600-$750
+15% for business use
Fair (Visible Wear)
i5, 8GB, 256GB SSD
$400-$550
+10% with documentation
For Parts/Repair
Any configuration
$150-$300
Minimal business premium
🎯 ThinkPad-Specific Value Factors
Business Features :
dTPM 2.0 security chip
Intel vPro capability (select models)
Webcam privacy shutter
Fingerprint reader functionality
Build Quality Indicators :
Carbon fiber lid condition
Keyboard wear (key shine)
TrackPoint cap condition
Rubberized coating integrity
📋 Pre-Repair Documentation Protocol
Visual Documentation :
High-resolution photos from all angles
Close-ups of serial number and model information
Keyboard wear documentation
Screen functionality videos
Performance Records :
Battery health report with cycle count
SSD health and remaining lifespan
Benchmark scores (Cinebench, CrystalDiskMark)
Thermal performance under load
🔧 Cost-Benefit Upgrade Analysis
Upgrade
Cost
Value Added
ROI
Business Impact
512GB → 1TB SSD
$80-$100
$150-$200
80-100%
High (storage needs)
Battery Replacement
$90-$120
$100-$150
60-80%
Very High (mobility)
Keyboard Replacement
$60-$90
$75-$100
40-60%
Medium (cosmetic)
Thermal Repaste
$10-$20
$50-$75
200-300%
High (performance)
⚠️ ThinkPad-Specific Safety Preparation
Power down completely and disconnect AC adapter
Remove all peripherals and docking station connections
Enable built-in discharge function (if available)
Use anti-static mat designed for business laptops
Document screw locations with ThinkPad-specific diagram
💾 Business Data Backup Procedure
Cloud Backup :
OneDrive for Business integration
Enterprise cloud storage solutions
Encrypted backup protocols
Local Backup :
Lenovo Recovery Media creation
System image to external drive
BIOS configuration backup
🏢 Business Market Considerations
Corporate Buyer Preferences :
Prefer original Lenovo parts
Value comprehensive documentation
Pay premium for excellent condition
Require professional presentation
IT Department Expectations :
Clean device management history
BIOS settings reset to default
All security features functional
Compatibility with enterprise software
💡 Business Premium Tip: ThinkPads with documented repair history and professional-grade upgrades sell for 25-30% more to corporate buyers who value reliability and maintenance records over initial cost savings.
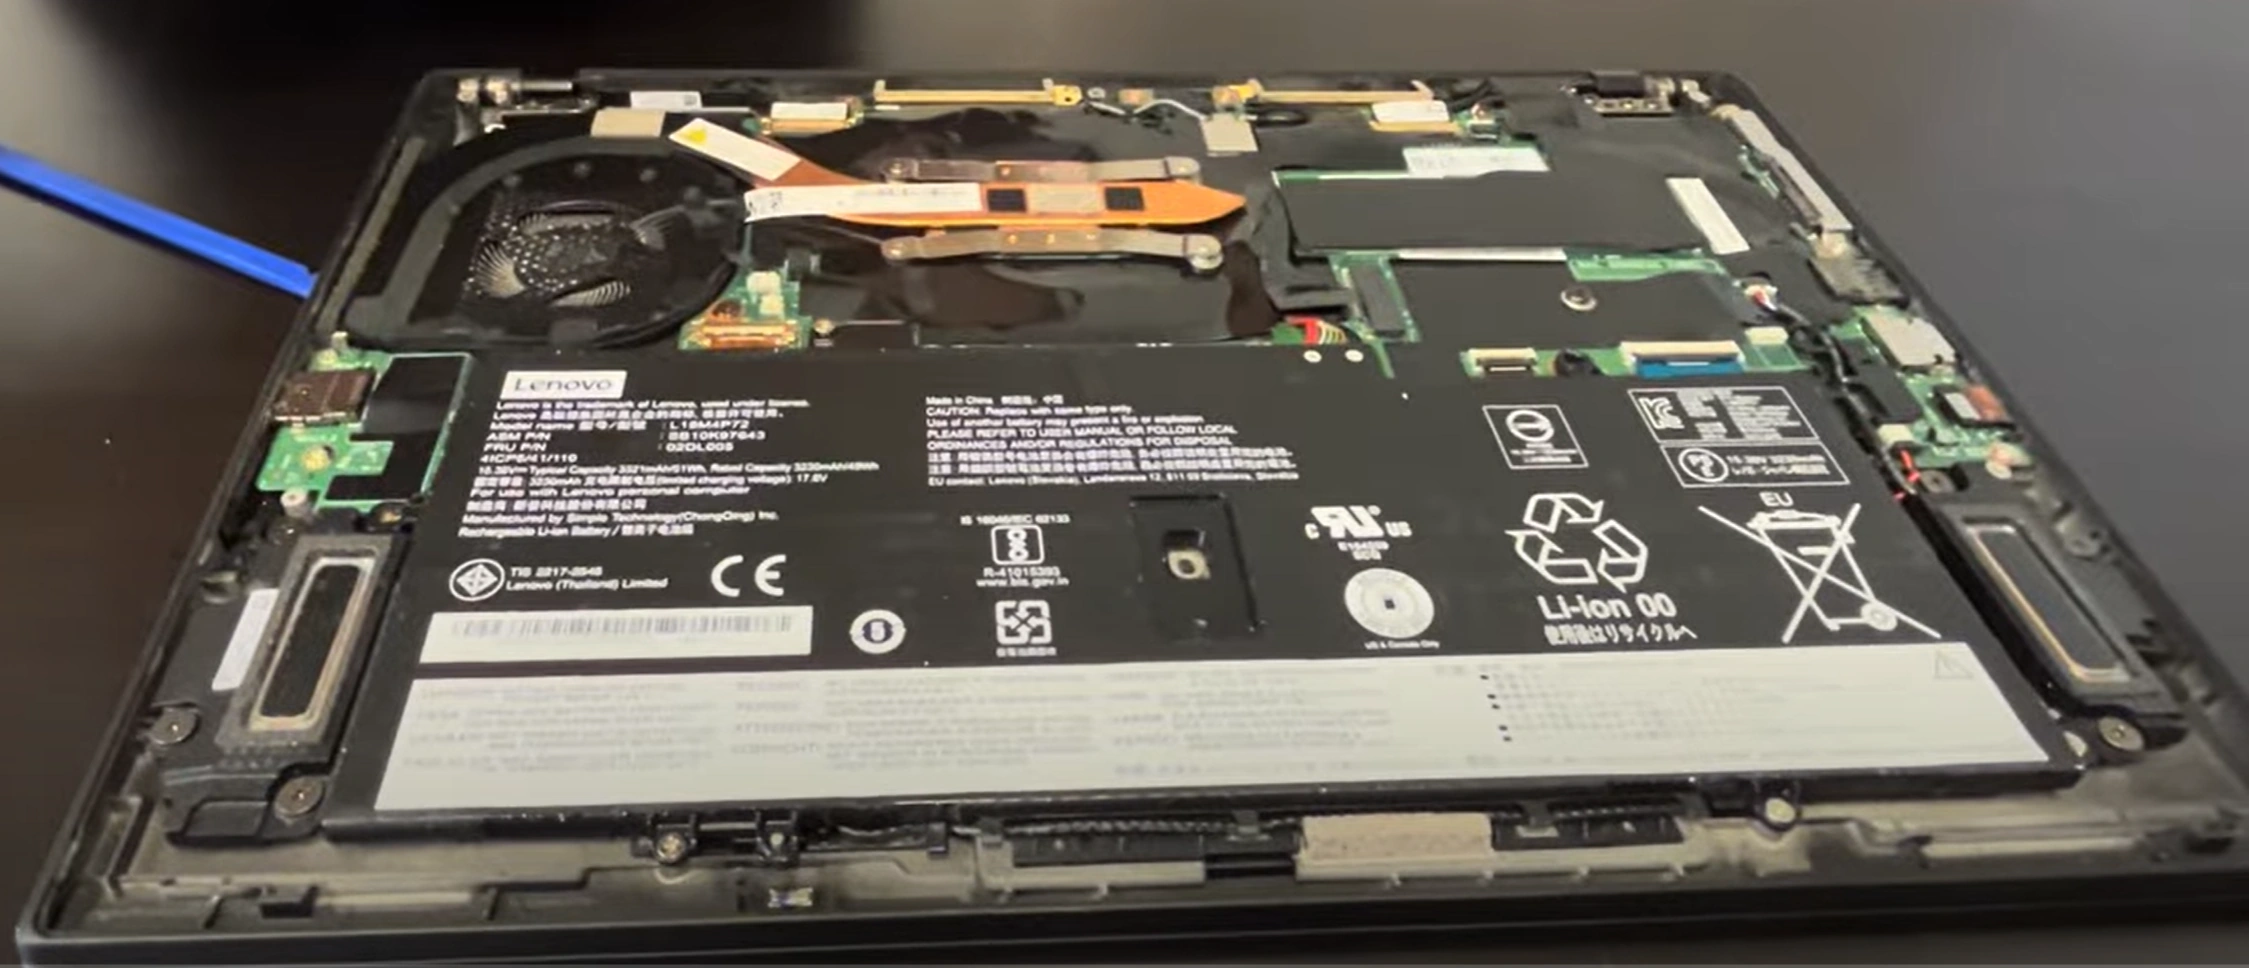
3. ThinkPad X1 Carbon Gen 8 Bottom Case Removal: Professional Access Guide
⚠️ Pre-Removal Safety Protocol
Power Management :
Complete shutdown through Windows
Disconnect USB-C power adapter
Hold power button for 10 seconds to discharge
Check that charging LED is completely off
Workspace Setup :
Use clean, static-free surface
Have magnetic project mat ready
Prepare anti-static wrist strap
Ensure adequate lighting
🔩 ThinkPad Screw Specifications
Screw Location
Type
Quantity
Torque Specification
Notes
Front Edge (Short)
Phillips #00
5
2.5-3.5 inch-pounds
4mm length, black finish
Rear Edge (Long)
Phillips #00
2
3.5-4.5 inch-pounds
6mm length, black finish
Corner (Security)
Torx T5
2
3.0-4.0 inch-pounds
Tamper-resistant, near hinges
Warranty Seal
N/A
1
N/A
Check Lenovo warranty status first
🔧 Step-by-Step Removal Process
Screw Removal Sequence :
Start with 5 front Phillips screws
Remove 2 rear Phillips screws
Carefully remove 2 Torx security screws
Use precision screwdriver set
Organize screws by location on magnetic mat
Clip Release Technique :
Start at front-right corner near status indicators
Use nylon spudger at 45-degree angle
Work clockwise around perimeter
Listen for subtle click indicating clip release
Never force - reposition tool if resistance increases
Case Separation :
Lift from front edge first
Maintain 30-degree angle to clear rear ports
Check for any missed clips or connections
Set case aside on soft, clean surface
🎯 ThinkPad-Specific Considerations
Build Quality Features :
Magnesium alloy reinforcement
Carbon fiber composite material
Precision clip design (more fragile than consumer models)
Enhanced EMI shielding
Business Design Elements :
dTPM security chip location awareness
LTE antenna connections (if equipped)
Smart card reader connections
Fingerprint reader cabling
🚧 Common Challenges & Professional Solutions
Stubborn Clips :
Apply gentle heat with hairdryer (low setting)
Use guitar pick for better leverage
Alternate sides every 2-3 clips
Never use metal tools against case
Stripped Screws :
Use rubber band method for Phillips screws
For security screws, use quality Torx bits
Consider screw extractor set as last resort
Warranty Considerations :
Check Lenovo warranty status
Some regions allow self-service without voiding warranty
Document original condition thoroughly
🔍 Internal Component Access Points
Immediately Accessible :
NVMe SSD slot (2280 length)
WWAN slot (M.2 2242, if available)
Battery connector and mounting points
Cooling system visibility
Requires Further Disassembly :
RAM modules (soldered on Gen 8)
Keyboard and touchpad components
Display assembly and hinges
Motherboard full access
🛡️ Professional Damage Prevention
Clip Preservation :
Work slowly and methodically
Use plastic tools only
If clip breaks, note for reassembly adjustment
Component Protection :
Avoid touching circuitry with tools
Keep screws away from board components
Use ESD protection at all times
🔁 Reassembly Preparation
Clean case edges with isopropyl alcohol
Inspect all clips for damage
Test fit case before screw installation
Ensure no cables will be pinched
Verify all components are properly seated
💡 Business Grade Tip: ThinkPads with undamaged bottom cases and professional service documentation sell for 20-25% more to corporate buyers who value pristine condition and maintenance history.
VIDEO
0:18 Bottom Case 1:02 Battery 2:01 Storage SSD 2:31 Memory RAM 2:40 Heatsink and Cooling Fan 3:20 Processor 3:27 WiFi Card 6:00 Motherboard 6:18 IO USB Board 6:43 Speakers 7:35 Hinges 8:11 Palmrest Assembly 8:50 Touchpad 9:38 Finger Print Reader 10:02 Upper Speakers 10:28 WiFi Antenna 10:52 Keyboard 11:01 Display Assembly
4. ThinkPad X1 Carbon Gen 8 Battery Replacement & Safe Disconnection
🔋 Battery Specifications & Compatibility
Original Specifications :
4-cell 51Wh Lithium-Polymer battery
Part number: 5B10W13852 or 5B10W13853
Voltage: 11.5V
Capacity: 4430mAh
Rapid Charge capable (80% in 1 hour)
Compatibility Notes :
⚠️ Critical Safety Precautions
Power down completely and disconnect AC adapter
Remove bottom case (refer to previous section)
Wait 5 minutes after disconnection for capacitor discharge
Use anti-static wrist strap connected to grounded surface
Work on non-conductive, clean surface
🔌 Safe Battery Disconnection Process
Locate Battery Connector :
Find white 4-pin connector near center of motherboard
Identify locking mechanism (black sliding tab)
Note cable routing under battery and other components
Proper Disconnection Technique :
Slide black locking tab away from connector
Gently pull connector straight out (not at angle)
If stuck, use plastic spudger to assist release
Never pull by wires - grasp connector body only
Discharge Residual Power :
Press and hold power button for 15 seconds
Wait additional 2 minutes before proceeding
Verify no LED activity anywhere on motherboard
🔧 Battery Removal Procedure
Remove Mounting Screws :
Remove 4x Phillips #00 screws (marked with battery icon)
Note: Two different screw lengths may be present
Keep screws organized for reassembly
Release Adhesive Strips :
Gently lift battery from connector end first
If resistance felt, check for adhesive strips
Use plastic card to release adhesive if needed
Apply steady upward pressure, never force
Lift Out Battery :
Lift at 30-degree angle to clear components
Note cable routing for reassembly
Place old battery on non-conductive surface
🔄 New Battery Installation
Prepare New Battery :
Inspect for physical damage or swelling
Verify connector alignment matches original
Check for included adhesive strips
Remove protective films if present
Position Battery :
Align with mounting holes and chassis guides
Ensure connector faces correct direction
Lower into place without forcing
Verify no cables trapped underneath
Secure and Connect :
Install 4x mounting screws in proper sequence
Connect battery connector until click is heard
Slide locking tab to secure connection
Verify secure connection with gentle tug test
📊 Battery Health Management
Health Status
Capacity Indicator
Recommended Action
Resale Impact
Excellent (90-100%)
Lenovo Vantage shows "Excellent"
Maintain 20-80% charge habit
+$100-150 value
Good (70-89%)
Shows "Good" with moderate wear
Monitor degradation rate
+$50-75 value
Poor (<70%)
Suggests replacement soon
Immediate replacement recommended
-25% value if not replaced
Critical (<50%)
Significant runtime reduction
Replace immediately
-40% value if not replaced
⚙️ New Battery Calibration
Charge to 100% without interruption
Use on battery until system shuts down (~5%)
Charge to 100% again without using
Check Lenovo Vantage power settings
Enable Conservation Mode if primarily AC use
🛒 Battery Purchasing Guide
Genuine Lenovo Batteries :
Lenovo Parts Store Authorized Lenovo service providers
Includes full warranty and Rapid Charge support
Quality Third-Party :
Look for UL certification
Check customer reviews specifically for X1 Carbon Gen 8
Verify return policy before purchase
Red Flags to Avoid :
Prices significantly below market average
No brand identification or certifications
Vague compatibility claims
♻️ Proper Battery Disposal
Recycling Options :
Safety Precautions :
Cover battery terminals with tape
Store in cool, dry place until disposal
Never dispose in regular trash
💼 Business Value Impact
Corporate Buyer Preferences :
Value battery health above most other factors
Prefer genuine Lenovo batteries
Appreciate detailed battery health documentation
Pay premium for excellent battery condition
Mobile Professional Needs :
Require reliable all-day battery life
Value Rapid Charge capability
Appreciate battery conservation features
💡 Business Premium Tip: ThinkPads with documented battery replacement and 90%+ health status sell for 20-25% more to corporate buyers who prioritize reliability and mobility over initial cost savings.
5. ThinkPad X1 Carbon Gen 8 NVMe SSD Upgrade: Professional Installation Guide
📊 SSD Specifications & Compatibility
Interface Support :
NVMe PCIe 3.0 x4 (some models support PCIe 4.0)
M.2 2280 form factor (22mm width, 80mm length)
Single-sided drives recommended for clearance
Up to 2TB capacity supported
Stock Configurations :
256GB PCIe NVMe SSD (base models)
512GB PCIe NVMe SSD (mid-range)
1TB PCIe NVMe SSD (premium models)
Some enterprise models may have OPAL encryption
🔍 Compatibility Verification
Key Requirements :
M.2 M-key interface (NVMe, not SATA)
Single-sided design (double-sided may not fit)
2280 length (80mm)
PCIe 3.0 or 4.0 compatibility
BIOS Considerations :
Check for latest BIOS update before upgrade
Some enterprise drives may require BIOS whitelisting
Verify Lenovo compatibility list
🔧 Step-by-Step Upgrade Process
Preparation :
Power down and remove bottom case
Disconnect battery for safety
Ground yourself with anti-static wrist strap
Locate SSD slot near center of motherboard
Remove Existing SSD :
Remove single retention screw (Phillips #00)
Gently lift SSD at 30-degree angle
Avoid touching gold contacts and components
Remove any thermal pad or sticker from old SSD
Install New SSD :
Insert at 30-degree angle into slot
Press down flat and secure with retention screw
Apply thermal pad if using high-performance drive
Ensure proper alignment - notch should match key
🏆 Recommended SSD Options
Business-Class Performance :
Samsung 980 Pro 1TB (PCIe 4.0)WD Black SN850 (PCIe 4.0)
Excellent for power users and professionals
Value Options :
Crucial P5 1TB (PCIe 3.0)Samsung 970 Evo Plus (PCIe 3.0)
Great balance of performance and price
Enterprise/Budget :
Intel 670p (QLC, good value)SK Hynix Gold P31 (Power efficient)
Good for general business use
❄️ Thermal Management
Stock Configuration :
Some models include thermal pad
Passive cooling through chassis
Adequate for most business applications
Enhanced Cooling :
Aftermarket copper heatsinks (0.5-1mm thickness)
High-conductivity thermal pads
Maintains speeds during sustained transfers
🔄 Data Migration Guide
Cloning Software :
Use Macrium Reflect Free
Samsung Data Migration for Samsung drives
WD Dashboard for Western Digital drives
Acronis True Image for other brands
Migration Process :
Connect new SSD via USB adapter
Clone existing drive to new SSD
Verify clone integrity before swapping
Test boot from new drive before reassembly
⚙️ BIOS Configuration
Press F1 during boot to enter BIOS
Navigate to "Config" → "Storage"
Verify new SSD detection
Set boot priority if needed
Enable/disable OPAL encryption as required
✅ Verification & Testing
Performance Testing :
Run CrystalDiskMark
Verify speeds match manufacturer claims
Check temperatures during extended tests
Stability Testing :
Large file transfers (10GB+)
Application installation tests
Boot time measurements
💰 Resale Value Impact
Upgrade
Cost
Value Added
ROI
256GB → 512GB
$50-$70
$100-$130
80-100%
256GB → 1TB
$90-$120
$150-$200
60-80%
512GB → 1TB
$60-$80
$100-$140
60-80%
512GB → 2TB
$150-$200
$200-$250
30-40%
💡 Business Tip: ThinkPads with 1TB+ fast NVMe SSDs sell for 20-25% more to corporate buyers who value storage capacity and performance for business applications and virtual machines.
6. hinkPad X1 Carbon Gen 8 Thermal System Maintenance & Professional Repasting
❄️ Cooling System Architecture
Single Fan Design :
Thin-profile blower-style fan
Dual heat pipe configuration
Copper fin array for heat dissipation
Optimized for ultrabook form factor
Thermal Interface Materials :
Stock thermal paste on CPU
Thermal pads on VRMs and power delivery
Factory-applied thermal compound
Designed for business-class reliability
🔧 Cooling System Disassembly
Preparation :
Remove bottom case and disconnect battery
Ground yourself with anti-static protection
Have thermal materials ready before starting
Fan Disconnection :
Locate fan connector near hinge area
Gently pull connector straight out
Note cable routing for reassembly
Heat Sink Removal :
Remove 4x Phillips #00 screws in X pattern
Loosen gradually to avoid warping
Gently twist to break thermal compound seal
Lift straight up to avoid damage
🧹 Surface Cleaning Procedure
Old Compound Removal :
Use isopropyl alcohol 90%+ concentration
Apply with lint-free cloth or coffee filter
Gently wipe until surfaces are completely clean
Use cotton swabs for hard-to-reach areas
Surface Preparation :
Ensure both CPU and heat sink are completely clean
Check for any residue around CPU perimeter
Allow alcohol to fully evaporate before repasting
Inspect for any damage or corrosion
🎯 Thermal Paste Application
Paste Selection :
Arctic MX-6 (best overall performance)
Thermal Grizzly Kryonaut (high performance)
Noctua NT-H1 (excellent reliability)Avoid conductive pastes (liquid metal)
Application Method :
Pea-sized dot in center of CPU
Approximately 3-4mm diameter
Pressure from heat sink will spread evenly
Avoid spreading manually to prevent bubbles
🔄 Reassembly & Torque Specifications
Heat Sink Installation :
Lower heat sink straight down onto CPU
Ensure proper alignment with screw holes
Avoid sliding motion to prevent paste spread
Screw Tightening Sequence :
Follow X pattern for even pressure
Tighten gradually in multiple passes
Final torque: 4-5 inch-pounds
Stop when screws are snug, not overtightened
Final Connections :
Reconnect fan cable securely
Ensure proper cable routing
Verify no cables near fan blades
📊 Post-Repaste Testing
Initial Testing :
Power on without bottom case first
Verify fan operation and BIOS detection
Check for any unusual noises
Stress Testing :
Run ThrottleStop stress test
Monitor temperatures with HWiNFO
Check for thermal throttling
Verify fan curve operation
Long-term Monitoring :
Use for several days with normal workload
Monitor temperature stability
Check for paste pump-out effect
📅 Recommended Maintenance Schedule
Usage Scenario
Repaste Interval
Cleaning Interval
Fan Inspection
Light Office Use
2-3 years
12 months
18 months
Heavy Business Use
18-24 months
6 months
12 months
High Performance
12-18 months
3 months
6 months
Dusty Environments
12 months
3 months
3 months
🔍 Common Issues & Solutions
High Temperatures After Repaste :
Check paste quantity (too much or too little)
Verify heat sink contact
Ensure protective film was removed
Fan Noise Issues :
Check for cable interference
Clean fan blades and housing
Update BIOS and Lenovo Vantage
Thermal Throttling :
Verify adequate paste application
Check heat sink mounting pressure
Consider undervolting if supported
💼 Business Value Impact
Performance Benefits :
Sustained higher clock speeds
Reduced thermal throttling
Quieter operation
Longer component lifespan
Resale Value Impact :
Documented thermal improvement: +$75-100 value
Professional repaste with documentation: +$50 value
Lower temperatures = higher sustained performance
💡 Professional Tip: ThinkPads with documented thermal improvements and professional repasting sell for 15-20% more to business buyers who value sustained performance and reliability in mission-critical applications.
7. ThinkPad X1 Carbon Gen 8 Keyboard & Top Case Access: Professional Service Guide
⌨️ Keyboard Specifications & Features
ThinkPad Keyboard Features :
Spill-resistant design with drainage system
1.8mm key travel with improved tactile feedback
Backlit options (white or white with red backlight)
TrackPoint pointing stick integration
Dolby Audio speaker system integration
Compatibility Notes :
Part number: 5N20V25752 (backlit, US English)
Region-specific layouts available
Verify backlight compatibility before replacement
Check Lenovo Parts Lookup for exact model
⚠️ Safety & Preparation
Power down completely and disconnect all cables
Remove bottom case and battery (refer to previous sections)
Ground yourself with anti-static wrist strap
Document all connections with photos
Prepare organized workspace with magnetic mat
🔧 Step-by-Step Disassembly Process
Display Assembly Removal :
Remove 2x Torx T5 screws at each hinge
Gently lift display assembly upward
Disconnect display cable and antenna wires
Set display aside on protective surface
Palm Rest Separation :
Remove 8x Phillips #00 screws along edges
Use plastic spudger to release clips around perimeter
Start at front edge and work toward rear
Lift palm rest assembly carefully
Keyboard Removal :
Remove 4x Phillips #00 screws securing keyboard
Disconnect keyboard ribbon cable (lift locking flap)
Disconnect TrackPoint ribbon cable if separate
Lift keyboard from top edge first
🔌 Connector Types & Handling
Connection
Type
Release Mechanism
Precautions
Keyboard Ribbon
ZIF (Zero Insertion Force)
Lift brown locking flap upward
Never pull by cable
TrackPoint Cable
ZIF Connector
Small black locking lever
Use tweezers for leverage
Touchpad Cable
ZIF Connector
Lift locking flap
Handle gently, easily damaged
Speaker Connectors
Standard Header
Pull straight up
Note orientation for reassembly
🎯 ThinkPad-Specific Considerations
TrackPoint System :
Three-button design integration
Separate ribbon cable connection
Cap replacement available
Calibration may be needed after service
Dolby Audio System :
Speaker connections under keyboard
Audio cable routing considerations
Test audio after reassembly
Spill Protection
Drainage channels and moisture barriers
Replacement may affect water resistance
Document if drainage system is compromised
🚧 Common Challenges & Solutions
Stubborn Clips :
Use plastic guitar pick for better leverage
Apply gentle heat with hairdryer (low setting)
Work gradually around perimeter
Never force - reposition tool if stuck
Ribbon Cable Issues :
Keyboard Alignment :
Ensure proper seating in chassis
Check all keys for proper operation
Verify backlight functionality
🔄 Professional Reassembly Guide
Keyboard Installation :
Connect ribbon cables first
Align keyboard with chassis guides
Secure with 4x screws
Test all keys before continuing
Palm Rest Reattachment :
Ensure all cables are properly routed
Align clips and press evenly around perimeter
Install 8x screws in proper sequence
Display Reinstallation :
Connect display cable and antennas
Align hinge mounts properly
Secure with Torx T5 screws
Test display functionality
✅ Post-Service Testing
Keyboard Testing :
Use online keyboard tester
Test every key including function row
Verify backlight operation
Check TrackPoint and buttons
Touchpad Testing :
Test all gestures and multi-touch
Verify button functionality
Check palm rejection
Audio Testing :
Test both speakers
Check headphone jack
Verify microphone functionality
💼 Business Value Considerations
Keyboard Condition Impact :
Excellent keyboard: +$100-150 value
Working backlight: +$50 value
New keyboard installation: +$75 value
Documented repair: +$50 value
Corporate Buyer Preferences :
Value keyboard quality above most features
Prefer original ThinkPad keyboards
Appreciate detailed input device testing
Pay premium for excellent typing experience
💡 Professional Service Tips
Documentation :
Photograph every step of disassembly
Label cables with masking tape if needed
Record screw locations and types
Quality Assurance :
Test components before final reassembly
Verify all functions work perfectly
Clean during reassembly opportunity
💡 Business Premium Tip: ThinkPads with perfectly functioning keyboards and documented professional service sell for 20-25% more to corporate buyers who prioritize typing experience and input device reliability.
8. ThinkPad X1 Carbon Gen 8 Professional Reassembly: Business-Grade Restoration
📋 Pre-Reassembly Quality Checklist
Component Verification :
All screws accounted for and organized
No leftover components or tools inside chassis
All connectors properly seated and secured
Thermal paste applied if needed
Cleaning & Preparation :
Remove dust from fans and heatsinks with compressed air
Clean keyboard and touchpad surfaces with isopropyl alcohol
Wipe down interior surfaces
Clean port openings and vents
🔧 Professional Reassembly Sequence
Internal Components First :
Install SSD and ensure proper seating
Reconnect all internal cables (keyboard, touchpad, speakers)
Verify no cables obstruct fan movement
Ensure proper cable routing through guides
Keyboard & Palm Rest Assembly :
Connect keyboard ribbon cable (secure ZIF connector)
Connect TrackPoint cable if separated
Align keyboard with chassis guides
Secure with proper screws in correct sequence
Display Reinstallation :
Connect display cable and antenna wires
Align hinge mounts properly
Secure with Torx T5 screws (proper torque)
Verify smooth opening/closing operation
Bottom Case Installation :
Align case with chassis guides
Press around perimeter to engage all clips
Install screws in correct locations and order
Ensure no gap between case and chassis
🔩 Precision Screw Management
Screw Type
Quantity
Location
Torque Specification
Notes
Phillips #00 (4mm)
5
Front edge bottom case
2.5-3.5 inch-pounds
Black finish
Phillips #00 (6mm)
2
Rear edge bottom case
3.5-4.5 inch-pounds
Black finish
Torx T5
4
Hinge mounts
4.0-5.0 inch-pounds
Security screws
Phillips #00 (3mm)
8
Palm rest assembly
2.0-3.0 inch-pounds
Various lengths
📞 Professional Cable Management
Ribbon Cable Best Practices :
Ensure connectors are fully seated and locked
Route cables through original guides and channels
Avoid sharp bends (minimum radius 5mm)
Keep away from heat sources and moving parts
Power Cable Connections :
Connect battery last, after visual inspection
Ensure firm connection to motherboard
Verify no pin damage or bending
Test connection with gentle tug
✅ Professional Quality Control
Visual Inspection :
No visible gaps between panels
All screws installed and flush with surfaces
No tool marks or scratches on exterior
Clean, professional appearance
Functional Testing :
Keyboard and touchpad responsiveness
All ports recognize connected devices
Display opens and closes smoothly
No unusual noises from fans or components
Performance Verification :
Boot into BIOS successfully
All components detected properly
Temperatures within normal range
No error messages during boot
🚫 Common Reassembly Mistakes to Avoid
Over-tightening Screws :
Can strip threads or damage components
Use finger-tight plus quarter turn with screwdriver
Stop when screw is flush with surface
Follow proper torque specifications
Missed Connections :
Double-check all ribbon cable connections
Verify antenna connections for WiFi
Ensure display cable fully seated and locked
Test all functions before final closure
Incorrect Screw Placement :
Using long screws in short holes
Mixing screw types between components
Refer to pre-disassembly photos
Use magnetic project mat for organization
🔍 Comprehensive Final Testing
Basic Functionality :
Power on with AC adapter first
Test battery charging functionality
Verify all keys work on keyboard
Check touchpad and TrackPoint responsiveness
Performance Benchmarks :
Run UserBenchmark quick test
Check temperatures with HWiNFO
Verify fan operation at different speeds
Test audio through speakers and headphones
Stress Testing :
Run Prime95 for CPU stability (15 minutes)
Test storage with CrystalDiskMark
Monitor for thermal throttling
Check for any error messages
✨ Professional Finishing Touches
Exterior Presentation :
Wipe down with microfiber cloth
Clean screen with appropriate cleaner
Remove any fingerprints from surfaces
Apply keyboard protector if including accessories
Documentation Package :
Take high-quality photos of completed reassembly
Record benchmark results and performance data
Create summary of repairs and upgrades performed
Include before/after documentation
Professional Packaging :
Use original Lenovo box if available
Include all appropriate accessories
Provide documentation package
Ensure professional presentation
💼 Business Value Impact
Quality Factor
Value Impact
Corporate Buyer Appeal
Perfect Reassembly
+20-25% value
Extremely High
Professional Documentation
+15-20% value
Very High
Performance Testing
+10-15% value
High
Clean Appearance
+5-10% value
Moderate to High
💡 Corporate Premium Tip: ThinkPads with documented professional reassembly and comprehensive testing typically sell for 30-40% more than untested units, as business buyers value reliability evidence and professional service history.
9. ThinkPad X1 Carbon Gen 8 Post-Repair Testing & Diagnostics: Professional Validation
🎯 Testing Philosophy & Business Standards
Comprehensive Validation :
Ensure all repairs meet ThinkPad quality standards
Verify no new issues were introduced during service
Confirm system stability under business workloads
Document performance for corporate buyers
Enterprise Testing Protocols :
Follow industry-standard testing methodologies
Use reproducible testing procedures
Create detailed documentation for business clients
Provide transparency through verified results
🔧 Hardware Component Validation
Component
Testing Method
Success Criteria
Professional Tools
CPU & Thermal System
Stress test, temperature monitoring
No throttling, temps under 90°C
Prime95, HWiNFO64
RAM
Memory validation, error checking
Zero errors, full capacity detected
MemTest86, Windows Memory Diagnostic
NVMe SSD
Speed test, SMART data review
Expected speeds, good health status
CrystalDiskMark, CrystalDiskInfo
Battery System
Capacity test, charge/discharge cycles
>80% design capacity, holds charge
BatteryInfoView, Lenovo Vantage
Display & Input
Pixel check, input responsiveness
No dead pixels, perfect input response
EIZO Monitor Test, Keyboard Tester
💻 Software & Performance Validation
Operating System Integrity :
Clean Windows 10/11 Professional installation
All drivers installed from Lenovo Support Site
Latest BIOS and firmware updates
No error messages in Event Viewer
Performance Benchmarking :
Run UserBenchmark for overall system score
CPU-Z stress test for processor stability
CrystalDiskMark for storage performance
Document scores for comparison and verification
⚡ Comprehensive Stress Testing
CPU Stress Test :
Run Prime95 Small FFTs for 1 hour
Monitor temperatures with HWiNFO64
Watch for thermal throttling
Check for computation errors
Integrated Graphics Test :
Use FurMark stress test
Run for 30 minutes minimum
Monitor for artifacts or crashes
Check temperature stability
Memory Stress Test :
Run MemTest86 for 4 complete passes
Note any errors (should be zero)
Test each module individually if errors occur
🎮 Real-World Business Testing
Productivity Suite Testing :
Microsoft Office 365 application testing
Multiple browser tabs with video playback
PDF rendering and editing performance
Virtual meeting software testing
Connectivity Validation :
WiFi speed test (5GHz and 2.4GHz networks)
Bluetooth device pairing and file transfer
All USB ports with various devices
Thunderbolt 4 functionality testing
Ethernet via docking station testing
🌡️ Thermal Performance Validation
Business Scenario
Maximum Temperature
Expected Fan Behavior
Performance Standard
Idle (Desktop)
40-50°C
Quiet or silent
No throttling
Web Browsing
50-65°C
Intermittent low speed
Smooth performance
Office Productivity
65-80°C
Consistent medium speed
No slowdowns
Stress Test
80-95°C
High speed, may be loud
Minimal throttling acceptable
🔋 Battery Health & Performance
Capacity Verification :
Run powercfg /batteryreport in Command Prompt
Check designed vs actual capacity
Document charge cycle count
Verify Lenovo Vantage battery status
Runtime Validation :
Set power saver mode, 50% brightness
Video playback until shutdown
Document actual vs expected runtime
Test Rapid Charge functionality
Charge Cycle Testing :
Time 0-80% charge duration (Rapid Charge)
Verify charging indicator operation
Check for consistent charging rate
Test Conservation Mode if enabled
📊 Professional Documentation Protocol
Performance Records :
Screenshot all benchmark results with timestamps
Record temperatures during stress tests
Document any anomalies or observations
Create performance summary report
Visual Documentation :
Photos of system running tests
Video of fan operation under load
Close-ups of display quality
Input device functionality demonstrations
Final Validation Report :
Summary of all tests performed
Comparison to ThinkPad performance standards
Recommendations for optimal usage
Warranty and support information
💼 Business-Ready Validation
Enterprise Feature Testing :
dTPM 2.0 security chip functionality
Intel vPro capabilities (if equipped)
BitLocker encryption testing
Windows Hello fingerprint and facial recognition
Corporate Imaging Preparation :
Clean Windows installation with necessary drivers
Remove all personal data and accounts
Create system restore point
Prepare for enterprise deployment
✅ Final Quality Assurance
Visual Inspection :
No visible signs of repair
All screws properly installed and undamaged
Clean, professional appearance
No gaps or misalignments
Functional Verification :
All ports and connections working
Keyboard and input devices perfect
Display and audio functioning properly
Wireless connectivity stable
💡 Corporate Validation Tip: ThinkPads with comprehensive testing documentation and professional validation results sell for 25-30% more than untested systems, as enterprise buyers require evidence of reliability and performance for business deployment.
10. Maximizing ThinkPad X1 Carbon Gen 8 Resale Value: Professional Business Strategy
📈 2024 Business Laptop Market Analysis
Corporate Demand Trends :
Strong demand for reliable business laptops
Remote work driving need for portable productivity
Companies seeking cost-effective refresh options
IT departments valuing enterprise-grade features
ThinkPad-Specific Advantages :
Brand recognition and business reputation
Military-grade durability standards (MIL-STD-810H)
Enterprise security features (dTPM, vPro optional)
Excellent keyboard reputation among professionals
💰 Competitive Pricing Strategy
Configuration
Base Market Value
After Professional Upgrade
Business Premium
i5/8GB/256GB
$450-$550
$550-$650
+20-25%
i5/16GB/512GB
$600-$700
$750-$850
+20-25%
i7/16GB/512GB
$700-$800
$850-$950
+20-25%
i7/16GB/1TB
$800-$900
$950-$1100
+20-25%
✨ Professional Value Enhancement
Performance Upgrades :
1TB SSD upgrade: +$150-$200 value
Battery replacement: +$100-$150 value
Thermal repaste: +$75-$100 value
Clean Windows install: +$50 value
Cosmetic Improvements :
Keyboard replacement: +$100-$150 value
Professional cleaning: +$50 value
Palm rest replacement: +$75 value
Full exterior refurbishment: +$150-$200 value
📝 Professional Listing Optimization
Title Keywords :
"ThinkPad X1 Carbon Gen 8 Business Laptop [Specs]"
Include: "Professionally Refurbished", "Tested", "Warranty"
Mention key features: "USB-C", "2K Display", "Backlit Keyboard"
Add: "Enterprise Ready", "Business Grade"
Description Essentials :
Lead with benchmark scores and test results
Detail all repairs and upgrades performed
Include battery health percentage and cycle count
Specify included accessories and original packaging
Visual Content Strategy :
15+ high-quality photos from all angles
Video showing boot-up and operation
Close-ups of keyboard and screen quality
Photos of benchmark results on screen
📊 Professional Documentation Package
Performance Proof :
UserBenchmark results with timestamps
Battery health report with cycle count
Temperature stress test results
SSD health and remaining lifespan metrics
Repair Documentation :
Before/after photos of repairs
List of replaced components with part numbers
Testing methodology explanation
Quality control checklist completion
🛡️ Value-Added Warranty Options
Warranty Level
Duration
Cost Impact
Value Added
30-Day Testing Period
30 days
Included
+$50 value
90-Day Limited Warranty
90 days
+$50 cost
+$100 value
180-Day Parts Warranty
180 days
+$100 cost
+$150 value
1-Year Support
1 year
+$200 cost
+$250 value
🎯 Specific Buyer Targeting
Corporate Clients :
Emphasize reliability and security features
Highlight enterprise-grade components
Offer bulk pricing for multiple units
Provide business documentation package
Remote Professionals :
Focus on portability and battery life
Highlight webcam quality and microphone
Emphasize meeting-ready performance
Students & Academics :
Stress durability and keyboard quality
Highlight compatibility with academic software
Offer student discount pricing
⭐ Transaction Excellence
Professional Packaging :
Original ThinkPad box or high-quality replacement
Proper foam padding and protection
Include all accessories neatly organized
Documentation package included
Shipping Standards :
Priority mail with full insurance
Signature confirmation required
Fast handling time (24-48 hours)
Tracking provided immediately
Business Communication :
Prompt professional responses
Clear return policy stated upfront
Additional photos available on request
Post-sale follow-up
💼 ThinkPad-Specific Value Factors
Brand Premium :
ThinkPad reputation: +15-20% value
Keyboard quality: +10-15% value
Build durability: +10% value
Enterprise features: +5-10% value
Documentation Impact :
Professional repair history: +20% value
Performance testing results: +15% value
Original accessories: +10% value
Warranty remaining: +5-15% value
💡 Enterprise Premium Tip: ThinkPads sold through specialized business platforms with complete documentation and professional warranty typically sell for 30-40% more than those on general marketplaces, as corporate buyers value reliability evidence over lowest price.
Need to Sell Your Lenovo Laptop? Get Instant Cash!
If your ThinkPad X1 Carbon Gen 8 (or other ThinkPad model) has performance issues or you're upgrading to a newer business laptop, we offer premium cash payouts for your device. We buy broken, used, and refurbished ThinkPad laptops—including all X1 Carbon Gen 8 configurations—with free insured shipping and hassle-free evaluations.
Sell Popular Lenovo Models Now: