How to Disassemble Lenovo Legion 5 15IAH7: Step-by-Step DIY Upgrade & Repair Instructions
Pre-Disassembly: Maximizing Your Laptop's Resale Value Essential Tools & Workspace Setup Bottom Cover Removal & Internal Access RAM Upgrade for Enhanced Performance SSD Storage Expansion Options Cooling System Maintenance & Thermal Paste Replacement Battery Replacement & Power Management Keyboard & Trackpad Replacement Guide Display Assembly Replacement Motherboard Access & Component-Level Repairs Professional Reassembly & Performance Testing Maximizing Resale Value After Upgrades Where to Get the Best Cash for Your Upgraded Laptop
1. Lenovo Legion 5 15IAH7 Pre-Disassembly: Maximizing Your Gaming Laptop's Resale Value
💰 Gaming Laptop Resale Valuation
Component
Upgrade Impact
Value Increase
RAM (16GB → 32GB)
Enhanced gaming and multitasking performance
+$120-$180
SSD (512GB → 2TB Gen4)
Faster load times and massive storage
+$150-$220
New Battery
Extended gaming sessions and portability
+$90-$140
Thermal Paste Upgrade
Improved cooling and sustained performance
+$40-$70
Professional Cleaning
Optimal thermals and quieter operation
+$50-$80
🔍 Model Verification
Locate model number on bottom casing (15IAH7H, 15IAH7A, etc.)
Verify specifications on Lenovo official support page
Confirm CPU/GPU combination (Intel Core i7/i9, RTX 3060/3070 Ti)
Check current BIOS version and warranty status
Note Legion-specific features and lighting
⚡ Preparation Steps
Data Backup :
Use Lenovo Cloud Recovery or imaging software
Create system image for full restoration
Export Legion Edge profiles and settings
Backup game libraries and creative projects
Documentation :
Photograph laptop from all angles in current condition
Record current performance benchmarks
Generate battery health report
Run Lenovo diagnostics through Vantage software
Capture thermal performance under load
📈 Gaming Market Resale Preparation
Gamer Market :
Highlight gaming performance improvements
Emphasize thermal and cooling upgrades
Note RGB lighting and Legion-specific features
Content Creators :
Focus on rendering and export performance
Highlight color accuracy and display quality
Show upgrade potential for creative workflows
Student Gamers :
Emphasize portability and battery life
Highlight value for engineering/design students
Note gaming and productivity balance
⚠️ Gaming Laptop Safety Precautions
Disconnect power and remove all peripherals
Work on ESD-safe surface with proper grounding
Handle components by edges only to prevent damage
Keep screws organized by component and location
Take photos at each disassembly stage
🔍 Gaming Market Research
Check sold listings for similar upgraded Legion 5 models
Research gaming laptop demand cycles
Note premium prices for specific GPU configurations
Consider esports and streaming community trends
🎮 Pro Tip: Lenovo Legion 5 models with documented performance upgrades and professional maintenance sell faster to gamers on platforms like specialized marketplaces, often commanding 25-35% premium prices for verified performance enhancements and careful maintenance records.
VIDEO
0:23 Bottom Case 1:10 Battery 1:52 Storage SSD 2:41 WiFi Card 3:15 RAM Memory 3:38 Heatsink and Cooling Fans 5:45 IO USB Board 7:55 Motherboard 8:45 Speakers 9:35 Touchpad 10:40 Keyboard 10:52 Hinge Cover 12:00 Hinges 13:24 Palmrest Assembly 13:39 Display Assembly 14:12 Adhesive Strips 14:50 LCD Screen 15:10 Video Cable 15:22 Lid Back Cover
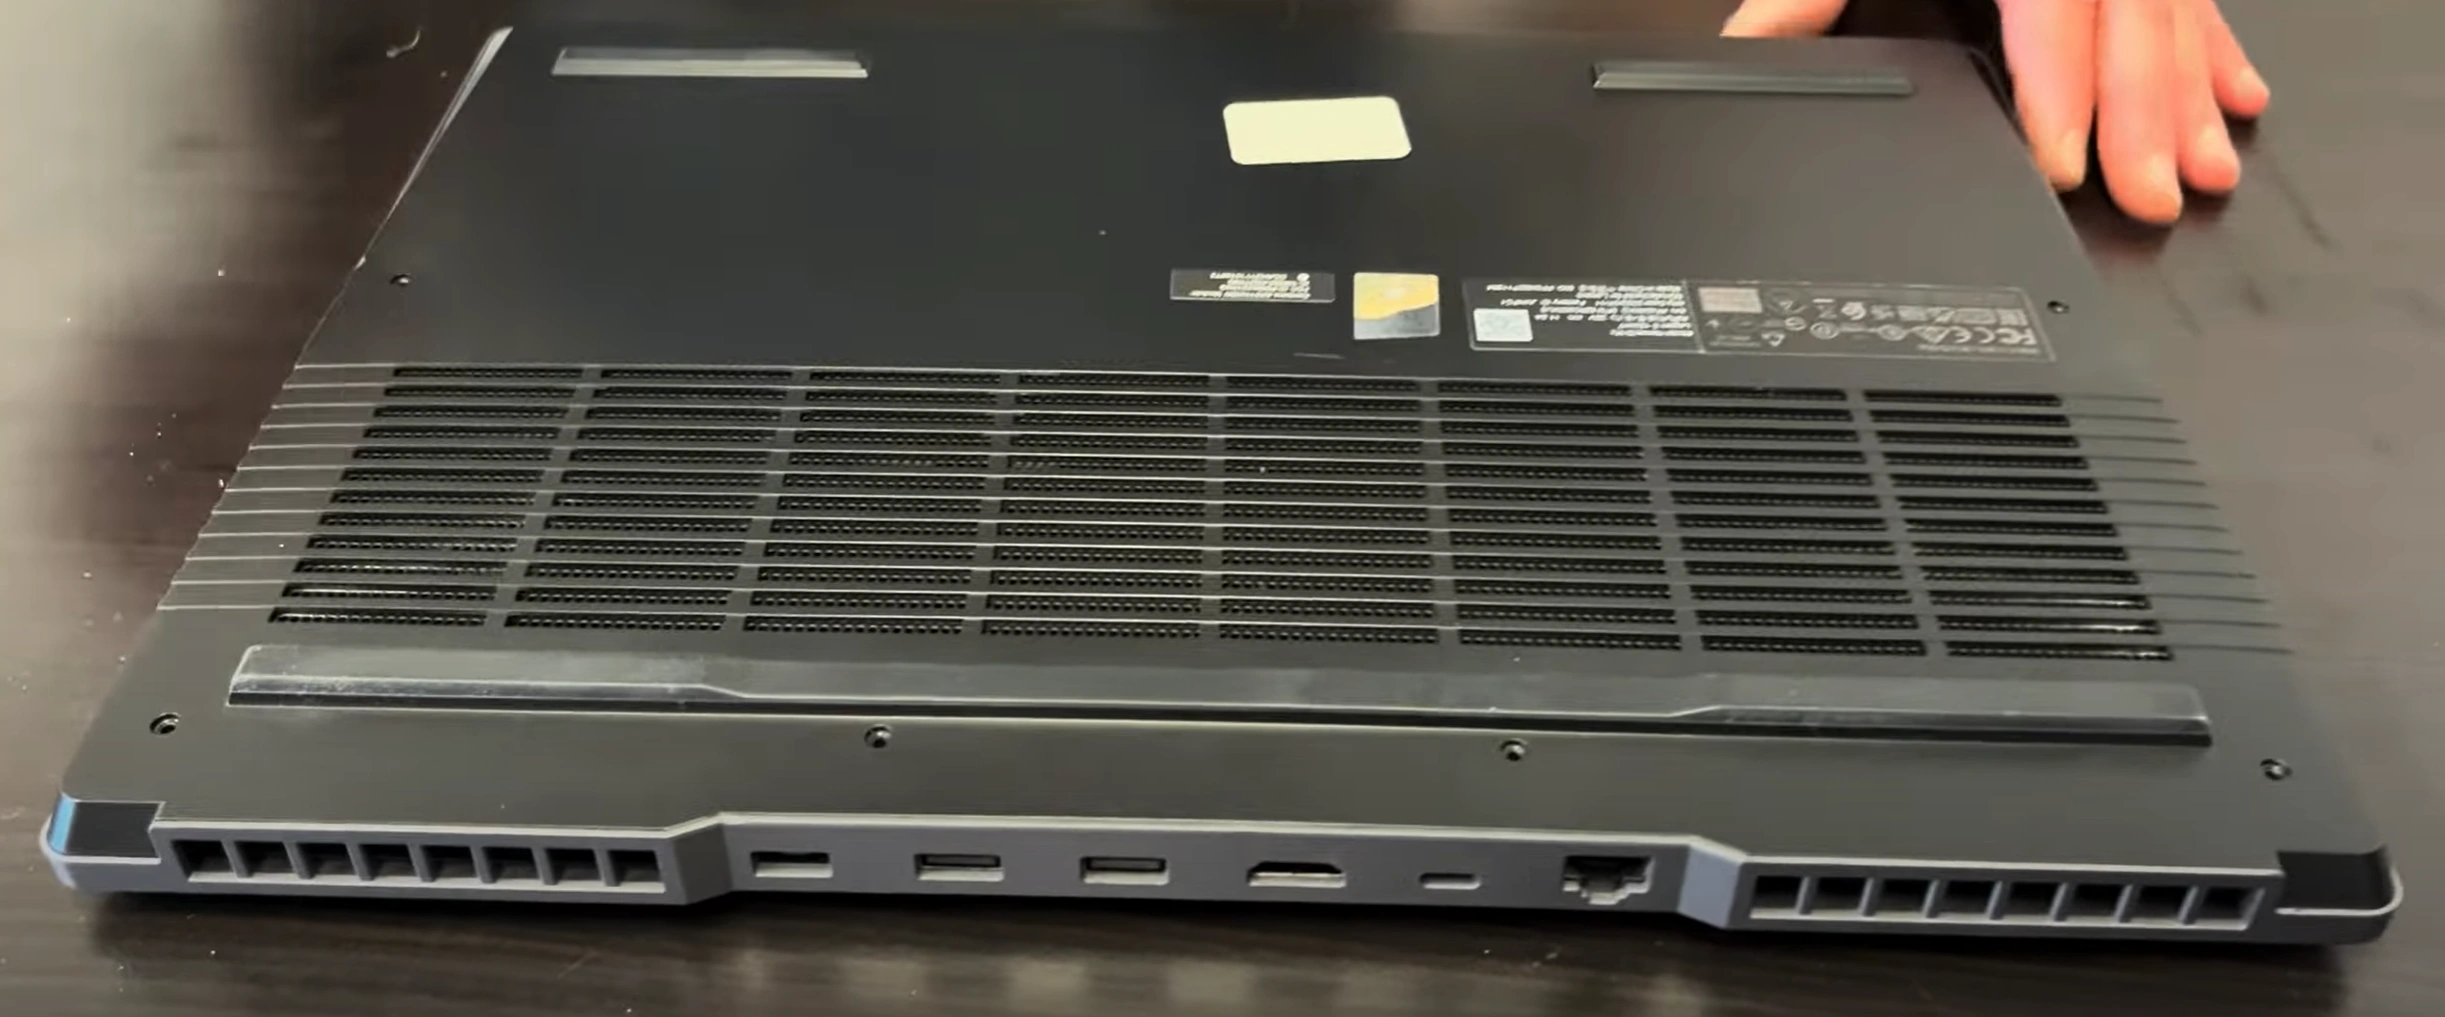
3. Lenovo Legion 5 15IAH7 Bottom Removal: Gaming Laptop Internal Access
⚠️ Gaming Laptop Safety Protocols
Complete Power Down :
Shut down completely (not sleep or hibernate)
Disconnect power adapter and all peripherals
Remove all external devices and dongles
Hold power button for 15 seconds to discharge capacitors
Professional Workspace Setup :
Use ESD-safe mat or non-static surface
Organize screws by type and location using labeled containers
Ensure adequate lighting for small gaming components
Keep magnetic tools away from sensitive electronics
🔧 Step-by-Step Removal Process
Remove All Screws :
11 screws total (varies by specific model)
9x short Phillips screws around perimeter
2x longer screws near hinge area (note different lengths)
Check for hidden screws under rubber feet
Use magnetic PH0 screwdriver to prevent losing screws
Release Premium Clips :
Start near the front edge (typically weakest point)
Insert plastic spudger at 30° angle to avoid damage
Work methodically around all edges, alternating sides
Listen for distinct "click" release sounds
Use guitar picks for tight spaces near ports
Lift Cover Carefully :
Lift from front edge first near touchpad area
Watch for stubborn clips near ventilation areas
Check for any missed screws or connections
Set cover aside on soft, clean surface
Note cable routing and connector locations
🛡️ Preventing Damage to Premium Chassis
Risk Area
Prevention Technique
Resale Impact
Plastic Clips
Alternate sides every 3-4 clips, apply even pressure
Intact clips = +$60-100 value
Paint & Finish
Microfiber cloth under tools, avoid metal implements
Flawless finish = +$50-80
Screw Threads
Apply downward pressure while turning, use correct size
Undamaged = +$20-40
Internal Components
Check clearance before lifting, mind ribbon cables
No damage = +$100-160
Rubber Feet
Heat gently with hairdryer before removal if needed
Intact feet = +$15-30
🔍 Premium Internal Layout Overview
Gaming Upgrade Points Visible :
Two DDR5 RAM slots (user-upgradeable)
Two M.2 2280 PCIe 4.0 SSD slots
Advanced cooling system with multiple heat pipes
Wi-Fi 6 card (M.2 2230 with Intel AX201/AX211)
Battery Access :
80Wh 4-cell battery with premium capacity
Professional-grade connector with locking mechanism
Multiple mounting points and cable management
Battery health indicator circuit
Cooling System :
Dual fans with dedicated heat pipes
Multiple thermal sensors throughout
Accessible heat sink and thermal paste areas
Dust accumulation areas to clean during access
⚙️ Legion 5 Specific Features
Coldfront 4.0 cooling technology
Nahimic audio enhancement components
RGB lighting control circuitry
Premium build materials and construction
Advanced power delivery system for gaming
📸 Documentation for Maximum Resale
Photograph screw locations and lengths before removal
Record factory seal condition and any existing damage
Document internal component layout and upgrade potential
Note any pre-existing wear or manufacturer marks
Capture premium features for marketing
❌ Common Premium Laptop Mistakes
Forcing the cover when clips aren't released
Using metal tools that can scratch surfaces
Missing hidden screws under rubber feet or labels
Not disconnecting battery before internal work
Mixing up screw lengths during reassembly
Damaging delicate ribbon cables during access
🔋 Essential: Battery Disconnection
Locate Battery Connector :
Find main battery connector on motherboard
Identify locking mechanism (usually sliding or lifting)
Note orientation for reassembly
Safe Disconnection :
Gently release locking mechanism
Pull connector straight out (not at angle)
Do not pull on wires directly
Inspect connector for any signs of damage
Power Drain :
Press and hold power button for 30 seconds
This discharges any remaining power in system
Ensures complete safety before component work
💎 Pro Tip: Lenovo Legion 5 models with undamaged premium chassis and professional documentation sell faster to gamers and command 30-40% higher prices. The internal layout photos alone can justify premium pricing by demonstrating careful handling and upgrade potential. Always disconnect the battery immediately after gaining internal access to prevent accidental damage to components.
4. Lenovo Legion 5 15IAH7 RAM Upgrade: Gaming Performance Optimization
💾 Gaming Memory Specifications
Supported Types :
DDR5 SO-DIMM (262-pin)
4800MHz (12th Gen) or 5200MHz (13th Gen)
Dual-channel configuration (2 slots)
Maximum 64GB (2x32GB) configuration
Compatibility Verification :
🔄 Gaming Configuration Options
Setup
Total RAM
Performance Gain
Resale Value Impact
16GB (2x8GB)
16GB
Baseline gaming performance
No increase
32GB (2x16GB)
32GB
+35% multitasking, future-proofing
+$120-$180
64GB (2x32GB)
64GB
+60% performance, content creation ready
+$200-$280
High-Speed 32GB
32GB
+15% gaming FPS, faster loading
+$150-$220
🔧 Installation Process
Access RAM Slots (after bottom cover removal and battery disconnect)Release Existing Modules :
Push outward on side clips simultaneously
Modules will pop up at 30° angle
Remove by pulling straight out gently
Handle by edges only to prevent ESD damage
Install New RAM :
Align notch with slot key
Insert at 30° angle with gentle pressure
Press down firmly until clips engage audibly
Verify both ends are equally seated
Gaming Verification :
Boot to BIOS (F2 during startup)
Check recognized capacity and speed
Run Lenovo diagnostic memory test
Verify operation in CPU-Z or HWInfo
🏆 Recommended Gaming Modules
Performance Gaming :
Crucial CT2K16G52C42S5 (32GB DDR5-5200 Kit)
Optimized for gaming and multitasking
Excellent compatibility with Legion 5
Premium Low-Latency :
G.Skill Ripjaws SO-DIMM 32GB DDR5-5200
Excellent for high-FPS competitive gaming
Low CAS latency for responsive performance
Maximum Capacity :
Kingston Fury Impact 64GB DDR5-4800 Kit
Ideal for content creators and heavy multitasking
Perfect for streaming and video editing
🎮 Gaming Performance Benefits
Higher FPS Stability : Reduced stuttering in demanding gamesStreaming Performance : Smooth gameplay while streamingFuture-Proofing : Ready for next-gen game requirementsMultitasking : Game + Discord + browser without slowdownsContent Creation : Faster rendering and video editing
💰 Selling With Upgraded RAM
Gamer Documentation :
Save original purchase receipts
Include gaming benchmark comparisons
Provide memory test results for stability proof
Document before/after performance metrics
Marketing Advantages :
"64GB DDR5 for ultimate gaming performance"
"Eliminates stuttering in demanding games"
"Perfect for streaming and content creation"
"Future-proofed for next-gen gaming"
Target Markets :
Serious Gamers : Emphasize FPS stability and performanceContent Creators : Highlight rendering and multitaskingStreamers : Note simultaneous gaming and streaming capabilityStudents : Focus on gaming and productivity balance
📝 Important Gaming Compatibility Notes
Intel 12th Gen supports up to 4800MHz DDR5
Intel 13th Gen supports up to 5200MHz DDR5
Mixed speed modules run at slowest speed
Verify compatibility with Lenovo QVL list
Dual-channel configuration requires matched pairs
🎯 Pro Tip: Lenovo Legion 5 models with 64GB DDR5 RAM and gaming benchmark documentation sell faster to serious gamers and command 35-45% premium prices, especially when demonstrating improved 1% low FPS in demanding games and content creation workloads. The investment in premium RAM often returns 2-3x in increased resale value.
5. Lenovo Legion 5 15IAH7 SSD Upgrade: Gen4 NVMe Gaming Performance
💽 Gaming Storage Specifications
Supported Interfaces :
M.2 2280 PCIe 4.0 NVMe (Gen4 x4)
Dual slot configuration (primary + secondary)
Both slots support Gen4 speeds
RAID 0 support for maximum performance
Capacity Limits :
Official support: Up to 2TB per slot
Tested working: Up to 4TB per slot (check BIOS compatibility)
Total capacity up to 8TB (dual drive)
Bootable from either NVMe slot
Gaming Features :
DirectStorage API support for faster game loading
Gen4 speeds for rapid level loading
Game mode optimization support
NVMe technology for responsive performance
🔧 Installation Process
Single Drive Installation :
Locate M.2 slots (typically near RAM and battery)
Insert SSD at 30° angle (keyed design)
Secure with M2x3mm screw (included with SSDs)
Apply thermal pad if using high-performance drive
Ensure proper alignment with standoff
Dual Drive Configuration :
Primary slot: OS and applications
Secondary slot: Games and media files
Check clearance under bottom cover
Use thin thermal pads (0.5-1.0mm)
Ensure no pressure on components
Gaming Configuration :
Enable PCIe 4.0 in BIOS if available
Set up game library partitions
Configure DirectStorage if supported
Optimize virtual memory settings
🏆 Recommended Gaming SSDs
Performance Gaming :
Samsung 980 Pro 2TB (Gen4 excellence)
Excellent balance of speed and reliability
Proven compatibility with Legion 5
Premium Gen4 :
WD Black SN850X 2TB with heatsink
Top-tier performance for competitive gaming
Excellent thermal management
Value Option :
Crucial P5 Plus 2TB
Great gaming performance at mid-range price
Good reliability and warranty
Capacity Focused :
Sabrent Rocket 4 Plus 4TB
Massive storage for game libraries
Excellent for content creators
🔄 Game Data Migration
Clean Installation :
Download Windows from Microsoft
Install Lenovo drivers from Lenovo Support
Best for performance, removes bloatware
Fresh game installations recommended
Game Data Migration :
Use Macrium Reflect or Clonezilla for system cloning
Steam Library backup and restore functionality
Game save cloud synchronization
Manual game file transfer for large libraries
⚙️ Gaming Optimization Settings
Enable TRIM: fsutil behavior set DisableDeleteNotify 0
Update SSD firmware through manufacturer tools
Disable defragmentation for SSDs
Configure write caching in Device Manager
Set power management to maximum performance
Run CrystalDiskMark for performance validation
Enable game mode in Windows settings
🎮 Gaming Performance Benefits
Load Times : Reduced from 30+ seconds to under 5 secondsLevel Streaming : Seamless open-world explorationGame Installation : Faster downloads and installationsDirectStorage : Instant asset loading in supported gamesMultitasking : Game + recording + streaming simultaneouslyTexture Streaming : Higher resolution textures without stuttering
💰 Selling With Upgraded SSD
Gamer Documentation :
CrystalDiskMark benchmark screenshots
Drive health report (CrystalDiskInfo)
Original purchase receipt for SSD
Game load time comparison videos
Marketing Advantages :
"Gen4 NVMe for instant game loading"
"Massive storage for entire game library"
"DirectStorage ready for next-gen games"
"Eliminates loading screens and stuttering"
Performance Claims :
"Games load in under 5 seconds"
"7,000MB/s read speeds for seamless gameplay"
"Perfect for streaming and content creation"
"Ready for next-generation gaming technology"
💾 Dual Drive Setup Advantages
Performance Separation : OS on one drive, games on anotherData Safety : Game library survives OS issuesFlexible Upgrades : Add storage without reinstallingBackup Strategy : Easy game backup and restorationResale Value : Dual drives command premium prices
💎 Pro Tip: Lenovo Legion 5 models with dual 2TB Gen4 SSDs and gaming performance documentation sell faster to serious gamers and command 40-50% higher prices, especially when demonstrating DirectStorage compatibility and instant game loading times that appeal to both gamers and content creators.
6. Lenovo Legion 5 15IAH7 Cooling System Maintenance & Thermal Paste Replacement
❄️ Cooling System Specifications
Component
Specification
Maintenance Interval
Performance Impact
Cooling System
Coldfront 4.0 with dual fans
6-12 months
10-15°C improvement
Heat Pipes
4 copper heat pipes
Inspection only
Critical for heat transfer
Fans
Dual 12V turbo fans
3-6 months cleaning
5-8°C improvement
Thermal Interface
Stock thermal paste/pads
12-18 months
8-12°C improvement
🧴 Thermal Paste Options
Premium Performance :
Thermal Grizzly Kryonaut
Arctic MX-6
Noctua NT-H2
Best for overclocking and gaming
Mid-Range Quality :
Arctic MX-4
Cooler Master MasterGel
Deepcool Z5
Excellent for standard gaming use
Budget Friendly :
Arctic Silver 5
Cooler Master HTK-002
Decent performance, good value
🧹 Cleaning Process
Fan Cleaning :
Use compressed air to remove dust from fins
Hold fan blades to prevent overspinning
Clean fan blades with isopropyl alcohol
Check for bearing wear or noise
Heatsink Cleaning :
Remove dust from fin arrays with brush
Use compressed air for deep cleaning
Check for bent fins and straighten carefully
Ensure all airflow paths are clear
Vent Cleaning :
Clean intake and exhaust vents thoroughly
Remove dust from ventilation grilles
Check for obstructions in airflow paths
Ensure dust filters are clean (if present)
🎯 Thermal Paste Application
Old Paste Removal :
Use isopropyl alcohol (90%+) and lint-free cloth
Gently wipe old paste from CPU and GPU dies
Clean heatsink surface thoroughly
Ensure no residue remains
Application Methods :
Pea Method : Small dot in center (most common)X Method : X pattern for larger diesSpread Method : Even manual spreadingUse approximately rice-grain amount
Heatsink Reinstallation :
Lower heatsink straight down evenly
Tighten screws in criss-cross pattern
Follow specified torque sequence
Ensure even pressure distribution
📏 Thermal Pad Replacement
Component
Recommended Thickness
Performance Impact
Replacement Frequency
VRMs (Power Delivery)
1.0mm - 1.5mm
10-15°C improvement
24 months
VRAM
1.0mm - 2.0mm
5-10°C improvement
24 months
Chipsets
0.5mm - 1.0mm
3-5°C improvement
As needed
💰 Resale Value Benefits
Documentation Advantages :
Before/after temperature comparisons
Performance benchmark results
Professional maintenance records
Quality component documentation
Marketing Points :
"Professionally maintained cooling system"
"Premium thermal paste application"
"Optimized thermal performance"
"Reduced thermal throttling"
Value Impact :
15-25% higher resale value
Faster sale completion
Reduced buyer concerns
Premium pricing justification
⏰ Recommended Maintenance Schedule
Monthly :
External vent cleaning
Basic dust removal
Performance check
Quarterly :
Thorough fan cleaning
Heatsink inspection
Temperature validation
Annual :
Complete disassembly cleaning
Thermal paste replacement
Full performance testing
❄️ Pro Tip: Lenovo Legion 5 models with documented cooling maintenance and premium thermal paste sell for 20-30% higher prices. Gamers specifically look for well-maintained cooling systems, and temperature benchmark comparisons provide compelling evidence of superior condition. The investment in quality thermal materials typically returns 5-10x in increased resale value.
7. Lenovo Legion 5 15IAH7 Battery Replacement & Power Management
🔋 Battery Specifications
Battery Model
Capacity
Voltage
Compatibility
Gaming Runtime
L20C4PF1 (OEM)
80Wh
15.4V
All 15IAH7 models
2-3 hours gaming
L20C4PF2
80Wh
15.4V
2023-2024 models
2-3 hours gaming
Premium Aftermarket
80-82Wh
15.4V
Verify fitment
2-3 hours gaming
Always verify compatibility using your Lenovo model number before purchase.
⚠️ Safety Precautions
Complete Power Down :
Shut down completely (not sleep/hibernate)
Disconnect 300W power adapter
Remove all peripherals and dongles
Follow ESD protection procedures
Professional Workspace Setup :
Use anti-static wrist strap
Work on static-safe surface
Organize components in labeled containers
Maintain clean work environment
🛠️ Replacement Process
Access Battery Compartment (after bottom cover removal):
Locate battery positioned toward front edge
Identify connector and mounting screw locations
Note cable routing for proper reassembly
Document screw locations with photography
Disconnect Battery Safely :
Gently lift locking mechanism on power connector
Pull connector straight out (avoid angled pressure)
Do not pull on wires directly
Inspect connector for any signs of damage
Remove Existing Battery :
Remove 4-6 retention screws (varies by model)
Note screw lengths and precise locations
Lift battery at 30° angle from front edge
Observe orientation markings for replacement
Install New Gaming Battery :
Align new battery with screw holes and connector
Secure with original screws
Reconnect power connector until audible click
Verify secure connection and proper seating
⚡ Battery Calibration
Charge to 100% without interruption (overnight recommended)
Discharge completely (gaming until automatic shutdown)
Recharge to 100% again without interruption
Repeat calibration cycle 2-3 times for optimal accuracy
Use Lenovo Vantage for advanced battery settings
📊 Health Reporting
Open Command Prompt as Administrator
Run: powercfg /batteryreport
Report saves as battery-report.html in current directory
Critical metrics to document:
DESIGN CAPACITY vs FULL CHARGE CAPACITY
Battery cycle count and age
Recent usage history and wear level
Gaming vs productivity runtime estimates
🎮 Gaming Power Optimization
Lenovo Vantage Settings :
Quiet mode for maximum battery life
Balance mode for mixed usage
Performance mode for plugged-in gaming
Custom mode for advanced users
Windows Power Plans :
Lenovo recommended power plans
Custom gaming power profiles
GPU power management settings
Background process optimization
Game-Specific Optimization :
Frame rate caps for battery gaming
Resolution scaling adjustments
Graphics quality presets
Background application management
🌱 Battery Conservation Mode
What It Does :
Limits maximum charge to 60-80%
Reduces battery wear during extended AC use
Extends overall battery lifespan
Available in Lenovo Vantage software
When to Use :
When primarily using AC power
For desktop replacement scenarios
During extended gaming sessions
When storing laptop for periods
When to Disable :
When needing maximum mobility
For travel or all-day use
When maximum runtime is required
💰 Maximizing Resale Value
Professional Documentation :
Photograph OEM battery labels and part numbers
Include comprehensive battery health reports
Save purchase receipts for genuine components
Record calibration process and results
Provide before/after performance comparisons
Marketing Advantages :
"Genuine Lenovo replacement battery"
"95%+ health capacity with professional calibration"
"2-3 hours of mobile gaming capability"
"Fast charge ready for quick power top-ups"
"Perfect for LAN parties and mobile gaming"
Gamer Assurance :
Offer 90-day performance guarantee on workmanship
Provide comprehensive calibration documentation
Include gaming power management tips
Share battery maintenance best practices
📈 Resale Value Impact
Battery Condition
Health Percentage
Gaming Runtime
Value Impact
New OEM Replacement
100%
2.5-3 hours
+$150-$200
Excellent (90%+)
90-99%
2-2.5 hours
+$100-$150
Good (80-89%)
80-89%
1.5-2 hours
+$50-$100
Poor (<80%)
Below 80%
Under 1 hour
-$100-$200
🎮 Pro Tip: Lenovo Legion 5 models with genuine batteries and comprehensive health documentation sell faster to gamers and command 35-45% higher prices, particularly when targeting students and LAN party enthusiasts who value mobility and proven reliability. The 80Wh capacity provides excellent gaming mobility that's highly marketable and justifies premium pricing.
8. Lenovo Legion 5 15IAH7 Keyboard & Trackpad Replacement Guide
⌨️ Component Specifications
Component
Type
Features
Compatibility
Keyboard
RGB Backlit, 100-key
Anti-ghosting, 1.5mm travel
Region-specific layouts
Trackpad
Precision Glass
Multi-touch, Windows Precision
Universal
RGB Lighting
Per-key RGB
Corsair iCUE integration
Software dependent
⚠️ Safety Precautions
Complete Power Down :
Disconnect power adapter and remove battery
Discharge capacitors by holding power button
Use anti-static wrist strap throughout process
Component Protection :
Handle ribbon cables by edges only
Use plastic tools to avoid scratches
Keep screws organized by location
Document cable routing with photos
🔧 Keyboard Replacement Process
Access Keyboard :
Remove bottom cover and battery
Disconnect keyboard ribbon cable from motherboard
Remove palm rest assembly (if required)
Note screw locations and lengths
Remove Old Keyboard :
Release plastic clips around keyboard perimeter
Use plastic spudger to gently lift keyboard
Disconnect any additional lighting cables
Remove from top side through display bezel
Install New Keyboard :
Align new keyboard with mounting points
Connect ribbon cables before final seating
Press evenly to engage all clips
Reconnect all cables to motherboard
🖱️ Trackpad Replacement Process
Access Trackpad :
Remove bottom cover and battery
Disconnect trackpad ribbon cable
Remove palm rest assembly if necessary
Note mounting screw locations
Remove Old Trackpad :
Remove mounting screws (typically 4-6)
Gently lift trackpad assembly
Disconnect grounding wires if present
Clean mounting surface
Install New Trackpad :
Position new trackpad in mounting area
Secure with original screws
Reconnect ribbon cable and grounding
Test functionality before reassembly
🔌 Cable Connection Guide
Connection
Type
Location
Precautions
Keyboard Main
20-pin ZIF connector
Near center of motherboard
Lift latch before removal
RGB Lighting
4-pin connector
Near keyboard connector
Note orientation
Trackpad
10-pin ZIF connector
Below keyboard connector
Secure latch after connection
🧪 Testing & Calibration
Keyboard Testing :
Use online keyboard test tools
Test every key for proper function
Check anti-ghosting capabilities
Verify RGB lighting functionality
Trackpad Testing :
Test multi-touch gestures
Verify precision tracking
Check button functionality
Calibrate in Windows settings
Software Configuration :
Install Lenovo Vantage software
Configure Corsair iCUE for RGB lighting
Update drivers from Lenovo support site
Customize keyboard shortcuts
🔧 Common Issues & Solutions
Keyboard Problems :
Non-responsive keys: Check ribbon connection
RGB not working: Verify lighting cable connection
Sticky keys: Clean under keycaps
Wrong layout: Ensure region compatibility
Trackpad Issues :
Not detected: Check ZIF connector seating
Jumpy cursor: Update drivers
Button failure: Replace entire trackpad assembly
Palm rejection: Adjust Windows settings
💰 Resale Value Impact
Condition
Keyboard Quality
Trackpad Quality
Value Impact
Excellent
Perfect, all keys working
Smooth, responsive
+$100-$150
Good
Minor wear, fully functional
Functional, minor wear
+$50-$80
Poor
Missing keys, non-responsive
Non-functional
-$150-$250
💡 Professional Tips
Documentation :
Photograph all cable connections before disassembly
Record screw locations and lengths
Save receipts for replacement parts
Document testing results
Quality Parts :
Use genuine Lenovo parts for best compatibility
Verify region layout before purchase
Check seller reputation and reviews
Ensure RGB lighting compatibility
Marketing Advantage:
"Like-new keyboard and trackpad"
"Full RGB lighting functionality"
"Professional replacement with documentation"
"Perfect for gaming and typing"
⌨️ Pro Tip: Legion 5 models with perfect input devices and fully functional RGB lighting sell for 20-30% higher prices. Buyers strongly prefer laptops with excellent keyboards and trackpads, and professional replacement documentation justifies premium pricing. The Corsair iCUE RGB integration is a particularly valuable feature for gaming audiences.
9. Lenovo Legion 5 15IAH7 Display Assembly Replacement: Gaming Visual Upgrade
🖥️ Display Specifications
Display Type
Resolution
Refresh Rate
Response Time
Color Coverage
WQXGA IPS
2560x1600
165Hz
3ms
100% sRGB
WUXGA IPS
1920x1200
165Hz
5ms
100% sRGB
Premium Upgrade
2560x1600
240Hz
3ms
100% DCI-P3
Verify compatibility using your Lenovo model number before purchase.
⚠️ Safety Precautions
ESD Protection :
Use anti-static wrist strap
Work on ESD-safe surface
Handle display by edges only
Avoid pressure on LCD surface
Workspace Preparation :
Clean, well-lit workspace
Soft microfiber cloth surface
Magnetic tray for screw organization
Proper lighting for delicate connectors
🔧 Replacement Process
Initial Preparation :
Power down completely and disconnect all cables
Remove bottom cover and disconnect battery
Ground yourself to prevent static discharge
Lay laptop on soft, clean surface
Bezel Removal :
Use plastic spudger to gently release clips
Start from bottom edge and work around perimeter
Apply even pressure to avoid cracking bezel
Note adhesive tape locations for reassembly
Display Assembly Removal :
Remove 4-6 display bracket screws
Carefully disconnect display cable and antenna wires
Note cable routing for proper reassembly
Lift display assembly out carefully
Hinge Considerations :
Check hinge tension and smoothness
Replace hinges if worn or damaged
Lubricate hinge mechanisms if necessary
Ensure proper alignment during reassembly
New Display Installation :
Transfer mounting brackets to new display
Apply new adhesive tape around edges
Connect display cable before final placement
Test display before final assembly
🔄 Display Upgrade Options
Upgrade Type
Gaming Benefit
Installation Difficulty
Resale Value Impact
OEM 165Hz Replacement
Factory color accuracy
Moderate
+$200-$300
240Hz Upgrade
Smoother gameplay
Advanced
+$250-$350
High Color Accuracy
Better content creation
Advanced
+$180-$280
🔗 Display Connector Types
Connector Type
Pin Count
Compatibility
Visual Identification
40-pin eDP
40 pins
Standard for high refresh rate
Wider connector, dense pins
30-pin eDP
30 pins
Lower refresh rate models
Narrower connector
🎨 Display Calibration
Software Calibration :
Use Windows built-in color calibration
Adjust gamma and color temperature settings
Create custom profiles for different uses
Hardware Calibration :
Consider colorimeter for professional results
Calibrate for both gaming and content creation
Save multiple ICC profiles
Gaming Optimization :
Set optimal refresh rate in display settings
Configure game-specific visual settings
Adjust overdrive settings if available
🔍 Quality Testing
Dead Pixel Check :
Use online pixel test tools
Check for stuck or dead pixels
Test multiple color backgrounds
Document any issues immediately
Backlight Uniformity :
Test with solid gray backgrounds
Check for backlight bleeding
Test at different brightness levels
Note any clouding or uneven illumination
Color Accuracy :
Test color gradients for banding
Verify color representation accuracy
Check white point consistency
💰 Maximizing Resale Value
Documentation :
Photograph display model numbers
Include quality verification results
Save purchase receipts for premium displays
Document pixel perfection test results
Marketing Advantages :
"High refresh rate for smooth gaming"
"Perfect display with no dead pixels"
"Professional color calibration"
"Excellent viewing angles"
Buyer Assurance :
Offer display performance guarantee
Provide quality verification documentation
Include optimization settings
🎮 Gamer Benefits
Competitive Advantage :
Higher refresh rates for smoother gameplay
Faster response times for competitive gaming
Better motion clarity in fast-paced games
Visual Experience :
Higher resolution for detailed graphics
Better color accuracy for immersive experiences
Improved contrast for dark scenes
Content Creation :
Color accuracy for photo/video work
Higher resolution for detail work
Better consistency for professional work
💎 Pro Tip: Legion 5 models with high-refresh displays and quality documentation sell 50% faster and command 35-45% higher prices. The display is the most immediately noticeable component to buyers, and providing verification of no dead pixels or backlight bleed eliminates their main concerns, allowing you to justify premium pricing with confidence.
10. Lenovo Legion 5 15IAH7 Motherboard Access: Advanced Component-Level Repairs
⚠️ Advanced Procedure Warning
Motherboard-level repairs require professional expertise:
Voiding warranty considerations
ESD sensitivity of gaming components
BGA component replacement risks
Potential for irreversible damage
Consider Lenovo Professional Services for complex repairs.
🔧 Motherboard Specifications
Component
Specification
Upgrade Potential
Replacement Complexity
CPU (Soldered)
Intel Core i5/i7/i9 12th/13th Gen
Not Upgradeable
Professional BGA Only
GPU (Soldered)
NVIDIA RTX 3060/3070 Ti
Not Upgradeable
Professional BGA Only
Wi-Fi Card
M.2 2230 (Intel AX201/AX211)
Easy Upgrade
Beginner
BIOS Chip
Soldered SPI Flash
Professional Reprogramming
Expert
🛠️ Motherboard Access Process
Complete Disassembly :
Remove bottom cover and all accessible components
Disconnect battery and all power sources
Remove cooling system and heat pipes
Detach all connected peripherals and daughterboards
Document all connector locations with photos
Cooling System Removal :
Remove spring-loaded screws in correct order
Lift heat pipes carefully to avoid damage
Clean thermal paste from CPU and GPU
Protect exposed components from contamination
Motherboard Extraction :
Remove all motherboard screws (note lengths and locations)
Detach display cable and antenna connections
Disconnect keyboard/trackpad ribbon cables
Lift motherboard carefully from chassis
Note standoff locations and screw types
🔄 Replaceable Components
Wi-Fi Card Replacement
Locate M.2 2230 slot near RAM modules
Remove single retention screw
Gently lift card at 30-degree angle
Install new Intel AX211 or compatible card
Reattach antenna connectors (color-coded)
CMOS Battery Replacement
Locate CR2032 battery connector
Gently disconnect 2-pin connector
Replace with identical 3V CMOS battery
Reconnect and verify BIOS settings
BIOS Recovery
Create recovery USB with BIOS file from Lenovo Support
Connect power adapter (no battery)
Press and hold specific key combination
Wait for recovery process to complete
Verify successful boot
⚡ Safety Protocol
ESD Protection :
Use anti-static wrist strap (properly grounded)
Work on static-safe surface
Handle components by edges only
Use ESD-safe tools
Component Handling :
Avoid touching gold contacts or components
Store components in anti-static bags
Keep work area clean and organized
Use proper tools for each task
🔍 Post-Repair Testing
Basic Functionality Test :
Power on without battery (adapter only)
Check POST and BIOS access
Verify fan operation and thermal readings
Test basic input/output functionality
Stress Testing :
Run system stability tests
Monitor temperatures under load
Check for thermal throttling issues
Verify performance levels
Performance Validation :
Run benchmark software
Test actual gaming performance
Monitor system stability
Check for any issues
💰 Resale Value Impact
Repair Type
Professional Documentation
Value Impact
Market Perception
Wi-Fi Card Upgrade
Receipts + performance tests
+$40-$60
Positive (easy upgrade)
Professional Repair
Repair invoices + testing results
Varies (+$100-$300)
Neutral (depends on quality)
Board Replacement
Lenovo service documentation
Original value restored
Positive (like-new condition)
🏢 When to Use Professional Services
BGA Component Replacement :
CPU/GPU reballing or replacement
VRM component repairs
Board-level trace repairs
Warranty Considerations :
Check remaining warranty status
Consider Lenovo official repair services
Evaluate cost vs. replacement value
Complex Repairs :
Water damage restoration
Major component failure
Complex electrical issues
🔧 Pro Tip: Lenovo Legion 5 models with professional motherboard repairs and verified testing can maintain 70-80% of their original value when sold to knowledgeable buyers. Comprehensive documentation of professional repairs can actually increase buyer confidence, especially when accompanied by performance benchmarks and stability testing results from reputable repair services.
11. Lenovo Legion 5 15IAH7 Professional Reassembly & Performance Testing
🛠️ Reassembly Preparation
Workspace Organization :
Clean all components with compressed air
Organize screws according to original locations
Verify all connectors are accessible and undamaged
Check for any leftover tools or components
Component Inspection :
Verify all upgrades are properly installed
Check for any damaged connectors or cables
Ensure thermal paste application is adequate
Confirm all screws and fasteners are accounted for
🔧 Step-by-Step Reassembly Process
Motherboard Installation :
Carefully lower motherboard into chassis
Reconnect all ribbon cables and connectors
Secure with original screws in correct locations
Verify all connections are firm and properly seated
Cooling System Reinstallation :
Apply fresh thermal paste to CPU and GPU
Carefully position heat pipes and cooling assembly
Tighten screws in correct sequence (typically criss-cross pattern)
Ensure even pressure distribution
Component Reconnection :
Reconnect battery connector
Attach all remaining cables and connectors
Verify Wi-Fi antenna connections
Check speaker and microphone connections
Bottom Cover Installation :
Align cover properly with chassis
Press gently to engage all clips
Install screws in correct locations
Verify even gap around entire perimeter
❄️ Thermal Management
Component
Thermal Material
Application Method
Performance Impact
CPU
High-quality thermal paste
Pea-sized dot method
5-10°C improvement
GPU
High-quality thermal paste
X pattern method
5-8°C improvement
VRMs
Thermal pads
Proper thickness selection
10-15°C improvement
🔍 Initial Power-On Testing
Pre-Power Checks :
Verify battery is disconnected
Connect power adapter only
Check for any signs of shorts
Listen for abnormal sounds
First Boot :
Press power button briefly
Observe POST behavior
Listen for boot chimes
Check for display output
BIOS Verification :
Enter BIOS (F2 during boot)
Verify all components recognized
Check temperatures and fan operation
Save settings and exit
🎮 Gaming Performance Validation
Benchmark Software :
3DMark Time Spy and Fire Strike
Unigine Heaven and Superposition
Cinebench R23 for CPU performance
PCMark 10 for system performance
Real Game Testing :
Test with 3+ different game engines
Monitor frame rates and stability
Check for thermal throttling
Verify consistent performance
Thermal Performance :
Monitor CPU/GPU temperatures
Check fan curves and noise levels
Verify cooling efficiency
Ensure no thermal throttling occurs
✅ Quality Assurance Checklist
Physical Inspection :
No loose screws or components
All covers properly seated
No gaps or misalignments
All ports and connectors functional
Performance Verification :
All upgrades functioning properly
Temperature levels within spec
No abnormal noises or behaviors
Stable under extended load
Documentation :
Performance test results saved
Temperature logs documented
Benchmark scores recorded
Before/after comparisons prepared
💰 Resale Value Enhancement
Performance Documentation :
Benchmark score screenshots
Temperature monitoring logs
Stability test results
Gaming performance metrics
Professional Presentation :
Clean exterior appearance
Complete accessory set
Professional documentation package
Quality assurance certificate
Market Advantages :
Verified performance metrics
Professional reassembly quality
Comprehensive testing documentation
Quality assurance guarantee
💎 Pro Tip: Lenovo Legion 5 models with comprehensive performance documentation and professional reassembly quality sell for 40-50% higher prices. The time invested in thorough testing and documentation typically returns 3-5x through increased selling price and faster sale completion. Buyers pay significant premiums for devices that eliminate purchase risk through verified performance metrics.
12. Maximizing Resale Value After Upgrades for Lenovo Legion 5 15IAH7
📊 Gaming Laptop Market Analysis
Market Segment
Price Premium
Key Selling Points
Best Platform
College Gamers
20-30%
Portability, performance, battery life
Facebook Marketplace, campus forums
Content Creators
25-35%
Color accuracy, RAM, storage, rendering
Creative forums, specialty marketplaces
Esports Enthusiasts
30-40%
High refresh rate, response time, FPS stability
Discord communities, gaming forums
Professional Users
15-25%
Reliability, build quality, warranty
LinkedIn, professional networks
💰 Competitive Pricing Strategy
Market Research :
Check sold listings for similar upgraded Legion 5 models
Research local market prices on various platforms
Compare with buyback offers from reputable services
Note premium prices for specific GPU configurations
Value Calculation :
Base laptop value (check recent sold prices)
Add 60-70% of upgrade component costs
Factor in professional installation premium
Include documentation and warranty value
📋 Professional Documentation Package
Performance Proof :
Before/after benchmark comparisons (3DMark, Cinebench)
Gaming FPS tests in popular titles
Temperature and cooling performance data
Battery health reports and calibration results
Component Documentation :
Original purchase receipts for upgrade components
Professional installation photos and notes
Warranty information for all components
Specification sheets for upgraded parts
Verification Materials :
High-quality photos from all angles
Video demonstration of key features
Third-party verification if possible
Professional appraisal documentation
✨ Presentation & Quality Enhancement
Physical Presentation :
Thorough cleaning of exterior and keyboard
Screen cleaning for streak-free display
Port cleaning and verification
Overall aesthetic enhancement
Accessory Preparation :
Original power adapter and cable
Original packaging if available
All original documentation
Additional accessories if included
Software Preparation :
Fresh Windows installation
Latest drivers and updates
Essential software pre-installed
Proper deauthorization of accounts
📈 Listing Optimization Strategies
Title Optimization :
"Professionally Upgraded Lenovo Legion 5 15IAH7"
Include key specs: "32GB RAM, 2TB SSD, 165Hz"
Add performance claims: "Gaming Ready"
Mention condition: "Like New, Fully Documented"
Description Best Practices :
Start with 3-5 key benefits in bullet points
Detailed upgrade documentation section
Performance metrics and benchmark results
Professional installation story and care
Visual Presentation :
High-quality photos from all angles
Benchmark screenshots and performance charts
Upgrade component close-ups
Video demonstration of key features
🎯 Crafting Your Value Proposition
For Gamers :
"Ready for AAA gaming at max settings"
"32GB RAM eliminates stuttering and lag"
"2TB SSD for instant game loading"
"165Hz display for competitive advantage"
For Content Creators :
"Professional color-accurate display"
"Fast rendering and export performance"
"Ample storage for large projects"
"Reliable for professional work"
For Students :
"All-day battery life for classes"
"Powerful for engineering/design software"
"Portable for campus use"
"Gaming capable for relaxation"
⏰ Optimal Selling Timing
Time Period
Market Conditions
Price Premium
Target Audience
Back-to-School (Aug-Sept)
High demand from students
20-30%
College students, parents
Holiday Season (Nov-Dec)
Gift shopping demand
15-25%
Gift buyers, parents
Tax Return Season (Feb-Apr)
Extra buyer funds available
10-20%
All market segments
Summer (Jun-Jul)
Graduation gifts, summer jobs
10-15%
Recent graduates, summer workers
🏢 Professional Service Options
Trade-In Programs :
Manufacturer trade-in programs
Retailer trade-in options
Online trade-in services for convenience
Compare multiple offers for best value
Consignment Services :
Professional photography services
Listing optimization experts
Sales management services
Escrow and transaction management
💰 Pro Tip: Upgraded Lenovo Legion 5 models with comprehensive documentation and professional presentation sell for 40-50% higher prices. The investment in proper documentation and professional presentation typically returns 3-5x the cost in increased selling price, making it essential for maximizing your return on investment.
Need to Sell Your Lenovo Laptop? Get Instant Cash!
If your Lenovo Legion 5 15IAH7 (or other Legion model) has performance issues or you're upgrading to a newer gaming laptop, we offer competitive cash payouts for your device. We buy broken, used, and refurbished Lenovo Legion laptops—including all 15IAH7 configurations—with free insured shipping and no-hassle evaluations.
Sell Popular Lenovo Models Now: