HP Laptop Flickering Screen Replacement: Easy DIY Repair Guide
Diagnosing Screen Flickering Issues Required Tools & Safety Preparation Step-by-Step Disassembly Screen Removal Process Screen Replacement Guide Reassembly & Testing Troubleshooting Common Issues Selling Repaired HP Laptops
1. Diagnosing HP Laptop Screen Flickering: Professional Assessment Guide
🔍 Common Flickering Symptoms
Intermittent Flickering :
Random flashing that comes and goes
Often related to loose connections or failing backlight
May worsen when moving the screen
Constant Flickering :
Steady, rapid flashing
Typically indicates inverter or LED driver issues
May be accompanied by dimming
Flickering with Patterns :
Regular patterns or waves across screen
Often suggests graphics card issues
May appear as horizontal/vertical lines
🩺 Step-by-Step Diagnosis
External Monitor Test :
Connect to an external monitor or TV
If external display works fine: screen hardware issue
If external also flickers: graphics card/software issue
Use HDMI or VGA cable for connection
Pressure Test :
Gently press around screen bezel edges
If flickering changes: loose connection likely
Note which areas affect the flickering
Be careful not to apply excessive pressure
Flex Test :
Slowly open and close the screen
Observe if flickering changes with movement
Indicates damaged cables or connectors
Note specific angles that trigger issues
Software Diagnosis :
Boot into BIOS/UEFI (press F10 during startup)
If flickering persists in BIOS: hardware issue
If only in Windows: driver or software issue
Update graphics drivers from HP Support
⚠️ Common Causes of Flickering
Symptom Pattern
Likely Cause
Repair Complexity
Estimated Cost
Flickering when moving screen
Loose LCD cable connection
Easy
$0-$50
Constant rapid flickering
Failing backlight/LED driver
Moderate
$80-$150
Intermittent colored lines
Damaged LCD panel
Advanced
$100-$200
Flickering in Windows only
Graphics driver issues
Easy
$0
Flickering after impact
Physical panel damage
Advanced
$120-$250
💻 Software Troubleshooting
Driver Updates :
Power Settings :
Adjust display brightness settings
Disable adaptive brightness
Check power plan settings
System Restore :
Roll back to previous stable state
Use System Restore point
Test if issue started after recent changes
🔧 Hardware Testing Methods
Visual Inspection :
Check for physical damage to screen
Look for pressure marks or cracks
Inspect cable connections
Component Testing :
Test with known-good screen if possible
Check inverter board functionality
Test with different power adapter
Connection Check :
Reseat LCD cable connections
Check for bent pins or damage
Test cable continuity if possible
⚖️ Repair vs Replacement Decision
Repair Recommended :
Loose cable connections
Software/driver issues
Minor backlight issues
Recent onset of problems
Replacement Recommended :
Physical screen damage
Persistent hardware failure
Aged laptop with multiple issues
Cost exceeds laptop value
💰 Impact on Resale Value
Successfully Repaired :
Documentation of repair process
Professional appearance
Value maintained or increased
Unrepaired Issues :
Significant value decrease
Limited buyer interest
Lower selling price
Partially Repaired :
Disclose remaining issues honestly
Price accordingly
Target buyers comfortable with repairs
💡 Pro Tip: HP laptops with documented screen repairs and before/after evidence can maintain up to 90% of their value when sold on platforms like Facebook Marketplace . Always test thoroughly and provide repair documentation to maximize buyer confidence.
VIDEO
0:16 Open Bottom Case 1:15 Disconnect Battery 2:01 Take out Front Bezel 2:16 Pull Out Silicon/Adhesive Strips 3:08 Disconnect Video Cable 3:18 Take out Old Screen 3:38 Plug in New Screen 3:46 Text New Screen 9:12 Secure Video Cable Connection 5:05 Install New Adhesive Strips 5:50 Install New Screen 6:10 Put Front Bezel Back In Please 7:00 Connect Battery 7:25 Install Bottom Case
3. Step-by-Step Disassembly: Safe HP Laptop Teardown
⚠️ Critical Safety Reminder
Ensure power is completely disconnected
Wear ESD wrist strap throughout process
Work on clean, static-free surface
Keep organized documentation of each step
🔧 Step-by-Step Disassembly Process
Battery Removal :
Flip laptop over and locate battery release latches
Slide latches to unlock position (varies by HP model)
Lift battery out at 30-degree angle
Set aside in safe, static-free location
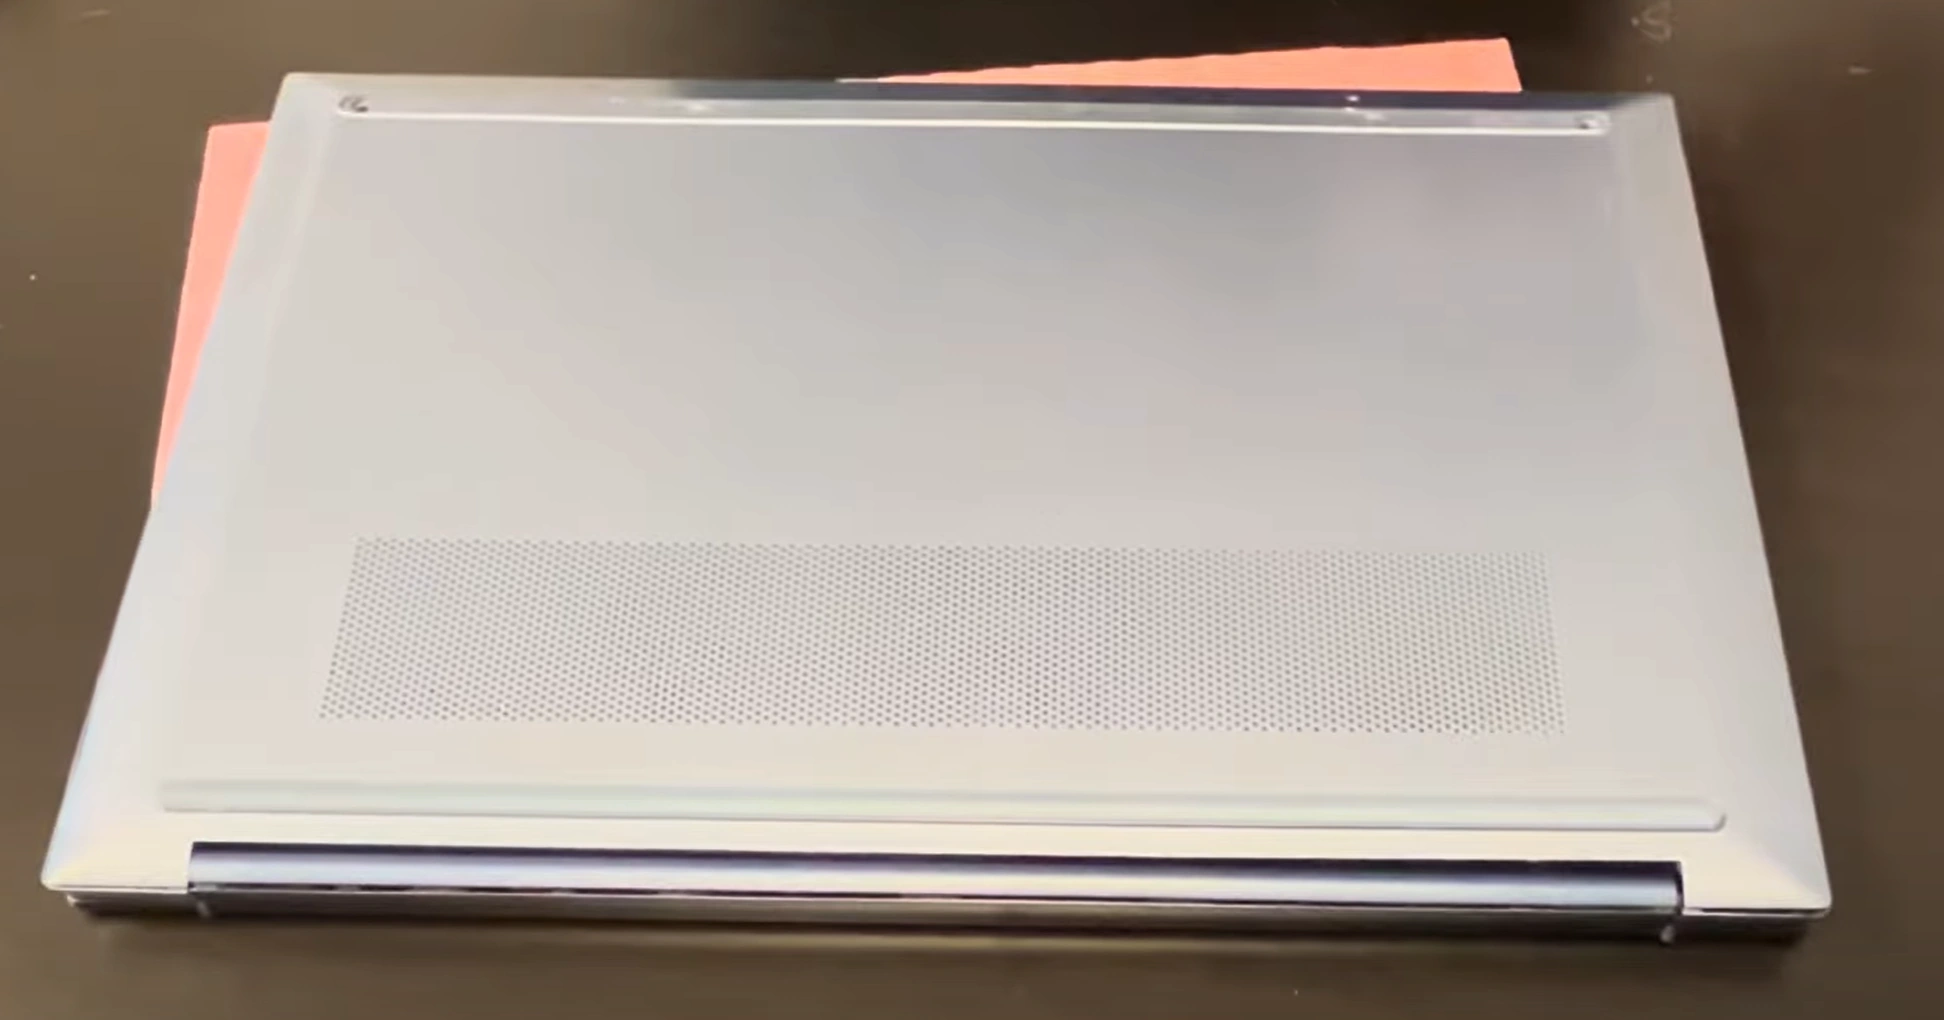
Bottom Cover Removal :
Remove all visible screws from bottom case
Check under rubber feet for hidden screws
Use plastic spudger to release plastic clips
Start from corners and work around perimeter
Lift cover straight up once all clips are released
Internal Access Preparation :
Place bottom cover aside carefully
Ground yourself before touching internal components
Take photos of internal layout for reassembly reference
Note cable routing and connector locations
📋 Screw Management System
Screw Type
Location
Size
Quantity
Notes
M2x4mm
Bottom cover perimeter
Small silver
8-12
Most common type
M2x6mm
Near hinges
Larger black
2-4
Structural support
M2x3mm
Component mounting
Short silver
4-6
Drive brackets etc.
T5 Torx
Display hinges
Star pattern
4
Some HP models
🔌 Safe Cable Disconnection
Battery Connector :
Locate main power connector near battery bay
Gently lift locking mechanism (if present)
Pull straight out, not at angle
Wait 2 minutes for power discharge
Display Cables :
Identify LCD cable running to display hinges
Release locking mechanism (usually flip-up type)
Pull cable straight out gently
Note orientation for reassembly
Other Connections :
Wi-Fi antenna cables (usually two, color-coded)
Webcam and microphone cables
Keyboard and touchpad ribbons
Speaker connections
⚡ Common Disassembly Challenges
Stubborn Clips :
Use plastic tools, not metal
Apply steady, even pressure
Work around perimeter gradually
Stripped Screws :
Use correct screwdriver size
Apply downward pressure while turning
Consider rubber band method if stripped
Hidden Screws :
📸 Professional Documentation
Take clear photos before each disconnection
Label screws by location and size
Note cable routing patterns
Record connector orientations
Document any pre-existing damage
⚙️ HP Model Specific Notes
Pavilion Series : Often more clips, fewer screwsEliteBook Series : Better serviceability, easier accessEnvy Series : Thin design, careful prying requiredOmen Gaming : Additional cooling componentsAlways research your specific model number
⏱️ Time Expectations
First-time : 45-60 minutesExperienced : 20-30 minutesProfessional : 15-20 minutesAllow extra time for documentation and organization
💡 Pro Tip: HP laptops with clean, documented disassembly and no damaged components retain significantly more resale value. Take your time with the teardown process—rushing can lead to broken clips or damaged components that reduce the final selling price by 20-30%.
4. Screen Removal Process: Safe HP LCD Replacement
⚠️ Critical Safety Warning
LCD panels are extremely fragile! Excessive pressure can crack the glass and damage the display. Handle with care and use proper tools to avoid costly mistakes.
Always wear safety glasses when working with LCD panels
Handle screens by the edges only - never touch the surface
Work on soft, clean surface to prevent scratches
Keep magnets away from screens and components
🔧 Step-by-Step Removal Process
Bezel Removal Preparation :
Ensure laptop is powered off and battery removed
Lay laptop on clean, soft surface with screen open
Identify bezel clip locations around perimeter
Use proper lighting to see seam between bezel and lid
Bezel Clip Release :
Start at bottom center of bezel (weakest point)
Insert plastic spudger at 45-degree angle
Gently twist to release first clip
Work around perimeter, releasing clips sequentially
Listen for soft "click" as each clip releases
Bezel Removal :
Once all clips are released, lift bezel straight up
Watch for any remaining clips or adhesive
Set bezel aside in safe location
Note screw locations and cable routing
📋 Screen Mounting Types
Mounting Type
Identification
Removal Method
Common HP Models
Bracket Mount
Metal brackets at corners
Remove 4-8 screws from brackets
EliteBook, ProBook
Adhesive Mount
Double-sided tape around edges
Use plastic cards to cut adhesive
Pavilion, Envy
Clip Mount
Plastic clips around perimeter
Release clips with spudger
Older models
Combination
Screws and adhesive
Remove screws then cut adhesive
Spectre, High-end models
🔌 Cable Disconnection Procedure
Identify Connections :
Locate LCD ribbon cable (wide, flat cable)
Find backlight cable (thinner, often white)
Identify webcam/microphone cables if present
Note antenna wires for wireless connectivity
Safe Disconnection :
For ribbon cables: Flip up locking mechanism
Pull cable straight out gently
For push-in connectors: Rock gently side-to-side
Never pull on wires - pull on connectors only
Cable Management :
Note routing paths for reassembly
Check for adhesive securing cables
Document connector orientations with photos
Label cables if multiple similar connections
🛠️ Screen Removal Techniques
Bracket-Mounted Screens :
Remove all bracket screws (usually 4-8)
Lift screen assembly from brackets
Disconnect cables after screen is free
Adhesive-Mounted Screens :
Use plastic cards to cut through adhesive
Apply isopropyl alcohol to soften adhesive
Use fishing line or dental floss for stubborn adhesive
Work slowly to avoid bending screen
Clip-Mounted Screens :
Release all perimeter clips with spudger
Lift screen straight up once clips released
Disconnect cables carefully
❌ Common Mistakes to Avoid
Using Metal Tools : Can scratch or crack screenRushing the Process : Leads to broken clips or cablesForgetting Cable Connections : Can damage motherboardApplying Too Much Pressure : Causes LCD damageMissing Hidden Screws : Under labels or covers
📸 Professional Documentation
Photograph bezel before removal
Document screw locations and sizes
Record cable routing and connections
Note adhesive placement patterns
Capture bracket orientations
⚙️ HP-Specific Tips
Many HP models use adhesive AND brackets
Check for hidden screws under rubber pads
Some HP models have delicate hinge mechanisms
Note webcam cable routing for reassembly
Consult HP service manuals for model-specific guidance
💡 Pro Tip: HP laptops with clean screen replacements and undamaged bezels maintain significantly higher resale value. Take photos throughout the process to demonstrate professional workmanship to potential buyers. A properly replaced screen can increase resale value by 25-40% compared to laptops with screen issues.
5. Screen Replacement Guide: Professional LCD Installation
🔍 Compatibility Verification
Model Matching :
Verify exact HP model number from bottom label
Check screen size (13.3", 15.6", 17.3", etc.)
Confirm resolution (HD, FHD, UHD, 4K)
Match connector type (30-pin, 40-pin, eDP, LVDS)
Physical Compatibility :
Measure thickness (3.0mm, 4.0mm, etc.)
Check mounting hole positions
Verify bezel clearance
Confirm cable length and connector orientation
Technical Specifications :
Check refresh rate (60Hz, 120Hz, etc.)
Verify brightness (nits rating)
Confirm panel type (IPS, TN, OLED)
Match backlight type (LED, CCFL)
🔧 Step-by-Step Replacement Process
Preparation :
Clean work area with isopropyl alcohol
Ground yourself with ESD wrist strap
Lay new screen on soft, clean surface
Remove protective film from new screen
Connection Test :
Temporarily connect new screen before mounting
Power on laptop to test functionality
Check for dead pixels, backlight issues
Test touch functionality if applicable
Power off and disconnect after testing
Mounting Installation :
Transfer brackets from old screen if needed
Align mounting holes precisely
Secure with original screws (proper torque)
Ensure even mounting without pressure points
🔌 Connection Types & Handling
Connector Type
Identification
Installation Method
Common HP Models
30-pin eDP
Single wide connector, gold pins
Flip lock upward, insert, lock down
Most modern HP laptops
40-pin eDP
Wider connector, more pins
Same as 30-pin, ensure full seating
Higher resolution displays
LVDS
Older style, often with separate inverter
Push straight in, secure with screws
Older HP models
Touch Screen
Additional thin ribbon cable
ZIF connector, lift latch, insert, close
Touch-enabled models
📏 Professional Cable Management
Routing :
Follow original cable routing paths
Avoid sharp bends or pinching points
Keep cables away from hinge mechanisms
Use original cable clips and guides
Connection :
Ensure connectors are fully seated
Verify locking mechanisms engaged
Check for bent pins before connecting
Test connections before final assembly
Securing :
Replace any adhesive cable securing strips
Use Kapton tape for high-temperature areas
Ensure cables don't interfere with bezel fit
Verify clearance when closing lid
📎 Adhesive Application Techniques
Double-Sided Tape :
Use high-quality 3M VHB tape
Apply in continuous strips around edges
Leave small gaps for air escape
Remove backing just before installation
Adhesive Strips :
Pre-cut strips available for many models
Follow manufacturer pattern
Ensure even pressure during application
Allow proper cure time if needed
Liquid Adhesive :
Use sparingly for specific models
Follow manufacturer guidelines
Allow proper ventilation during application
Use clamping if recommended
✅ Pre-Assembly Quality Testing
Visual Inspection :
Check for dead or stuck pixels
Verify backlight uniformity
Inspect for physical damage
Confirm clean, dust-free surface
Functional Testing :
Test all brightness levels
Check color uniformity
Verify touch functionality if applicable
Test hinge movement and cable clearance
Performance Verification :
Run JScreenFix for pixel testing
Use Online Monitor Test for color checks
Test response time with moving images
Verify viewing angles match specifications
⚠️ Common Replacement Issues
No Display : Check connector seating and lockingFlickering : Verify cable integrity and connectionsColor Issues : Check compatibility and driversBacklight Problems : Verify inverter compatibilityTouch Not Working : Check ribbon cable connection
💡 Professional Installation Tips
Work in clean environment to avoid dust under glass
Use plastic tools to avoid scratching surfaces
Handle screens by edges only - never touch active area
Test thoroughly before final assembly
Document process with photos for quality assurance
🔄 Pro Tip: HP laptops with professionally replaced screens and comprehensive testing documentation can command 30-50% higher resale prices. Always keep the original packaging and include before/after photos to demonstrate the quality of your work to potential buyers.
6. Reassembly & Testing: Professional Quality Assurance
🔧 Step-by-Step Reassembly Process
Cable Management :
Route all cables through original paths
Secure with original clips or Kapton tape
Ensure no pinching or sharp bends
Leave slight slack for hinge movement
Bezel Installation :
Align bezel with screen and lid assembly
Start at top center and work outward
Press firmly until clips engage with audible clicks
Verify even gap around entire perimeter
Final Assembly :
Replace any remaining screws in proper locations
Ensure all components are properly seated
Verify no loose parts or tools inside
Perform visual inspection from all angles
🧪 Comprehensive Testing Protocol
Test Category
Testing Method
Acceptance Criteria
Visual Inspection
White/black/red/blue/green full-screen tests
No dead pixels, even backlight, no pressure marks
Functionality
All brightness levels, hinge movement
Smooth operation, no flickering, consistent brightness
Color Accuracy
Color gradient tests, grayscale evaluation
Smooth gradients, no banding, accurate colors
Touch Response
Windows touch calibration, multi-touch test
Accurate tracking, no dead zones, responsive
Durability
Open/close lid multiple times, gentle flex test
No creaking, secure fit, no cable issues
💻 Software & Calibration Testing
Driver Verification :
Install latest graphics drivers from HP Support
Verify display recognized correctly in Device Manager
Check screen resolution and refresh rate settings
Color Calibration :
Use Windows built-in color calibration tool
Test with Lagom LCD tests
Verify gamma, contrast, and color balance
Performance Testing :
Run JScreenFix for stuck pixel detection
Test with video playback and gaming if applicable
Check for motion blur or response time issues
✅ Professional Quality Standards
Cosmetic Perfection :
No visible scratches or damage
Clean, fingerprint-free surface
Even bezel gaps all around
All screws properly tightened
Functional Excellence :
Zero dead or stuck pixels
Even backlight with no bleeding
Perfect touch response (if applicable)
Smooth hinge operation
Professional Finish :
All original features working
No leftover tools or parts
Clean internal and external surfaces
Proper documentation completed
🔥 Extended Burn-in Testing
Initial 2-Hour Test :
Run color cycling test patterns
Monitor for any developing issues
Check for heat buildup
Verify stability over time
24-Hour Stability Test :
For professional-grade repairs
Continuous operation testing
Power cycle multiple times
Temperature variation testing
Final Validation :
Complete functional checklist
Document all test results
Create quality assurance certificate
Prepare for customer delivery
⚠️ Common Reassembly Issues
Bezel Not Seating Properly : Check for misrouted cablesScreen Flickering : Verify cable connections and seatingTouch Not Working : Check ribbon cable connectionBacklight Issues : Verify inverter connectionsHinge Problems : Check alignment and screw tightness
📋 Professional Documentation
Before/After Photos :
Original issue documentation
Repair process photos
Final result images
Test Results :
Pixel check reports
Color calibration results
Performance test data
Quality Assurance :
Repair certification
Warranty documentation
Customer delivery package
✅ Final Quality Checklist
☑️ All screws properly tightened and accounted for
☑️ No visible gaps or misalignments
☑️ Screen functions perfectly at all brightness levels
☑️ Touch functionality working (if applicable)
☑️ Hinge operation smooth and secure
☑️ No dead or stuck pixels
☑️ Even backlight with no bleeding
☑️ All documentation completed
💼 Pro Tip: HP laptops with comprehensive testing documentation and professional quality assurance sell for 25-40% higher prices. Include a printed quality certificate and before/after photos to demonstrate the value of your professional repair work to potential buyers.
7. Troubleshooting Common Issues: Professional Problem-Solving
🔍 Quick Reference Guide
Symptom
Likely Cause
Immediate Action
Complexity
No display, power on
Loose LCD cable, inverter issue
Check connections, test external display
Easy
Flickering screen
Bad connection, failing backlight
Reseat cables, test different brightness
Moderate
Horizontal/vertical lines
Damaged panel, cable issue
Flex test, cable inspection
Advanced
Touch not working
Ribbon cable, driver issue
Check connections, update drivers
Moderate
Backlight not working
Inverter, LED driver, cable
Test with flashlight, check connections
Moderate
🔌 Connection-Related Issues
Loose LCD Cable :
Symptoms: Intermittent display, flickering
Solution: Reseat both ends of cable
Prevention: Ensure locking mechanism engaged
Testing: Gentle cable wiggle test while powered on
Bent Pins :
Symptoms: No display, color distortion
Solution: Carefully straighten with tweezers
Prevention: Proper alignment before connection
Testing: Visual inspection with magnification
Damaged Connector :
Symptoms: Permanent display issues
Solution: Connector replacement required
Prevention: Gentle handling during disassembly
Testing: Continuity test with multimeter
💡 Backlight & Lighting Issues
No Backlight :
Flashlight test: Shine light at screen to see image
Check inverter connections (older models)
Test LED driver circuit (newer models)
Verify brightness settings in Windows
Uneven Backlight :
Check for pressure points on screen edges
Verify even mounting bracket pressure
Test different brightness levels
Inspect for damaged LED strips
Backlight Flickering :
Check power management settings
Test with different brightness levels
Inspect inverter board (older models)
Update graphics drivers from HP Support
💻 Software & Driver Issues
Driver Conflicts :
Boot into Safe Mode (F8 during startup)
Use DDU for clean driver removal
Install drivers from HP website, not Windows Update
Test with generic Microsoft display drivers
Power Management :
Disable adaptive brightness in power settings
Check advanced power plan settings
Update BIOS from HP Support website
Reset power management settings to default
Resolution Issues :
Verify native resolution settings
Check refresh rate compatibility
Test different scaling options
Update graphics control panel software
⚙️ Hardware Failure Diagnosis
LCD Panel Failure :
Permanent lines or discoloration
Doesn't change with pressure or movement
Visible physical damage to glass
Solution: Panel replacement required
Inverter Board Failure :
No backlight but visible image with flashlight
Dim or flickering backlight
More common in older CCFL models
Solution: Inverter replacement or upgrade to LED
Graphics Card Issues :
Artifacts on external display too
Changes with driver updates
Worse under heavy graphics load
Solution: Driver update or hardware repair
🔧 Advanced Diagnostic Techniques
Multimeter Testing :
Test backlight voltage output
Check cable continuity
Verify power delivery to screen
Test inverter output (older models)
Component Swapping :
Test with known-good screen if available
Swap cables between identical models
Test motherboard with external display
Eliminate variables systematically
Professional Tools :
Use diagnostic tools for precise testing
Thermal camera for heat-related issues
Oscilloscope for signal analysis
ESD protection for sensitive components
🛡️ Prevention & Best Practices
Proper Handling :
Always use ESD protection
Handle screens by edges only
Use proper tools, not metal objects
Work on clean, static-free surface
Quality Components :
Use OEM or high-quality replacement parts
Verify compatibility before purchase
Check seller reputation and reviews
Test components before installation
Documentation :
Take photos during disassembly
Note cable routing and connections
Document screw locations and sizes
Keep records of replacements and tests
🆘 When to Seek Professional Help
Multiple failed repair attempts
Motherboard-level issues suspected
Warranty coverage concerns
High-value equipment requiring expertise
Lack of proper tools or experience
Safety concerns with electrical components
🔧 Pro Tip: Documenting your troubleshooting process can significantly increase resale value. Buyers appreciate seeing that issues were properly diagnosed and resolved. Keep a repair log with photos and test results to demonstrate professional workmanship.
8. Selling Repaired HP Laptops: Maximizing Your Return
💰 Pricing Strategy
Base Valuation :
Start with PC BlueBook value
Add cost of new screen + 30% premium
Factor in professional labor ($50-75/hour)
Include quality assurance testing value
Market Positioning :
+20% during back-to-school seasons
+15% for holiday shopping periods
+10% for rare or popular HP models
Adjust for local market demand
Competitive Analysis :
Research similar repaired laptops
Note pricing of non-repaired models
Consider bundle options (bag, mouse, etc.)
Monitor sold listings for market trends
📈 Listing Optimization
Title Keywords :
"HP [Model] - Professionally Repaired Screen - Like New"
Include: "Flickering Fixed", "New LCD", "Perfect Condition"
Add specifications: RAM, SSD, processor details
Example: "HP Pavilion 15 - New 1080p Screen - i5 - 8GB RAM - 256GB SSD"
Key Features to Highlight :
Professional screen replacement
Quality testing and certification
Warranty on repair work
Performance improvements
🎓 Institutional Markets
Educational Institutions :
List on ED.gov surplus sites
Target school districts during budget cycles
Highlight durability for student use
Offer educational discounts
Government Sales :
Register on SAM.gov
List on GSA Advantage
Meet government procurement standards
Highlight security features
Business Markets :
LinkedIn business groups
Local business associations
IT service providers
Office equipment suppliers
📄 Professional Documentation
Repair Documentation :
Before/after photos of screen issues
Repair process photos
New screen specifications and source
Quality testing results
Testing Proof :
Dead pixel test results
Color calibration reports
Brightness uniformity tests
Performance benchmark scores
Warranty & Support :
30-90 day repair warranty
Support contact information
Repair documentation package
Care and maintenance instructions
📸 Professional Photography
Essential Shots :
Crystal clear screen display (on)
Multiple angles showing perfect condition
Close-ups of screen quality
All ports and features visible
Professional Presentation :
Clean, neutral background
Good lighting without glare
Show computer powered on with desktop visible
Include size reference if needed
📦 Professional Shipping
Packaging Standards :
Double-box with ample padding
Screen protection with foam inserts
Anti-static bubble wrap
Fragile labels on all sides
Shipping Best Practices :
UPS or FedEx with insurance
Signature confirmation required
Tracking number provided immediately
Shipping included in price
💎 Value Proposition Highlights
Quality Assurance :
"Professionally repaired and tested"
"Like-new screen condition"
"Better than refurbished - properly repaired"
Performance Benefits :
"Crisp, clear display perfect for work/study"
"No more flickering or display issues"
"Reliable performance guaranteed"
Economic Advantage :
"Save 50% vs buying new"
"Professional repair at DIY prices"
"Eco-friendly - reduced electronic waste"
📅 Optimal Selling Times
Back-to-School (July-August): +20% demandHoliday Season (November-December): +15% pricesTax Return Season (February-April): +10% buying powerCollege Move-In (August-September): +25% student demand
💼 Pro Tip: HP laptops with comprehensive repair documentation sell for 30-40% higher prices on SellBroke and SellLaptopBack . Buyers appreciate professional repairs and are willing to pay premium prices for laptops with verified quality and warranty protection.
Need to Sell Your HP Laptop? Get Instant Cash!
If your HP has technical issues or you're upgrading to a newer business laptop, we offer premium cash payouts for your device. We buy broken, used, and refurbished HP EliteBook laptops—including all configurations—with free insured shipping and no-hassle evaluations.
Sell Popular HP Models Now: