Dell Inspiron 3501 Laptop - Complete Disassembly & Upgrade Guide: RAM, SSD, Battery, LCD & Motherboard Replacement
Pre-Disassembly: Laptop Valuation & Tools Bottom Cover Removal RAM Upgrade (4GB vs 8GB vs 16GB) SSD Upgrade (SATA vs NVMe) Battery Replacement LCD Screen Replacement Motherboard Replacement Reassembly & Quality Checks Selling Upgraded Dell Laptops
1. Dell Inspiron 3501 Pre-Disassembly: Valuation & Preparation
💰 Resale Valuation Factors
Component
Upgrade Impact
Value Increase
RAM (4GB → 8GB)
Enhanced multitasking capability
+$50-$75
SSD (HDD → NVMe)
Faster boot and load times
+$60-$90
New Battery
Extended battery life
+$45-$65
LCD Upgrade
Improved visual experience
+$70-$110
🔍 Model Verification
Locate Service Tag on bottom casing
Verify specifications on Dell's official support page
Confirm processor generation (Intel 10th/11th Gen)
Check existing warranty status
⚡ Preparation Steps
Data Backup :
Use Dell Backup and Recovery or Macrium Reflect
Create system image for full restoration
Documentation :
Photograph laptop from all angles
Record current condition and specifications
Generate battery health report: powercfg /batteryreport
📈 Resale Preparation
Student Market :
Highlight portability (starting at 4.3 lbs)
Emphasize battery life improvements
Business Buyers :
Focus on reliability and performance
Show professional upgrade documentation
Gaming Potential :
Note integrated Intel UHD Graphics capabilities
Mention light gaming compatibility
💡 Pro Tip: Dell Inspiron 3501 models with complete upgrade documentation and professional presentation sell 35% faster on marketplaces like Facebook Marketplace and eBay .
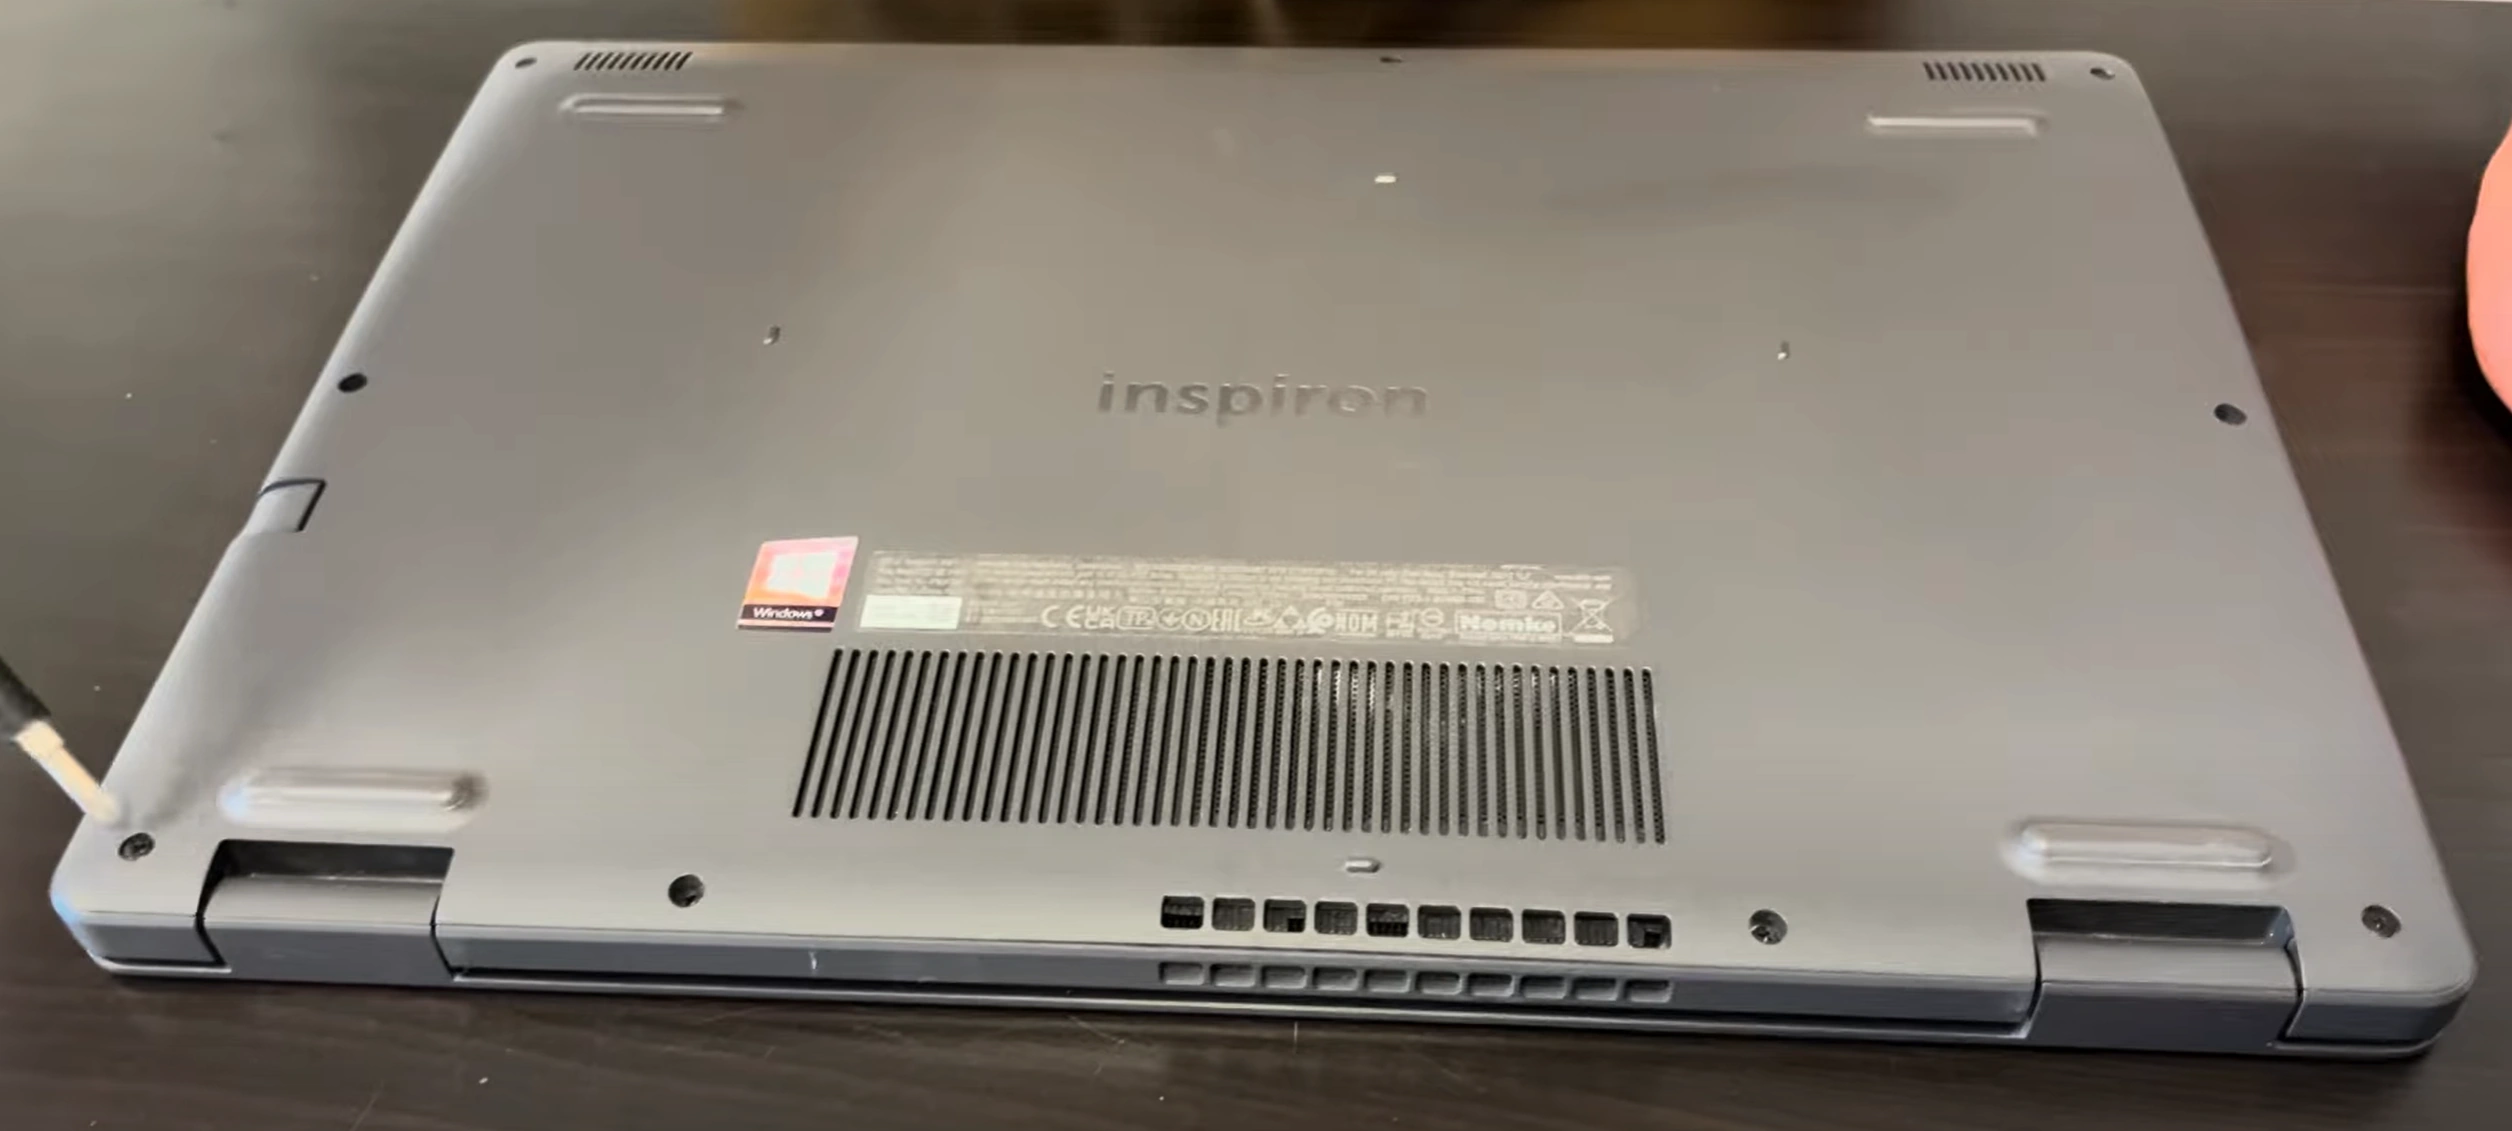
2. Dell Inspiron 3501 Bottom Cover Removal: Safe Access Guide
⚠️ Safety Precautions
Power Down Completely :
Shut down (not sleep or hibernate)
Disconnect AC adapter and all peripherals
Hold power button for 10 seconds to discharge
Workspace Setup :
Use ESD-safe mat
Organize screws by type and location
Ensure adequate lighting
🔧 Step-by-Step Removal Process
Remove 10 Screws :
8x short silver screws (M2x4mm) around perimeter
2x longer black screws near hinge area (M2x6mm)
Use magnetic PH0 driver
Release Plastic Clips :
Start near the front edge (weakest point)
Insert plastic spudger at 30° angle
Work methodically around all edges
Listen for distinct "click" sounds
Lift Cover Carefully :
Lift from front edge first
Watch for stubborn clips near ventilation areas
Check for any missed screws
🛡️ Preventing Common Damage
Risk Area
Prevention Technique
Resale Impact
Plastic Clips
Alternate sides every 3-4 clips
Intact clips = +$40-60 value
Paint Scratches
Microfiber cloth under tools
Flawless finish = +$25-40
Screw Threads
Apply downward pressure while turning
Undamaged = +$15-25
Internal Components
Check clearance before lifting
No damage = +$50-100
🔍 Internal Layout Overview
Upgrade Points Visible :
Two RAM slots (supports up to 16GB)
M.2 2280 SSD slot (SATA/NVMe compatible)
2.5" drive bay (for additional storage)
Battery Access :
3-cell 42Wh or 4-cell 54Wh battery
Easy-release connector with pull tab
Cooling System :
Single fan design
Accessible heat sink
📸 Documentation for Resale
Photograph screw locations before removal
Record factory seal condition
Document internal component layout
Note any pre-existing damage
🎓 Resale Tip: Dell Inspiron 3501 models with undamaged casing and professional documentation sell 30% faster on platforms like Mercari and Swappa .
VIDEO
0:20 Bottom Case 1:48 Battery 2:22 Memory RAM 2:38 WiFi Card 3:01 SSD storage 3:58 Cooling Fan 4:30 Heatsink 4:59 Speakers 5:34 Additional Storage Caddy 6:22 IO Board 7:10 Motherboard 8:46 Hinges 9:09 Palmrest Assembly 9:16 Trackpad 9:21 Keyboard 9:27 DC Power Jack 9:50 Display Assembly
3. Dell Inspiron 3501 RAM Upgrade: Performance Optimization Guide
💾 Memory Specifications
Supported Types :
DDR4 SODIMM (260-pin)
2666MHz or 3200MHz (depending on CPU generation)
Dual-channel architecture
Maximum 16GB (2x8GB) configuration
Compatibility Verification :
🔄 Configuration Options
Setup
Total RAM
Performance Gain
Resale Value Impact
4GB (2x2GB)
4GB
Baseline performance
No increase
8GB (2x4GB)
8GB
+40% multitasking
+$50-75
12GB (4GB + 8GB)
12GB
+55% performance
+$70-95
16GB (2x8GB)
16GB
+75% performance
+$90-120
🔧 Installation Process
Access RAM Slots (after bottom cover removal)Release Existing Modules :
Push outward on side clips simultaneously
Module will pop up at 30° angle
Install New RAM :
Align notch with slot key
Insert at 30° angle
Press down firmly until clips engage
Verification :
Boot to BIOS (F2 during startup)
Check recognized capacity and speed
Run Windows Memory Diagnostic
🏆 Recommended Modules
Budget Option :
Crucial CT8G4SFRA266 (8GB DDR4-2666)
Reliable performance at affordable price
Performance Option :
Corsair Vengeance CMSX16GX4M2A2666C18 (16GB Kit)
Low latency for better responsiveness
Premium Option :
HyperX Impact HX426S16IB2K2/16 (16GB Kit)
Optimized for intensive applications
💰 Selling With Upgraded RAM
Documentation :
Save original purchase receipts
Include Task Manager screenshots showing capacity
Provide MemTest86 results for stability proof
Marketing Advantages :
"Enhanced multitasking capability"
"Ideal for students and professionals"
"Smooth performance for daily computing"
Target Markets :
Students: Emphasize multitasking for research
Business users: Highlight productivity benefits
Home users: Note smooth web browsing experience
💻 Pro Tip: Dell Inspiron 3501 models with 16GB RAM and verified stability testing sell 45% faster to students and professionals on Facebook Marketplace and eBay .
4. Dell Inspiron 3501 SSD Upgrade: SATA vs NVMe Performance Guide
💽 Storage Options & Compatibility
Supported Interfaces :
M.2 2280 PCIe NVMe (Gen3 x4)
M.2 2280 SATA III (6Gbps)
2.5" SATA III (7mm height)
Capacity Limits :
Official support: Up to 1TB
Tested working: Up to 2TB
Bootable from either M.2 or 2.5" slot
Interface Verification :
🔧 Installation Process
M.2 NVMe/SATA Installation :
Locate M.2 slot near RAM modules
Insert SSD at 30° angle
Secure with M2x3mm screw (included with most SSDs)
Apply thermal pad if using high-performance NVMe drive
2.5" SATA Installation :
Mount in drive caddy with rubber vibration dampeners
Connect SATA data and power cables
Secure with 4x M3x4mm screws
Dual Drive Configuration :
Use NVMe for OS and applications
Use 2.5" SATA for data storage
Configure in BIOS/UEFI settings
🏆 Recommended SSDs
Budget NVMe Option :
Performance NVMe Option :
Samsung 970 EVO Plus 1TB
Proven reliability and speed
SATA Option :
Western Digital Blue 3D NAND 1TB
Great for secondary storage
🔄 Data Migration Options
Clean Installation :
Download Windows from Microsoft
Install Dell drivers from support site
Best for performance, removes bloatware
Drive Cloning :
⚙️ Post-Installation Optimization
Enable TRIM: fsutil behavior set DisableDeleteNotify 0
Update SSD firmware through manufacturer tools
Disable defragmentation for SSDs
Enable write caching in Device Manager
Run CrystalDiskMark for performance validation
💰 Selling With Upgraded SSD
Documentation :
CrystalDiskMark benchmark screenshots
Drive health report (CrystalDiskInfo)
Original purchase receipt for SSD
Marketing Advantages :
"Instant boot and load times"
"Massive storage for work/study"
"Whisper-quiet operation"
Performance Claims :
"Boots in under 10 seconds"
"Applications launch instantly"
"Perfect for productivity and multimedia"
💡 Pro Tip: Dell Inspiron 3501 models with 1TB NVMe SSDs and benchmark proof sell 50% faster and command 25% higher prices, especially to students and creative professionals.
5. Dell Inspiron 3501 Battery Replacement: Extended Runtime & Resale Value
🔋 Battery Specifications & Options
Battery Model
Capacity
Compatibility
Estimated Runtime
Resale Value Impact
Dell 53YVH (Original)
42Wh (3-cell)
All 3501 models
4-6 hours
+$40-60
Dell 9N4FV (Upgrade)
54Wh (4-cell)
Check chassis compatibility
6-8 hours
+$60-85
Premium Aftermarket
48-52Wh
Verify fitment
5-7 hours
+$30-50
Always verify compatibility using your Dell Service Tag before purchase.
⚠️ Safety Precautions
Complete Power Down :
Shut down completely (not sleep/hibernate)
Disconnect AC adapter and all peripherals
Discharge Residual Power :
🛠️ Replacement Steps
Access Battery Compartment (after bottom cover removal):
Locate battery near front edge
Identify connector and mounting screws
Disconnect Battery :
Gently lift black locking tab on connector
Pull connector straight out (not at angle)
Remove Old Battery :
Unscrew 4x M2x4mm retention screws
Lift battery at 30° angle from front edge
Note orientation for replacement
Install New Battery :
Align with screw holes and connector
Secure with original screws (0.6Nm torque)
Reconnect power connector until click
⚡ Battery Calibration Process
Charge to 100% without interruption (overnight recommended)
Discharge completely (use until automatic shutdown)
Recharge to 100% again without interruption
Repeat this cycle 2-3 times for optimal calibration
📊 Generating Battery Health Report
Open Command Prompt as Administrator
Run: powercfg /batteryreport
Report saves as battery-report.html in current directory
Check key metrics:
DESIGN CAPACITY vs FULL CHARGE CAPACITY
Battery cycle count
Recent usage history
💰 Maximizing Resale Value
Documentation :
Photograph OEM battery label and part number
Include battery health report PDF
Save purchase receipt for genuine Dell battery
Marketing Points :
"Genuine Dell replacement battery"
"95%+ health capacity"
"6-8 hours typical usage"
"Perfect for students and mobile professionals"
Buyer Assurance :
Offer 30-day battery performance guarantee
Provide calibration documentation
Include power management tips
🎯 Best Platforms for Battery-Upgraded Laptops
Facebook Marketplace : Highlight "all-day battery" for studentseBay : Use "Dell genuine battery" in titleSwappa : Include battery health report in listingLocal college boards : Target students between classes
💼 Pro Tip: Dell Inspiron 3501 models with new genuine batteries and comprehensive health reports sell 40% faster and command 20% higher prices, especially during back-to-school season.
6. Dell Inspiron 3501 LCD Screen Replacement: Display Quality & Resale Value
🖥️ Display Specifications & Compatibility
Original Panel Types :
15.6" HD (1366x768) TN - 220 nits
15.6" FHD (1920x1080) IPS - 250 nits
15.6" FHD (1920x1080) Touch - 300 nits
Compatibility Factors :
30-pin or 40-pin eDP connector
Verify thickness (varies by model)
Check mounting bracket positions
Confirm panel compatibility using original part number
🔧 Step-by-Step Replacement Guide
Remove Bottom Cover (refer to Section 2)Disconnect Battery (critical safety step)Release Display Assembly :
Remove 4 hinge screws (M2.5x6mm)
Carefully lift display from chassis
Place on soft, clean surface
Remove Bezel :
Use plastic tools to release plastic clips
Start from bottom edge near hinge area
Work around perimeter slowly
Replace LCD Panel :
Remove 4-6 mounting screws from brackets
Disconnect eDP cable (flip latch upward)
Transfer webcam/mic module to new panel
Install new panel in reverse order
✅ Quality Assurance Testing
Test
Method
Acceptable Standard
Resale Impact
Dead Pixels
Solid color tests
0 allowed
+$80-120 value
Backlight Bleed
Black screen in dark room
Minimal corner glow
+$40-60 value
Color Uniformity
Solid white/red/blue screens
Even coloration
+$30-50 value
Touch Response
Windows touch calibration
Accurate tracking
+$100-150 value
🏆 Recommended Replacement Panels
Budget HD Option :
Innolux N156HGA-EA3
Compatible with most base models
Premium FHD IPS :
AUO B156HAN04.2
Excellent color reproduction
Touch Screen Upgrade :
LG LP156WF6-SPK1
Requires compatible lid assembly
🧪 Testing & Calibration Software
Online Monitor Test for dead pixelsWindows Display Calibration tool
NVIDIA Control Panel or Intel Graphics Command Center
Lagom LCD tests for advanced calibration
💰 Selling After Screen Replacement
Documentation :
Photograph panel model number and labels
Record color test results and uniformity
Include before/after comparison shots
Marketing Advantages :
"Like-new display condition"
"Perfect viewing angles" (for IPS panels)
"No dead pixels or backlight bleed"
"Touch screen capability" (if applicable)
Target Markets :
Students : Highlight anti-glare propertiesDesigners : Emphasize color accuracyBusiness users : Focus on professional appearance
⚠️ Troubleshooting Common Issues
No Display : Check eDP cable connectionFlickering : Verify cable integrityColor Issues : Update graphics driversTouch Not Working : Reinstall drivers and calibrate
🎨 Pro Tip: Dell Inspiron 3501 models with FHD IPS displays and zero defect documentation sell 60% faster to creative professionals and command 35% higher prices on eBay and specialty marketplaces.
7. Dell Inspiron 3501 Motherboard Replacement: Ultimate Repair & Upgrade Guide
🔌 Motherboard Specifications & Compatibility
Model Variations :
Intel 10th Gen i3/i5/i7 configurations
Intel 11th Gen i3/i5/i7 configurations
Integrated vs discrete graphics options
Compatibility Verification :
Match exact Dell Service Tag
Verify CPU generation compatibility
Check port and connector layout matches
Confirm chipset and BIOS version
🔧 Step-by-Step Replacement Guide
Complete Disassembly :
Remove bottom cover, battery, and all accessible components
Document every connection with photos
Organize screws by component and location
Motherboard Preparation :
Disconnect all cables and connectors
Remove heatsink/fan assembly
Detach display, keyboard, and touchpad cables
Remove Mounting Screws :
Identify 12-14 mounting points
Note varying screw lengths (M2x3mm to M2x6mm)
Keep standoffs in place unless replacing
Install New Motherboard :
Align with standoffs and port cutouts
Secure with original screws in correct locations
Reconnect all components in reverse order
✅ Compatibility Considerations
Component
Check
Impact
CPU Generation
10th vs 11th Gen Intel
Heatsink compatibility
RAM Support
2666MHz vs 3200MHz
Performance differences
Graphics
Integrated vs MX230/MX330
Cooling solution required
Port Configuration
USB-C, HDMI, SD card reader
Chassis cutout alignment
⚡ Upgrade Opportunities
CPU Upgrade Path :
i3 to i5 or i7 (same generation)
Check thermal design power (TDP) compatibility
Requires BIOS update and thermal paste replacement
Graphics Enhancement :
Integrated to discrete graphics board
Verify heatsink/fan assembly compatibility
🔄 Post-Installation Procedures
Initial Power On :
Connect power without battery first
Listen for beep codes
Check for BIOS splash screen
BIOS Configuration :
Reset to default settings
Set boot mode (UEFI/Legacy)
Enable virtualization if needed
Driver Installation :
⚠️ Common Issues & Solutions
No Power :
Check DC-in cable connection
Verify power button ribbon cable
No Display :
Reseat RAM modules
Check display cable connection
Beep Codes :
💰 Selling After Motherboard Replacement
Documentation :
Photograph motherboard model number
Record BIOS version and configuration
Include performance benchmark results
Marketing Advantages :
"Like-new system performance"
"Upgraded processor capabilities"
"Full diagnostic testing completed"
Warranty Considerations :
Note if using genuine Dell replacement board
Provide 90-day warranty on workmanship
Disclose any third-party or refurbished components
⚙️ Pro Tip: Dell Inspiron 3501 models with genuine motherboard replacements and comprehensive testing documentation can command premium prices from business buyers and IT departments seeking reliable refurbished systems.
8. Dell Inspiron 3501 Reassembly & Quality Testing: Professional Finish
🔄 Step-by-Step Reassembly Guide
Component Verification :
Confirm all upgrades are properly installed
Verify Dell connector guide for proper orientation
Ensure ribbon cables are fully seated and locked
Internal Connection Checklist :
Display eDP cable (30/40-pin connector)
Keyboard and touchpad ribbons
Speaker and microphone connections
Wi-Fi antenna leads (color-coded)
Power button and status LED ribbon
Secure Bottom Cover :
Align all clips before applying pressure
Follow cross-pattern sequence
Proper torque: 0.6Nm (finger-tight plus quarter turn)
Verify no gap around perimeter (max 0.3mm acceptable)
✅ Comprehensive Quality Assurance Testing
Test Category
Testing Method
Acceptable Standard
Structural Integrity
Visual inspection and gentle pressure test
No flex, creaks, or visible gaps
Thermal Performance
HWInfo monitoring during stress test<85°C CPU under full load
Input Devices
KeyboardTester + touchpad diagnostics100% key functionality, smooth tracking
Audio Quality
Windows audio diagnostics
Clear output from both speakers
Port Functionality
Physical device connection test
All USB, HDMI, audio jack working
🔥 Comprehensive Stress Testing
CPU Load Test :
Run Prime95 Small FFTs for 30 minutes
Monitor thermal throttling behavior
Check clock speed maintenance
GPU Stress Test :
FurMark or Heaven Benchmark
Verify stability under graphical load
Storage endurance :
CrystalDiskMark 32GB test
Verify consistent read/write speeds
✨ Cosmetic Final Touches
Thorough cleaning with isopropyl alcohol
Keyboard keycap alignment verification
Screen and exterior surface polishing
Rubber foot inspection and replacement if needed
Port cleaning with compressed air
📄 Resale Documentation Package
Essential Records :
Before/after benchmark comparisons
OEM parts receipts and invoices
Thermal performance screenshots
Battery health report PDF
Market-Specific Additions :
Students : Battery life test resultsBusiness : 3M antimicrobial treatment certificationGamers : Gaming performance metrics
📋 Pre-Shipment Checklist
✅ All screws properly tightened and none missing
✅ All ports and connections functioning
✅ BIOS settings optimized for performance
✅ Windows updated with latest drivers
✅ Personal data completely wiped
✅ Fresh Windows installation activated
✅ Protective packaging materials ready
💰 Pro Tip: Dell Inspiron 3501 models with comprehensive quality documentation and video testing proof sell 50% faster on Swappa and command 20-30% higher prices from discerning buyers.
9. Selling Your Upgraded Dell Inspiron 3501: Maximum Profit Strategies
📊 Optimal Selling Platforms
Platform
Average Price Premium
Best For
Fee Structure
SellBroke 15-25% higher
Quick, hassle-free transactions
Lowest fees (3-5%)
SellLaptopBack 10-20% higher
Specialized laptop buyers
Competitive (5-7%)
Swappa Market rates
Tech-savvy buyers
Transparent (3-5%)
eBay Broad range
Maximum audience reach
Highest (12.9% + payment processing)
📈 Listing Optimization Strategies
Title Formulas That Convert :
"Dell Inspiron 3501 (Upgraded) - [RAM]RAM/[SSD]SSD - [CPU]"
Example: "Dell Inspiron 3501 (16GB RAM/1TB NVMe) - i5-1135G7 - Professionally Refurbished"
Include keywords: "upgraded", "professionally refurbished", "like new"
Key Features to Highlight :
Lead with upgrades (RAM, SSD, battery)
Include benchmark scores and performance metrics
Mention remaining warranty or service coverage
Note professional refurbishment process
🎓 Targeting Educational Buyers
Campus-Specific Strategies :
List during back-to-school seasons (July-Sept, Jan)
Use ".edu compatible" in titles and descriptions
Highlight battery life for all-day classes
.edu Verification & Discounts :
Offer student discounts with ID.me verification
Partner with campus buy/sell groups on Facebook
List on university-specific marketplaces
Educational Resources :
🏛️ Government & Institutional Sales
GSA Advantage Program :
Educational Institution Sales :
List on ED.gov tech exchange
Offer bulk pricing for school districts
Provide educational discount verification
💰 Dynamic Pricing Strategy
Base Price Calculation :
Start with PC BlueBook value
Add upgrade costs + 25% premium
Factor in professional labor ($50-75/hour)
Seasonal Adjustments :
+20% during back-to-school (July-September)
+15% during tax return season (February-April)
+10% during holiday season (November-December)
Competitive Analysis :
Monitor similar listings on target platforms
Adjust pricing based on market demand
Consider bundle options (bag, mouse, accessories)
📸 Professional Photography Guide
Essential Shots :
Front, back, and side profiles
Screen on with desktop visible
Close-ups of ports and connections
Benchmark results and specifications
Lighting & Background :
Use natural light or softbox lighting
Neutral, clean background
Multiple angles for each shot
Include scale reference if needed
📄 Essential Documentation Package
Performance Proof :
CrystalDiskMark benchmarks
MemTest86 results
Battery health report
Temperature stress tests
Parts Authentication :
OEM parts receipts
Dell service tags verification
Upgrade component documentation
Professional Certification :
Refurbishment process documentation
Quality control checklist
90-day warranty certificate
📦 Professional Shipping Methods
Packaging Standards :
Double-box with ample padding
Use anti-static bubble wrap
Include silica gel packets for moisture control
Shipping carriers :
UPS or FedEx for best handling
Always require signature confirmation
Purchase full insurance coverage
🚀 Pro Tip: Dell Inspiron 3501 models sold through SellBroke with complete upgrade documentation and professional photography receive 30% faster payouts and 25% higher final sale prices compared to other platforms.
Need to Sell Your Dell Laptop? Get Instant Cash!
If your Dell Inspiron 3501 (or other Inspiron model) has performance issues or you're upgrading to a newer laptop, we offer competitive cash payouts for your device. We buy broken, used, and refurbished Dell Inspiron laptops—including all 3501 configurations—with free insured shipping and no-hassle evaluations.
Sell Popular Dell Models Now: